_GOTOBOTTOM
Armor/AFV
For discussions on tanks, artillery, jeeps, etc.
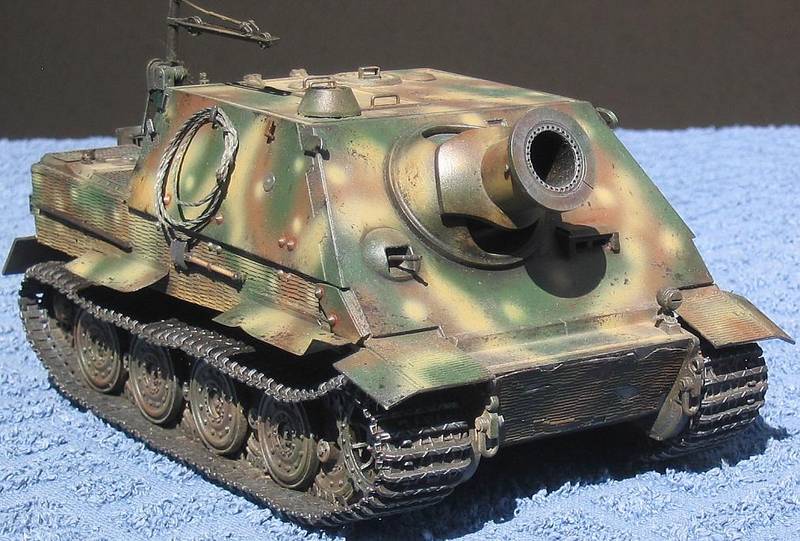
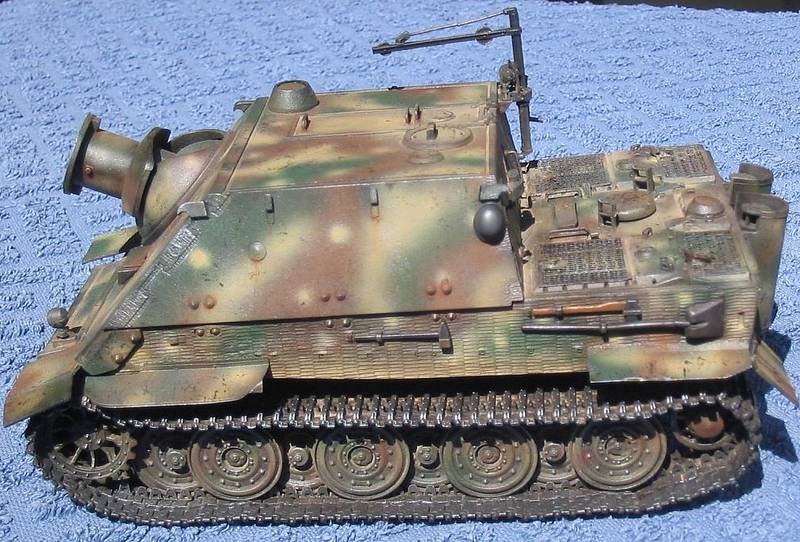
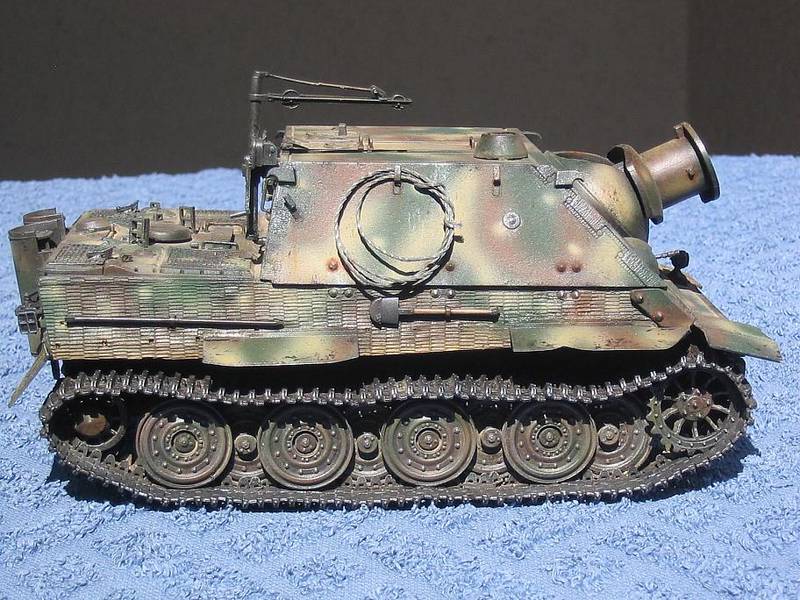
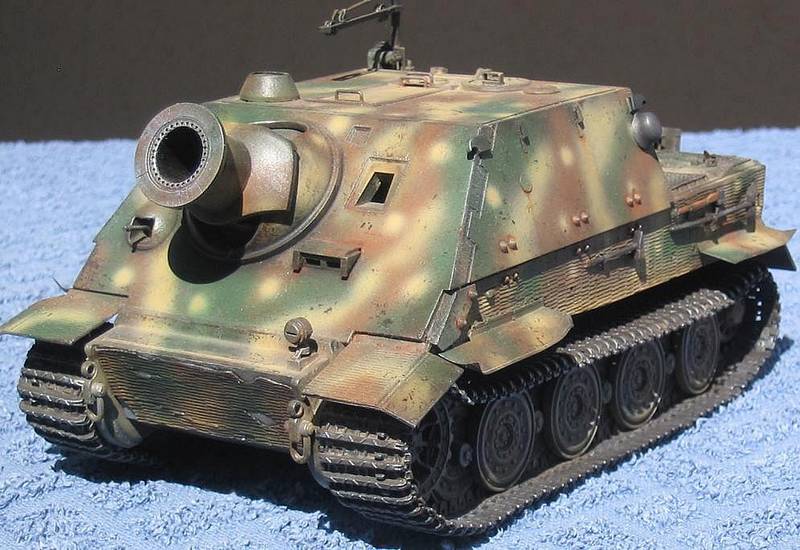
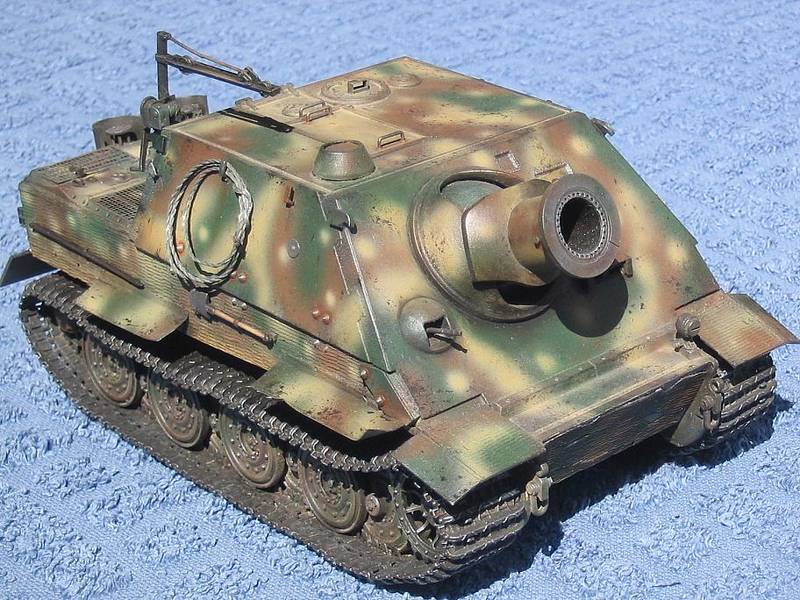
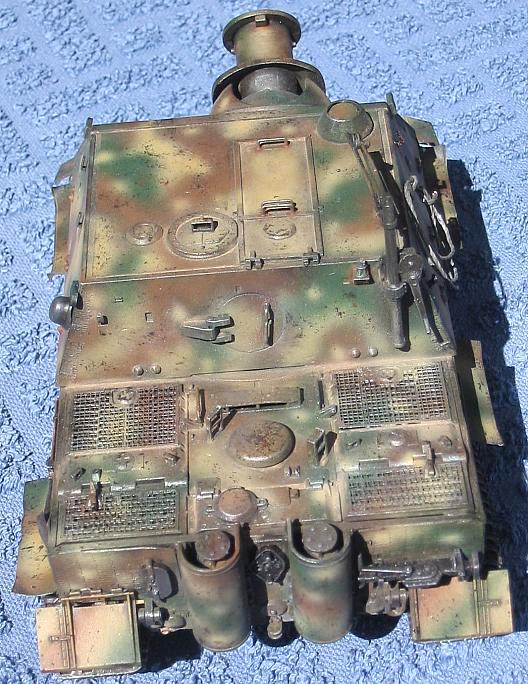
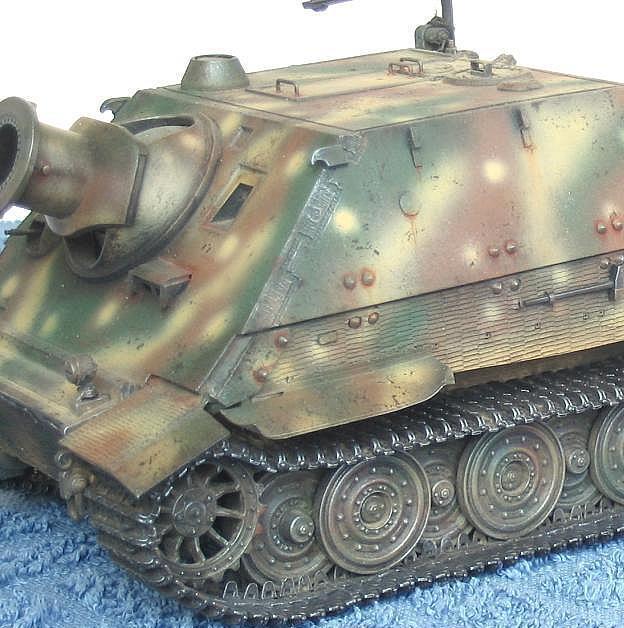
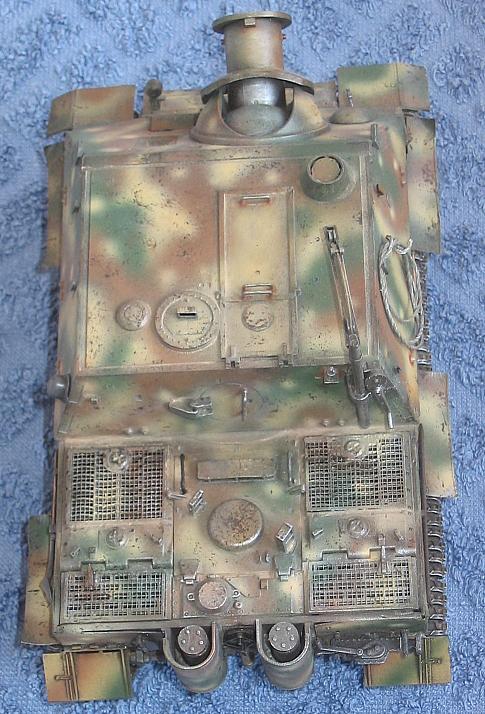
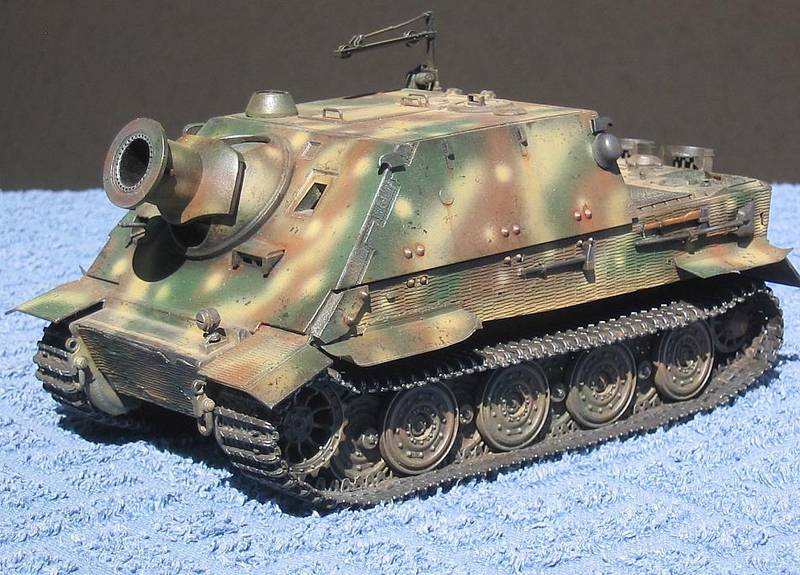
Sturmtiger (AFV Club 1/35) - completed
Kuno-Von-Dodenburg
Visit this Community
England - North, United Kingdom
Joined: February 20, 2007
KitMaker: 1,453 posts
Armorama: 1,319 posts
Posted: Saturday, August 30, 2008 - 03:28 AM UTC
Hello Guys,

This is my take on AFV Club's 1/35 Sturmtiger.

I added Zimmerit and new front mudguards from the Atak set. I replaced the kit-supplied side fenders with photo-etched ones from the Aber set (35 A43), and the rubber-band tracks with AFV Club's own single-link replacements.

Airbrushing was done with Tamiya paints, followed by oil washes & filters, a bit of scratching & chipping with VanDyke Brown oil paint, and finally slight dusting with pigments here & there and "metallizing" by drybrushing using "Shadowed Steel" acrylic paint from the 'Reaper' Master Series.


- Steve
trahe
Visit this Community
Virginia, United States
Joined: April 03, 2006
KitMaker: 1,158 posts
Armorama: 950 posts
Posted: Saturday, August 30, 2008 - 06:02 AM UTC
Steve,

Looks very nice! I like the subtle weathering.
c5flies
Visit this Community
California, United States
Joined: October 21, 2007
KitMaker: 3,684 posts
Armorama: 2,938 posts
Posted: Saturday, August 30, 2008 - 07:12 AM UTC
Great job, Steve! Build, camo, weathering all come together nicely. tracks look great and the whole model looks to have some 'weight' to it.
jjumbo
Visit this Community
British Columbia, Canada
Joined: August 27, 2006
KitMaker: 2,012 posts
Armorama: 1,949 posts
Posted: Sunday, August 31, 2008 - 07:42 PM UTC
Very nice job Steve,
Not too much battle damage !!
Cheers

jjumbo
yelvhontu
Visit this Community
Mongolia
Joined: June 02, 2008
KitMaker: 46 posts
Armorama: 42 posts
Posted: Sunday, August 31, 2008 - 07:46 PM UTC
Super nice!it's looks great!!
spitfire303
Visit this Community
Vendee, France
Joined: December 22, 2006
KitMaker: 1,437 posts
Armorama: 1,406 posts
Posted: Sunday, August 31, 2008 - 08:53 PM UTC
excellant job. Superbe weathering. Which green do you guys use for the german armor from the tamiya range?

spit
fockewulf
Visit this Community
Daerah Istimewa Yogyakarta, Indonesia
Joined: November 04, 2004
KitMaker: 145 posts
Armorama: 132 posts
Posted: Sunday, August 31, 2008 - 09:23 PM UTC
Great job!! subtle finish
Kuno-Von-Dodenburg
Visit this Community
England - North, United Kingdom
Joined: February 20, 2007
KitMaker: 1,453 posts
Armorama: 1,319 posts
Posted: Monday, September 01, 2008 - 10:28 AM UTC
Thanks for the feedback, chaps. Appreciate all your comments.

Pawel - to answer your question: The green here is Tamiya XF-58 Olive Green (the other two camo colours being XF-60 Dark Yellow and XF-64 Red Brown).

All paints are thinned down with Tamiya's own thinner X-20A for airbrush application.

- Steve
biffa
Visit this Community
Tennessee, United States
Joined: September 07, 2005
KitMaker: 881 posts
Armorama: 826 posts
Posted: Monday, September 01, 2008 - 12:15 PM UTC
Looks super Steve the camo really sets it off and is weathered very very nicely, like already said it really makes this one look heavy and thats how i like them plus this is one of my favorite vehicles, great looking beast

Ron.
malcolm
Visit this Community
England - North East, United Kingdom
Joined: September 24, 2007
KitMaker: 312 posts
Armorama: 278 posts
Posted: Tuesday, September 02, 2008 - 07:32 AM UTC

i have one of these in the stash, yours looks really good, well done

malc.
tjkelly
Visit this Community
Maryland, United States
Joined: May 04, 2007
KitMaker: 1,132 posts
Armorama: 1,123 posts
Posted: Tuesday, September 02, 2008 - 08:20 AM UTC
Great looking Sturmtiger Steve! Nice job with the scheme and weathering, especially like how your tracks came out! Thanks for sharing.

Cheers -

Tim
SIRNEIL
Visit this Community
England - South East, United Kingdom
Joined: July 30, 2007
KitMaker: 658 posts
Armorama: 599 posts
Posted: Tuesday, September 02, 2008 - 08:55 AM UTC
hi steve

nice looking sturmtiger you have got yourself there.how did you attach the atak zimm and did you have any problems with it.....?

neil.
Hederstierna
#247
Visit this Community
Nordjylland, Denmark
Joined: January 03, 2008
KitMaker: 1,102 posts
Armorama: 1,018 posts
Posted: Tuesday, September 02, 2008 - 10:59 PM UTC
Hi Steve
Very nice model - great paintjob and weathering.
Regards
Jacob
koenele
Visit this Community
Oost-Vlaanderen, Belgium
Joined: January 17, 2006
KitMaker: 4,194 posts
Armorama: 408 posts
Posted: Wednesday, September 03, 2008 - 01:01 AM UTC
nice and clean build and paint-job

nice model

thanks for sharing

koen
210cav
Visit this Community
Virginia, United States
Joined: February 05, 2002
KitMaker: 6,149 posts
Armorama: 4,573 posts
Posted: Wednesday, September 03, 2008 - 02:15 AM UTC
Steve- superb! The paint chipping is outstanding. How did you do it?
thanks
DJ
Kuno-Von-Dodenburg
Visit this Community
England - North, United Kingdom
Joined: February 20, 2007
KitMaker: 1,453 posts
Armorama: 1,319 posts
Posted: Thursday, September 04, 2008 - 01:06 AM UTC
Thanks again guys for the ongoing comments.

It means a lot to get such positive feedback (and thus further encouragement & motivation) from fellow scale tanksmiths, among them a number of folks whose own work I've admired and have been inspired by in these 'ere forums.

To answer your questions:

Neil: I attached the Zimmerit with superglue, thinly applied. I like Atak Zimmerit: It's nice and fine and it didn't give me any real problems, although it does need careful handling, as it's quite thin and a bit on the fragile side until you get it in place.

DJ: The paint chips & scratches are done with VanDyke Brown oil paint using the "scouring pad" method.

This is a technique I learned about here at Armorama, and for those who may not know what it entails, it's relatively straightforward:

Simply take one of those everyday kitchen sponges that have a scouring pad on top of them. Remove the scouring pad, tear a piece off from it and then dip a fibrous corner of this piece gently into your oil paint.

Then dab it onto a piece of kitchen roll or a cloth to remove the excess (you don't want too much paint on there!!), then touch it lightly against the model where you want to make your scratches & chips.

If you're doing this for the first time, it may be advisible to (as usual) try it out on an old hulk first in order to hone your technique, because although it's a fairly straightforward method, it's easy to overdo it if you aren't careful. You also need to take care not to smear the oil paint once it's on your build (so set it aside afterwards until it's good and dry).

- Steve
wildbill426
Visit this Community
Connecticut, United States
Joined: December 08, 2006
KitMaker: 403 posts
Armorama: 375 posts
Posted: Thursday, September 04, 2008 - 01:24 AM UTC
great job. love the camo; i can imagine a few drunk tankers applying it late at night having a grand old time.
210cav
Visit this Community
Virginia, United States
Joined: February 05, 2002
KitMaker: 6,149 posts
Armorama: 4,573 posts
Posted: Thursday, September 04, 2008 - 02:28 AM UTC
Steve-- thanks for the response. I have to try that technique. Your work is super.
DJ
Kuno-Von-Dodenburg
Visit this Community
England - North, United Kingdom
Joined: February 20, 2007
KitMaker: 1,453 posts
Armorama: 1,319 posts
Posted: Thursday, September 04, 2008 - 10:33 PM UTC
Just as a post-script to the "scouring pad" method, I thought it worth mentioning that I've also experimented with other tones apart from VanDyke brown (e.g. raw umber), but found that VanDyke brown does indeed produce the best results.

- Steve
ppawlak1
Visit this Community
Victoria, Australia
Joined: March 14, 2006
KitMaker: 1,973 posts
Armorama: 1,843 posts
Posted: Thursday, September 04, 2008 - 11:31 PM UTC
Nice Steve.

As the others have said subtle but VERY effective,

Love it !!

Paul
Vemmadave
Visit this Community
Alberta, Canada
Joined: April 17, 2013
KitMaker: 44 posts
Armorama: 40 posts
Posted: Sunday, November 13, 2016 - 09:53 AM UTC
Did the afv club 1/35th sturmtiger have interior details in the kit!?
tatbaqui
Staff MemberNews Writer
ARMORAMA
#040
Visit this Community
Metro Manila, Philippines
Joined: May 06, 2007
KitMaker: 2,713 posts
Armorama: 2,451 posts
Posted: Sunday, November 13, 2016 - 10:14 AM UTC
Not with the Sturmtiger kit itself (AF35103). But AFV Club released an interior set as a separate kit #AF35S40.
 _GOTOTOP