


Dioramas
Do you love dioramas & vignettes? We sure do.
Do you love dioramas & vignettes? We sure do.
Hosted by Darren Baker, Mario Matijasic
Staubige grenzen.
jba

Joined: November 04, 2005
KitMaker: 1,845 posts
Armorama: 777 posts

Posted: Thursday, December 18, 2008 - 06:20 PM UTC
Not only for the weirdness of it, but simply to cross the ditch! A bit of downded plane like Seb says is also a very interesting suggestion!


jagd654

Joined: July 14, 2008
KitMaker: 296 posts
Armorama: 280 posts
Posted: Thursday, December 18, 2008 - 07:53 PM UTC
Hey Nico !
Love the 223, love the dio layout; GOOD JOB, my friend
 !!!!! For the ditch filler, have a range of small rocks, pebbles that have basically accumulated in the centre and at the sides of the ditch. Place a few small desert plants between them. For the piece de resistance, get hold of the DML Afrika Korps set and use the desert lizard provided within. Better yet, sculpt one yourself. Place the lizard among the rocks/plants and have the 223 crew looking at it. I can actually spare you the lizard if you are keen on the idea. Drop me an e-mail off-line ([email protected]) if you are keen. Once again, GREAT JOB on the dio ! Cheers !
Kenneth .
.
!Love the 223, love the dio layout; GOOD JOB, my friend
!!!!! For the ditch filler, have a range of small rocks, pebbles that have basically accumulated in the centre and at the sides of the ditch. Place a few small desert plants between them. For the piece de resistance, get hold of the DML Afrika Korps set and use the desert lizard provided within. Better yet, sculpt one yourself. Place the lizard among the rocks/plants and have the 223 crew looking at it. I can actually spare you the lizard if you are keen on the idea. Drop me an e-mail off-line ([email protected]) if you are keen. Once again, GREAT JOB on the dio ! Cheers !Kenneth
.
bill1

Joined: August 14, 2005
KitMaker: 3,938 posts
Armorama: 520 posts

Posted: Friday, December 19, 2008 - 09:52 AM UTC
Yo Friends,
Good ideas, again...thanks!
@-Seb, thanks for the respons...the idea with the piece off plane is excellent...that's the right missing link I think...I can also put a sign with the text "Danger Mines"...looking for a piece off German or English plane now
@-Mike and Slodder, Thanks for the hints.
@-Jean, Yes, that piece off plain...
@-Kenneth, Thanks for the nice words and also thanks for the nice offer...I well keep this in mind
Stay tuned Boys!
Greetz Nico


REMEARMR

Joined: August 17, 2002
KitMaker: 443 posts
Armorama: 357 posts
Posted: Saturday, December 20, 2008 - 02:18 AM UTC
Hi mate,
I've been watching this for a while and think you have a really good dio coming here. The rocks and wires look good but as has been said before i think the sunken barrels looks out of place. As for this empty space in between the wires, I don't see what the problem is. I've been to the desert and if there is alot of anything it is empty space! It seems that the problem is one of the rules for dio building "no empty spaces" is being taken too far. If the dio doesn't look bare or incomplete because of the space then why try to fill it. Although the idea of a crashed plane is good i feel it would be trying to squeeze too much in. Sometimes less is more. If you really want to fill the spaces have a figure or two staning/sitting there.
Cheers
Robbo
bill1
Joined: August 14, 2005
KitMaker: 3,938 posts
Armorama: 520 posts
Posted: Monday, December 22, 2008 - 05:58 AM UTC
Yo Remaermr,
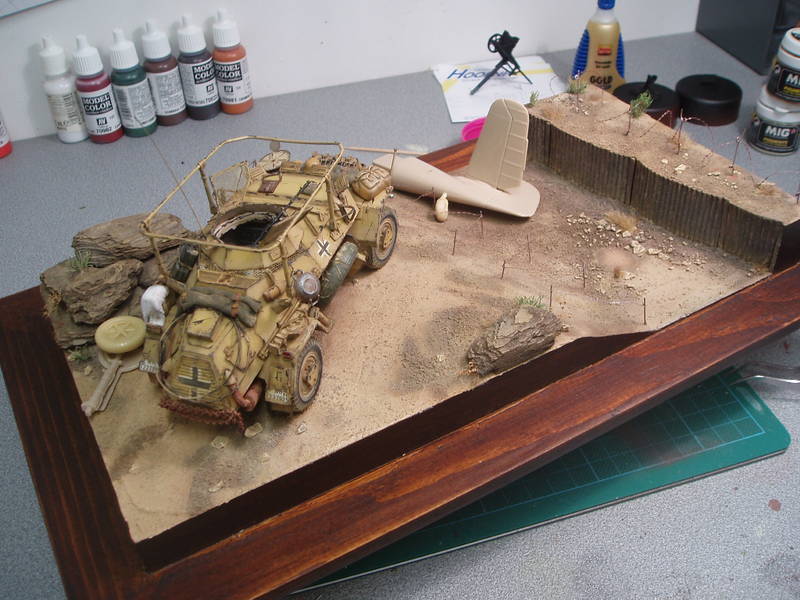
Thanks for you're reply..you're right about the empty spaces..this is what I wanted to created in my dio. Bud the idea of the plane by Seb is great...and would give my story that I wanted to tell that extra more...Staubige grenzen...the farest point the German will get in the desert...and with a piece off tail off a German fighter plane in the tankditch...well that should more symbolise my story...
I hope i will achieve that feeling...
So, anyone that have a piece off german fighter plain tail and does need it anymore...I'am the right man
Greetz
Stay tuned!

seb43
Joined: August 30, 2005
KitMaker: 2,315 posts
Armorama: 2,158 posts

Posted: Monday, December 22, 2008 - 06:14 AM UTC
Nico
I am very happy that you are gonna use my idea in your dio.
I do believe that you can build the tail using blasa wood ???
cheers
Seb
I am very happy that you are gonna use my idea in your dio.
I do believe that you can build the tail using blasa wood ???
cheers
Seb
calvin_ng

Joined: June 23, 2008
KitMaker: 1,024 posts
Armorama: 753 posts

Posted: Monday, December 22, 2008 - 12:47 PM UTC
WOW two thumbs up. EXCELLENT!!!! i just bought one of these of ebay along with a tank workshop interior for a measely 26 $$$$$$ .this diorama just gets better and better
bill1
Joined: August 14, 2005
KitMaker: 3,938 posts
Armorama: 520 posts
Posted: Friday, August 14, 2009 - 11:03 PM UTC
Hey boys,
Long time since I worked on this one...so, time to get started again!!!
The empty space behind te 223 will be filled up with a piece of the Messerschimt.
Bought this kit for a nice price.

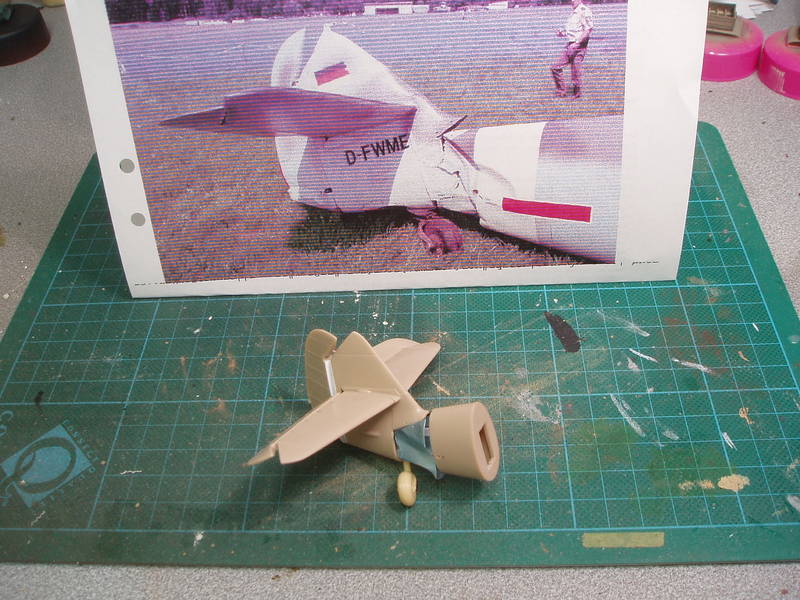
First a little layout and a google trip to find good reference pics...

Found nice pic...I will try to get that result...will be hard I think...
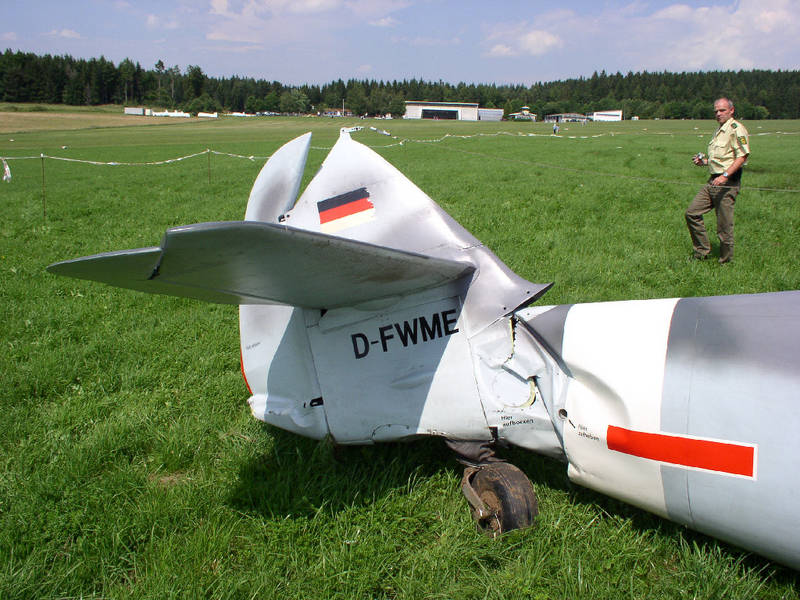
Source: worldwar.be
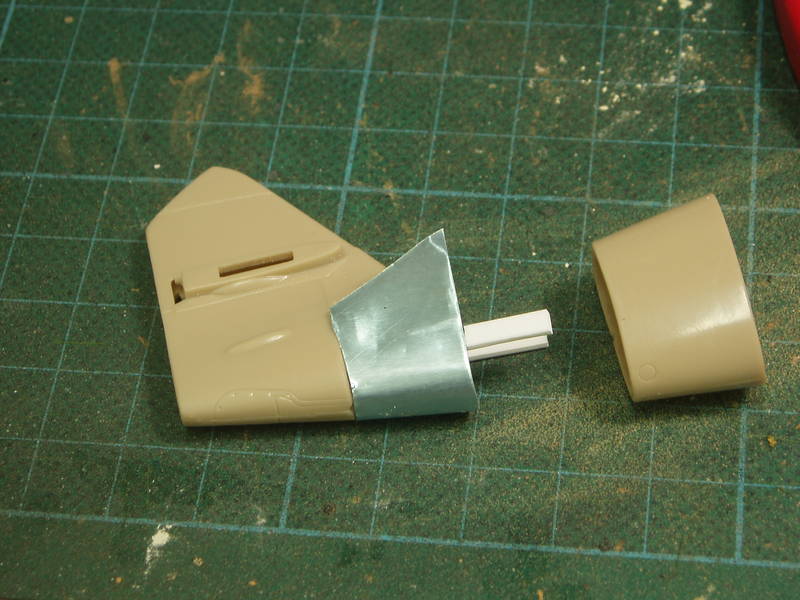
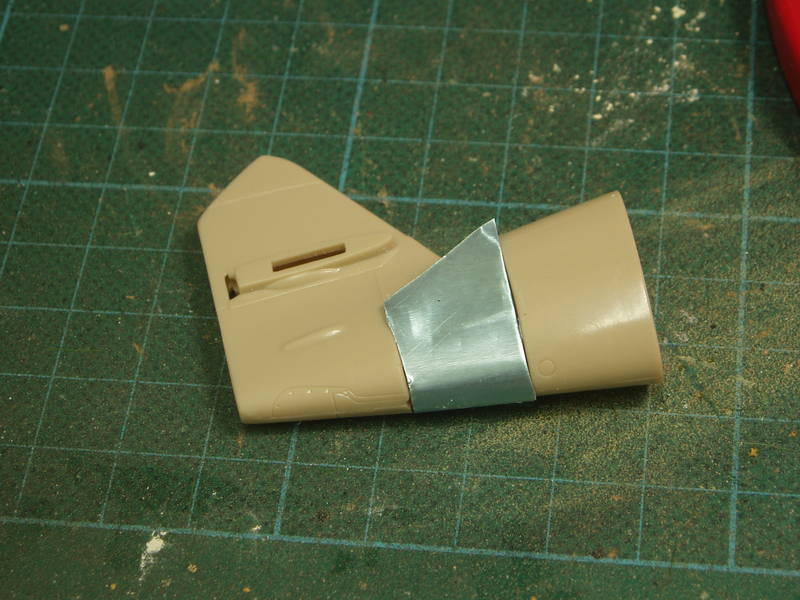
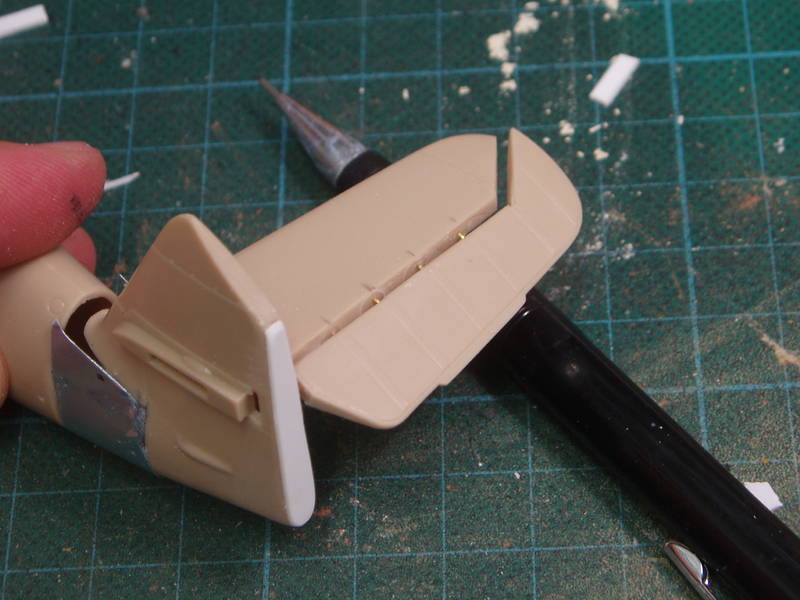
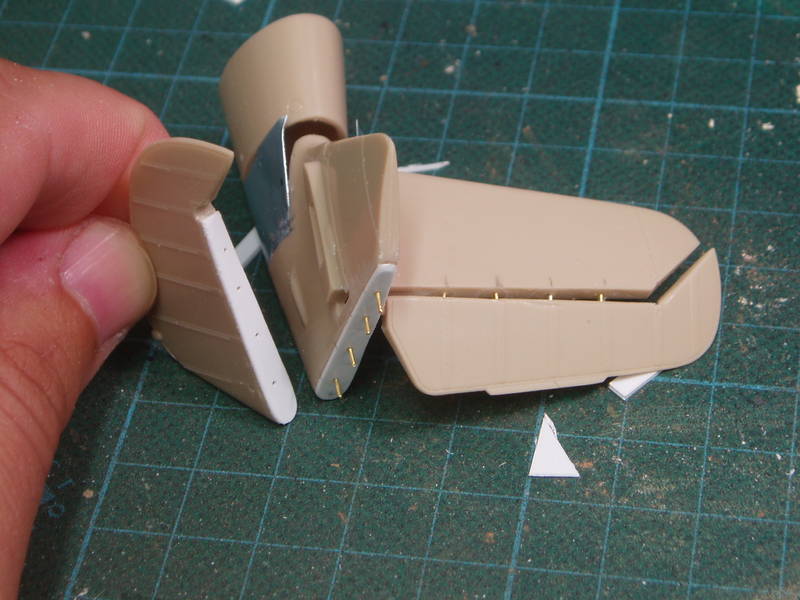
Nice weather yesterday...so I went outside to cut my schmit in two.
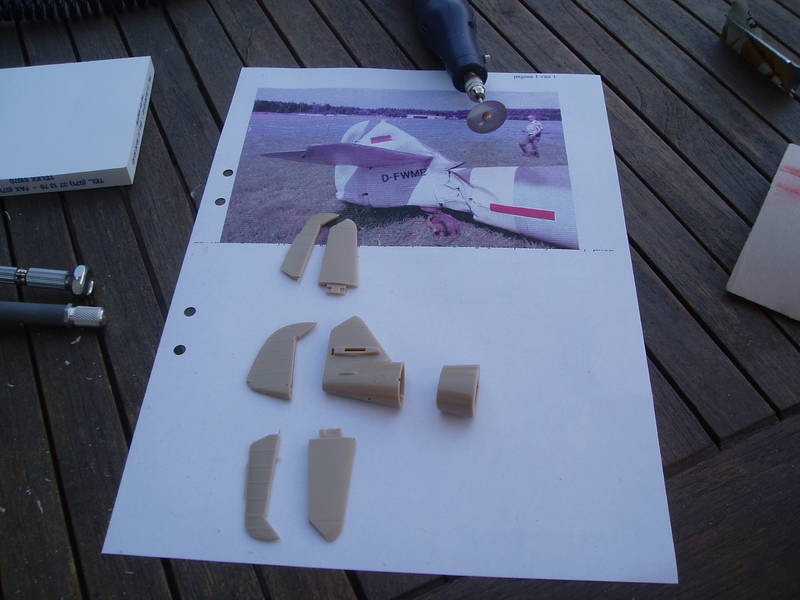
With a motortool I nicely cut out the pieces off tail from the schmitt, just like the foto. One piece, the middle one, will get out for good, the one with the heavy damage. So a new one will have to be made out off aluminium 0,2. So the damage on that piece will go easyer.
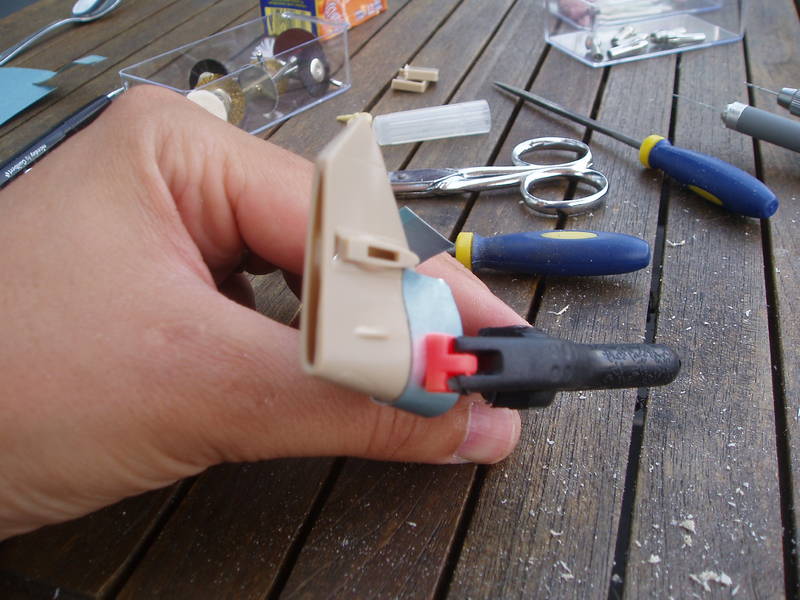
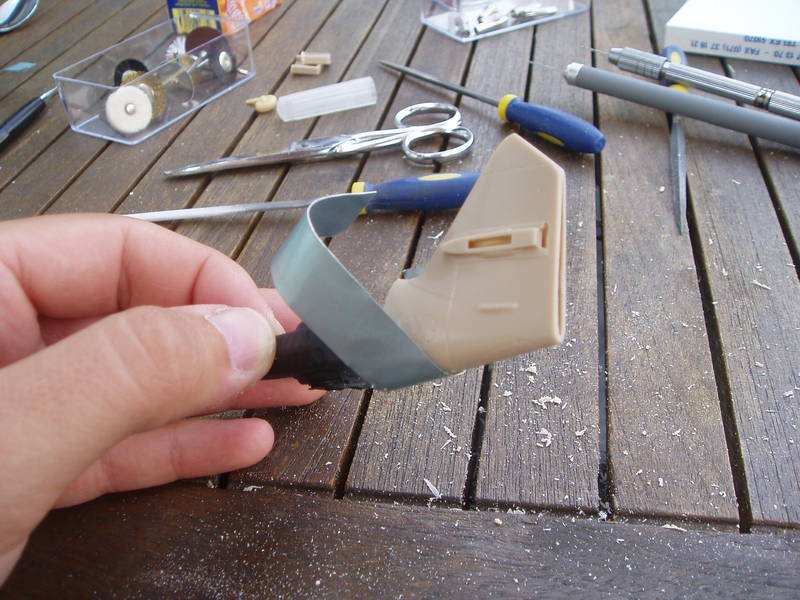
The piece off aluminium is made out off to parts, so I will get the nice rounding of the plane.
No I have to find a way to get all the pieces of the body put togeter again, so I will have one piece a the end...so, mutch work to do...
Any tips and tricks?
Greetz Nico
Long time since I worked on this one...so, time to get started again!!!
The empty space behind te 223 will be filled up with a piece of the Messerschimt.
Bought this kit for a nice price.
First a little layout and a google trip to find good reference pics...
Found nice pic...I will try to get that result...will be hard I think...
Source: worldwar.be
Nice weather yesterday...so I went outside to cut my schmit in two.
With a motortool I nicely cut out the pieces off tail from the schmitt, just like the foto. One piece, the middle one, will get out for good, the one with the heavy damage. So a new one will have to be made out off aluminium 0,2. So the damage on that piece will go easyer.
The piece off aluminium is made out off to parts, so I will get the nice rounding of the plane.
No I have to find a way to get all the pieces of the body put togeter again, so I will have one piece a the end...so, mutch work to do...
Any tips and tricks?
Greetz Nico

slodder
Joined: February 22, 2002
KitMaker: 11,718 posts
Armorama: 7,138 posts
Posted: Friday, August 14, 2009 - 11:45 PM UTC
Nice to see this one come back into threads.
If you can remove the metal piece you may want to try and thin down the 'receiving' end of the plastic tail part so you wont have as much putty/blending work.
If you can remove the metal piece you may want to try and thin down the 'receiving' end of the plastic tail part so you wont have as much putty/blending work.


dioman13
Joined: August 19, 2007
KitMaker: 2,184 posts
Armorama: 1,468 posts
Posted: Saturday, August 15, 2009 - 01:33 AM UTC
Nico, Just came across your build here and it is excellent. Looks as if the vehicale has been around for a longtime, nice weathering on it. Your ground work ties it all together real nice. You might have used an enexploded bomb in the ditch to fill in some space or the anti tank mines. Could even have the tops showing from the wind blowing away the sand. Would make me think twice about crossing there. As far as open space goes, there is a heck of a lot of it in the dessert so I wouldn't worry about the empty space syndrom. No matter, you have done a great job here.
jba
Joined: November 04, 2005
KitMaker: 1,845 posts
Armorama: 777 posts
Posted: Saturday, August 15, 2009 - 02:49 AM UTC
very nice to see that promising dio of yours back on the tracks Nico, i think your aluminium trick will do great, good luck with it
bill1
Joined: August 14, 2005
KitMaker: 3,938 posts
Armorama: 520 posts
Posted: Monday, August 17, 2009 - 05:08 AM UTC
Yo Guys,
@-Scott, Bob and Jba, thanks for the nice words and the reply!
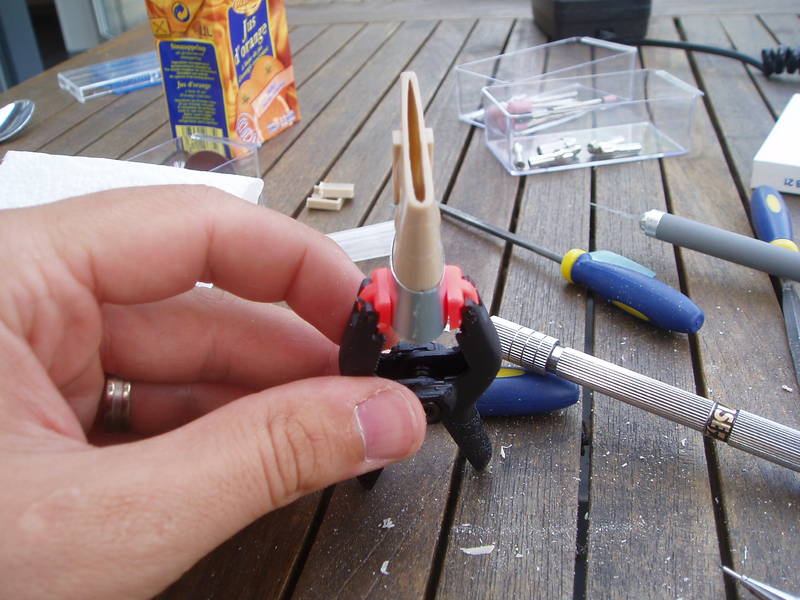
Working this afternoon on the tail of the schmitt...it went easyer than I firtst tought
To get to one piece out off all the separet pieces I fixed some plastic card in the plain.
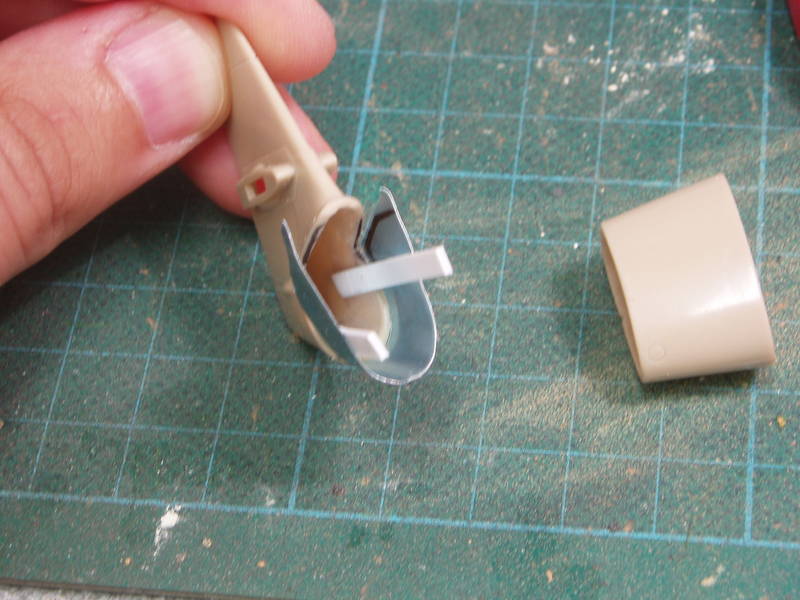
With this I had again the basic piece witch I needed to make the damage...
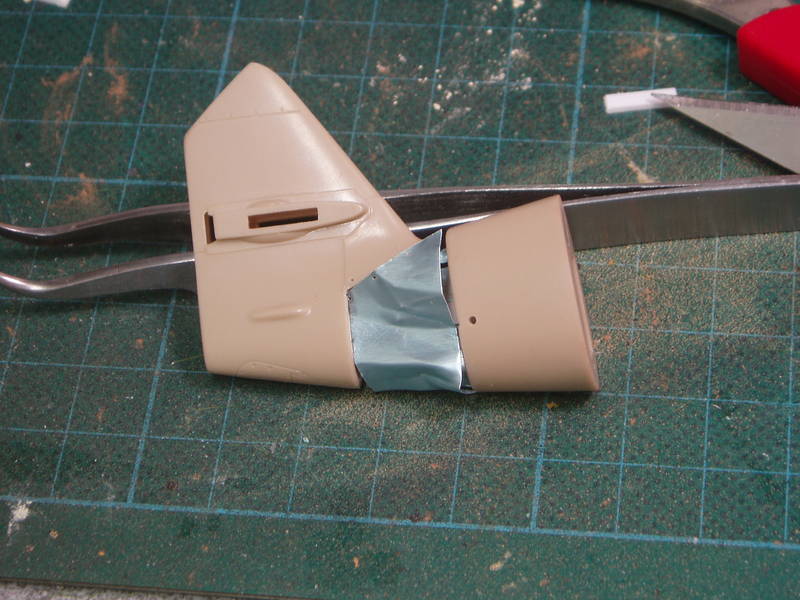

To get the little wings togheter a little improvisation came across here...not really like the real thing, but I think it get along like that...
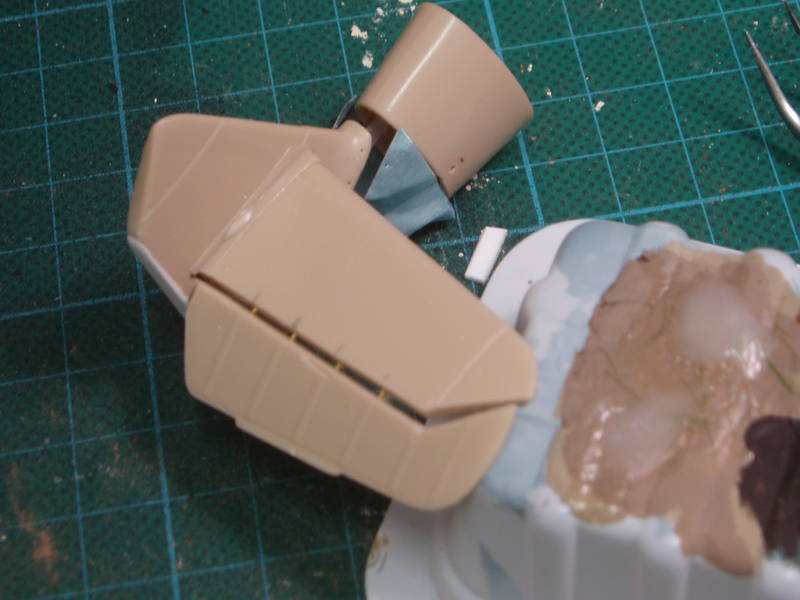
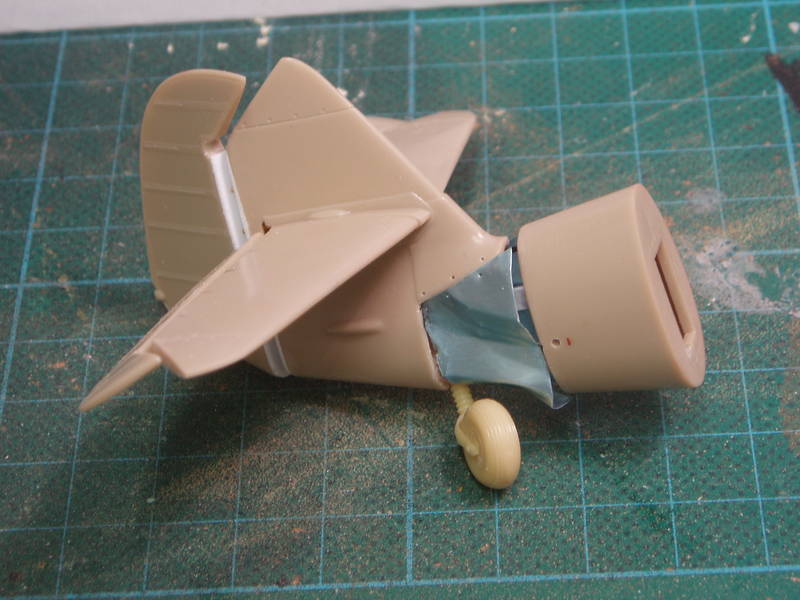
Not really like the ref pic...but he can recieve the first layer off paint like this...what do you think??
Greetz Nico
@-Scott, Bob and Jba, thanks for the nice words and the reply!
Working this afternoon on the tail of the schmitt...it went easyer than I firtst tought
To get to one piece out off all the separet pieces I fixed some plastic card in the plain.
With this I had again the basic piece witch I needed to make the damage...
To get the little wings togheter a little improvisation came across here...not really like the real thing, but I think it get along like that...
Not really like the ref pic...but he can recieve the first layer off paint like this...what do you think??
Greetz Nico
bill1
Joined: August 14, 2005
KitMaker: 3,938 posts
Armorama: 520 posts
Posted: Monday, August 17, 2009 - 07:21 PM UTC
I' am thinking to replace the plastic piece on the right side also in to aluminium...now its not realy a "smooth" balance between plastic and alu on the right side. And I will get the damagde further to right...
More scratch on the way!!
Stay tuned!
Greetz Nico
More scratch on the way!!
Stay tuned!
Greetz Nico

bobman331
Joined: April 13, 2009
KitMaker: 177 posts
Armorama: 142 posts

Posted: Saturday, September 12, 2009 - 03:21 PM UTC
really i would add wire stringers to the inside of the plastic so that wen u glue the foil on it will sit flush with the edje of the fuselage...and then paint the interior id green or watever color they painted the insides of these things...and then just superglue the foil on so that the plane looks normal and the "play with it" as in like use youyr hand yo move the plane at high speed toards the desktop and then "crash" it so that the foil bends realisticly, just like it would if it was a real plane.. lolololololol its the full contact side of modeling
lolololololol its the full contact side of modelingbill1
Joined: August 14, 2005
KitMaker: 3,938 posts
Armorama: 520 posts
Posted: Wednesday, January 20, 2010 - 05:57 AM UTC
Yo Friends,
Back on tracks with this one...(again)
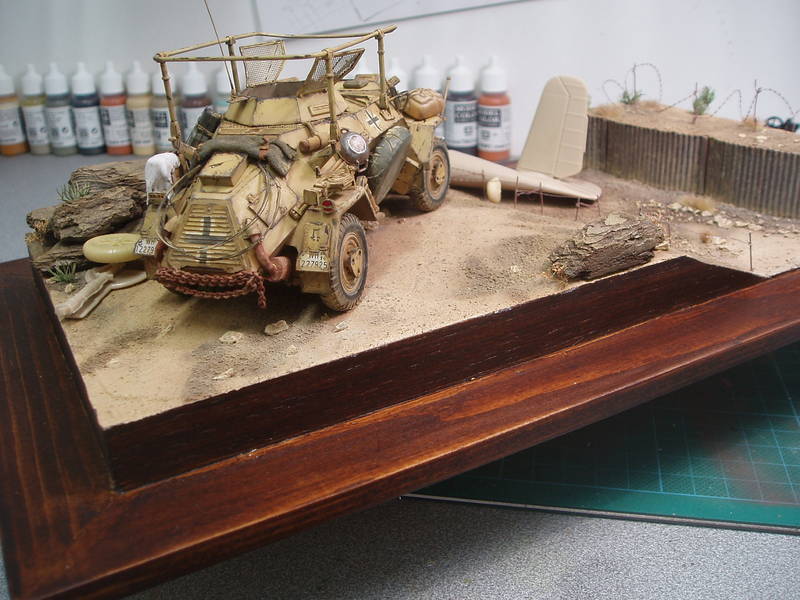
The tail of the schmitt has get a wash and some pigments fixings...not ready yet, still need some touch ups.
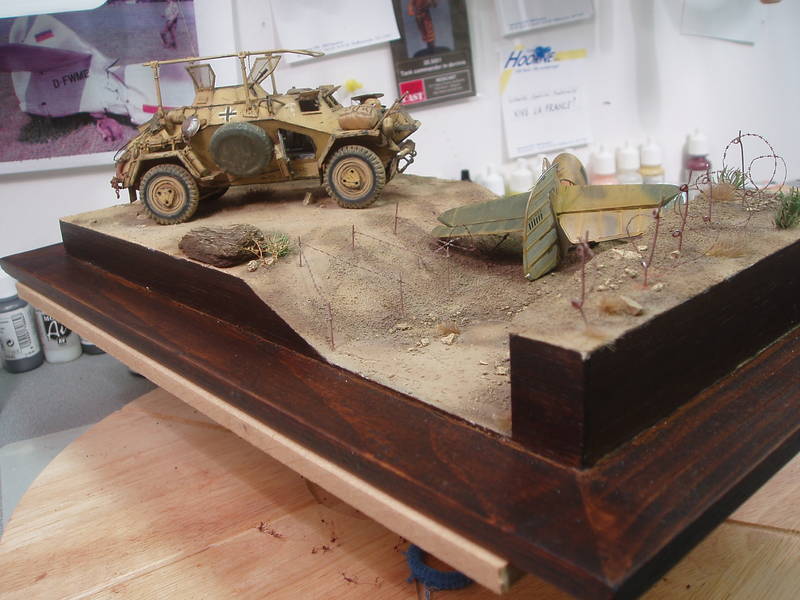
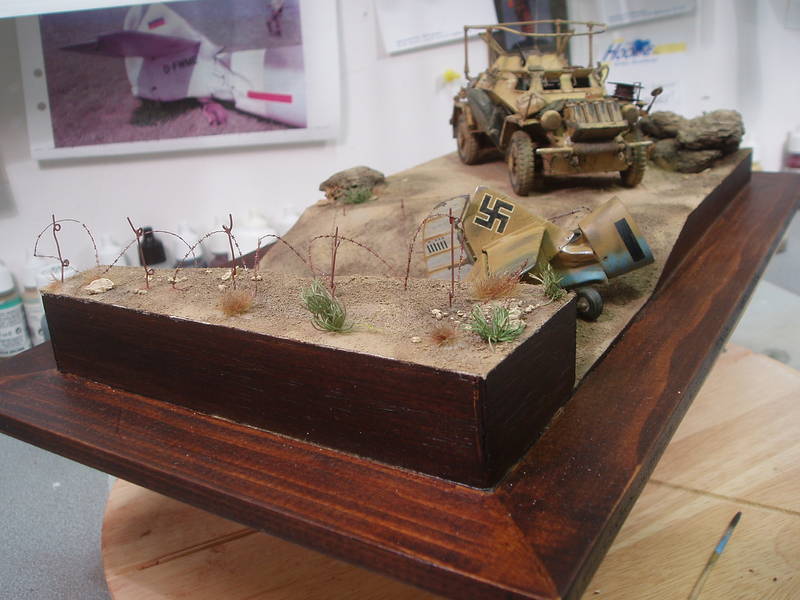
First some pics of the layout the way I see it...what do you think?
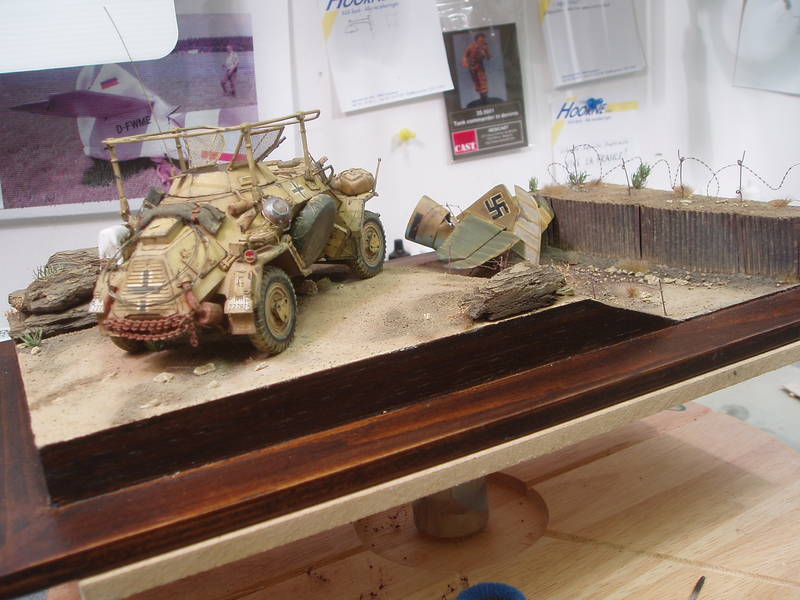
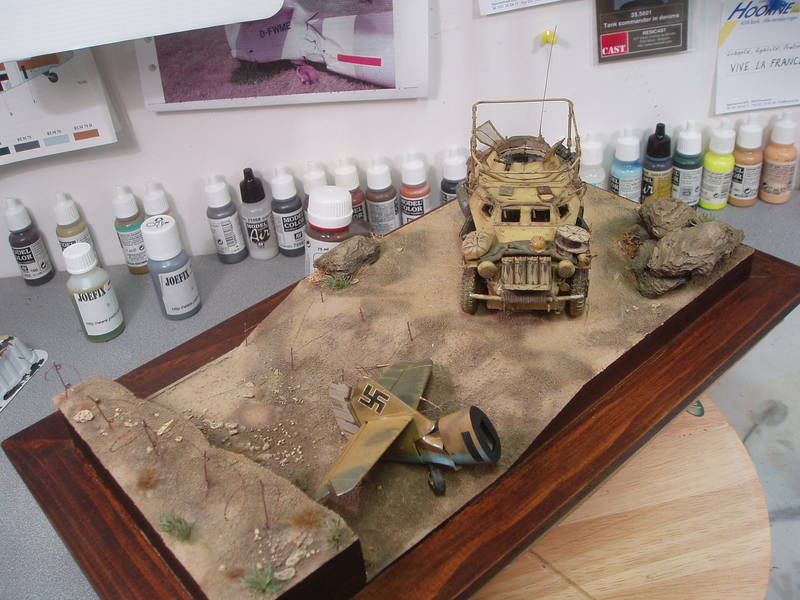
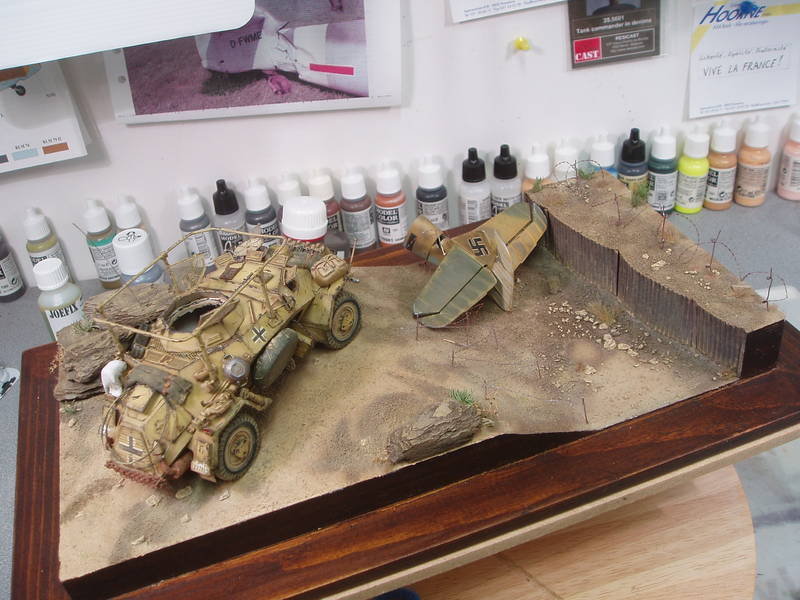

EDIT: Today I finished the tail...some pigments en minor touch ups. So, tail is ready to get his final place on the diorama.
Comments are welkom!
Stay tuned!
Greetz Nico
Back on tracks with this one...(again)
The tail of the schmitt has get a wash and some pigments fixings...not ready yet, still need some touch ups.
First some pics of the layout the way I see it...what do you think?
EDIT: Today I finished the tail...some pigments en minor touch ups. So, tail is ready to get his final place on the diorama.
Comments are welkom!
Stay tuned!
Greetz Nico
roudeleiw

Joined: January 19, 2004
KitMaker: 2,406 posts
Armorama: 2,224 posts
Posted: Wednesday, January 20, 2010 - 06:04 AM UTC
Haha! It's deep winter and everyone is getting back on track! Good.
Nico,
this looks really good, for once, a different setting and also a different layout then the norm.
But, i see a slight problem with the coloring of your sand. The brown patches are to much ...patches. I think you need them blend in more to the rest.
And then, the cut of your plane is not in one line with the end of the dio. I know it is difficult to do, but now it does not look like a visual cut due to space requirements, it looks like a cleanly cut plane lying in the desert. I hope you understand what i mean.
Cheers
Claude

bill1
Joined: August 14, 2005
KitMaker: 3,938 posts
Armorama: 520 posts
Posted: Wednesday, January 20, 2010 - 06:25 AM UTC
Yo Claude,
Thanks for the VERY fast reply
Ok, The patches are a bit darkener in the tank ditch to simulate a more "wet" sand, in desert terms ofcourse The tankditch is more present in the diorama with the darkener sand I think. Maybe more blending on top of out of the ditch....
The tail of the schmitt is not glued on the dio...its only a dry fit. I can still place it anywhere I want...in the tankditch. But it have indeed put in one line with the base.
Thanks for you're reply
greetz Nico
Thanks for the VERY fast reply
Ok, The patches are a bit darkener in the tank ditch to simulate a more "wet" sand, in desert terms ofcourse
The tankditch is more present in the diorama with the darkener sand I think. Maybe more blending on top of out of the ditch.... The tail of the schmitt is not glued on the dio...its only a dry fit. I can still place it anywhere I want...in the tankditch. But it have indeed put in one line with the base.
Thanks for you're reply
greetz Nico
jagd654
Joined: July 14, 2008
KitMaker: 296 posts
Armorama: 280 posts
Posted: Wednesday, January 20, 2010 - 03:31 PM UTC
Hey Nico !
Good to see your FANTASTIC diorama back on track !!!! I really like what you have done so far and am looking forward to the completion of the diorama and the final pictures. Cheers !
Kenneth .
.
!Good to see your FANTASTIC diorama back on track
!!!! I really like what you have done so far and am looking forward to the completion of the diorama and the final pictures. Cheers !Kenneth
.
m3orm5

Joined: December 22, 2009
KitMaker: 46 posts
Armorama: 42 posts
Posted: Wednesday, January 20, 2010 - 07:18 PM UTC
Nice work you got there. Excellent weathering! 
Hope to see more updates!
Hope to see more updates!
bill1
Joined: August 14, 2005
KitMaker: 3,938 posts
Armorama: 520 posts
Posted: Friday, January 22, 2010 - 01:29 AM UTC
Yo Friends,
Thanks for the lookies so far!
@- Kenneth, Thanks for the nice words...final pics are not for away...only a few more things to do like placing the figs on the right place en blend them nice in to the diorama...
@- m3orm5, Thanks mate!
greetz Nico
Thanks for the lookies so far!
@- Kenneth, Thanks for the nice words...final pics are not for away...only a few more things to do like placing the figs on the right place en blend them nice in to the diorama...
@- m3orm5, Thanks mate!
greetz Nico

martyncrowther

Joined: September 12, 2007
KitMaker: 1,548 posts
Armorama: 1,407 posts
Posted: Friday, January 22, 2010 - 12:07 PM UTC
YO Nico! Great to see this dio again! Brillain work my friend! I was searching for this on the Belgian kitmaker site and could not find it! Looking forward to the next update!
ALso the rest of your plane is that going in your next dio? .....
..... 

ALso the rest of your plane is that going in your next dio?
..... 
randyd
Joined: July 04, 2009
KitMaker: 241 posts
Armorama: 199 posts
Posted: Friday, January 22, 2010 - 04:14 PM UTC
Hello Nico, The car is one of best finished models I have seen on this site, Congratulations!!!!!!
Randy
bill1
Joined: August 14, 2005
KitMaker: 3,938 posts
Armorama: 520 posts
Posted: Monday, January 25, 2010 - 04:58 AM UTC
Yo Friends,
@ Martyn, Thanks mate...so nice of you that you where looking for my work on Kitmaker Benelux
Well...not a bad idea
@ Randy, Thanks for the kind words...helps me to go on with this nice hobby
Stay tuned!
Greetz Nico
@ Martyn, Thanks mate...so nice of you that you where looking for my work on Kitmaker Benelux
Quoted Text
ALso the rest of your plane is that going in your next dio? .....
Well...not a bad idea
@ Randy, Thanks for the kind words...helps me to go on with this nice hobby
Stay tuned!
Greetz Nico
pzcreations
Joined: May 24, 2006
KitMaker: 2,106 posts
Armorama: 1,116 posts
Posted: Monday, January 25, 2010 - 06:27 AM UTC
WoW! very nice..love the 222 ..well, the whole scene for that matter.

Danny_506
Joined: October 07, 2007
KitMaker: 254 posts
Armorama: 26 posts
Posted: Sunday, January 31, 2010 - 01:46 AM UTC
Very nice dio Nico....
 |

WEB HOSTING BY


Copyright ©2021 Armorama and Kitmaker Network, a subsidiary of Silver Star Enterprises
All Rights Reserved. Please read our Conditions of Use and Privacy Policy.
All Rights Reserved. Please read our Conditions of Use and Privacy Policy.