British Columbia, Canada
Joined: October 16, 2006
KitMaker: 480 posts
Armorama: 399 posts
Posted: Wednesday, November 26, 2008 - 07:23 AM UTC
So due to a head cold I'm not spending the day on a roof as I should be, but home drinking neocitroen and rum. I decided could be a good chance to clear something out of the stash. Something simple, quick to build and not needing to many scratch built extras or texturing, preferably no real interior so the M10 and halftrack were out, The sturmtiger still needs that sweet resin barrel. Dragon wagon? no. Then I noticed the DML Stug III early smart kit, perfect, still lots of small parts but if its anything like the panther g it would fall together. So pop the box top and away I go!... except I cant see out of my right eye 'cause its watering so much... and I feel dizzy...

And after an hour or so

Wish me luck!
Kentucky, United States
Joined: August 26, 2008
KitMaker: 286 posts
Armorama: 273 posts
Posted: Wednesday, November 26, 2008 - 08:13 AM UTC
This looks like it's gonna be a cool build. I always liked the prospect of this vehicle. Keep us posted!
Hope you get better soon too.
Richard
"Building is easy. Painting is hard. Weathering is harder. Not going crazy doing the above is hardest."
"Building is easy. Painting is hard. Weathering is harder. Not going crazy doing the above is the hardest."
If it moves, shoot it. If it screams in [insert enemies language], shoot it again!
Play the XBox 360? Look for fallshirmjager9
British Columbia, Canada
Joined: December 17, 2006
KitMaker: 97 posts
Armorama: 83 posts
Posted: Wednesday, November 26, 2008 - 08:32 AM UTC
Now that's a f*&^$n work bench!!! Does that box art depict a stug 3 that rolled off the assembly line about 60 feet behind it, having just knocked out a t-34 ?? wow I bet those pesky Russians didn't notice that secret German underground tank factory! Man I knew that Germans were clever but... ahem.. anyways that's a perfect kit to do with one eye, and a belly-o-rum. To bad it's time for you to sit at your Xbox 360 console and play some Call of Duty 5 withe me ... your damn stug can wait

talk to ya soon
p.s. Bronwyn wants you to man up and make your own damn pasta sauce ( classico... ppffffT )
British Columbia, Canada
Joined: October 16, 2006
KitMaker: 480 posts
Armorama: 399 posts
Posted: Wednesday, November 26, 2008 - 08:37 AM UTC
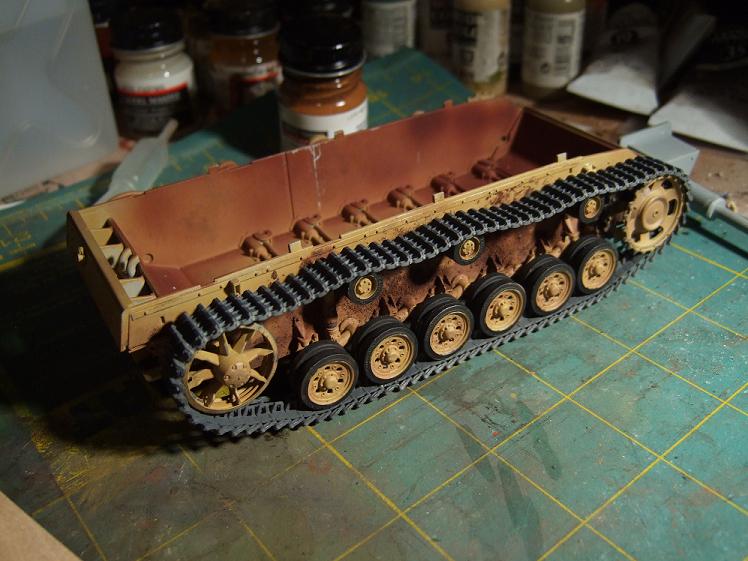
So I'm just charging the camera, painted the bottom hull/running gear. Might add some pigment mud and sludge before the tracks. Going to go get some dayquil or some such.
Oh, am I correct in assuming the interior would be the panzer buff found in other tanks? Dont think It calls it out in the directions. Thanks.
British Columbia, Canada
Joined: October 16, 2006
KitMaker: 480 posts
Armorama: 399 posts
Posted: Wednesday, November 26, 2008 - 08:47 AM UTC
Oost-Vlaanderen, Belgium
Joined: May 14, 2006
KitMaker: 3,829 posts
Armorama: 881 posts
Posted: Wednesday, November 26, 2008 - 10:00 AM UTC
nice to see
a) a vehicle I'm going to build soon ( if santa got my mail

)
b) to see another modeler who has the same spartan attidude , has the cleanness of a Japanese company builder,...I'm not alone

but good luck,all eyes on you now


Rest in peace my dearest of friends, Mike I 'll miss ya a lot
fastest way to get killed,
messing with the man with a gun.
modelling is life, anything before or after is waiting...
New York, United States
Joined: August 11, 2005
KitMaker: 231 posts
Armorama: 225 posts
Posted: Wednesday, November 26, 2008 - 04:28 PM UTC
looks good so far , kep up the good work !
British Columbia, Canada
Joined: October 16, 2006
KitMaker: 480 posts
Armorama: 399 posts
Posted: Thursday, November 27, 2008 - 08:54 AM UTC
OK sick day Version 2.0
A little better today, can see out of 1 1/2 eyes now.
Main upper structure is about 80% assembled, its starting to look like something now which is inspiring.
I'll post a few pics as soon as I find the camera.
New York, United States
Joined: October 13, 2002
KitMaker: 444 posts
Armorama: 439 posts
Posted: Thursday, November 27, 2008 - 09:29 AM UTC
Hey Eric, Looks good iam about 90% finished with the same kit. I took a break from it because i was haveing fit issues. The upper/lower hull and rear deck where not fitting properly. I intersted to see if you have the same issues.

British Columbia, Canada
Joined: October 16, 2006
KitMaker: 480 posts
Armorama: 399 posts
Posted: Thursday, November 27, 2008 - 03:15 PM UTC
So I have the upper hull sort of assembled, not a great way of attaching the sub-assemblies but I guess it will do. I do have reservations about fitting the upper and lower hulls. The gun was an interesting problem. not sure what I did but the gun was to long for the cabin, the barrel and mantlet fit perfectly over the main gun body but the entire unit was to long and the guard around the breach hit the rear wall. I tried everything I could think of to no avail, the mantlet/gun join was exactly like the cad drawings on the box. So a little surgery on the breach guard and it fit like a glove... ish.
A quick spray and some chipping followed by a quick oil was and its ready to be hidden away inside.
I'll try to find that darned camera and post some pics.
British Columbia, Canada
Joined: October 16, 2006
KitMaker: 480 posts
Armorama: 399 posts
Posted: Thursday, November 27, 2008 - 03:16 PM UTC
Quoted Text
Hey Eric, Looks good iam about 90% finished with the same kit. I took a break from it because i was haveing fit issues. The upper/lower hull and rear deck where not fitting properly. I intersted to see if you have the same issues. 
looks like it may end up that way. Did you have any trouble with the fit of the gun?
British Columbia, Canada
Joined: October 16, 2006
KitMaker: 480 posts
Armorama: 399 posts
Posted: Thursday, November 27, 2008 - 03:43 PM UTC

Gun ready to be hidden away

gun deck fitted into lower hull

Dry fit of troubles to come!
New York, United States
Joined: October 13, 2002
KitMaker: 444 posts
Armorama: 439 posts
Posted: Thursday, November 27, 2008 - 05:31 PM UTC
Hey Eric, I did the opposite. I attached the entire gun assembley to the upper hull. I just slide into the channel in the lower hull. It fit good. Its only when i tried to attach the upper/lower, rear engine deck and fenders.


Oklahoma, United States
Joined: March 01, 2002
KitMaker: 6,043 posts
Armorama: 4,347 posts
Posted: Friday, November 28, 2008 - 12:27 AM UTC
Indiana, United States
Joined: June 10, 2005
KitMaker: 6,188 posts
Armorama: 5,960 posts
Posted: Friday, November 28, 2008 - 02:46 AM UTC
Does that gun assembly come in the kit? Does it have a detachable roof?
Please ... keep us updated with more pictures. Hope you're feeling better.

British Columbia, Canada
Joined: October 16, 2006
KitMaker: 480 posts
Armorama: 399 posts
Posted: Friday, November 28, 2008 - 03:04 AM UTC
Mike thats what I tried to do as well, the pic is just to show it in place in the hull. I must have somehow turned a piece around in the assembly or something because It would end up hitting the back wall of the cabin. strange. Probably cold medacine related

Jeff the gun comes in the kit, and no detachable roof... unless you just didnt glue it down. The problem is no driver compartment or tranny/ final drive up front. Im just opening the hatches for some crew doen the road hence the soft detail and basic paint job. I actually went a little heavy on the chippin and wear and tear down there because It will be harder to see when closed up. Kind of the same idea as stage makeup.
Tracks are on one side as of last night, post a pic this evening. Now its time to go sling plywood onto a roof, and see if I can actually cough up an entire lung in one go.
Thanks for the good health wishes

British Columbia, Canada
Joined: December 17, 2006
KitMaker: 97 posts
Armorama: 83 posts
Posted: Friday, November 28, 2008 - 04:42 AM UTC
you sure picked a nice day to go back to work. It's a damn monsoon out there. anyways, your model looks good, shame about the gun fit. maybe just cut the breech off and just use the barrel, then just use some fat panzer crew members for the hatches...

jk. take care buddy,
p.s. when you get home you know what time it is

New Jersey, United States
Joined: February 02, 2008
KitMaker: 1,388 posts
Armorama: 1,325 posts
Posted: Friday, November 28, 2008 - 11:14 AM UTC
I think i am going to put this kit on the Xmas list. Any build problems? I tend to like kits that go together without a hassle. (i usually skip the gun breach assemblies anyway)
Modelling is not just a hobby, it's an addiction.
Ontario, Canada
Joined: September 18, 2005
KitMaker: 1,226 posts
Armorama: 819 posts
Posted: Friday, November 28, 2008 - 12:05 PM UTC
Makes me want to use a sick day or two lol.
Darryl
blackpoolkennels.com
Do not meddle in the affairs of dragons, for you are crunchy and taste good with ketchup.
England - South East, United Kingdom
Joined: December 13, 2004
KitMaker: 2,192 posts
Armorama: 1,615 posts
Posted: Friday, November 28, 2008 - 02:18 PM UTC
Eric,
Thats really good progress for a couple of days with a head cold (or is it flu). When I did mine the gun breach unit was a very tight fit against the rear wall of the fighting compartment, I think they were on the original vehicle. BTW I note that you have painted the recuperator housing. I found that the gun barrel & mantlet were very tight fitting over that, you may need to shave it down a bit.
Mike- take it from me it does all fit, in fact it's pretty tight, almost snap together. DML would have you fasten all the superstructure sub-assemblies together & then try & fix them to the chassis. I found this didn't really work, because the whole breech assembly is only held by a small contact area on the rear wall so it all waggles about, & then you have to try & get it into a slot moulded in the chassis. It's easier to install the interior first, then build the superstructure, you're not trying to get everything to match up at once then. Note however that as you put the fighting compartment on you have to install the mantlet at the same time, or it won't fit past the side plates. This probably sounds clear as mud, but it will make sense when the pieces are in your hands. You may also find that the PE below the mudguards are catching on the hull as you lower them over, you need to spring them slightly then it all just snuggles down. When I first tried it, I thought it was never going to fit, but then I saw the light....
"Lord Raglan wishes the cavalry to advance rapidly to the front, follow the enemy, and try to prevent the enemy carrying away the guns. Troops of Horse Artillery may accompany. French cavalry is on your left. Immediate. Airey."
New York, United States
Joined: October 13, 2002
KitMaker: 444 posts
Armorama: 439 posts
Posted: Friday, November 28, 2008 - 06:06 PM UTC
Thanks Steve for your advice and time. I will give it another try,it is a beautiful kit.

British Columbia, Canada
Joined: October 16, 2006
KitMaker: 480 posts
Armorama: 399 posts
Posted: Friday, November 28, 2008 - 06:28 PM UTC
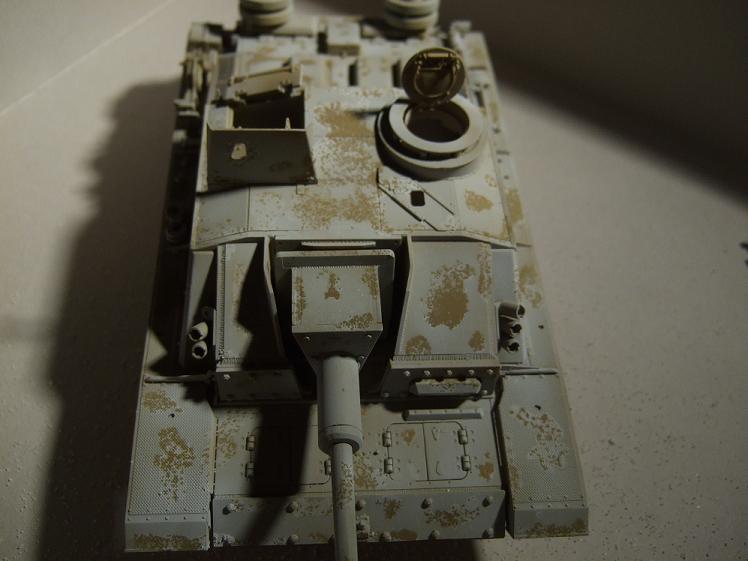
Thanks Steve, I'll be the first to admit it's not my best but I'm just trying to have fun and throw something together quickly. Going to try the dark art of salt weathering on this baby, the dreaded "weathered whitewash of DOOM!!!" with out the doom. I hope.
Tracks are together, what a joy these magic tracks are, used a lenght of masking tape on balsa sheet to hold them in place while I glued and painted them, all said and done tracks took about 20 min's of actual construction time, let them set up until just plyable and bingo! easy as pie, assuming you find pie easy. If not then be assured it was easy and leave it at that.
moving on...
I'll spray the white in the morning, then tell you all how horribly it went, how some got in my coffee, eye or cat etc.
I am feeling better but still have a horrid hacking cough so It still counts under the sick day column.
cheers.


British Columbia, Canada
Joined: October 16, 2006
KitMaker: 480 posts
Armorama: 399 posts
Posted: Saturday, November 29, 2008 - 06:26 AM UTC
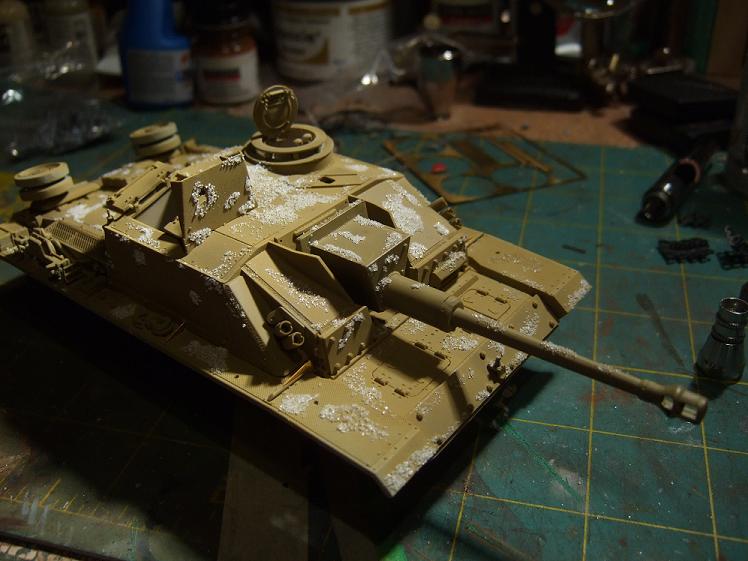
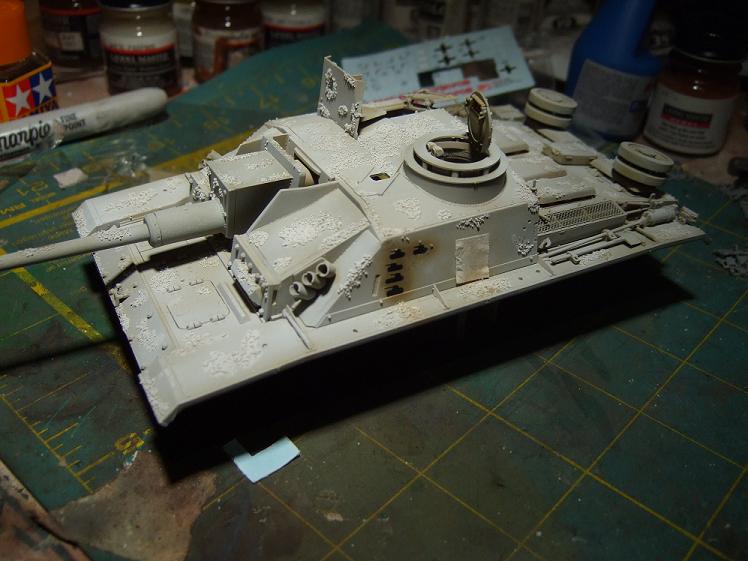
Couldn't sleep in this morning so whitewash it was. Went well, some spots seem to have had to much water and not enough salt, created a brighter white stain but dosent look to bad.
all in all it was a success, looking foreward to starting the weathering, going to try some white oil washes on the snow cammo to try to give it a metalic "sheen" should be fun.


Wisconsin, United States
Joined: August 10, 2008
KitMaker: 204 posts
Armorama: 191 posts
Posted: Saturday, November 29, 2008 - 01:35 PM UTC
Nice work so far, I still remember that technique when posted at FSM...works very well. One piece of advice, try to combine the titanium white oil plus raw umber and raw sienna "light washes" here and then and you will be impressed with the result....=)
Will continue to follow....
Nice job..
mirko
Mirko A. Meier
http://sites.google.com/site/meiermodelling/
Rigas, Latvia
Joined: September 16, 2008
KitMaker: 7 posts
Armorama: 6 posts
Posted: Saturday, November 29, 2008 - 11:36 PM UTC
Nice job! looks very good so far!!!
I have a little question?

How do you put salt onyour model,and how do you getit off? Im realy interested

good luck!


 talk to ya soon


 )
)


 and using a sick day
  to do it so no reply a real bummer


 jk. take care buddy,


 How do you put salt onyour model,and how do you getit off? Im realy interested
