_GOTOBOTTOM
Armor/AFV: Allied - WWII
Armor and ground forces of the Allied forces during World War II.
Hosted by Darren Baker
Sherman M4A3w75mmVVSS rebuild WIP
Rambo44
Visit this Community
New Brunswick, Canada
Joined: November 27, 2008
KitMaker: 55 posts
Armorama: 54 posts
Posted: Sunday, November 30, 2008 - 09:07 AM UTC
Hi folks,
here's one of my latses projects.I've decided to rebuild this kit I had stored away.It's the Tamiya M4A3 Sherman kit #35122.

I've removed the molded handles everywhere and replaced with wire,added the perriscope guards and changed out the commander's cuppola so far.
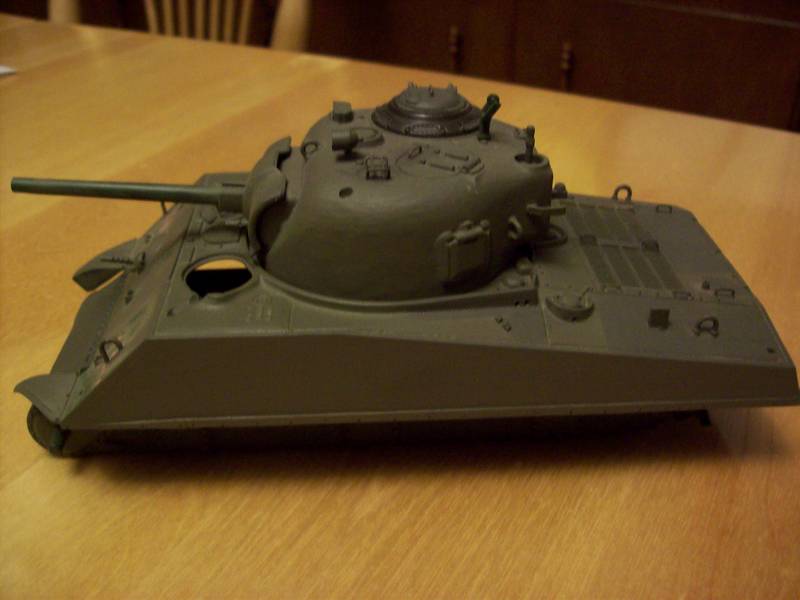

http://gallery.kitmaker.net/data/13711/100_0619.jpg" BORDER="0">

I've also drilled out the drain holes at the bottom of the feul cap protectors and added the engine grille support(located in front of rear lift ring) as this photo shows.
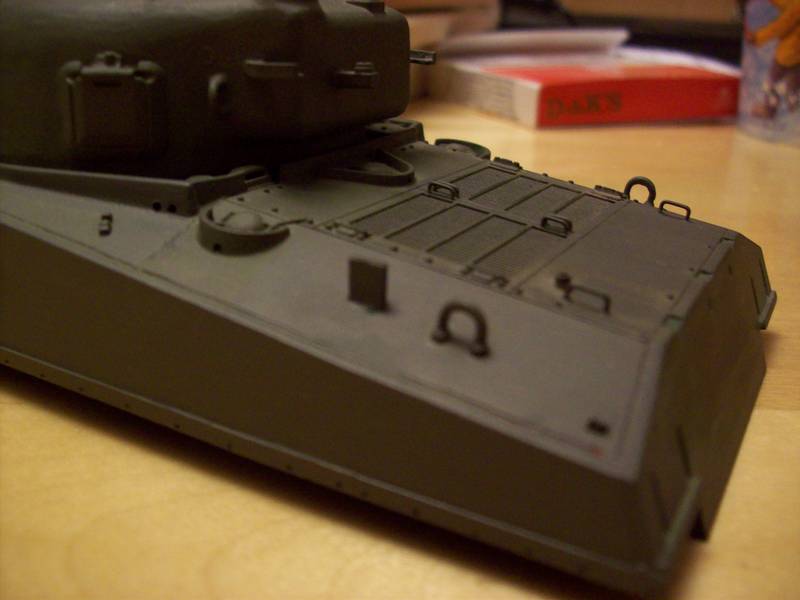

I have a set of Friule tracks and the Aber PE set comming to add to this build as well.

Let me know what you think and tips are always welcome as I'm just getting back into armor building.Thanks for looking,
Ron.
ericadeane
Visit this Community
Michigan, United States
Joined: October 28, 2002
KitMaker: 4,021 posts
Armorama: 3,947 posts
Posted: Sunday, November 30, 2008 - 10:44 AM UTC
Maybe add the sponson fillers? There's a template on Archer transfers homepage. Also i'm not a fan whatsoever of Friul Sherman tracks. The weightiness of them actually make Sherman tracks look inaccurate. There should not be any sag with Sherman tracks. Friuls are great for Panthers, T-55s, IS-2s and tanks like that.

This page has some good tweaks for the Tamiya M4A3
http://www.usarmymodels.com/ARTICLES/articles.html
skyhawk
Visit this Community
Florida, United States
Joined: June 03, 2003
KitMaker: 1,095 posts
Armorama: 743 posts
Posted: Monday, December 01, 2008 - 01:28 AM UTC
looking good, and these taymia kits are a chalenge, but rewarding. They can build into some nice models with a little work, and you are well on your way!

One thing you may want to do if you dont mind doing some touch up paint is to fill in the welds. they should be almost flat and even with the surface, not the trenches found on taymia kits. You can take some very thin strip plastic, lay it in the trench, and cover it with liquid glue. Then take a small flat headed screwdriver, pressing the softened plastic into the trench. Add a bit of texture by just pressing the screwdriver along the bead lengthwise (the welds are a "flowing" type, not the scaloped type....see some sherman reviews on perthmillitarymodelling.com for photo examples)

this one detail is the most glaring and yet fixable issue with the taymia kits.

looking good....ill be following your progress and cant wait to see the finished build.!
Andy
Rambo44
Visit this Community
New Brunswick, Canada
Joined: November 27, 2008
KitMaker: 55 posts
Armorama: 54 posts
Posted: Monday, December 01, 2008 - 03:22 PM UTC
Thanks for the tips guys.I think I will add the sponson fillers.Not that you'd see trough the tank because I plan on displaying it with closed hatches anyway.
Roy,I think I will follow your advice as well for redoing the weld seems since I had planned to repaint the entire vehicle.
Which brings me to a question.....what color is best for this tank,preferably in the Model Master Acryl line but if there's a more accurate color in an other line, please let me know.
Should have progress pics up soon and thanks for the comments and advice guys.
Ron.
Rambo44
Visit this Community
New Brunswick, Canada
Joined: November 27, 2008
KitMaker: 55 posts
Armorama: 54 posts
Posted: Monday, December 01, 2008 - 03:24 PM UTC
Sorry Andy,It was your tip on the weld seams.Ooooooops my bad.
Ron.
Rambo44
Visit this Community
New Brunswick, Canada
Joined: November 27, 2008
KitMaker: 55 posts
Armorama: 54 posts
Posted: Thursday, December 04, 2008 - 05:28 PM UTC
Hi guys.
Got a couple of minor updates on this rebuild.First off, I have filled in the trenches that were supposed to be weld seams originaly and retextured these using the "pyrogravure" method using my soldering iron tip.As this was my first time using this method,I'll have to describe these seams as being "welded" by a rookie welder(LOL).Have a looke at this sorry attempt at weld seams:


I've also added sponsons to this Shermie.Still have a small piece to add to the front section as you can see.The reason for this is that I'm awaiting the Aber PE set for this build and I'm not sure if this set includes the front fenders or not.If they are included,I think tis way it will be easier to cut off the originals for replacement:


I've also begun reworking the suspension boogies.Removed the molded skid plates and started to add bolt heads and drilling holes.(Sory,no pics of this yet).Progress wor should pick up quickly once my PE set and tracks arrive.Let me know what you think.
Ron.
HONEYCUT
Visit this Community
Victoria, Australia
Joined: May 07, 2003
KitMaker: 4,002 posts
Armorama: 2,947 posts
Posted: Thursday, December 04, 2008 - 06:24 PM UTC
Hey Ron
Starting to shape up well mate. And with us on your case you'll have a decent workload... Nah, just kiddin'!
You seem to have most all under control. This may be the motivation to get my project back on the front burner... It is the same kit about 95% done, but with the split hatch instead of the all vision cupola for the commander. I have some Aber parts included, (and yes it does come with fenders) and if you can get the folding parcel shelf assembled and in position you are a better man than I, eh!

Brad
skyhawk
Visit this Community
Florida, United States
Joined: June 03, 2003
KitMaker: 1,095 posts
Armorama: 743 posts
Posted: Friday, December 05, 2008 - 11:27 AM UTC
looking good. If you are still not satisfied with the welds, just use the method i discribed (responded to your post) on my M4 Dozer thread.... use some .005" thick strips the same width of the weld, lay them over the weld, run some liquid glue, and just press them down with a flat head screwdriver. The resulting look will give you the flush, flowing welds that are on a sherman (not the scaloped kind)...or you can go with what you got and press on!

sounds like your doing some fine work on the bogies...thats on my plate as well for the moment.

Dont be daughted by the Aber set when you see it. There are A LOT of fiddley bits.... You will also have lots of extra stuff for future shermans! Some of my favorite parts are the sand sheld mounting strips, mud guards, M2 details, skids, and periscope bits. The OVM gear mounts are not bad either. You get a lot of bang for the buck on this PE set.

again, looking good and am looking forward to the next update!
andy
newfish
Visit this Community
England - West Midlands, United Kingdom
Joined: June 23, 2008
KitMaker: 2,329 posts
Armorama: 2,110 posts
Posted: Sunday, December 21, 2008 - 12:37 PM UTC
great start to the rebuild
what happpened to the kit in the first place if you dont mind me asking?


padawan_82
Visit this Community
United Kingdom
Joined: December 10, 2008
KitMaker: 817 posts
Armorama: 555 posts
Posted: Sunday, December 21, 2008 - 04:15 PM UTC
i agree with James, you've got off to a good start with that rebuild Ron, i'm currently rebuilding Tamiya's old Tiger 1 i know why bother some would say, but it was the first armor kit i built when i started modelling, and i couldn't bring myself to srapping it, so i raided the spares box, and grabbed an aber PE set and went to work. keep up the good work mate, and merry christmas
Rambo44
Visit this Community
New Brunswick, Canada
Joined: November 27, 2008
KitMaker: 55 posts
Armorama: 54 posts
Posted: Monday, December 22, 2008 - 10:51 PM UTC
Thanks for the comments everyone.
James,nothing realy happened to it per se...I had just built this kit back about 10 or 15 years ago and it was basicaly an OOB build.It was in storage for about the past 7 years and I just thought it could use the refurbishment.I guess I was inspired by all the great Sherman builds on this forum.So,tore it down and began the resurection of one of my favorite pieces of armor.
Just to let you know,work has been progressing;just have'nt gotten around to taking pics of this progress yet.Bogeys are done and half of these are primered.This is due to my running out of primer.I also started adding the PE parts from the Aber set which is absolutely outstanding.Way more stuff there than I thought there would be.There's even a seperate fret specificaly for the Ma Deuce.(M2)WOW!!!!!Hope to have progress pics up before Christmas but things have been a little crazy this holliday seasonfor some reason.
Thanks again for the kind words everyone and happy hollidays to you and yours,
Ron.
 _GOTOTOP