_GOTOBOTTOM
Armor/AFV
For discussions on tanks, artillery, jeeps, etc.
Vajra Miniatures' Boxer MRAV
Henk
Visit this Community
England - South West, United Kingdom
Joined: August 07, 2004
KitMaker: 6,391 posts
Armorama: 4,258 posts
Posted: Tuesday, December 09, 2008 - 01:13 PM UTC
Hi all,

To complement the review for this new kit by Vajra Miniatures, I will do a blow by blow of the building progress. As the instructions are typical for the genre (not very good..), it will be much of a trail and error story.

After examining the individual parts and some tentative dry fitting, we first need a plan of attack to determine the order in which we are going to work. The initial dry fitting indicated that some remedial force would be needed to get the four main components for the hull to fit correctly. I therefore decided to complete the hull before moving to the suspension, and to add the various hull and roof fittings to finish.

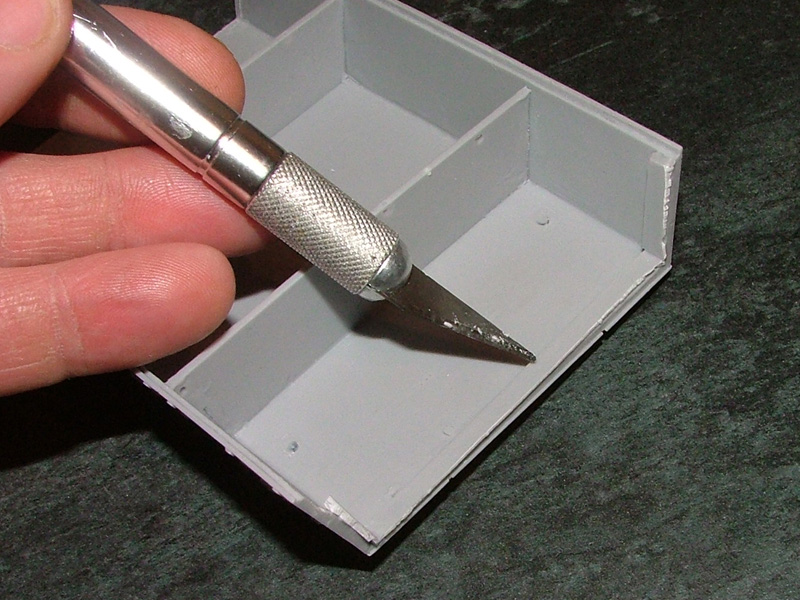
A very small twist in the lower hull was quickly resolved by holding the part over a boiling kettle, and gently twisting the rear to it's appropriate position. Cleaning up the considerable pour plugs is a bit of a chore, but the softish resin is easily worked with both razor saw and exacto knife.


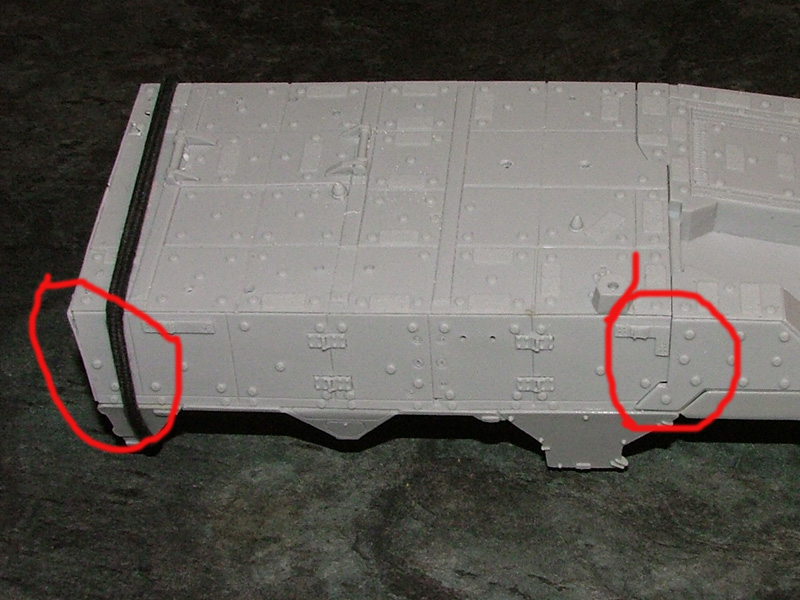
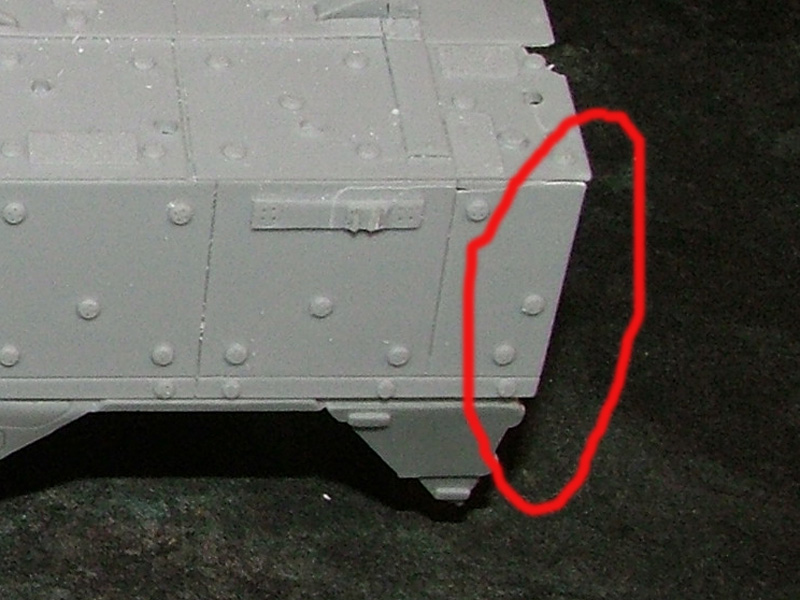
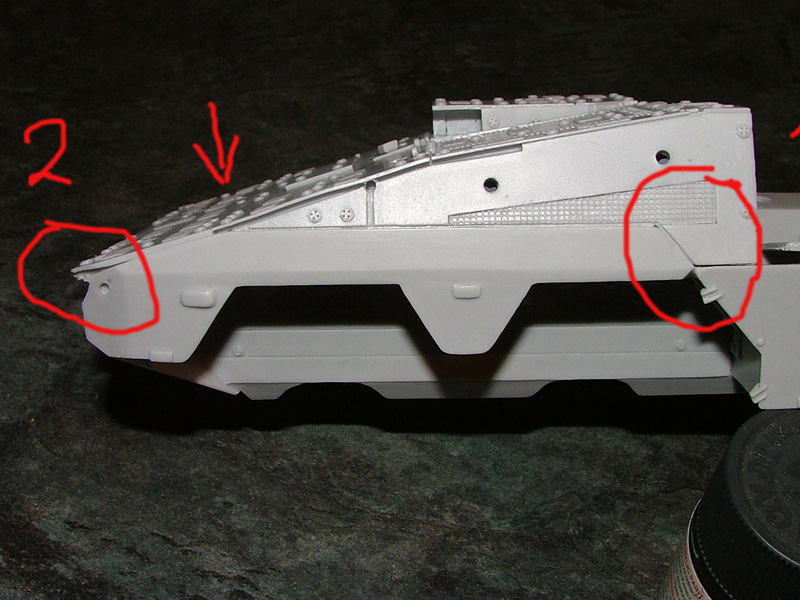
Starting at the front, the front upper hull is easy to line up correctly, as the corner under the air outlet (circled) should fit flush to the lower hull. There is an accuracy issue here, but more about that later. Right now, we want to fit the hull components. Note where the angle of the upper hull meets the lower hull (arrowed), this should be flush. If it is stepped, you are too far back. In my kit this results in the front of the upper hull sticking out over the front of the lower hull by a milimeter or two (circled 2). Again, this is part of an accuracy problem which I will come to later.


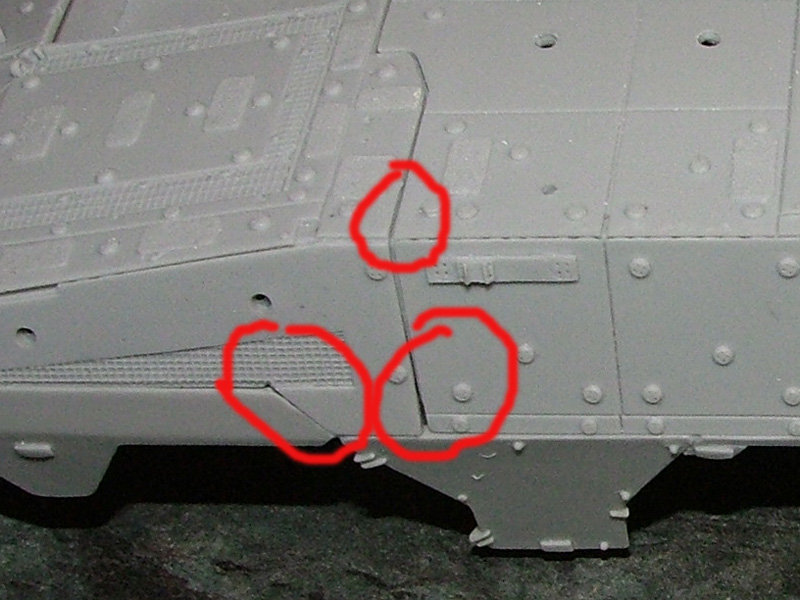
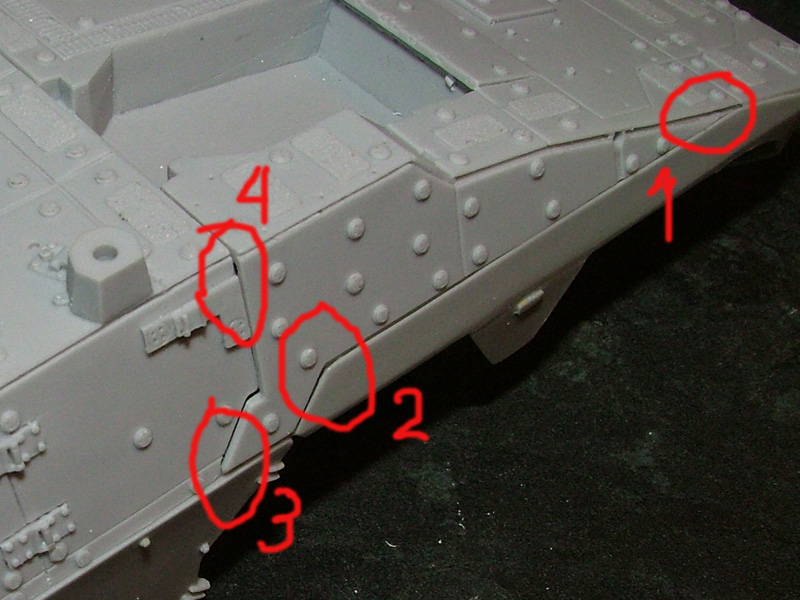
When the parts are lined up correctly, apply a fairly generous amount of CA, and repeat the process on the other side. The photo shows the rear section in place, but don't worry about that right now. You need to check that the point circled 1 and 2 line up correctly. The 'gap' you can see between the upper and lower hull is intentional, and should actually be a little bit bigger. The section of the lower hull that connects to the upper hull is in reality a separate part, that is fitted a few centimetres proud of the hull. The model tries to replicate this with a simplified one piece casting, which is not entirely successful. This is part of the problem with the front, which I will explain when I attach the nose section.


Next step is the rear section of the hull. On the real vehicle this section is a removable module, which can be interchanged to optimise the vehicle for a specific operation. The kit stays true to this concept, in that the rear section is separate and has a separate floor section, but it is not removable as such.


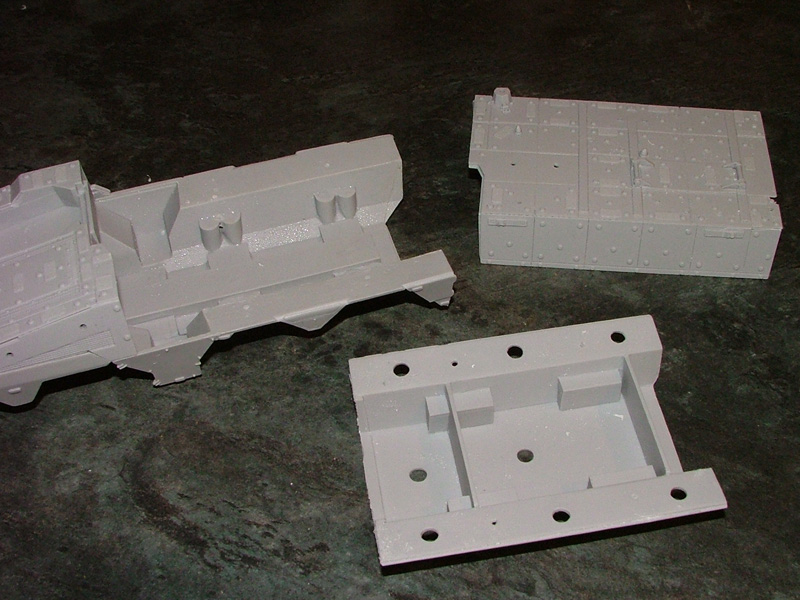
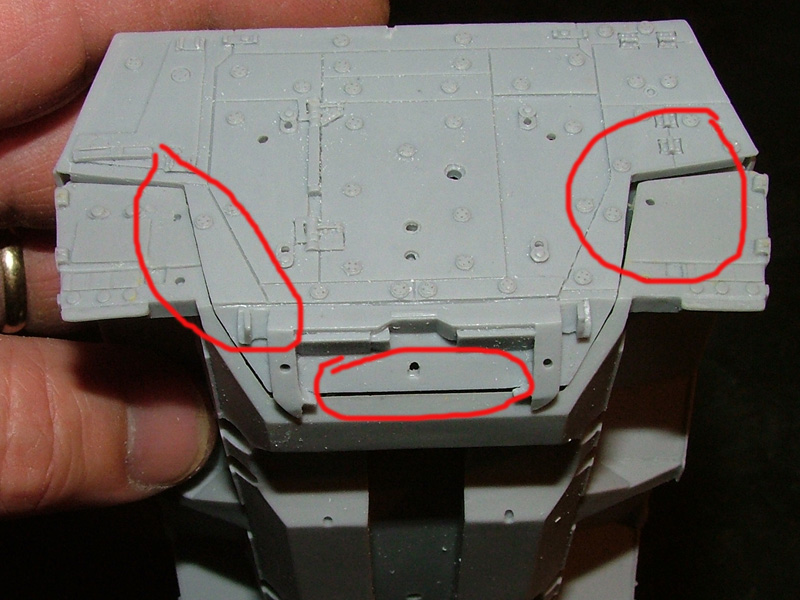
First we position the floor section. I removed the locating pins, as they did not line up exactly, and they are not really needed any way. Do not glue at this point...


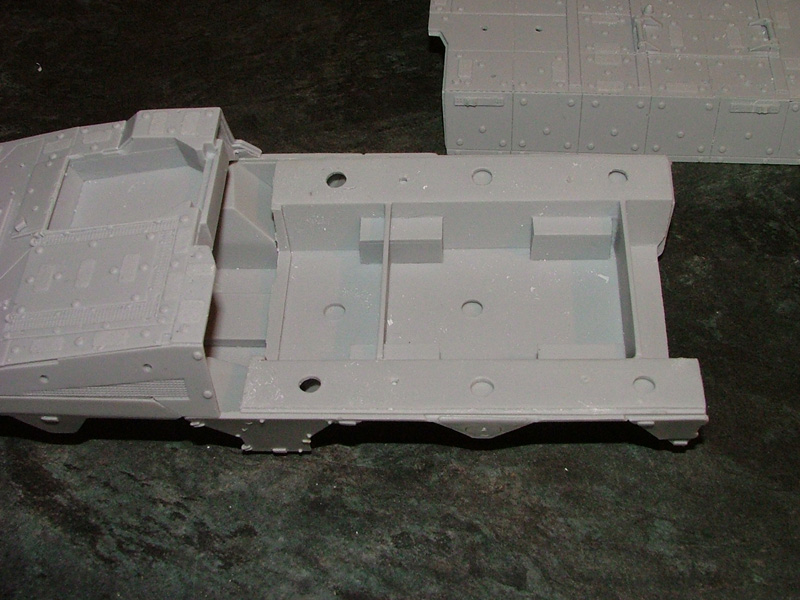
Next the upper hull section is positioned so as to line up correctly at the rear of the vehicle. As this part of the construction gets a bit involved, I'll tackle it tomorrow.

Cheers
Henk
Henk
Visit this Community
England - South West, United Kingdom
Joined: August 07, 2004
KitMaker: 6,391 posts
Armorama: 4,258 posts
Posted: Tuesday, December 09, 2008 - 01:38 PM UTC
Ohh, seeing as this is a resin kit, I might as well install the "blood drawn-o-meter" for my Exacto knife.

ONE (ring finger left hand)


CMOT
Staff MemberEditor-in-Chief
ARMORAMA
Visit this Community
England - South West, United Kingdom
Joined: May 14, 2006
KitMaker: 10,954 posts
Armorama: 8,571 posts
Posted: Tuesday, December 09, 2008 - 05:40 PM UTC
Henk I know squat about this vehicle, and have very little experience of resin kits. But a positive that I see is the resin components look more like injection model plastic, rather than huge solid lumps of resin.
iamsu7
Vendor
TRUMPETER
Visit this Community
Anhui, China / 简体
Joined: July 22, 2008
KitMaker: 354 posts
Armorama: 339 posts
Posted: Tuesday, December 09, 2008 - 06:10 PM UTC

CB1000h
Visit this Community
Pennsylvania, United States
Joined: March 01, 2006
KitMaker: 358 posts
Armorama: 304 posts
Posted: Tuesday, December 09, 2008 - 07:24 PM UTC
Can you post full pic of this vehicle
I dont think I have ever seen one
Henk
Visit this Community
England - South West, United Kingdom
Joined: August 07, 2004
KitMaker: 6,391 posts
Armorama: 4,258 posts
Posted: Wednesday, December 10, 2008 - 12:17 AM UTC
a superb 'walk around' can be found on the excellent Prime Portal site.

Boxer walk around


The vehicle in this walk around is the correct one to compare the model to.


t_kuehn
Visit this Community
Germany
Joined: March 23, 2008
KitMaker: 29 posts
Armorama: 26 posts
Posted: Thursday, December 11, 2008 - 05:35 AM UTC
Hello Henk!

Where do you have this model kit from? I can't find any distributor in the internet.

Best regards from Germany

Tobias
Henk
Visit this Community
England - South West, United Kingdom
Joined: August 07, 2004
KitMaker: 6,391 posts
Armorama: 4,258 posts
Posted: Friday, December 12, 2008 - 12:03 AM UTC

(picture by Frank Baunach and hosted on Prime Portal) .

This is a full picture of the Boxer Wayne. The vehicle is quite a bit longer and about the same width as a Stryker.

Don Busack has kindly allowed me to use the superb walk around pictures from Moritz Schulze to illustrate my Blog. If you know Prime Portal, it needs no introduction. If you don't, you must check it out here . You will be hard pushed to find a better, and more varied, collection of reference photos.

Tobias,
Armorama received the kit direct from the company Vajra Miniatures, and they told me that at this moment, they have not yet finalised a distributor. You can contact them direct via their website however, I found them to respond quickly to my queries.

Henk
Henk
Visit this Community
England - South West, United Kingdom
Joined: August 07, 2004
KitMaker: 6,391 posts
Armorama: 4,258 posts
Posted: Friday, December 12, 2008 - 12:53 AM UTC
The next step is attaching the rear upper hull module. This is an involved step, which requires plenty of dry fitting, and some careful trimming of the parts. Study of the reference pictures shows that there is a small gap between the front and rear hull parts, and that the rear of the module lines up slightly inside the rear of the bottom hull.


Dry fitting the upper hull part indicates that this is not quite the case, and when the rear is lined up correctly, there is no discernible gap between the upper hull parts. Unfortunately trimming the hull is not really an option, so I decided to live with the lack of gap, and rely on accentuating that later with paint effects.


Note how the two parts fit flush (circled right), and also the slight step between the front and rear. The rear of the hull lines up almost right, but should really be a little more forward.

After the glue had set, I noticed that the left hand side had moved a little bit, and now did have a slight gap towards the front.


This has resulted in the rear sticking out slightly, but as the rear hull fits, and it all looks o.k., I have decided to leave it. The picture angle makes it look worse than it is.


At the same time, the rear hull plate (which is also a one piece casting, with no separate door) needs to be fitted, and here I needed some trimming to fit it flush with the upper hull. There is a noticable gap where it connects to the lower hull, but this gap is easily filled with some CA. The cicled gap on the right is no problem, as that will resolve when everything is glued together. The gap on the left is about right, as this is where the separate module connects with the lower hull, and there is a gap on the real vehicle as well.


After all the parts have been fitted and trimmed, it remains to apply CA, and hold the parts together with an elastic band or such. This will also gently force the lower hull parts into the right position, and completes the first step of the build process.


Henk
Visit this Community
England - South West, United Kingdom
Joined: August 07, 2004
KitMaker: 6,391 posts
Armorama: 4,258 posts
Posted: Wednesday, December 17, 2008 - 11:16 AM UTC
A further instalment will be added tomorrow, showing how the suspension goes together. This is going to be interesting, as half the wishbone parts are missing...

(queue Dallas or Eastenders type theme tune.... if that doesn't get you interested, I don't know what will...)

GunTruck
Visit this Community
California, United States
Joined: December 01, 2001
KitMaker: 5,885 posts
Armorama: 3,799 posts
Posted: Wednesday, December 17, 2008 - 11:44 AM UTC
Henk - thank you for the Blog! This is very interesting to follow, as I'm thinking about getting one. It is nice to see what you're encountering during the assembly process - so much more there than what presents in a In-Box Review.

Valuable stuff!
CMOT
Staff MemberEditor-in-Chief
ARMORAMA
Visit this Community
England - South West, United Kingdom
Joined: May 14, 2006
KitMaker: 10,954 posts
Armorama: 8,571 posts
Posted: Wednesday, December 17, 2008 - 07:36 PM UTC
This kit looks to have a few problems, however nothing that can't be fixed.
Bigskip
Visit this Community
England - South East, United Kingdom
Joined: June 27, 2006
KitMaker: 2,487 posts
Armorama: 357 posts
Posted: Wednesday, December 17, 2008 - 08:26 PM UTC
Henk.

Very interesting to watch, i'm gonna have to do a blog of the Buffalo MRCV to follow suit.

Whats the latest on the injury count?

Andy
bison126
Visit this Community
Correze, France
Joined: June 10, 2004
KitMaker: 5,329 posts
Armorama: 5,204 posts
Posted: Wednesday, December 17, 2008 - 09:27 PM UTC
Thanks for sharing your build. It's nice to see more and more modern armor popping up those times !
Your pics give an overall feeling of quite a decent kit of the Boxer despite some flaws but which kit doesn't have ?
Henk
Visit this Community
England - South West, United Kingdom
Joined: August 07, 2004
KitMaker: 6,391 posts
Armorama: 4,258 posts
Posted: Thursday, February 19, 2009 - 03:38 AM UTC
Right, just before I'm off again, a quick update.

I finished the kit, but have not really had a change to upload pics, less to write down a detailed step by step of the process. I will however try to get this finished as soon as I come back. In the mean time, to wet your appetite, here is a picture of the painting in progress. PLease note, that the mirrors are very fragile...


see you soon

newfish
Visit this Community
England - West Midlands, United Kingdom
Joined: June 23, 2008
KitMaker: 2,329 posts
Armorama: 2,110 posts
Posted: Thursday, February 19, 2009 - 03:45 AM UTC
Looking good Henk, Shame about the problems!.

But you've turned this kit into a cracker

 _GOTOTOP