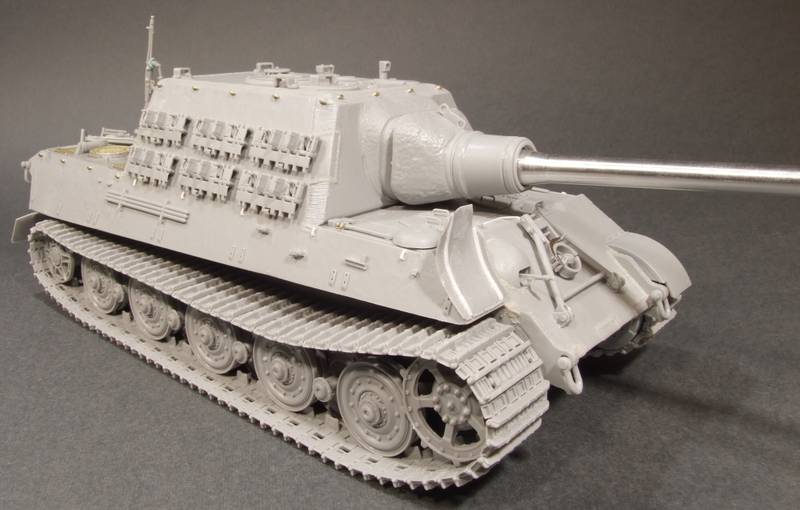
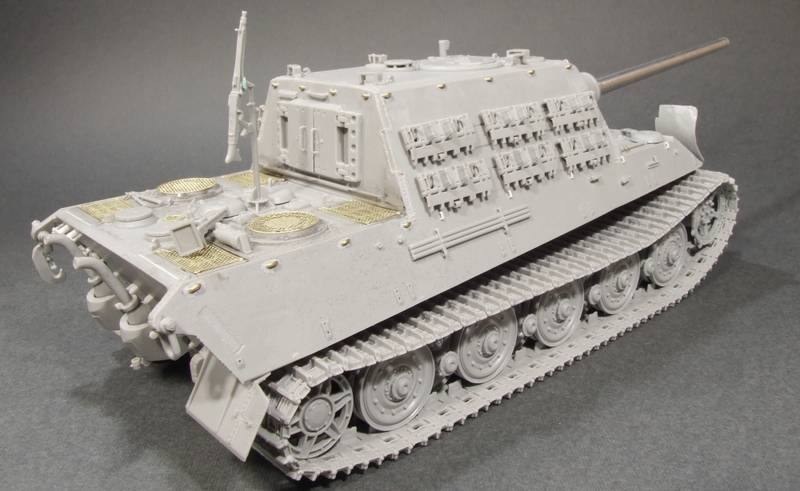
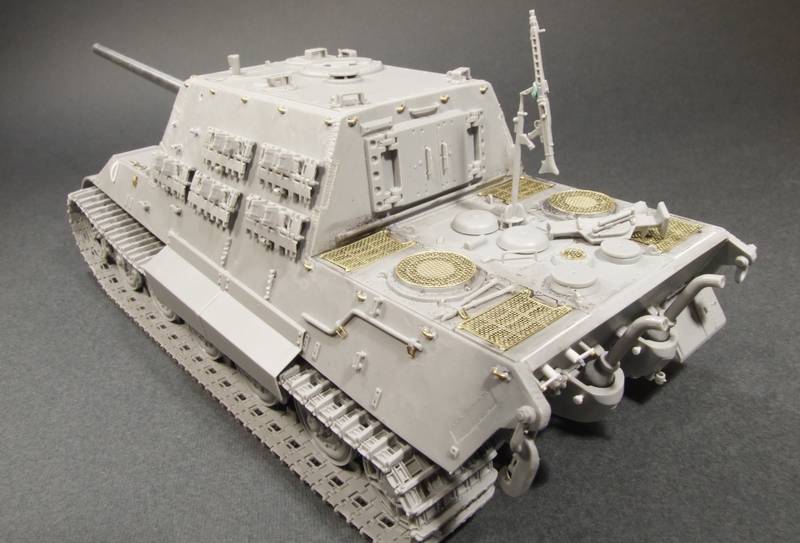
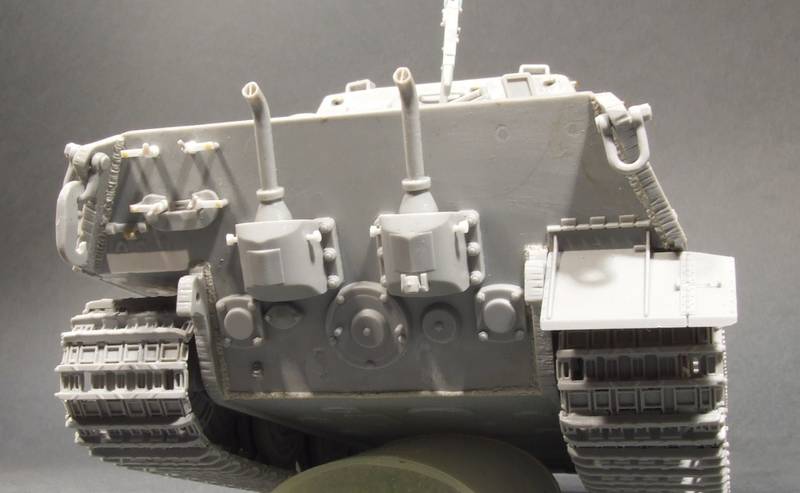
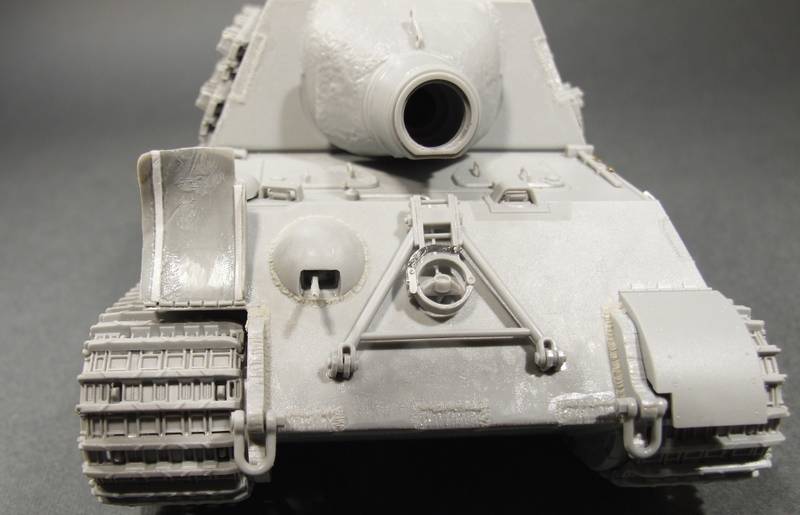
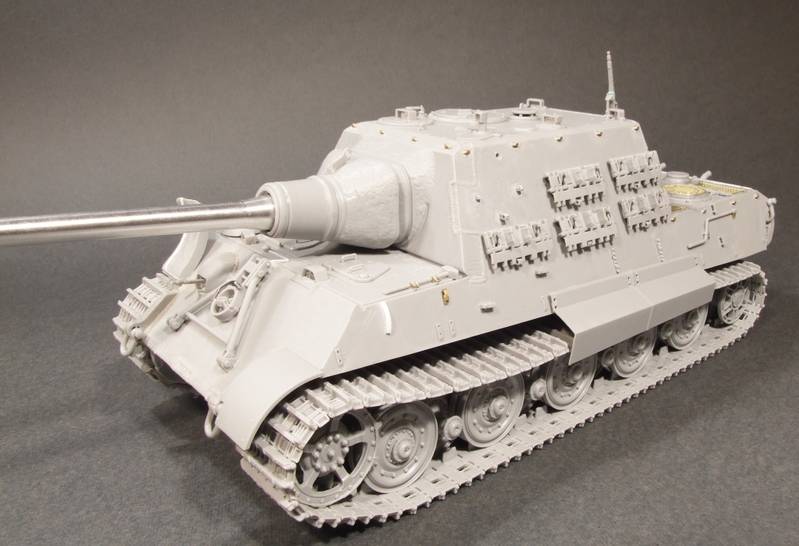
This is something I built a few months ago. Didn´t get much farther with it .. but it is primed. The Aber zoom set was used instead of the kit supplied grills as they were so much nicer, and a few little bits a pieces added to give detail ... much of which is based upon images of X7, after it was knocked out by friendly fire (supposedly). It was more as an exercise on weld techniques ... using both stretched sprue and magic sculpt with the Lee Lloyd method using a hypodermic needle.
Hosted by Darren Baker
Dragon Jagdtiger built (X7)
Posted: Sunday, January 18, 2009 - 07:06 AM UTC
wbill76
Texas, United States
Joined: May 02, 2006
KitMaker: 5,425 posts
Armorama: 4,659 posts
Joined: May 02, 2006
KitMaker: 5,425 posts
Armorama: 4,659 posts
Posted: Sunday, January 18, 2009 - 07:10 AM UTC
Looks ready to go for some serious painting and weathering Frank, the welds look the part so I'd say your exercise was a success.
Abydos
New York, United States
Joined: August 11, 2005
KitMaker: 231 posts
Armorama: 225 posts
Joined: August 11, 2005
KitMaker: 231 posts
Armorama: 225 posts
Posted: Sunday, January 18, 2009 - 04:25 PM UTC
Good job so far,looks very authentic..
jug-junkie
Gauteng, South Africa
Joined: September 19, 2005
KitMaker: 15 posts
Armorama: 4 posts
Joined: September 19, 2005
KitMaker: 15 posts
Armorama: 4 posts
Posted: Sunday, January 18, 2009 - 07:06 PM UTC
Beautiful work indeed! Would love to see your paint work in a step by step thread.
Geoff
Geoff
spitfire303
Vendee, France
Joined: December 22, 2006
KitMaker: 1,437 posts
Armorama: 1,406 posts
Joined: December 22, 2006
KitMaker: 1,437 posts
Armorama: 1,406 posts
Posted: Sunday, January 18, 2009 - 07:48 PM UTC
Very good job. Very clean build. I've made an X7 myself. Just a small detail if I may. The MG support was in a lower left corner of the engine cover. There are even pre drilled holes in the engine cover in those two positions. But it's a really small detail that doesn't really count. Did you decide how will you paint it?
spit
spit
GeraldOwens
Florida, United States
Joined: March 30, 2006
KitMaker: 3,736 posts
Armorama: 3,697 posts
Joined: March 30, 2006
KitMaker: 3,736 posts
Armorama: 3,697 posts
Posted: Sunday, January 18, 2009 - 08:15 PM UTC
Quoted Text
This is something I built a few months ago. Didn´t get much farther with it .. but it is primed. The Aber zoom set was used instead of the kit supplied grills as they were so much nicer, and a few little bits a pieces added to give detail ... much of which is based upon images of X7, after it was knocked out by friendly fire (supposedly). It was more as an exercise on weld techniques ... using both stretched sprue and magic sculpt with the Lee Lloyd method using a hypodermic needle.
Looking good. Couple of possible tweaks. The curved segments at the base of the machine gun pedestal are actually segments of steel rod or tubing, though Dragon has molded them as solid, crescent shaped sections of plastic. They would benefit from replacement with some .030" styrene rod (or just swipe the pedestal from the new Tamiya Jagdtiger, which is supposed to depict the 653rd Battalion--it was seldom seen on the 653rd's vehicles, anyway). And if you can get one of the new Gen 2 figure sets with a machine gun sprue included, you'll find that the new MG-42 machine gun now includes the cooling slots on top of the gun sleeve as well as the side, which looks much better than the old kit version.
Also, Dragon depicts the gun tube as too recessed in the mantlet sleeve, so be aware when fixing the metal gun--the taper on the tube begins right at the edge of the sleeve, not inside it.
tjkelly
Maryland, United States
Joined: May 04, 2007
KitMaker: 1,132 posts
Armorama: 1,123 posts
Joined: May 04, 2007
KitMaker: 1,132 posts
Armorama: 1,123 posts
Posted: Sunday, January 18, 2009 - 10:06 PM UTC
Looking good Frank, your welds came out great. Nice suttle damage as well, nice touch with the way the front fender is positioned. Will be following your post here waiting on some color!
Thanks for sharing! Cheers -
Tim
Thanks for sharing! Cheers -
Tim
Posted: Sunday, January 18, 2009 - 11:22 PM UTC
Thanks very much guys for your very kind comments. Much appreciated. This will be a three tone hard edge camo, so will take some time to plan out "what and how".
Thanks Bill. Im glad you think they´re OK. Im quite happy with them myself. Much easier than what I thought also. The magic sculpt tip Id recommend to anybody. Id knocked out a few tanks in the last 2 years with, little or no, personal development, so I thought it was high time to add a new trick to the tools box.
Hi Pawel. Thanks for dropping in. Ive seen your excellent X7, but it was "The last Befehlspanzer VI ausf B" that inspired me to build this. I loved all the little details you improved upon, and this was the only late war and big cat I had. I wont change the position of the machine gun arm at this stage as its primed.
Hi Gerald. Some great tips as always. I noticed the machine gun support a day after priming it. I wont change the details or the position at this stage ... this is something I can live with. I have several Gen II figure sets, so I hopefully have the better MG-42. The metal pipe is not fixed ... just placed for the photos .... but I´ll be keeping a careful eye on that one. Thanks very much.
Hi Geoff. I´ll try to do that here.
Thanks once again chaps.
Quoted Text
the welds look the part so I'd say your exercise was a success.
Thanks Bill. Im glad you think they´re OK. Im quite happy with them myself. Much easier than what I thought also. The magic sculpt tip Id recommend to anybody. Id knocked out a few tanks in the last 2 years with, little or no, personal development, so I thought it was high time to add a new trick to the tools box.
Quoted Text
Very good job. Very clean build. I've made an X7 myself.
Hi Pawel. Thanks for dropping in. Ive seen your excellent X7, but it was "The last Befehlspanzer VI ausf B" that inspired me to build this. I loved all the little details you improved upon, and this was the only late war and big cat I had. I wont change the position of the machine gun arm at this stage as its primed.
Quoted Text
Looking good. Couple of possible tweaks. The curved segments at the base of the machine gun pedestal are actually segments of steel rod or tubing, though Dragon has molded them as solid, crescent shaped sections of plastic. They would benefit from replacement with some .030" styrene rod (or just swipe the pedestal from the new Tamiya Jagdtiger, which is supposed to depict the 653rd Battalion--it was seldom seen on the 653rd's vehicles, anyway). And if you can get one of the new Gen 2 figure sets with a machine gun sprue included, you'll find that the new MG-42 machine gun now includes the cooling slots on top of the gun sleeve as well as the side, which looks much better than the old kit version.
Also, Dragon depicts the gun tube as too recessed in the mantlet sleeve, so be aware when fixing the metal gun--the taper on the tube begins right at the edge of the sleeve, not inside it.
Hi Gerald. Some great tips as always. I noticed the machine gun support a day after priming it. I wont change the details or the position at this stage ... this is something I can live with. I have several Gen II figure sets, so I hopefully have the better MG-42. The metal pipe is not fixed ... just placed for the photos .... but I´ll be keeping a careful eye on that one. Thanks very much.
Quoted Text
Would love to see your paint work in a step by step thread.
Hi Geoff. I´ll try to do that here.
Thanks once again chaps.
scratchmod
Massachusetts, United States
Joined: November 07, 2008
KitMaker: 796 posts
Armorama: 763 posts
Joined: November 07, 2008
KitMaker: 796 posts
Armorama: 763 posts
Posted: Monday, January 19, 2009 - 02:40 AM UTC
A very impressive Jagdtiger Frank. I love the weld seams they came out great and a nive clean build too. Looking foward to seeing some paint on that bad boy.
Rob
Rob
bill_c
Campaigns Administrator
New Jersey, United States
Joined: January 09, 2008
KitMaker: 10,553 posts
Armorama: 8,109 posts
Joined: January 09, 2008
KitMaker: 10,553 posts
Armorama: 8,109 posts
Posted: Monday, January 19, 2009 - 05:07 AM UTC
Quoted Text
It was more as an exercise on weld techniques ... using both stretched sprue and magic sculpt with the Lee Lloyd method using a hypodermic needle.
???????????
$#@%ing awesome, Frank. I have this one on my "wish list" now.
SIRNEIL
England - South East, United Kingdom
Joined: July 30, 2007
KitMaker: 658 posts
Armorama: 599 posts
Joined: July 30, 2007
KitMaker: 658 posts
Armorama: 599 posts
Posted: Monday, January 19, 2009 - 06:51 AM UTC
hi frank
could you please tell me/us a little bit more about how you created the weld's.
cheer's frank
neil.........
Quoted Text
using both stretched sprue and magic sculpt with the Lee Lloyd method using a hypodermic needle.
could you please tell me/us a little bit more about how you created the weld's.
cheer's frank
neil.........
FredRMA
California, United States
Joined: March 01, 2006
KitMaker: 72 posts
Armorama: 66 posts
Joined: March 01, 2006
KitMaker: 72 posts
Armorama: 66 posts
Posted: Monday, January 19, 2009 - 07:51 AM UTC
Great looking kit. I am building this same kit and would like to ask what you used for all the little handles around the "turret" and hull.
Posted: Monday, January 19, 2009 - 08:15 AM UTC
Thanks guys for your very kind comments. Much appreciated.
Hi Neil. I followed Lee Lloyd´s excellent articles HERE on Armorama. I used Magic sculpt instead of Milliput.
Hi Fred. This kit comes with small canvas ties on the etch sheet, but as they are so small and almost invisible (also hard to work with my 10 thumbs), I decided to replace with wire. My choice of wire is a little too thick though ..... something inbetween would have better.
Quoted Text
could you please tell me/us a little bit more about how you created the weld's.
Hi Neil. I followed Lee Lloyd´s excellent articles HERE on Armorama. I used Magic sculpt instead of Milliput.
Quoted Text
am building this same kit and would like to ask what you used for all the little handles around the "turret" and hull.
Hi Fred. This kit comes with small canvas ties on the etch sheet, but as they are so small and almost invisible (also hard to work with my 10 thumbs), I decided to replace with wire. My choice of wire is a little too thick though ..... something inbetween would have better.
Posted: Monday, January 19, 2009 - 08:29 AM UTC
Frank,
Exellent job of getting things right on this big cat! I have this one in the stash and am looking forward to seeing how you are doing the finish on this one . . . looks soooooo good already! Yeah, those welds sure look realistic, I'll have to give Lee Loyd's article a look-see!!!
-Eddy
Exellent job of getting things right on this big cat! I have this one in the stash and am looking forward to seeing how you are doing the finish on this one . . . looks soooooo good already! Yeah, those welds sure look realistic, I'll have to give Lee Loyd's article a look-see!!!
-Eddy
Tojo72
North Carolina, United States
Joined: June 06, 2006
KitMaker: 4,691 posts
Armorama: 3,509 posts
Joined: June 06, 2006
KitMaker: 4,691 posts
Armorama: 3,509 posts
Posted: Monday, January 19, 2009 - 09:51 AM UTC
Coming very nice Frank,can't wait to see the paint job.Is that Dragon #6285.....I have that one in the stash ??
spitfire303
Vendee, France
Joined: December 22, 2006
KitMaker: 1,437 posts
Armorama: 1,406 posts
Joined: December 22, 2006
KitMaker: 1,437 posts
Armorama: 1,406 posts
Posted: Monday, January 19, 2009 - 10:20 AM UTC
Nice to hear that you'll be painting it in a hard edged pattern. There has been so many discussions about the colours, the camouflage of this very vehicle. From plain dark yellow through soft edegd to hard edged. can't wait see it painted. Oh, one question. The tracks are already glued on the wheels?
spit
spit
varanus
Illinois, United States
Joined: November 22, 2007
KitMaker: 54 posts
Armorama: 53 posts
Joined: November 22, 2007
KitMaker: 54 posts
Armorama: 53 posts
Posted: Wednesday, January 21, 2009 - 01:27 PM UTC
Hi Frank,
looks good, I'm looking forward to some paint...a few questions for you ( if you don't mind )
I'm working on 2 of these brutes for a dio.
#1 - did you have any problems fitting? I did a few "dry runs" and had a hell of a time with the gun & opening on the turrert. I never got it to fit right, and was going back and forth in a "sliding & dropping" motion, hope that makes sense.
#2 - at the top of both front drive fenders I have a gap, it's small but noticable. The rest of the fit is good so I'm not sure where I'm going wrong. Did you notice this?
thanks,
Bryan
also "Burner" is one hell of a MH tune...................................
Posted: Wednesday, January 21, 2009 - 10:55 PM UTC
Thanks for dropping in guys and for the kind comments.
Yes ... see THIS thread that Burak has started ... same kit.
Hi Bryan. Im not 100% sure what you mean. Could you add an image with some arrows?
The front plate, that the gun is fixed to was not a snug fit if I remember correctly. I think I had to shave some plastic to make it fit better. The butt-locks didnt fit snugly either.. and there werelittle gaps afterwards ... but adding the magic sculpt welds have hidden this. Cant remember any fender gaps, was it underneath? I usually stretch some plastic sprue and cement it in position. Then shave it down and sand. I had fun building this, so didnt bother stopping to take pictures or notes.
I have sprayed the base colour ... bright green/pea green!!!!!! From some searches on ML and time-frame guidelines .. this is something I though would be different ... or even appropriate I havent started the camo yet ... buff and light brown probably... as Im dreading the hard edge camo.
Is there any chance these came in soft edge camo? Anyone?
Yes. The only things that are kept seperate are the gun barrel, the side fender piece, the machine gun and the jack, to throw on top. Everything else is one assembly.
I spray the whole of the lower model track-brown first and then the base colour is added, avoiding the tracks as much as possible. These can be touched up again later with a brush.
Quoted Text
Is that Dragon #6285.....?
Yes ... see THIS thread that Burak has started ... same kit.
Quoted Text
did you have any problems fitting?
Hi Bryan. Im not 100% sure what you mean. Could you add an image with some arrows?
The front plate, that the gun is fixed to was not a snug fit if I remember correctly. I think I had to shave some plastic to make it fit better. The butt-locks didnt fit snugly either.. and there werelittle gaps afterwards ... but adding the magic sculpt welds have hidden this. Cant remember any fender gaps, was it underneath? I usually stretch some plastic sprue and cement it in position. Then shave it down and sand. I had fun building this, so didnt bother stopping to take pictures or notes.
Quoted Text
There has been so many discussions about the colours, the camouflage of this very vehicle. From plain dark yellow through soft edegd to hard edged.
I have sprayed the base colour ... bright green/pea green!!!!!! From some searches on ML and time-frame guidelines .. this is something I though would be different ... or even appropriate I havent started the camo yet ... buff and light brown probably... as Im dreading the hard edge camo.
Is there any chance these came in soft edge camo? Anyone?
Quoted Text
Oh, one question. The tracks are already glued on the wheels?
Yes. The only things that are kept seperate are the gun barrel, the side fender piece, the machine gun and the jack, to throw on top. Everything else is one assembly.
I spray the whole of the lower model track-brown first and then the base colour is added, avoiding the tracks as much as possible. These can be touched up again later with a brush.
padawan_82
United Kingdom
Joined: December 10, 2008
KitMaker: 817 posts
Armorama: 555 posts
Joined: December 10, 2008
KitMaker: 817 posts
Armorama: 555 posts
Posted: Thursday, January 22, 2009 - 07:43 AM UTC
frank i can't wait to see this behemouth painted i've got the same kit sitting in my stash, were their any fit problems i should be aware of? also the tank your doing X7 do you happen to know who commanded it i'm trying to recall but for the life of me can't. cheers Ant
vonHengest
Texas, United States
Joined: June 29, 2010
KitMaker: 5,854 posts
Armorama: 4,817 posts
Joined: June 29, 2010
KitMaker: 5,854 posts
Armorama: 4,817 posts
Posted: Friday, July 09, 2010 - 05:06 AM UTC
Thanks for posting the link to your build on my thread, now that I'm a member here I can subscribe to it.
I remember looking at pictures of the X7 when I last ran across your build pics. From what I remember (this was sometime late last summer I think, '09) your Jagdtiger bore an awesome resemblance. Your build may have been mostly responsible for inspiring me to tackle the X8