Buskerud, Norway
Joined: July 31, 2005
KitMaker: 1,871 posts
Armorama: 1,423 posts
Posted: Wednesday, January 21, 2009 - 09:39 AM UTC
Belgium
Joined: March 17, 2005
KitMaker: 410 posts
Armorama: 383 posts
Posted: Wednesday, January 21, 2009 - 09:55 AM UTC
Hey Erik
Great choice of build. This one is on my to do list

Only problem is I need some revell Leopard1A5 kits

Don't know where to find them.
I like the progress you made on the Leopard 1. Do you have some close ups on the front grouser box?? It looks nicely build. I hope to see some paint and wheatering soon!
Keep it up
Cheers Roel
Buskerud, Norway
Joined: July 31, 2005
KitMaker: 1,871 posts
Armorama: 1,423 posts
Posted: Wednesday, January 21, 2009 - 10:15 AM UTC
Quoted Text
Do you have some close ups on the front grouser box?
Not at the moment, mate. It need some more detailing first.
Quoted Text
This one is on my to do list Only problem is I need some revell Leopard1A5 kits
Yup, I was lucky and got two some years ago. The second one will be yet another NO2
Erik
Btw,loved your article on the M-109A3GN in the latest issue of the Norwegian IPMS magazine. Hopefully they sent you a copy.
Scotland, United Kingdom
Joined: May 25, 2005
KitMaker: 2,218 posts
Armorama: 1,050 posts
Posted: Wednesday, January 21, 2009 - 10:39 AM UTC
That certainly seems to be coming on well Erik. Nice scratchbuilding.
I look forward to more pics mate.

Alberta, Canada
Joined: January 19, 2005
KitMaker: 4,085 posts
Armorama: 3,917 posts
Posted: Wednesday, January 21, 2009 - 12:54 PM UTC
Keep up the build....always good to see Leopard projects.
"We're not the public service of Canada, we're not just another department. We are the Canadian Forces, and our job is to be able to kill people."
July 2005- General R.J. Hillier (Retired), Former Chief of the Defence Staff
Nordrhein-Westfalen, Germany
Joined: August 01, 2006
KitMaker: 129 posts
Armorama: 113 posts
Posted: Wednesday, January 21, 2009 - 03:35 PM UTC
Heh, Roel,
what's that ? Shouldn't you concentrate on Belgian Leopards?
Though, I understand you ! I feel the same!
All the best
Harald
--------------------------------------
Eric,
I am looking forward to see your progress. Really fine Model!
Harald
Ontario, Canada
Joined: September 17, 2008
KitMaker: 54 posts
Armorama: 39 posts
Posted: Thursday, January 22, 2009 - 12:22 AM UTC
Hi Erik,
I was wondering which aftermarket barrel you were using on your Leopard? Is it the Perfect Scale resin barrel?
Cheers,
Duncan

PS The Leo looks good so far!
Buskerud, Norway
Joined: July 31, 2005
KitMaker: 1,871 posts
Armorama: 1,423 posts
Posted: Thursday, January 22, 2009 - 01:26 AM UTC
Quoted Text
I was wondering which aftermarket barrel you were using on your Leopard? Is it the Perfect Scale resin barrel?
It is the original kit barrel. It has just been primed for easier sanding of the glue seam.
Erik
Correze, France
Joined: June 10, 2004
KitMaker: 5,329 posts
Armorama: 5,204 posts
Posted: Thursday, January 22, 2009 - 07:03 AM UTC
Hi Erik,
I won't comment about accuracy, for sure you know much more about this version than I, but the additions are very nice.
I don't worry about your achievement with this project. I know it will turn out great !!
Visit my site Click the banner
"La reine des batailles, j'ai nommé l'infanterie"
Napoléon
Kansas, United States
Joined: July 20, 2003
KitMaker: 727 posts
Armorama: 648 posts
Posted: Thursday, January 22, 2009 - 07:46 AM UTC
Erik,
Nice build. One question what did you use to fill in the road wheel seams?
Rob
Rob Feehan
"vos can non redintegro bardus"
Buskerud, Norway
Joined: July 31, 2005
KitMaker: 1,871 posts
Armorama: 1,423 posts
Posted: Thursday, January 22, 2009 - 01:45 PM UTC
Quoted Text
what did you use to fill in the road wheel seams?
Tamiya liquid surface primer.
Texas, United States
Joined: March 05, 2003
KitMaker: 2,092 posts
Armorama: 1,607 posts
Posted: Thursday, January 22, 2009 - 03:08 PM UTC
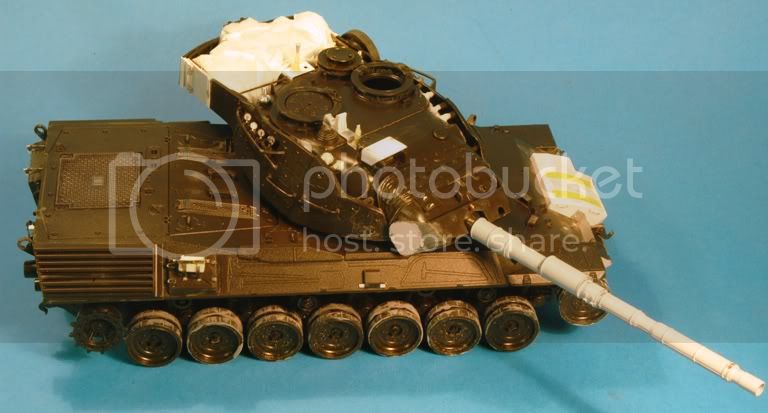
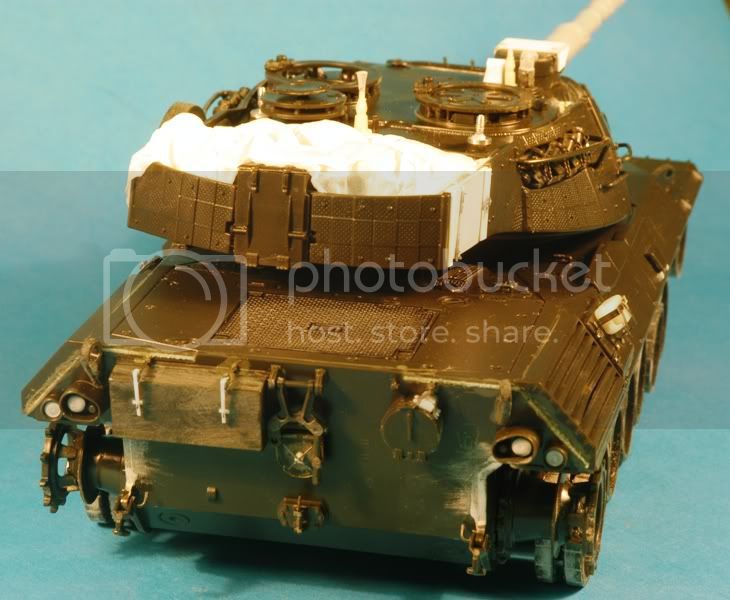
The rear bustle looks pretty neat filled out like that.
Did you do all the armor mounts?
Paul
Buskerud, Norway
Joined: July 31, 2005
KitMaker: 1,871 posts
Armorama: 1,423 posts
Posted: Thursday, January 22, 2009 - 05:39 PM UTC
Quoted Text
Did you do all the armor mounts?
No, I did not. When finished the turret will be partly covered with camo net, which will hide the fact that I was to lazy to redo all the mounts...
Erik
Buskerud, Norway
Joined: July 31, 2005
KitMaker: 1,871 posts
Armorama: 1,423 posts
Posted: Thursday, August 13, 2009 - 11:08 AM UTC
It has been a while since I did any work on this tank, but after finishing a wingy thingy I really felt the need to do some work on the Leo again. Revell's machinegun mount is basically two plastic rods with a small piece of plastic in between, so I challenged myself to scratchbuild a better mount. It might be a little out of scale since I used "eyeball mk1" to measure it, but in my opinion it turned out much better than the mount supplied by the kit. Judge for your self.
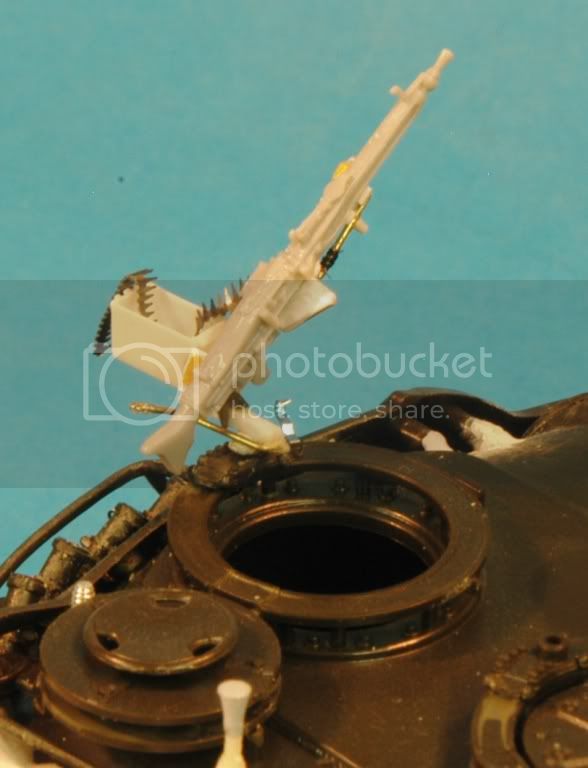


Erik
Texas, United States
Joined: March 05, 2003
KitMaker: 2,092 posts
Armorama: 1,607 posts
Posted: Thursday, August 13, 2009 - 05:44 PM UTC
The ammo box doesn't elevate with the gun?. What is the purpose of the rod in the back? Is it an elevation lock?
Looking good. Is that a resin MG3?
Paul
Buskerud, Norway
Joined: July 31, 2005
KitMaker: 1,871 posts
Armorama: 1,423 posts
Posted: Thursday, August 13, 2009 - 07:27 PM UTC
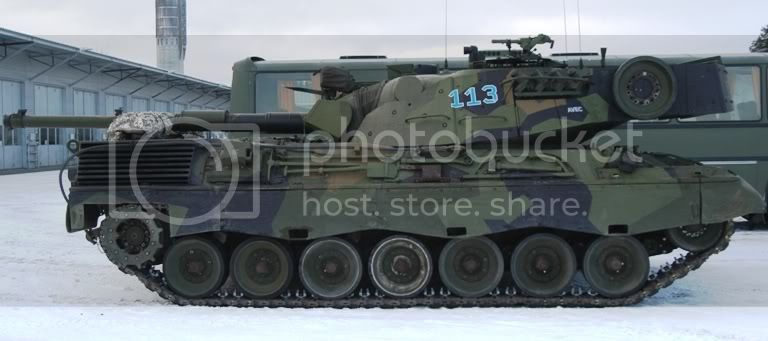
Quoted Text
The ammo box doesn't elevate with the gun?.
This picture shows pretty much how the ammo box works. The one in the picture is a bit different but is attached in the same way.

Quoted Text
What is the purpose of the rod in the back? Is it an elevation lock?
It is a lock preventing the weapon going side ways.
No, it is from Dragons Moder Machine gun set. It looks like a proper MG-3. The Revell version is a MG42.
Erik
Newfoundland, Canada
Joined: February 04, 2007
KitMaker: 473 posts
Armorama: 467 posts
Posted: Saturday, August 22, 2009 - 06:10 AM UTC
nice work so far I'm doing a 2A4NO
Ontario, Canada
Joined: August 05, 2003
KitMaker: 1,698 posts
Armorama: 1,563 posts
Posted: Saturday, August 22, 2009 - 08:46 AM UTC
Coming along Nice Erik! This one is worth doing for the splinter cammo and turret numbers alone. I've never been a fan of PE ammunition, I'd either leave it off or replace it with a link of 3-D ammo. There are a few sources in styrene and resin out there, IIRC Legends MAG-58 set has a couple links as do some of the Tamiya and DML weapons sets, though they may be tricky to impart the multiple bends you have done with the PE.
Cheers,
Graeme
Why plan when you can react?
Buskerud, Norway
Joined: July 31, 2005
KitMaker: 1,871 posts
Armorama: 1,423 posts
Posted: Saturday, October 10, 2009 - 09:23 AM UTC
Nordrhein-Westfalen, Germany
Joined: August 01, 2006
KitMaker: 129 posts
Armorama: 113 posts
Posted: Saturday, October 10, 2009 - 03:39 PM UTC
Hallo, Erik,
what a pleasing surprise that you are back again with your project.
Is the green colour only a primer or already the first camouflage colour?
Please, keep us updated. I am looking forward to your progress.
Harald
"It is always good to see a Leopard"
Buskerud, Norway
Joined: July 31, 2005
KitMaker: 1,871 posts
Armorama: 1,423 posts
Posted: Saturday, October 10, 2009 - 09:15 PM UTC
Quoted Text
Is the green colour only a primer or already the first camouflage colour?
It was supposed to be the first color, but I'm not happy with how it came out so I will re-spray with another shade of green.
Erik
Correze, France
Joined: June 10, 2004
KitMaker: 5,329 posts
Armorama: 5,204 posts
Posted: Sunday, October 11, 2009 - 07:09 AM UTC
Hi Erik,
is it me or is there a horizontal seam line on the first part of the gun tube ?
Nice to see this one popping up again.
Olivier
Visit my site Click the banner
"La reine des batailles, j'ai nommé l'infanterie"
Napoléon
Buskerud, Norway
Joined: July 31, 2005
KitMaker: 1,871 posts
Armorama: 1,423 posts
Posted: Sunday, October 11, 2009 - 08:31 AM UTC
Quoted Text
is it me or is there a horizontal seam line on the first part of the gun tube ?
It is you...

The seam has been properly filled and sanded, and I can not see it on a close inspection.
Erik
Ontario, Canada
Joined: September 28, 2006
KitMaker: 2,672 posts
Armorama: 2,475 posts
Posted: Sunday, October 11, 2009 - 10:11 AM UTC
Quoted Text
Hi Erik,
is it me or is there a horizontal seam line on the first part of the gun tube ?
Nice to see this one popping up again.
Olivier
Yes there is. It's where the two halves of the thermal cover meet and it's supposed to be there.
Nice build so far!
cheers
One of the serious problems in planning against Canadian doctrine is that the Canadians do not read their manuals, nor do they feel any obligations to follow their doctrine.
---From a Russian document
------------------------------------------------
Buskerud, Norway
Joined: July 31, 2005
KitMaker: 1,871 posts
Armorama: 1,423 posts
Posted: Sunday, October 18, 2009 - 10:20 AM UTC
I have started the paintjob and as you see there is a lot of work left. It needs a lot of touch ups due to the painters lazyness with maskingtape... However, the worst part is done.


I made license plates from lead foil and numbers shaved off an old sprue.