

WOW thats incredible Carmen, top job! the paint and weathering is very well thought out and implemented, "that bloody red dust gets everywhere"
Just a question
for your dpcu paint scheme, are you able to post the brand/colour code number that you have used? I just cant seem to get the right light/dark brown on my attempts
Hosted by Darren Baker
Aussie Abrams Build

bloodzy

Joined: April 14, 2009
KitMaker: 25 posts
Armorama: 16 posts

Posted: Thursday, September 03, 2009 - 09:43 AM UTC

jasmils
Joined: December 23, 2003
KitMaker: 1,016 posts
Armorama: 745 posts

Posted: Thursday, September 03, 2009 - 12:10 PM UTC
I hope this can help? Sorry, no paint numbers as yet.
As you can see, there are five colors in the pattern.
Cheers Jason

As you can see, there are five colors in the pattern.
Cheers Jason
csmanning

Joined: March 23, 2008
KitMaker: 333 posts
Armorama: 321 posts
Posted: Thursday, September 03, 2009 - 01:23 PM UTC
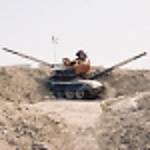
http://www.kamouflage.net/camouflage/00001.php
This was the image I tried to match. I think my dark green is off a bit but in my opinion after some weathering and dry brushing color shades change in real life... so as long as my colors are close I'm a happy guy.
I wasn't going to go out and purchase paint just to paint the pack so I used Model Color Vallejo Model Air paints. They're thinned down for airbrush use so I simply let them dry thoroughly before moving onto the next color. All colors listed above are Model Air except the Model Color Yellow Green for the base color. I hope that helps!
csmanning
Joined: March 23, 2008
KitMaker: 333 posts
Armorama: 321 posts
Posted: Thursday, September 03, 2009 - 02:27 PM UTC


bloodzy
Joined: April 14, 2009
KitMaker: 25 posts
Armorama: 16 posts
Posted: Thursday, September 03, 2009 - 07:52 PM UTC
Thanks Carmen and Jason
I should be able to get closer matches now
I should be able to get closer matches now

f1matt
Joined: August 13, 2006
KitMaker: 1,021 posts
Armorama: 805 posts
Posted: Thursday, September 03, 2009 - 08:03 PM UTC
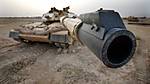
That last picture is interesting. The fume extractor (I hope that's the right name) seems to have a coarse texture with fine vertical groves for the length of it. Never seen that before.
Matt
Matt
Boggie
Joined: December 08, 2005
KitMaker: 1,370 posts
Armorama: 1,331 posts

Posted: Friday, September 04, 2009 - 12:05 AM UTC
Your build looks very complete, you must be proud.

More on the Aussie Defense web site.
Bill

More on the Aussie Defense web site.
Bill

DeskJockey

Joined: July 17, 2006
KitMaker: 1,558 posts
Armorama: 1,159 posts
Posted: Thursday, September 10, 2009 - 05:00 AM UTC
Fantastic! I love how your model closely mimics the picture! 
f1matt
Joined: August 13, 2006
KitMaker: 1,021 posts
Armorama: 805 posts
Posted: Wednesday, September 16, 2009 - 07:26 PM UTC
Hey Carmen. Have you seen this? A new ASLAV update from Legends.

Ask and you shall receive, apparently.
Matt
Ask and you shall receive, apparently.
Matt
Tonyfr
Joined: June 12, 2009
KitMaker: 516 posts
Armorama: 391 posts

Posted: Thursday, September 17, 2009 - 04:56 AM UTC
Carmen,
Excellent build! I like the display, vice nice.
Tony

Excellent build! I like the display, vice nice.
Tony
cesar

Joined: August 10, 2005
KitMaker: 110 posts
Armorama: 107 posts
Posted: Thursday, September 17, 2009 - 05:31 AM UTC
Quoted Text
Hey Carmen. Have you seen this? A new ASLAV update from Legends.
Ask and you shall receive, apparently.
Matt
Niceee!
I could buy it only for the kangaroo
, even if I don´t like LAVs that much.csmanning
Joined: March 23, 2008
KitMaker: 333 posts
Armorama: 321 posts
Posted: Thursday, September 17, 2009 - 08:50 AM UTC
Thanks guys for the comments!
Matt - Yeah I saw that a few days ago... pretty ironic eh? That's a bloody big kangaroo!
I've got a few pictures of my build left to post so stay tuned, but I heard last week that the Aussie Abrams Barracuda cam/thermal blanket trials are over... they didn't pass so now the Aussie Abrams will be getting the tri-color camo scheme painted right on the tank... Hopefully the ADF website will post pictures soon!
Just when I finish... they change the camo pattern!!! Curses!!
For those of you wanting to do a unique tank... you soon shall have it!
Cartyb
Joined: May 02, 2007
KitMaker: 39 posts
Armorama: 39 posts
Posted: Thursday, September 17, 2009 - 12:13 PM UTC
Figures, I toyed with painting my Aussie M1 in the three color scheme just cuz I thought it would look cool. But, alas, my anal self took over and made me do it straight tan. Kicking myself now!!!

ppawlak1
Joined: March 14, 2006
KitMaker: 1,973 posts
Armorama: 1,843 posts

Posted: Thursday, September 17, 2009 - 03:48 PM UTC
Aussie 3 Cam Abrams ?
Yes please.....
Now if that isn't enough motivation to do one
Can't wait for the DoD to release pics !!
Paul
Yes please.....
Now if that isn't enough motivation to do one
Can't wait for the DoD to release pics !!
Paul
ALBOWIE
Joined: February 28, 2006
KitMaker: 1,605 posts
Armorama: 1,565 posts

Posted: Thursday, September 17, 2009 - 05:19 PM UTC
Quoted Text
Just when I finish... they change the camo pattern!!! Curses!!
For those of you wanting to do a unique tank... you soon shall have it!
Damn nice work and very realistic. The DPCU colours vary tremendously between Webbing, uniforms etc due to the different materials so the exact colours are no great problem, particularly after a good dusting in the field.
The Pictures of the 3 colour have not been released to the public yet (apparently > Sep 30) but the one I have seen looks really interesting with what looks like demarcation lines between colours similar to the old Brit Schemes in NA WW2.
The change of Colour is a great excuse to do another one.
Al

ruzzaa

Joined: October 17, 2007
KitMaker: 197 posts
Armorama: 189 posts
Posted: Monday, September 21, 2009 - 07:35 PM UTC


BSHEVLIN
Joined: August 20, 2009
KitMaker: 47 posts
Armorama: 34 posts

Posted: Monday, September 21, 2009 - 08:33 PM UTC
i have some pics of one auscam painted pics as the rolled out of the paint shop recently.
 will share once i learn how to upload pics
will share once i learn how to upload pics 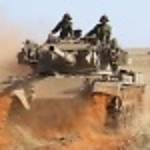
DAR

Joined: April 27, 2002
KitMaker: 250 posts
Armorama: 188 posts

Posted: Tuesday, September 22, 2009 - 06:09 AM UTC
Looking forward to them Brenton, thanks.
Cartyb
Joined: May 02, 2007
KitMaker: 39 posts
Armorama: 39 posts
Posted: Tuesday, September 22, 2009 - 09:23 AM UTC
Same here. Will give me a reason to build another M1.
csmanning
Joined: March 23, 2008
KitMaker: 333 posts
Armorama: 321 posts
Posted: Sunday, October 11, 2009 - 07:08 AM UTC
Hey Gents
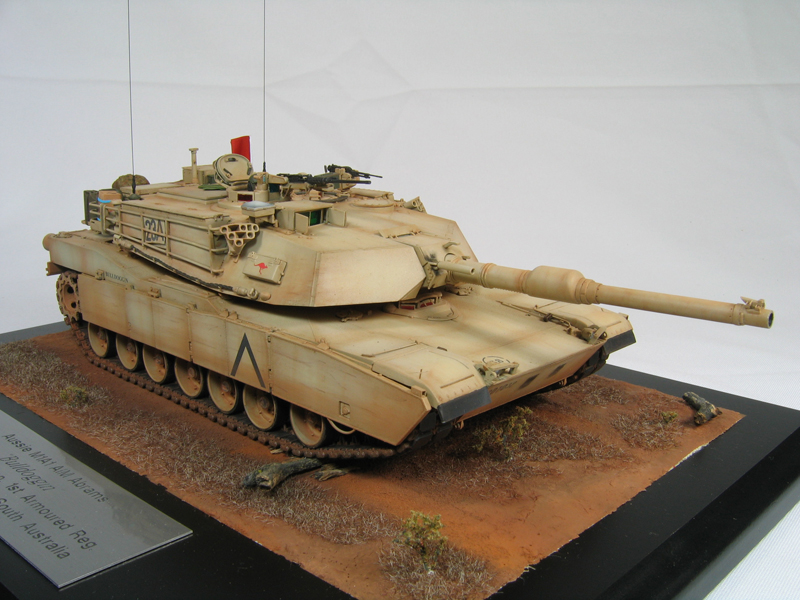
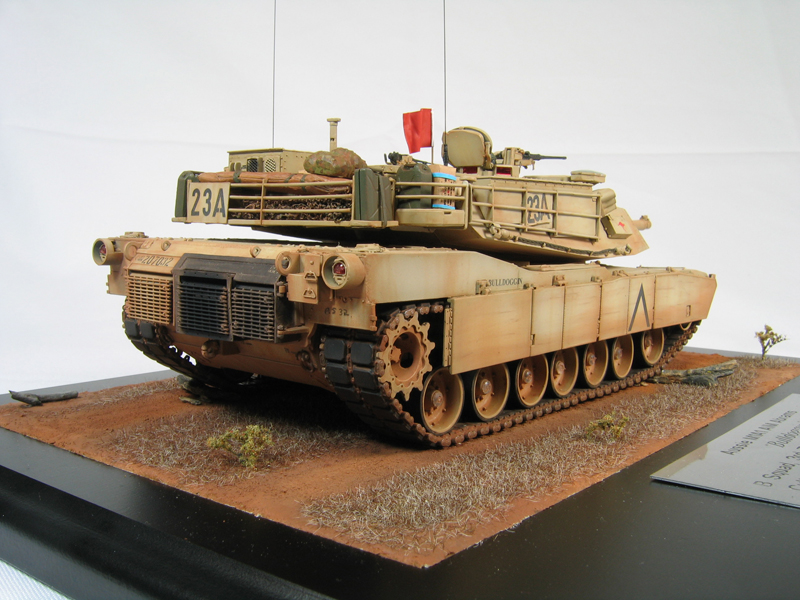
Well I think I'm going to call this build officially done. I have a few more tweeks left to do but all in all I'm extremely happy with how well this build went. I was going to hold out until the new tri color camo photos were released from the Aussie DnD.... ah well, they'll come eventually.
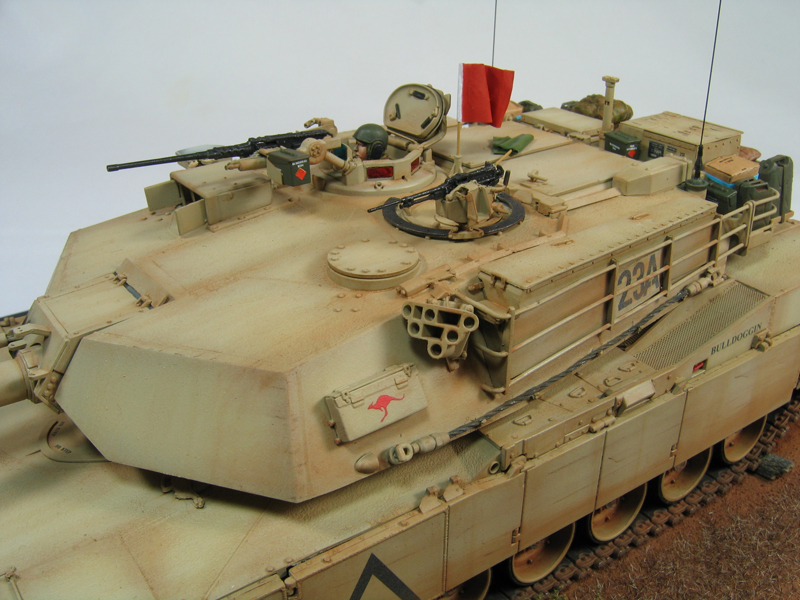
To finish off, I did got with the Alpine Modern US tanker figure even though the webbing and gear are incorrect. I've placed him low in the turret and you cannot see the inaccuracies. I painted the uniform similar to the back pack as decribed earlier. I even painted on the Australian flag shoulder patch but is not visible in the pictures below. Until a modern Aussie Tanker comes out I'll use him as a place holder.
I added a little bit of extra detail to the ammo canisters using left over white decals and I masked and painted the orange danger labels.
As was mentioned really early in the build log... no my wheels did not sit flat... I remedied this by crushing Woodland Scenic dead logs in a vice to protray crushed wood under the tracks. I know there is probably no fallen trees in Cultana but it was the only thing I could think of to fix the problem. I also bolted the tank to the base to.
The stowage should be somewhat obvious. The umbrella bag from the conversion set, both ration box sets from Mouse House, Australian pattern jerry cans and the camo net from Echelon which I bartered for from a friend (of which I need to replace when they are officially released). The camo net was easy to work with, the instructions are easy to follow, but I found sliding the netting off the transfer paper worked better then peeling the netting off. Just a suggestion.
Anyways, I've made a lot of new friends with this build and I thank you all for your help, contribution and constant encouragement. This is my first build log on Armorama and I'm motivated to continue with more. I'll be doing some Dieppe subjects until the Canadian forum so watch for that.
Thanks again everyone!! If anyone needs assitance with their Aussie Abrams build or has question don't hesitate to send me a PM or continue to post under this blog. Cheers!
Photos by Jim Carswell.
Well I think I'm going to call this build officially done. I have a few more tweeks left to do but all in all I'm extremely happy with how well this build went. I was going to hold out until the new tri color camo photos were released from the Aussie DnD.... ah well, they'll come eventually.
To finish off, I did got with the Alpine Modern US tanker figure even though the webbing and gear are incorrect. I've placed him low in the turret and you cannot see the inaccuracies. I painted the uniform similar to the back pack as decribed earlier. I even painted on the Australian flag shoulder patch but is not visible in the pictures below. Until a modern Aussie Tanker comes out I'll use him as a place holder.
I added a little bit of extra detail to the ammo canisters using left over white decals and I masked and painted the orange danger labels.
As was mentioned really early in the build log... no my wheels did not sit flat... I remedied this by crushing Woodland Scenic dead logs in a vice to protray crushed wood under the tracks. I know there is probably no fallen trees in Cultana but it was the only thing I could think of to fix the problem. I also bolted the tank to the base to.
The stowage should be somewhat obvious. The umbrella bag from the conversion set, both ration box sets from Mouse House, Australian pattern jerry cans and the camo net from Echelon which I bartered for from a friend (of which I need to replace when they are officially released). The camo net was easy to work with, the instructions are easy to follow, but I found sliding the netting off the transfer paper worked better then peeling the netting off. Just a suggestion.
Anyways, I've made a lot of new friends with this build and I thank you all for your help, contribution and constant encouragement. This is my first build log on Armorama and I'm motivated to continue with more. I'll be doing some Dieppe subjects until the Canadian forum so watch for that.
Thanks again everyone!! If anyone needs assitance with their Aussie Abrams build or has question don't hesitate to send me a PM or continue to post under this blog. Cheers!
Photos by Jim Carswell.
f1matt
Joined: August 13, 2006
KitMaker: 1,021 posts
Armorama: 805 posts
Posted: Sunday, October 11, 2009 - 07:33 PM UTC
Quoted Text
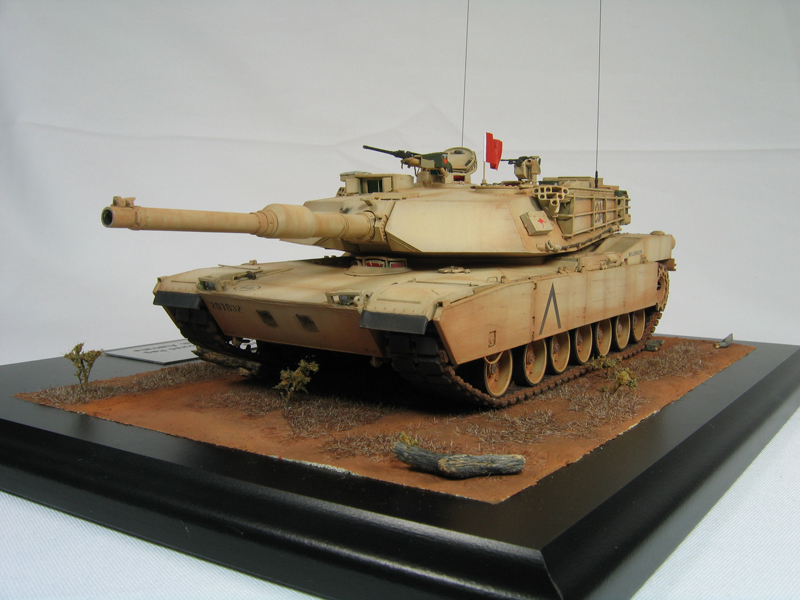
My favorite pic. Looks so real.
Matt
jasmils
Joined: December 23, 2003
KitMaker: 1,016 posts
Armorama: 745 posts
Posted: Sunday, October 11, 2009 - 08:10 PM UTC
GOLD!!!!!!! That has come out very well indeed Carmen. I never expected one of my kits would look this good painted up. Thanks again mate. great job.
Cheers Jason
PS, Is it possible to move the green gunnery flag a bit closer to the crew commander? And add the yellow one as well?
Cheers Jason
PS, Is it possible to move the green gunnery flag a bit closer to the crew commander? And add the yellow one as well?
grimmo
Joined: January 17, 2006
KitMaker: 752 posts
Armorama: 569 posts
Posted: Tuesday, October 13, 2009 - 04:40 PM UTC
Thats a brilliant build! I am doing 2 at the moment. One will be in Desert, one will be in the 3 color cam. Hope either of mine are as good as this one!
I know the red flag means live fire, but i have seen green flags as well. what do the green flags mean?
I know the red flag means live fire, but i have seen green flags as well. what do the green flags mean?

LeoCmdr
Joined: January 19, 2005
KitMaker: 4,085 posts
Armorama: 3,917 posts

Posted: Tuesday, October 13, 2009 - 05:12 PM UTC
Quoted Text
I know the red flag means live fire, but i have seen green flags as well. what do the green flags mean?
red- guns are loaded and/or laser is in use
green- all guns are unloaded and laser not in use
yellow- gun misfire
There are minor differences in terminology from nation to nation.
There is also a gun condition called "Red Check Fire".....guns are loaded but made safe.
ppawlak1
Joined: March 14, 2006
KitMaker: 1,973 posts
Armorama: 1,843 posts
Posted: Tuesday, October 13, 2009 - 09:16 PM UTC
Your build has been brilliant Carmen !
It looks awesome !!
I'll be PM-ing you when I start my 'beast'
Cheers
Paul
It looks awesome !!
I'll be PM-ing you when I start my 'beast'
Cheers
Paul
 |

WEB HOSTING BY


Copyright ©2021 Armorama and Kitmaker Network, a subsidiary of Silver Star Enterprises
All Rights Reserved. Please read our Conditions of Use and Privacy Policy.
All Rights Reserved. Please read our Conditions of Use and Privacy Policy.