


Hosted by Darren Baker
Carro Armato L6/40 build log
csmanning

Joined: March 23, 2008
KitMaker: 333 posts
Armorama: 321 posts
Posted: Saturday, August 29, 2009 - 04:11 AM UTC
Stefan - Lookin' good dude!! I wanted to give you a look at what the beading tool can do. As I mentioned before I built a WW1 British Mark IV and re-did alot of the rivets, here's a picture of some of the rivet work I did... I built the Airship Tow Tank. Sorry, don't mean to take away from your build. Cheers mate!

exer

Joined: November 27, 2004
KitMaker: 6,048 posts
Armorama: 4,619 posts

Posted: Saturday, August 29, 2009 - 06:46 AM UTC
Carmen that beading tool really gives good results. I may have to pick one up.
Stefan, great work. It's a pity it's such a dodgy kit.
Stefan, great work. It's a pity it's such a dodgy kit.

Dangeroo

#023

Joined: March 13, 2009
KitMaker: 2,058 posts
Armorama: 1,656 posts

Posted: Saturday, August 29, 2009 - 08:01 PM UTC
Carmen, those rivets do look very good, great work.
I've just sent in my updated review and gave it a 70% (recommended with reservations).
Might paint the interior today...
Cheers!
Stef
I've just sent in my updated review and gave it a 70% (recommended with reservations).
Might paint the interior today...
Cheers!
Stef
Dangeroo
#023
Joined: March 13, 2009
KitMaker: 2,058 posts
Armorama: 1,656 posts
Posted: Sunday, September 06, 2009 - 05:22 AM UTC
Some more work done on this one:
Interior painted (in a rather minimalistic way I'm afraid, as most of it can't be seen anyway...):

And the whole thing put together and primed:

Forgot the turret hatch, oh well, that'll be done some other day...
Cheers and thanks for looking!
Interior painted (in a rather minimalistic way I'm afraid, as most of it can't be seen anyway...):
And the whole thing put together and primed:
Forgot the turret hatch, oh well, that'll be done some other day...
Cheers and thanks for looking!
Dangeroo
#023
Joined: March 13, 2009
KitMaker: 2,058 posts
Armorama: 1,656 posts
Posted: Wednesday, October 14, 2009 - 07:23 AM UTC
Hi all!
Just to let you know I'm still active on this one (or rather again...), here's a pic with basecoat. Camo up next.

Cheerio!
Stef
Just to let you know I'm still active on this one (or rather again...), here's a pic with basecoat. Camo up next.
Cheerio!
Stef

panamadan

Joined: July 20, 2004
KitMaker: 1,513 posts
Armorama: 1,449 posts
Posted: Wednesday, October 14, 2009 - 07:49 AM UTC
Stef,
What sand color have you used?
Dan
What sand color have you used?
Dan
Dangeroo
#023
Joined: March 13, 2009
KitMaker: 2,058 posts
Armorama: 1,656 posts
Posted: Wednesday, October 14, 2009 - 11:03 PM UTC
Quoted Text
Stef,
What sand color have you used?
Dan
Dan, I used Testors Italian Sand. I usually work with acryllics but i wanted the pre-mixed color. There is also Italian green and brown.
Cheerio!
Dangeroo
#023
Joined: March 13, 2009
KitMaker: 2,058 posts
Armorama: 1,656 posts
Posted: Monday, October 19, 2009 - 08:10 AM UTC
Got some camo on it. Green worked great:

But then my airbrush appearantly didn't like the brown as it started spitting and I couldn't really control it. Might redo it, but I'll probably hope it won't be noticed once it's weathered...

Next up some detail painting (or a redo of the whole thing...).
Cheerio!
But then my airbrush appearantly didn't like the brown as it started spitting and I couldn't really control it. Might redo it, but I'll probably hope it won't be noticed once it's weathered...
Next up some detail painting (or a redo of the whole thing...).
Cheerio!
panamadan
Joined: July 20, 2004
KitMaker: 1,513 posts
Armorama: 1,449 posts
Posted: Monday, October 19, 2009 - 11:30 AM UTC
Stef,
The colors that you used? (again!)
Dan
The colors that you used? (again!)
Dan
Dangeroo
#023
Joined: March 13, 2009
KitMaker: 2,058 posts
Armorama: 1,656 posts
Posted: Monday, October 19, 2009 - 07:30 PM UTC
Dan
Testors (again) italian brown and italian green... Straight from the jar (ok, not from the testors jar, but no other colors mixed in...)
Cheerio!
Testors (again) italian brown and italian green...
Straight from the jar (ok, not from the testors jar, but no other colors mixed in...)Cheerio!
Dangeroo
#023
Joined: March 13, 2009
KitMaker: 2,058 posts
Armorama: 1,656 posts
Posted: Friday, December 04, 2009 - 09:09 AM UTC
Welcome to the final installment of the L6/40 build log. After painting and weathering, this is it... 
Here she is before weathering:


And after weathering with a whisker from my cat. That actually works pretty good! Of course it was a whisker that was laying around, not one I ripped off...
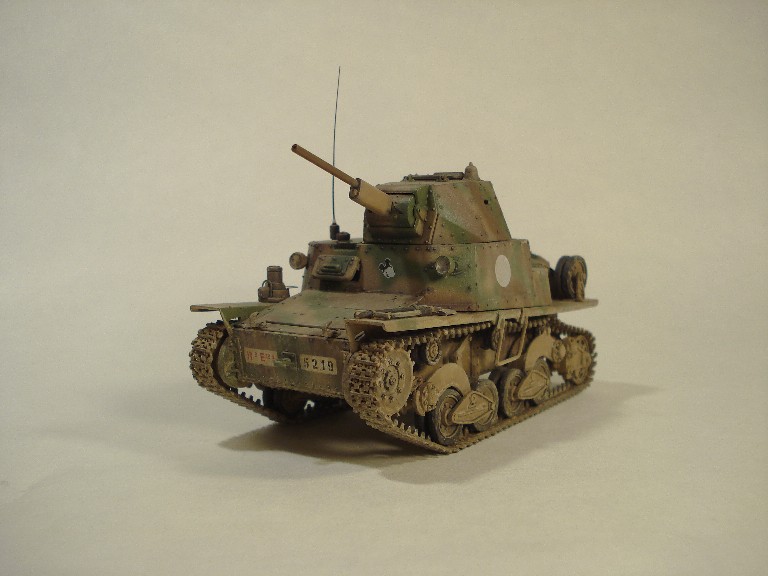
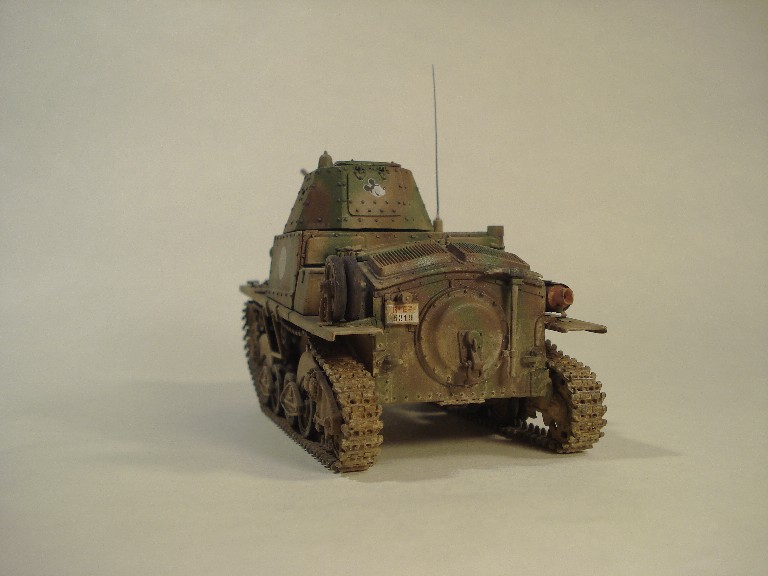
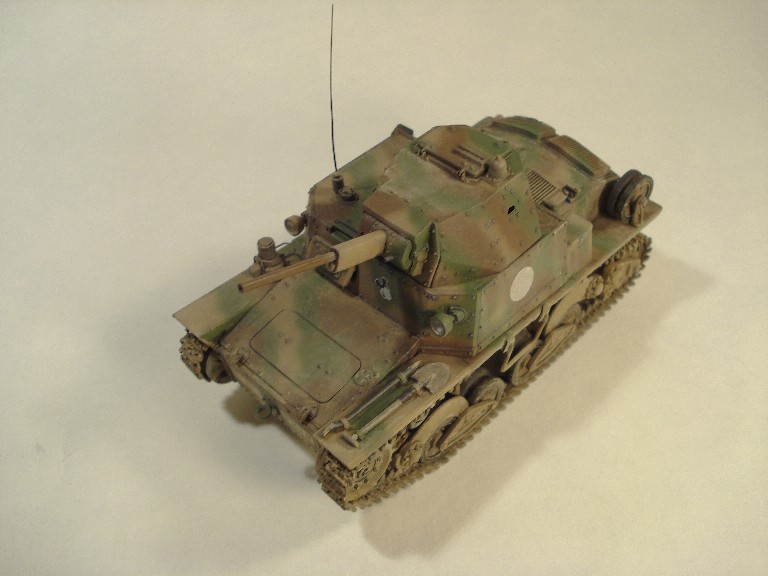

Cheerio and thanks for looking! Any comments welcome!
Here she is before weathering:
And after weathering with a whisker from my cat. That actually works pretty good! Of course it was a whisker that was laying around, not one I ripped off...
Cheerio and thanks for looking! Any comments welcome!

patncori
Joined: July 13, 2006
KitMaker: 84 posts
Armorama: 32 posts
Posted: Friday, December 04, 2009 - 09:35 AM UTC
Great weathering...it really all came together on this one...

koenele

Joined: January 17, 2006
KitMaker: 4,194 posts
Armorama: 408 posts

Posted: Friday, December 04, 2009 - 11:23 AM UTC
nice work
Belt_Fed
Joined: February 02, 2008
KitMaker: 1,388 posts
Armorama: 1,325 posts

Posted: Friday, December 04, 2009 - 12:18 PM UTC
excellent work! How did you do the weathering?
Dangeroo
#023
Joined: March 13, 2009
KitMaker: 2,058 posts
Armorama: 1,656 posts
Posted: Friday, December 04, 2009 - 10:17 PM UTC
Thanks guys!
Weathering was done with some washes and pigments. First a wash of Vallejo chocolate brown and earth to break up and tone down the camo. Then a pin wash followed by a general wash of W&N oil color (black with earth pigments mixed in to get the blue sheen out). Then I applied Mig pigments. No chipping, though I think it looks cool, I don't think these things were in use long enough to get a lot of chipping...
Cheerio!
 |

WEB HOSTING BY


Copyright ©2021 Armorama and Kitmaker Network, a subsidiary of Silver Star Enterprises
All Rights Reserved. Please read our Conditions of Use and Privacy Policy.
All Rights Reserved. Please read our Conditions of Use and Privacy Policy.