


Link to Item
Lars has also included a little more information on his build.
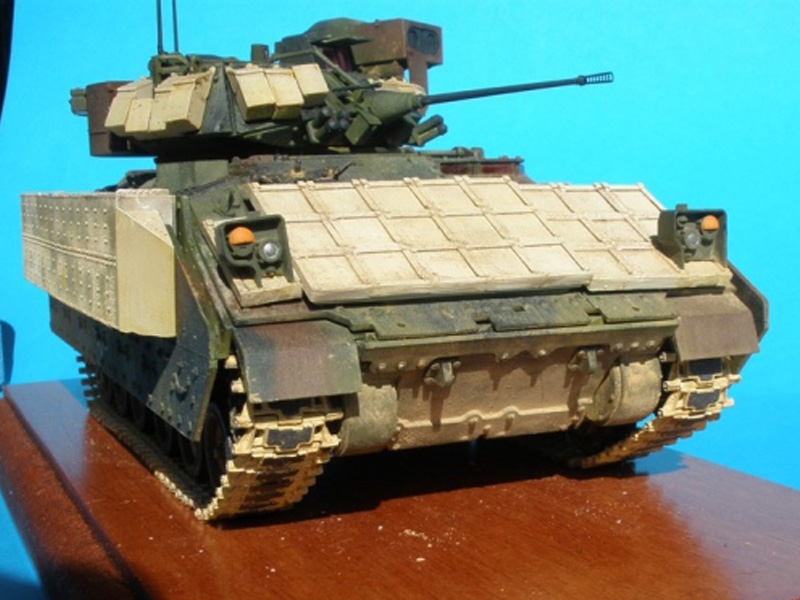
BUILDING
The Tamiya kit can be built without any problems, like I'm used to with Tamiya. This time I wanted to add some extra details. That's why I bought a lot of Aftermarket sets. This was the first time I'd used Fruil model tracks and a Resin conversion. I think these sets are absolutely superb, so this won't be the last time I use them.
PAINTING AND WEATHERING
As I wanted to depict a Bradley in woodland camouflage the overall vehicle received a paintjob consisting of Tamiya NATO Green, NATO Black and Red Brown. The Verlinden ERA was given a coat of Vallejo Model Air 075 Sand. After that it was time for the detail painting. Most details were painted with Vallejo Model Color and some with Tamiya Acrylics. When this was done, a few coats of Vallejo Model Color Gloss varnish could be applied.
The Fruil Model tracks were first painted in a mixture of Vallejo Model Air Sand and Model Color Mahogany Brown. After that they were given a mixture of MIG pigments and odorless Turpentine. When dry, I fixed that mixture with MIG Pigment Fixer. The rubber pads were painted with Vallejo Model Color Black Grey. The metallic colours coming through in some places were easily added by sanding the metal tracks at the desired places. The places where the road wheels would touch the tracks are "painted" with a soft charcoal pencil.
While letting the varnish dry for one night, it was time to start the weathering. For the dark pin washes I used 502 Abteilung Shadow Brown thinned with odorless Turpentine from the same brand. After that, a filter of 502 Abteilung Luftwaffe Yellow was applied also thinned with odorless Turpentine. To replicate the dust on this model, I used the stain techniqiue with 502 Abteilung oil paints. The basic idea of this technique is to place a lot of dots on your model and then blend them together with your thinner. This time I used mainly 502 Abteilung Buff and also a little bit of Shadow Brown, White and Luftwaffe Yellow.
Now the model was ready to receive a final coat of Vallejo Model Color Matt Varnish. To finish this model, I used some MIG Gulf War Sand pigments, with sometimes a little bit of Light Dust and Europe Dust added. This was added dry on the front, back and the side skirts. The front and the side skirts received some MIG Pigment Fixer to fix the pigments and mix them a bit into the base colour. While the fixer was drying, I tipped a bit of pigments on top of it in order to represent splattered mud. After that I - again - added some dry pigments and this model was ready.
If you have comments or questions please post them here.
Thanks!


