


Campaigns
Where Armorama group builds can be discussed, organized, and updates posted.
Where Armorama group builds can be discussed, organized, and updates posted.
Hosted by Darren Baker, Richard S.
All Hail the Abrams!

mikey

Joined: March 14, 2006
KitMaker: 229 posts
Armorama: 227 posts

Posted: Monday, November 02, 2009 - 07:32 AM UTC
Thanks for the heads up Steve, man there are so many variants its hard to keep up with the timelines. Almost like the Shermans.
johnybgood18

Joined: April 23, 2006
KitMaker: 29 posts
Armorama: 24 posts

Posted: Tuesday, November 03, 2009 - 09:11 AM UTC
Good day to all,
I have decided to join this campaign, hoping to bring down my stash a little but I have a dilemma! I have read and search the forums but couldn't find info specific to this, so please, don't flame me to much!
This is what I want, an M1A1. This is what I have: dragon M1A1 AIM, M1A2 SEP, Trumperter Panther II, a Tamiya M1A1 with mine plow (minus the plow) and an old M1A1HA built. Now, I would like to do either a USMC M1A1 or an Aussie M1A1 AIM using the Mouse House Enterprises conversion set.
I will eventually build a M1A2 SEP TUSK so I would really like to not kitbash the SEP to use for an Aussie AIM. In a perfect world, I could use the other Abrams parts to create either an Aussie M1 or USMC M1.
So my question to you is this, would it be possible to do that with the kits I have listed here with minimal use of the M1A2 SEP parts? Would there be a way for me to get the parts needed for a USMC Abrams?
Thanks for taking the time to read this,
Cheers
Chris

Gregor

Joined: July 31, 2005
KitMaker: 11 posts
Armorama: 10 posts
Posted: Tuesday, November 03, 2009 - 09:14 AM UTC
Hi together! It´s my first post at Armorama and my english isn´t good enough to take a part on the discussions, but if the Campain concerns the Abrams, I participate gladly!
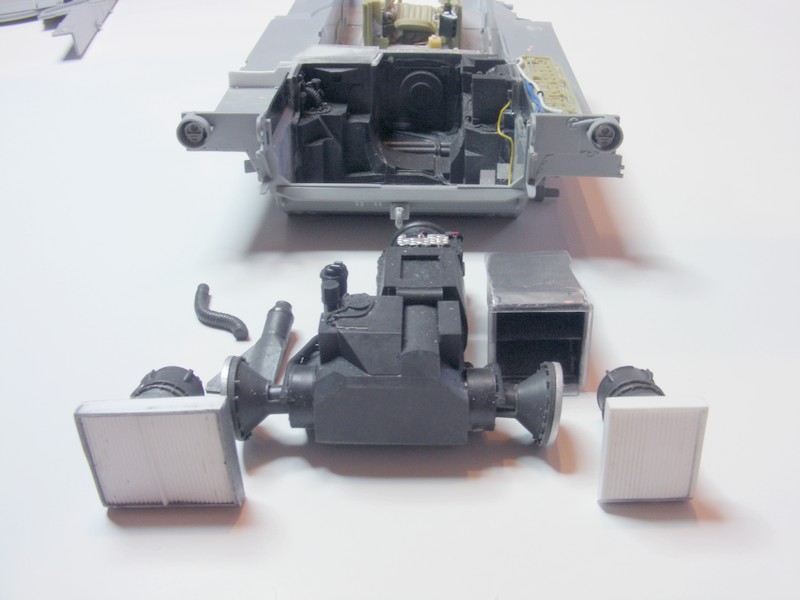
My Abrams is a Dragons AIM with Scratch built interior (partly the old Verlinden Kit and a lot of kitbashing) and CMK engine bay. The hull interior is a little bit tricky to build, because of few informations about the position of all that stuff inside. i took the most of the Abrams interior details from National Geografics "Megafactories". I began with the building already several months ago so let me show you the progress on this beast.
The beginn:
... to be continued...
Greetings
Gregor
mikey
Joined: March 14, 2006
KitMaker: 229 posts
Armorama: 227 posts
Posted: Tuesday, November 03, 2009 - 05:04 PM UTC
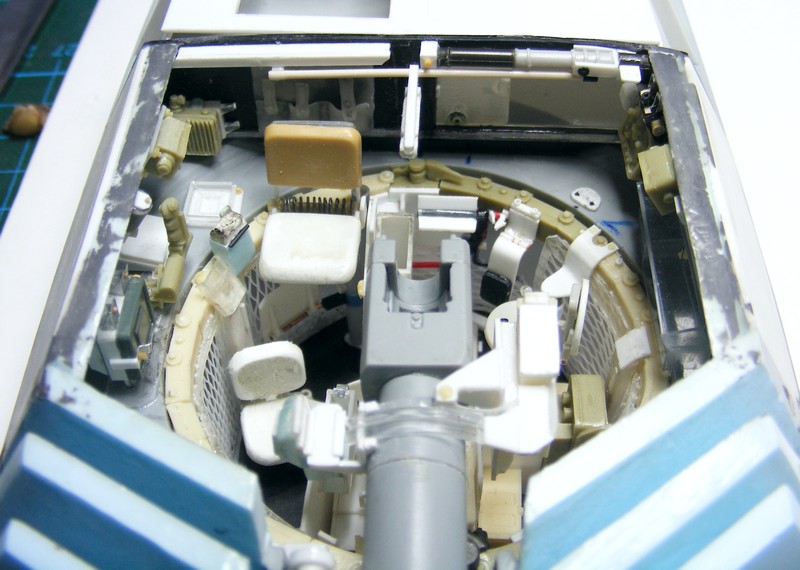
Gregor that is awesome. My hat is off to you and everyone else that puts the effort into the inside of any steel beast. Great job, can't wait to see the turret detail. 
Gregor
Joined: July 31, 2005
KitMaker: 11 posts
Armorama: 10 posts
Posted: Saturday, November 07, 2009 - 06:59 AM UTC
Hi again!
A little progress on my Abrams...
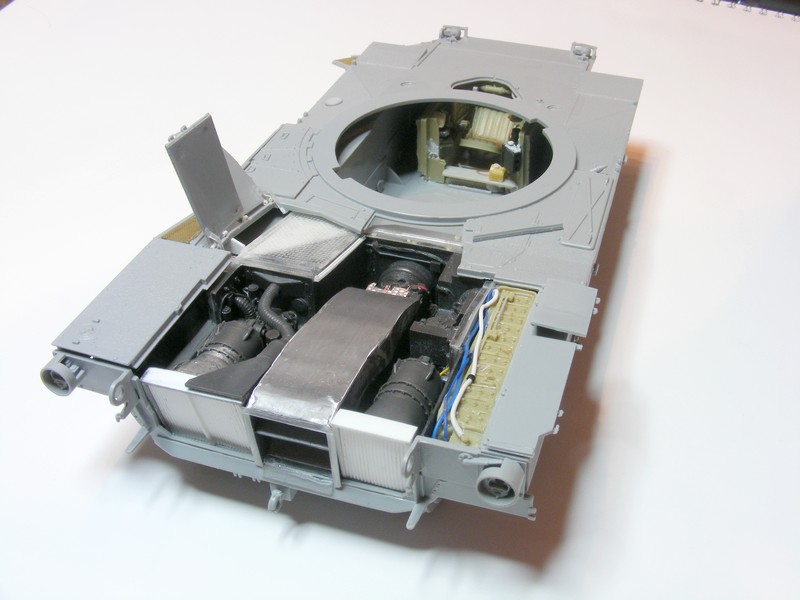
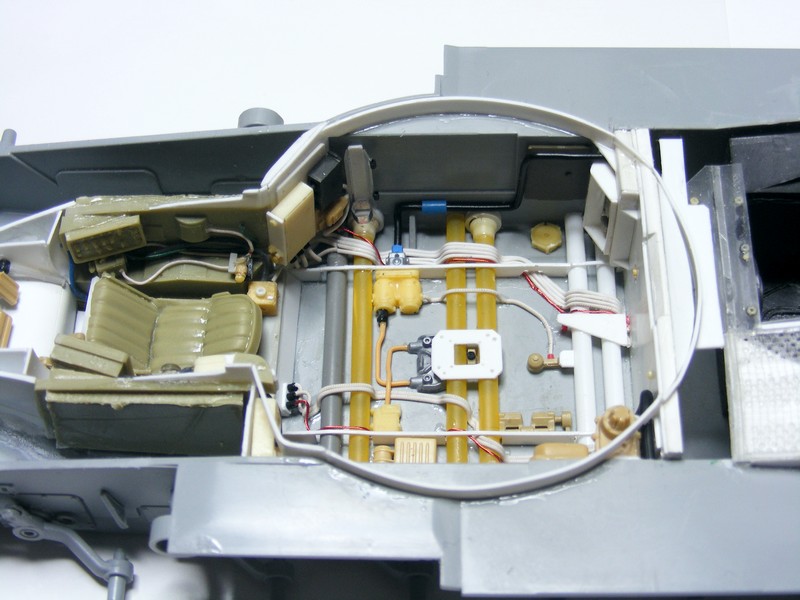
The hull interior and engine bay ar already painted...
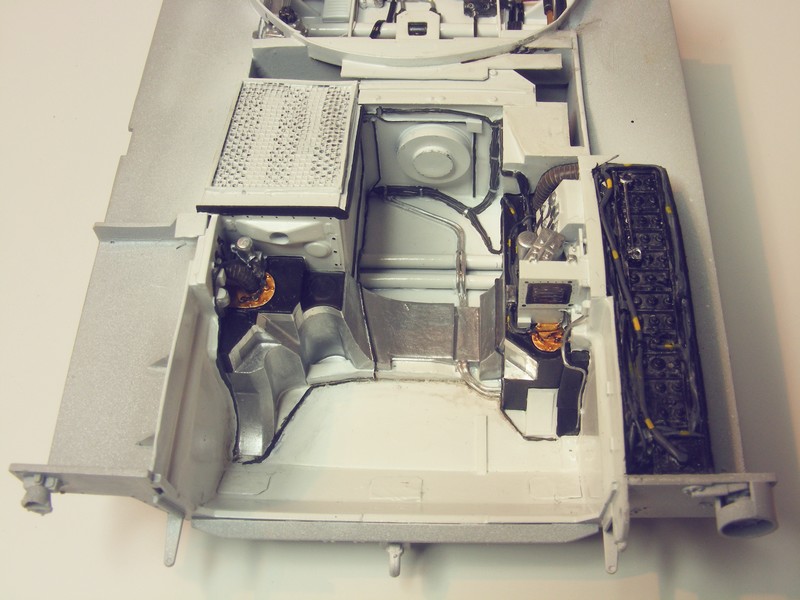
The battery blocks come from Verlinden and need some putty to fit onto the sidewall.
I think, it wouldn´t be very difficult to rebuilt the batteries with some styrene profiles an bits, but at this point i was too lazy and tired of the whole scratchbuilding
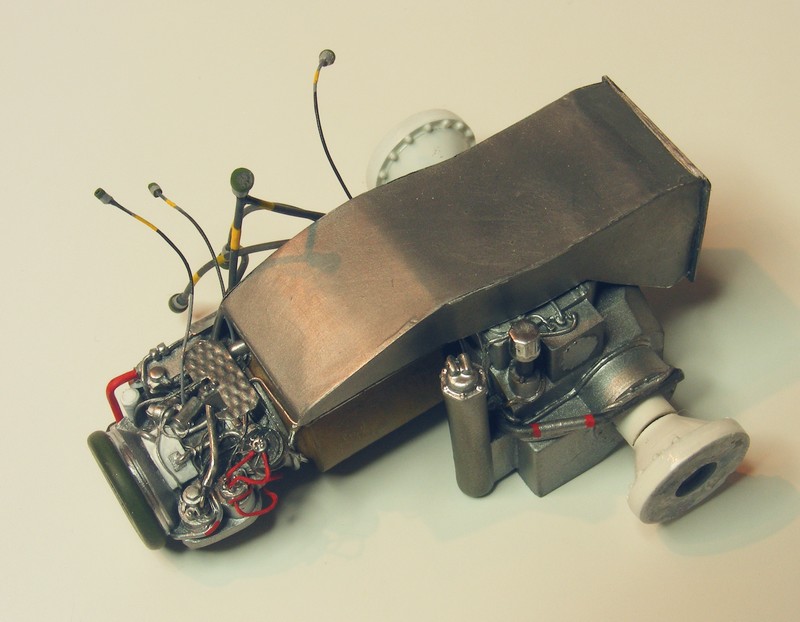
The AGT 1500 in the CMK Kit is quite accurate, but needs some more wirings and cables, coming from the console on the right side of the engine bay.
I made the cables from thin rubber strings, the advantage of these thin rubber lines is the extreme flexibility, necessary to place all that stuff later in the (tight) engine bay.
BTW; The air duct has to be completely rebuilt because of the fact, that the CMK piece was solid
 but i wanted to build the engine doors movable...
Next goal is to finish the hull interior and add some details to all that funny devices inside
Greetings
Gregor
A little progress on my Abrams...
The hull interior and engine bay ar already painted...
The battery blocks come from Verlinden and need some putty to fit onto the sidewall.
I think, it wouldn´t be very difficult to rebuilt the batteries with some styrene profiles an bits, but at this point i was too lazy and tired of the whole scratchbuilding
The AGT 1500 in the CMK Kit is quite accurate, but needs some more wirings and cables, coming from the console on the right side of the engine bay.
I made the cables from thin rubber strings, the advantage of these thin rubber lines is the extreme flexibility, necessary to place all that stuff later in the (tight) engine bay.
BTW; The air duct has to be completely rebuilt because of the fact, that the CMK piece was solid
but i wanted to build the engine doors movable... Next goal is to finish the hull interior and add some details to all that funny devices inside
Greetings
Gregor
mikey
Joined: March 14, 2006
KitMaker: 229 posts
Armorama: 227 posts
Posted: Monday, November 09, 2009 - 02:01 AM UTC
Does anyone have any idea on how the Legends tusk side armor should be mounted on the M1? The print just isn't that clear as far as where it is to be mounted. 

majjanelson
Joined: December 14, 2006
KitMaker: 1,355 posts
Armorama: 979 posts
Posted: Monday, November 09, 2009 - 02:42 PM UTC
Mike,
I don't have a clue about the Legends TUSK set, but as I understand it, the 1:1 Abrams TUSK Armor "blocks" are mounted to replacement skirts that are all thin sheet steel similiar in shape (but not exactly the same) to the standard armored skirts:

The thin skirt plates are mounted using the existing bracket system that is on the hull and the tube arms that extend out from the lower hull near the running gear return rollers.
Here are more pictures: M1A1 Add On Skirt Armor on Prime Portal . I could be wrong about all of this, but that does appear to be what is shown in the pictures. Hope this helps...
I don't have a clue about the Legends TUSK set, but as I understand it, the 1:1 Abrams TUSK Armor "blocks" are mounted to replacement skirts that are all thin sheet steel similiar in shape (but not exactly the same) to the standard armored skirts:
The thin skirt plates are mounted using the existing bracket system that is on the hull and the tube arms that extend out from the lower hull near the running gear return rollers.
Here are more pictures: M1A1 Add On Skirt Armor on Prime Portal . I could be wrong about all of this, but that does appear to be what is shown in the pictures. Hope this helps...
mikey
Joined: March 14, 2006
KitMaker: 229 posts
Armorama: 227 posts
Posted: Monday, November 09, 2009 - 04:29 PM UTC
Jeff, thanks for the pic. I keep forgetting about Prime Portal as a reference. That is a good picture on how the armor is mounted on. I wish Legends had just a little more detailed directions. Thanks again.

f1matt
Joined: August 13, 2006
KitMaker: 1,021 posts
Armorama: 805 posts

Posted: Monday, November 09, 2009 - 06:32 PM UTC
This looks interesting. I'm in. Though if I finish in time I'll be shocked.
Matt
Matt
Tonyfr
Joined: June 12, 2009
KitMaker: 516 posts
Armorama: 391 posts

Posted: Wednesday, November 11, 2009 - 01:12 PM UTC
Gregor, That interior looks great.
Note on my progress: Got the wheels painted and assembled. For me that is the slowest part of construction.
Tony
Note on my progress: Got the wheels painted and assembled. For me that is the slowest part of construction.
Tony
mikey
Joined: March 14, 2006
KitMaker: 229 posts
Armorama: 227 posts
Posted: Friday, November 13, 2009 - 03:44 AM UTC
Does anyone know how to work with resin? It appears my Legends Tusk kit has some warpage issue's.
majjanelson
Joined: December 14, 2006
KitMaker: 1,355 posts
Armorama: 979 posts
Posted: Friday, November 13, 2009 - 10:22 AM UTC
Mike,
I read somewhere that you can "heat up" resin by soaking it in hot water. I think the example I read this for was to soften some resin tracks to allow wrapping them around a drive sprocket.
I haven't tried this myself, yet, and I do not know how well this would work with thicker parts...
I read somewhere that you can "heat up" resin by soaking it in hot water. I think the example I read this for was to soften some resin tracks to allow wrapping them around a drive sprocket.
I haven't tried this myself, yet, and I do not know how well this would work with thicker parts...
mikey
Joined: March 14, 2006
KitMaker: 229 posts
Armorama: 227 posts
Posted: Friday, November 13, 2009 - 01:01 PM UTC
Quoted Text
Mike,
I read somewhere that you can "heat up" resin by soaking it in hot water. I think the example I read this for was to soften some resin tracks to allow wrapping them around a drive sprocket.
I haven't tried this myself, yet, and I do not know how well this would work with thicker parts...
Jeff, thanks for the advice. I thought of hot water, just was not sure of how resin would act vs. water. Plastic is pretty pliable when dipped in the boiling cauldron. Guess I will give it a go. Thanks.
Tonyfr
Joined: June 12, 2009
KitMaker: 516 posts
Armorama: 391 posts
Posted: Saturday, November 14, 2009 - 06:01 AM UTC
I have been looking for another set of decals for my Abrams. I was wondering if I could put my own words on the cannon like Grumpyoldman did. I have also seen pictures where pictures of Sadam were put on the front of the turret. Can I do these things and still be part of the campaign. I plan on building the tank of the box with extra cargo.
Thanks,
Tony
Thanks,
Tony

paxtonm
Joined: February 06, 2007
KitMaker: 89 posts
Armorama: 61 posts
Posted: Tuesday, November 17, 2009 - 04:13 PM UTC
Does anyone know why there is an extra hole in the top of part V5/V4 on the DML M1A1 AIM kit? it is the forward-most road wheel and idler arm connection.
Michael
Michael
majjanelson
Joined: December 14, 2006
KitMaker: 1,355 posts
Armorama: 979 posts
Posted: Wednesday, November 18, 2009 - 05:43 PM UTC
Michael,
If you are refering to the molded indentation in the Idler Sprocket Arm:

I believe it is a "casting process thing". I do not believe the real parts have this and are "solid" parts, with the actual pivot arm and bearings located on the hull side of the arm in this location.
But I could be wrong...
If you are refering to the molded indentation in the Idler Sprocket Arm:
I believe it is a "casting process thing". I do not believe the real parts have this and are "solid" parts, with the actual pivot arm and bearings located on the hull side of the arm in this location.
But I could be wrong...

Sudzonic

Joined: December 07, 2007
KitMaker: 2,096 posts
Armorama: 1,983 posts

Posted: Monday, November 23, 2009 - 03:07 AM UTC
Hay all thought i would join the fun. here's my build its a 1/72 scale revell M1A2 will be OOB not sure on final color yet tho?

Sudzonic
Joined: December 07, 2007
KitMaker: 2,096 posts
Armorama: 1,983 posts
Posted: Monday, November 23, 2009 - 06:47 AM UTC
ready for paint just have to finish the tracks and add the cooler box.

mikey
Joined: March 14, 2006
KitMaker: 229 posts
Armorama: 227 posts
Posted: Monday, November 23, 2009 - 11:42 AM UTC
nice one. nothing like a quick and easy kit to do. Unlike me who is doing the Dragon Sep kit where the TC hatch has at leats 35 parts to it.
Tonyfr
Joined: June 12, 2009
KitMaker: 516 posts
Armorama: 391 posts
Posted: Monday, November 23, 2009 - 12:30 PM UTC
Scott, Nice so far, I am looking forward to the paint job.
Tony
Tony
majjanelson
Joined: December 14, 2006
KitMaker: 1,355 posts
Armorama: 979 posts
Posted: Monday, November 23, 2009 - 03:29 PM UTC
Scott,
Nice Abrams, so far. Isn't it cool that Revell put the parts into this kit for the A1 and A2 US Army versions?
I'm building this kit also, but as an A1 version, in OIF 2 (2004) or so. I'm adding a little bit of detailing, though. Which is REAL slow going... Hopefully I'll get some work worth showing done over Thanksgiving and can post some pics.
Sudzonic
Joined: December 07, 2007
KitMaker: 2,096 posts
Armorama: 1,983 posts
Posted: Tuesday, November 24, 2009 - 06:18 AM UTC
Thanks guys i have to say i like revells 1/72 kits they go together really quickiy think it is going to be finished in desert colors to break up all the green on the shelf.
Herchealer
Joined: July 31, 2003
KitMaker: 1,523 posts
Armorama: 710 posts
Posted: Monday, November 30, 2009 - 08:23 AM UTC
So how are we all coming on our build guys? I have to post some pics of my in-progress. Might try to do that tonight. it is a Tamiya M1A2, With AFV Club tracks, barrel Depot Metal barrel and the old Mine Plow. I think i might be able to do more than one for this campaign.. Well lets hope anyway. So many I want to build.
Herky
Herky
mikey
Joined: March 14, 2006
KitMaker: 229 posts
Armorama: 227 posts
Posted: Monday, November 30, 2009 - 11:50 AM UTC
Quoted Text
So how are we all coming on our build guys? I have to post some pics of my in-progress. Might try to do that tonight. it is a Tamiya M1A2, With AFV Club tracks, barrel Depot Metal barrel and the old Mine Plow. I think i might be able to do more than one for this campaign.. Well lets hope anyway. So many I want to build.
Herky
So many to build, so little time
Sudzonic
Joined: December 07, 2007
KitMaker: 2,096 posts
Armorama: 1,983 posts
Posted: Tuesday, December 01, 2009 - 07:31 AM UTC
Hay gang
Got some paint on..

Got some paint on..
 |

WEB HOSTING BY


Copyright ©2021 Armorama and Kitmaker Network, a subsidiary of Silver Star Enterprises
All Rights Reserved. Please read our Conditions of Use and Privacy Policy.
All Rights Reserved. Please read our Conditions of Use and Privacy Policy.