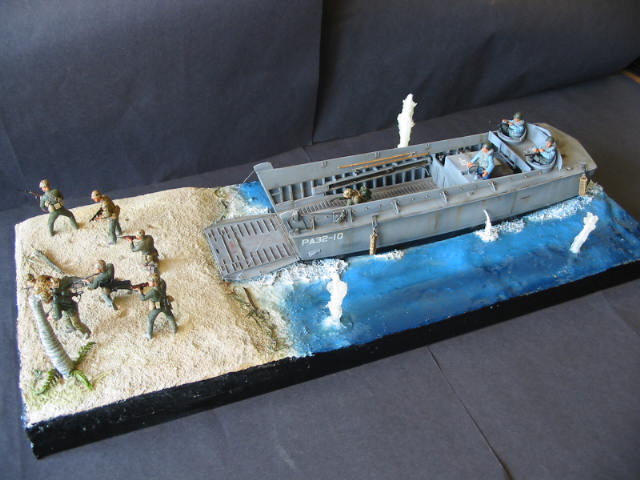
Hello all just completed this for the Gator Navy Campagine on M S W
A 1/35 scale LCVP with Dragon Figures any coments welcome as some of you don,t venture to the other side
Just thought to put it in here to get some feedback as it is a little quiet at MSW at the minute
Dioramas
Do you love dioramas & vignettes? We sure do.
Hosted by Darren Baker, Mario Matijasic
Tarawa First Wave
beefy66
England - North East, United Kingdom
Joined: October 22, 2007
KitMaker: 971 posts
Armorama: 280 posts
Joined: October 22, 2007
KitMaker: 971 posts
Armorama: 280 posts
Posted: Thursday, September 17, 2009 - 11:05 PM UTC
slodder
North Carolina, United States
Joined: February 22, 2002
KitMaker: 11,718 posts
Armorama: 7,138 posts
Joined: February 22, 2002
KitMaker: 11,718 posts
Armorama: 7,138 posts
Posted: Friday, September 18, 2009 - 01:11 AM UTC
Nice job overall, well done.
I like the water at the stern and coming out of the drain pipes.
Couple of pointers - I would have roughed up the sand at the landing ramp. The dark stripe of water down the bottom side (1st picture), I would have gone the other direction with the darkness. To me the darkness means the water gets deeper, so it doesn't work in my mind when the stripe runs right to the edge of the shore.
barbacanosa
Baleares, Spain / España
Joined: August 09, 2005
KitMaker: 296 posts
Armorama: 250 posts
Joined: August 09, 2005
KitMaker: 296 posts
Armorama: 250 posts
Posted: Friday, September 18, 2009 - 04:31 AM UTC
I like it, but also I think the difference in tone in the water should be in parallel to the line of sand.
very good these effects of water, drains and spray projectiles
Can you comment how you did it?
saludos
Domi
very good these effects of water, drains and spray projectiles
Can you comment how you did it?
saludos
Domi
mrockhill
Pennsylvania, United States
Joined: June 17, 2009
KitMaker: 566 posts
Armorama: 27 posts
Joined: June 17, 2009
KitMaker: 566 posts
Armorama: 27 posts
Posted: Friday, September 18, 2009 - 04:34 AM UTC
Nicely done, I am a big fan of the topic. I like the LCVP, whose is it? There are a couple minor things I would have done differently, like angle the scene on the base but that is a matter of personal taste. I also think you did a really nice job on the diorama and it seems a shame that the base is just simply painted black. I think just a simple stained and laquered frame made out of 1/4 round or some small molding, or edged it with veneer. Just really adds to the presentation.
The major change I would have made with the diorama is to model a section of the coconut log sea wall that Tarawa was famous for. Even if it wouldn't be so close to the water scale wise I think artistic license would let you get away with it and put emphasis on a dash for cover and remove doubt about where it is as this could depict the majority of pacific island battles. A detail note would be that the marines would have all their gear (packs) with them coming off the boat and drop it when convienient. Also there were no LCVPs in the first wave. Waves 1-3 were amtracs, 4-10 were the LCVPs and If I recall correctly no LCVPs made it ashore with the assault waves, being hung up on the reef. The marines had to either transfer to the diminishing amtracs or wade several hundred yards ashore.
BobCard
Florida, United States
Joined: August 09, 2006
KitMaker: 1,008 posts
Armorama: 847 posts
Joined: August 09, 2006
KitMaker: 1,008 posts
Armorama: 847 posts
Posted: Friday, September 18, 2009 - 04:45 AM UTC
I hate being the one to do this, makes me look like I'm being too picky.
The only actual problem I have with this is the word Tarawa, which would make some of the details of the diorama inaccurate. Maybe just use a different word like Peleliu maybe, or Okinawa which was hardly defended at all and this would be more feasible. At Tarawa the majority of Marines walked in, which means the water depth was about 2 to 5 feet on the reef, which covered about 500+ yards from the beach. It was also shot at pretty heavy and wouldn’t be this nice looking, the beach that is. There was some area that didn't have a wall, barrier or Japanese emplacement but not much.
Now having said that, very nicely done on the LCVP, like Scott I really like the water discharge, I haven't ever been able to do it as realistic as this. Nice weathering on the outside and also from the little amount of the inside I can see. Would like to see more photos and please add a word or two on the water.
The last photo was very hard to see any detail due to the lighting.
Overall very nicely done, congrats,
Bob
(Man I must type slow, was only Scott there when I started)
beefy66
England - North East, United Kingdom
Joined: October 22, 2007
KitMaker: 971 posts
Armorama: 280 posts
Joined: October 22, 2007
KitMaker: 971 posts
Armorama: 280 posts
Posted: Friday, September 18, 2009 - 11:25 PM UTC
Thanks for the feedback guys and thanks for the extra information this helps a lot
The lighter water around the LCVP is ment to be the sand a shale kicking up from the boat hitting the beach.The water splashing from the hull and rear is made from a Green dishwashing pad painted and gloss varnished.The water splash hits are a tip I got from MSW using a cotton bud or Q tip cut one end off PVA glue on cotton wool then smooth over with clear silicon sealer dry off with a hairdryer then using a toothpick tease out the splash.
I will take on board( no pun honest ) all the tips given and try again onces some alterations have been made will post some hopefully with new camera more photos for feedback
CreativeModelsAus
United States
Joined: May 07, 2008
KitMaker: 21 posts
Armorama: 3 posts
Joined: May 07, 2008
KitMaker: 21 posts
Armorama: 3 posts
Posted: Tuesday, September 22, 2009 - 02:12 PM UTC
Hey Keith,
Nice work you have doen there. I have done a dio for my LCM 3 HERE
Keith, it is my personal veiw that if you are happy with the work you have done, then thats all that counts.
For me as a modeller, I build what ever I find interesting, and build it the way I want to build it. simple. I couldnt give two hoots about accuracy, or history, or proper vehicle codes and placement of dates and times etc etc. If the water deepth looks wrong or out of place etc etc
My opinion is that you should be building for yourself, and not others.
Glen