_GOTOBOTTOM
Dioramas
Do you love dioramas & vignettes? We sure do.
1/32 Lancaster Construction
okdoky
Visit this Community
Scotland, United Kingdom
Joined: April 30, 2007
KitMaker: 1,597 posts
Armorama: 806 posts
Posted: Tuesday, September 29, 2009 - 11:34 AM UTC
Hi folks

I know Ted has already started his Lanc and it will be great to see how far he takes his model. I am going to be looking in on his cause I know he will have something clever up his sleave when it comes to detailing it.

I have something in mind for my part work and am going to see how far I can take this.

First things first the frame of the nose


All parts except the second from the front seem to fit very well (appears tobe slightly out of parallel with the others.

The next stage is to place the lengths of pvc strip that form the stringers between the main frames


The line of each stringer appears to fit exactly within the notches cut on each frame though looking at Mattie Beas photos they seem to be through the middle of side windows at the bomb aimer's location (will need to cut through one stringer on each side)

The next stage is to cut the tin foil to the rough shape of the panels I needed (the tin foil comes from chinese carry out tins that are big enough to allow large panels to be formed in one go). The part work series does not say when (which week) the tin foil that they would supply would be supplied, or when the stencils that would allow you to mark out on the foil the recommended shapes of panels that they suggest will fit the various sections of the model.

By trial and error I made my own panel sections and drew the shape of the panel on paper so I can make the multiple panels I will need later.


The stringers help to keep the form of the nose section as the panels of foil are glued and smoothed into shape. I kept the panels slightly longer and wider to allow trimming as needed.

The hardest panel is the junction between the nose turret and the bomb aimer's blister that goes from concave to convex.


After the glue is set, I cut out the underside window position and the location of the escape hatch


Three nose cones under construction. Four more to come.


What do you reckon,,,,, should I spen the £5000 to build all seven Lancs? Now that would be a sight to see built!!!!

Nige
slodder
Visit this Community
North Carolina, United States
Joined: February 22, 2002
KitMaker: 11,718 posts
Armorama: 7,138 posts
Posted: Tuesday, September 29, 2009 - 12:32 PM UTC
Wow, what a kit - I think - is the frame a kit?
Anyway, really nice job. It's fun to watch one of these multi-media kits come to life.

Diorama - hmmm can't wait.
roudeleiw
Visit this Community
Luxembourg
Joined: January 19, 2004
KitMaker: 2,406 posts
Armorama: 2,224 posts
Posted: Tuesday, September 29, 2009 - 06:32 PM UTC
That will be something different for a change sizewize as until now i have a bit of a déjàvu with JBA's build. Ok, not exactly, but having twice the same sort panelwork, a plane on a dio etc. ...

This will be interesting to watch

Claude

NebLWeffah
Visit this Community
Alberta, Canada
Joined: October 13, 2004
KitMaker: 1,683 posts
Armorama: 1,248 posts
Posted: Tuesday, September 29, 2009 - 06:55 PM UTC
Here it is

1/32 LANCASTER BOMBER KIT


Bob
Outerarm
Visit this Community
England - South East, United Kingdom
Joined: September 20, 2007
KitMaker: 240 posts
Armorama: 233 posts
Posted: Thursday, October 01, 2009 - 01:18 AM UTC
125 issues at £4.99 an issue?!?!? I'm in the wrong business, clearly.

Cheers,
Ian
slodder
Visit this Community
North Carolina, United States
Joined: February 22, 2002
KitMaker: 11,718 posts
Armorama: 7,138 posts
Posted: Thursday, October 01, 2009 - 07:18 AM UTC
That's one beast of a kit. Thanks for the link.
okdoky
Visit this Community
Scotland, United Kingdom
Joined: April 30, 2007
KitMaker: 1,597 posts
Armorama: 806 posts
Posted: Saturday, October 03, 2009 - 12:31 PM UTC
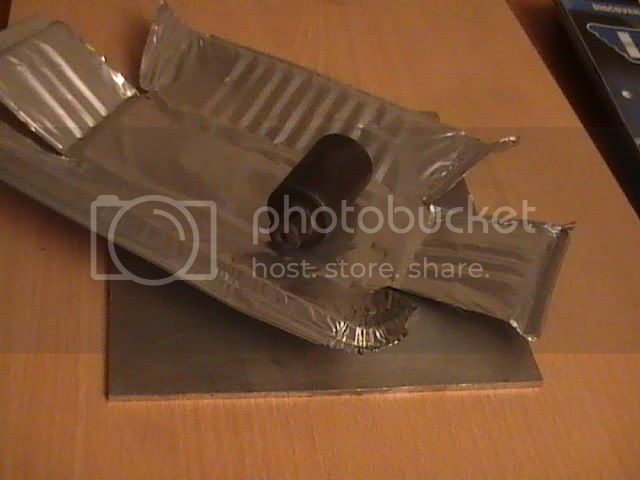
This is how I went about the skinning process. First consume the chinese meal.

Flatten the foil carton between an old metal plumb bob and a 150mm x 150mm x 4mm sheet metal plate


Using my first attempt as the basis for my paterns I sketched on paper to cut out my own templates for the rest


I tried an alternative patern to skin the area around the bomb aimer's blister which appears to have worked well this time


Using the rolling pin wheel I copied the template onto the foil making slightly larger to allow trim down


First panel I formed was the rear bottom half to allow all others to overlap in the flow of air and downwards
Super glue added to one edge and let to set hard


More glue added to the frames and the foil spread over the frame and held in place by hand or with rubber bands


The surplace foil can be folded flat and filed off with a rasp


The front panel was test fitted with the new Mk2 template


The cross stringers are marked on the foil to allow an overlap


More glue added as the panel is gradually smoothed into place and trimmed to fit


Second half of front section added and smoothed in and trimmed over the centre


Top panel added and overlaps trimmed to bare minimum


Will try to take more time over the pin wheel to represent the rivits on this and the other 5 still to be built

Nige
slodder
Visit this Community
North Carolina, United States
Joined: February 22, 2002
KitMaker: 11,718 posts
Armorama: 7,138 posts
Posted: Saturday, October 03, 2009 - 04:57 PM UTC
I've used foil only a little bit. I've covered a tissue plane a few times and I can only imagine the fun when the two mix. You're doing really well so far.
okdoky
Visit this Community
Scotland, United Kingdom
Joined: April 30, 2007
KitMaker: 1,597 posts
Armorama: 806 posts
Posted: Sunday, October 04, 2009 - 02:57 AM UTC
This is a great book that I found in The Works for a couple of quid


Some good bits of info in it, but if anyone has any additional info or cross sections through the nose, turret and cockpit areas these would be appreciated.

Nige
okdoky
Visit this Community
Scotland, United Kingdom
Joined: April 30, 2007
KitMaker: 1,597 posts
Armorama: 806 posts
Posted: Monday, October 19, 2009 - 12:15 PM UTC
Took the nose cones to Lossiemouth with me on the school break. Had a chance to do a wee bit of work.

Decided to invest in some boddy filler to smooth out the lumps and bumps. Is really good stuff and very easy to put on and sand down smooth.


Got rid of the over laps on the panels nicely and bulked up the areas between the stringers that were raised slightly giving the surface a much rounder appearance


Invested in a couple of Boots own version of the water filter cartridges that Ian Sadler told me about which came in at about £2.60 each. Millions of tiny beads of different sizes in them.


My first attempt to add raised rivet heads. Maybe slightly out of scale but I am going on the premise that a few couts of paint on top will lose a bit of height in them. Will see!


Also got around to cutting out the bomb aimer's side windows and adding the ventilation ducts (shiny foil add ons) that I presume help to get rid of any positive pressure in the nose cone getting in through seels behing the nose turret when flying.


What do ya think of the rivits so far? Only a few hundred to add on (times seven)!!!!!!

Nige
slodder
Visit this Community
North Carolina, United States
Joined: February 22, 2002
KitMaker: 11,718 posts
Armorama: 7,138 posts
Posted: Monday, October 19, 2009 - 10:54 PM UTC
Looking really good. So for the rivets did you just apply a narrow coat of liquid glue then drop each rivet down? Or did you apply glue one rivet at a time?

Do you have an idea of when you'll be finished? Looks like a long term project.
okdoky
Visit this Community
Scotland, United Kingdom
Joined: April 30, 2007
KitMaker: 1,597 posts
Armorama: 806 posts
Posted: Tuesday, October 20, 2009 - 01:07 AM UTC
Hi Scott

I tried two ways. First was to lay down the super glue with the end of a tooth pick where I wanted the rivet then pick up a beed with the other end after dabbing the end on the toothpick on my tongue.

Then, aside from being time consuming, I realised that I ran the distinct possibility of supergluing something to my tongue or lips or poisening myself if I got the wrong end of the stick.

I figured that I only needed a quick dab in the glue, pick a beed up, another quick dab in the glue again beed included, then a quick dab on the aircraft where hopefully the beed transferred straight over.

Most times it worked straight off, some times I had to use the other end of the toothpick to adjust the position slightly.

A small drop of superglue on a buckshee bit of foil went alot further that way too.

As for time scales,,,,,,,,,,,,,,,,,,,,,, New (third) baby on the way some time in May and house still in an uproar from extension.

Nige
Cyberbia
Visit this Community
United Kingdom
Joined: April 08, 2010
KitMaker: 3 posts
Armorama: 2 posts
Posted: Thursday, April 08, 2010 - 07:48 AM UTC
Hi everyone

I've just come across the pictures ff the 1/32nd scale Lancaster you've posted.

This kit has only recently been released over here in the UK - currently we're on about issue 27 or something.

Has anyone had problems with constucting the tail section of the fusalage?

I've built it according to the 'plans' and had to take it all to pieces as it has suffered a distinctive case of "tail droop" I've posted pictures of this onto Flickr.Com - wwwFlickr.Com

Any advice would be most welcome!!
justinm
Visit this Community
United States
Joined: March 27, 2010
KitMaker: 112 posts
Armorama: 88 posts
Posted: Thursday, April 08, 2010 - 07:56 AM UTC
This should be very awesome, the lancaster is one of my fave bombers!
gariwulf
Visit this Community
Busan, Korea / 대한민국
Joined: May 22, 2008
KitMaker: 40 posts
Armorama: 39 posts
Posted: Thursday, April 08, 2010 - 08:40 AM UTC
What a great kit and technique!

Though I am not familiar with this kind of kits, it looks very interesting.

Cheers!
Seung-il
CMOT
Staff MemberEditor-in-Chief
ARMORAMA
Visit this Community
England - South West, United Kingdom
Joined: May 14, 2006
KitMaker: 10,954 posts
Armorama: 8,571 posts
Posted: Thursday, April 08, 2010 - 10:46 AM UTC

Quoted Text

Hi everyone

I've just come across the pictures ff the 1/32nd scale Lancaster you've posted.

This kit has only recently been released over here in the UK - currently we're on about issue 27 or something.

Has anyone had problems with constucting the tail section of the fusalage?

I've built it according to the 'plans' and had to take it all to pieces as it has suffered a distinctive case of "tail droop" I've posted pictures of this onto Flickr.Com - wwwFlickr.Com

Any advice would be most welcome!!


I suggest you build the tail section upside down (IE top placed on the bottom) and then add some weight. This way as you add the nylon supports they should when dry keep it the correct shape and profile. I have not bought this kit but is it possible you have placed the frames upside down during construction?
Cyberbia
Visit this Community
United Kingdom
Joined: April 08, 2010
KitMaker: 3 posts
Armorama: 2 posts
Posted: Thursday, April 08, 2010 - 07:56 PM UTC

Quoted Text


Quoted Text

Hi everyone

I've just come across the pictures ff the 1/32nd scale Lancaster you've posted.

This kit has only recently been released over here in the UK - currently we're on about issue 27 or something.

Has anyone had problems with constucting the tail section of the fusalage?

I've built it according to the 'plans' and had to take it all to pieces as it has suffered a distinctive case of "tail droop" I've posted pictures of this onto Flickr.Com - wwwFlickr.Com

Any advice would be most welcome!!


I suggest you build the tail section upside down (IE top placed on the bottom) and then add some weight. This way as you add the nylon supports they should when dry keep it the correct shape and profile. I have not bought this kit but is it possible you have placed the frames upside down during construction?


Hi Darren

No, the frames are correct as they only fit one way round

I've re-built the tail section as you can see from my pictures on Flickr.Com, and so far I've now got the top of the frames level. However there is a 'hump' where the tail wheel will be going. I've heard from elsewhere that some of the parts as supplied have not been that well researched/tooled, and already there has been one modification since the kit was introduced.

Perhaps there will be another one due to put right the tail unit.
renick
Visit this Community
Canada
Joined: May 11, 2010
KitMaker: 2 posts
Armorama: 1 posts
Posted: Tuesday, May 11, 2010 - 04:16 AM UTC
Any progress on this?

Those of us in North America and away from Hachette's line of distribution have to live this build vicariously through this thread. I only wish they would make the kit available to the North American market.
flipper21
Visit this Community
Delaware, United States
Joined: October 29, 2006
KitMaker: 268 posts
Armorama: 144 posts
Posted: Thursday, May 13, 2010 - 06:17 AM UTC
Very nice. Reminds me of the flying kits my Dad and I built when I was a kid. What would the dimensions of the Lancaster be when completed.Looking forward to more updates...Vince
Gorizont
Visit this Community
Sachsen, Germany
Joined: November 28, 2007
KitMaker: 1,462 posts
Armorama: 1,289 posts
Posted: Thursday, May 13, 2010 - 06:35 AM UTC
I don´t build aircraft kits now, and I don´t build kits of this type or style - but the result looks very good so far!
Since some months I take a look at your build!

greetings...
Soeren
 _GOTOTOP