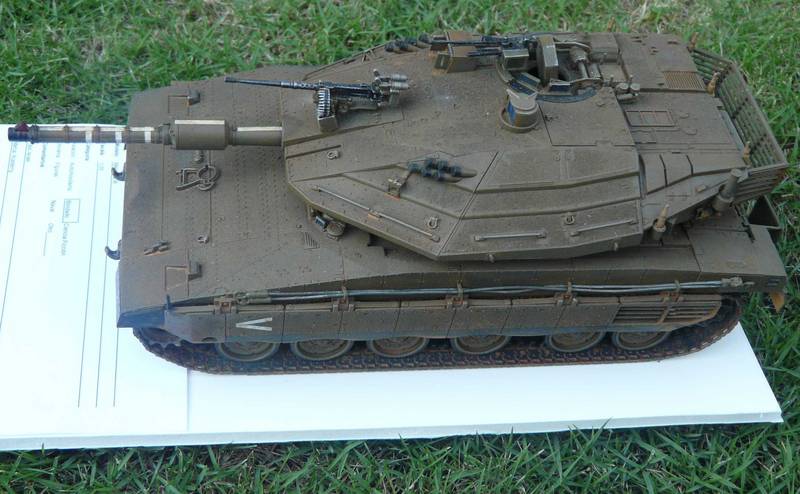
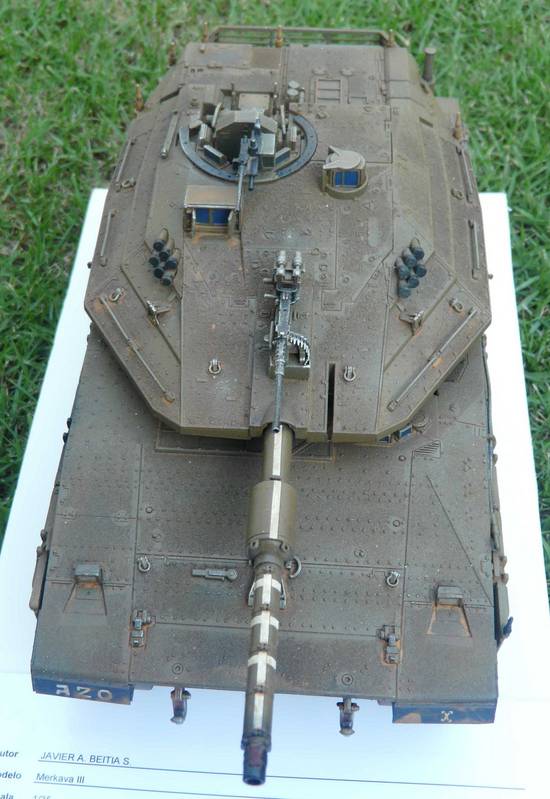
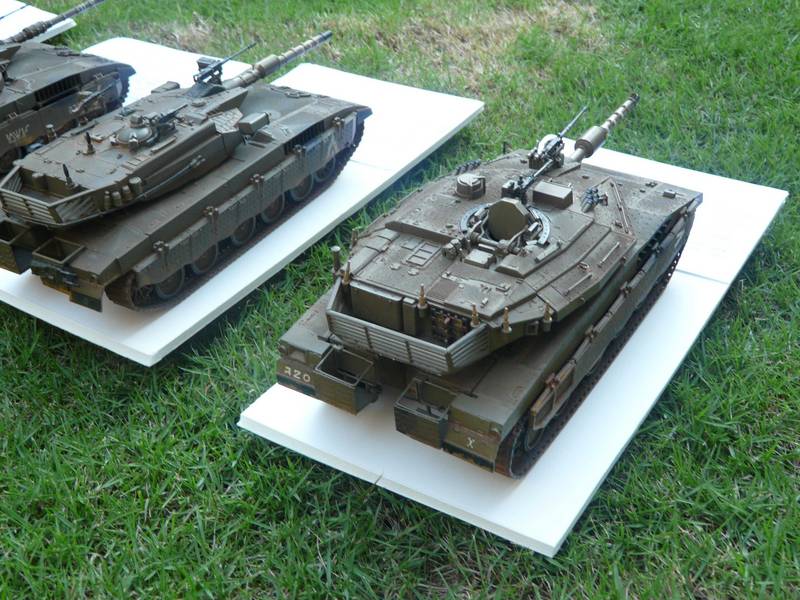
Merkavas I, II, III and IV
Panama
Joined: November 15, 2008
KitMaker: 19 posts
Armorama: 18 posts
Posted: Friday, November 06, 2009 - 09:35 AM UTC
Hi everyone
I'm writing from Panama, Central America. Actually I'm working on my Tamiya Merkava I and Academy Merkavas II, III and IV.
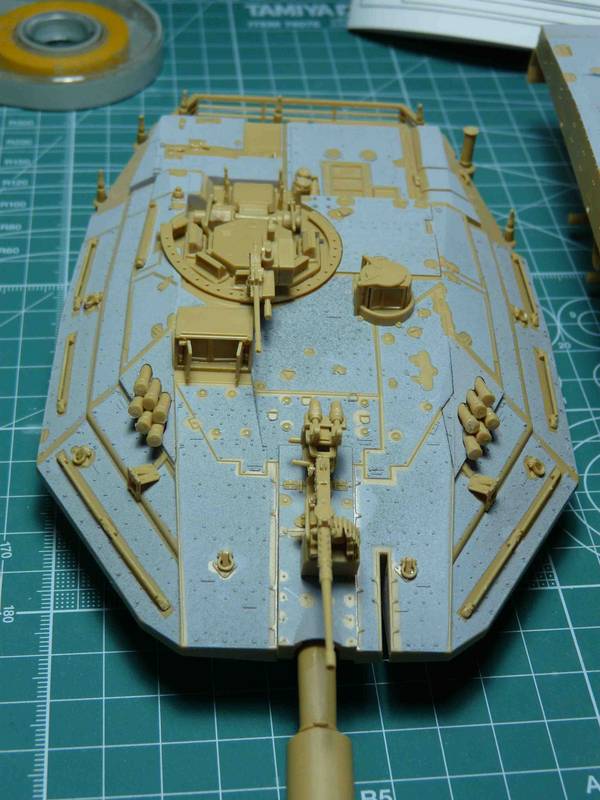
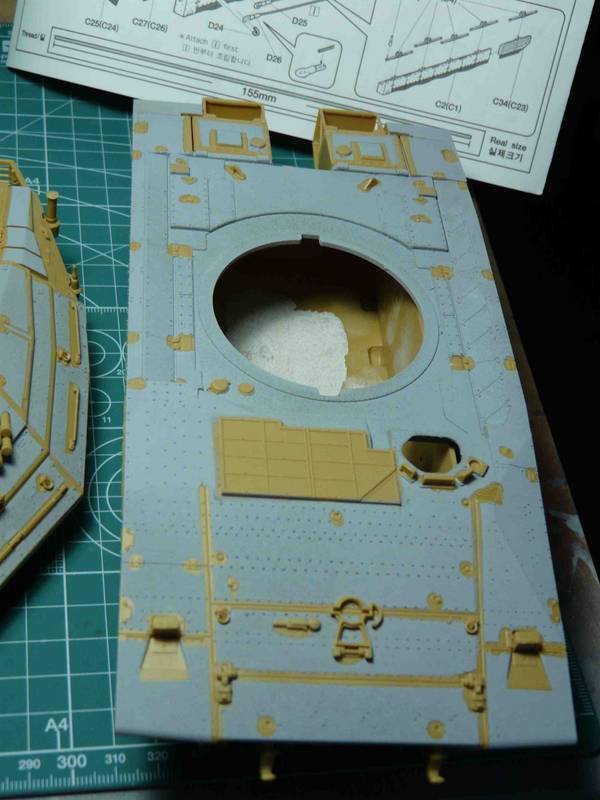
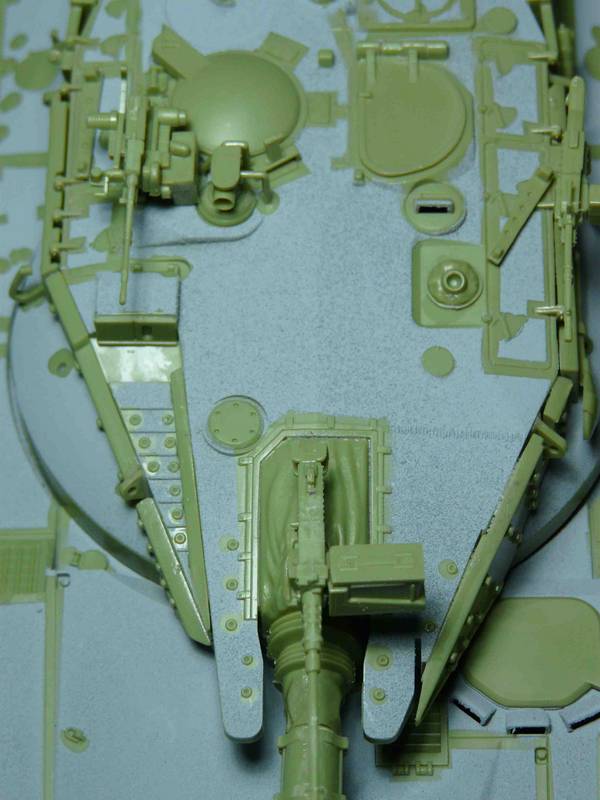
For the nonslip surfaces I tried to use very fine sand but I noticed that this method was too coarse and some details will be lost. I went to the Mr Surfacer 500 method and I think it worked very well. To maintain some details like bolts and handlings, I used Normal White Glue and it worked perfectly. Very easy to remove. Here are some pictures of the final results.


Panama
Joined: November 15, 2008
KitMaker: 19 posts
Armorama: 18 posts
Posted: Friday, November 06, 2009 - 09:36 AM UTC
I applied the white glue with a fine brush in thick layers. After it was dried then I applied the mr surfacer 500 with a little bit of mr color thinner, I used a bottom feed cheap airbrush separate about 8 inches from the model.
After the mr surfacer was dry I then removed the masking tape and the dry strips or drops of glue using a fine tip clamp.
Panama
Joined: November 15, 2008
KitMaker: 19 posts
Armorama: 18 posts
Posted: Friday, November 06, 2009 - 09:40 AM UTC
This is a closer look to the Mr Surfacer Technique I used. In the future I will try the Terracota.
Actually I'm working on the chains and balls for my Merkava IV, I had real problems with the academy photoecht set. I have the Legend's set for Merkavas II and III and I will try to addapt to the plates from the originally Academy´s set. I'm not sure is actually there is a Legen´s set only for the chains and balls that contains the plates of the Merkava IV. Does anyone know is there is one available?
Panama
Joined: November 15, 2008
KitMaker: 19 posts
Armorama: 18 posts
Posted: Friday, November 06, 2009 - 09:44 AM UTC
This is my best effort on getting the IDF Color... I used a Mixture of about 2/3 Olive Draft with 1/3 Khaki from Tamiya. I'm not quite sure about it, but now my Merkavas I, II, III and IV are ready with the base color. The next step is to apply the Future Coat to prepare them for decals.

With the black preshade

With the base paint
Panama
Joined: November 15, 2008
KitMaker: 19 posts
Armorama: 18 posts
Posted: Friday, November 06, 2009 - 09:45 AM UTC
South Australia, Australia
Joined: June 17, 2007
KitMaker: 235 posts
Armorama: 232 posts
Posted: Friday, November 06, 2009 - 10:29 AM UTC
Wow! Fantastic work Javier. The pics of the tanks on the grass look Awesome.
Connecticut, United States
Joined: December 15, 2006
KitMaker: 1,165 posts
Armorama: 1,105 posts
Posted: Friday, November 06, 2009 - 04:30 PM UTC
Great job Javier, I really like this grouping. Very well built and painted.
On da bench
Dragon Tiger I Early
Takom T-55A
Three Takom Mark IV's
Correze, France
Joined: June 10, 2004
KitMaker: 5,329 posts
Armorama: 5,204 posts
Posted: Friday, November 06, 2009 - 10:09 PM UTC
Building the 4 simultaneously, this is what I call a true challenge !
Keep on the good job Javier and good luck for the chains and balls. I think you did the easiest part of your project so far

Visit my site Click the banner
"La reine des batailles, j'ai nommé l'infanterie"
Napoléon
Ontario, Canada
Joined: September 17, 2008
KitMaker: 54 posts
Armorama: 39 posts
Posted: Saturday, November 07, 2009 - 01:38 AM UTC
I would say your colour mixture is pretty close...I have yet to see two photos of a Merkava with the same shade of colour anyway...keep up the good work.
Cheers,
Duncan

Panama
Joined: November 15, 2008
KitMaker: 19 posts
Armorama: 18 posts
Posted: Saturday, November 07, 2009 - 02:15 AM UTC
Thanks. The nonslip surfaces were a big challenge, but I think you are right with the chain and balls. This is the must difficult part. I'm trying to get the plates where the chains and balls are attached, does anybody know if there is a set of plates available?
Do you have a reference to built the fabric to cover the baskets?
Thanks

#011
Jerusalem, Israel
Joined: February 06, 2009
KitMaker: 1,507 posts
Armorama: 1,304 posts
Posted: Saturday, November 07, 2009 - 03:49 AM UTC
wow! very nice looking models! I really like the idea of modeling the entire set but just the thought of academy's old kits make me shutter

George: "If we do happen to step on a mine, Sir, what do we do ?"
Blackadder: "Normal procedure, Lieutenant, is to jump 200 feet in the air and scatter oneself over a wide area."
Panama
Joined: November 15, 2008
KitMaker: 19 posts
Armorama: 18 posts
Posted: Saturday, November 07, 2009 - 03:55 AM UTC
I have the Legend Merkavas IID and III D resin kits still waiting... but this is too much... Actually I'm working on Tamiya's Walker Bulldog, Churchill, Cromwell, Centurion, JS-3- and a Wiesel from AFV Club.


#011
Jerusalem, Israel
Joined: February 06, 2009
KitMaker: 1,507 posts
Armorama: 1,304 posts
Posted: Saturday, November 07, 2009 - 04:06 AM UTC
Quoted Text
a Wiesel from AFV Club... .
I'll be looking forward for that one! I don't know why, but I always had a soft spot for that vehicle

George: "If we do happen to step on a mine, Sir, what do we do ?"
Blackadder: "Normal procedure, Lieutenant, is to jump 200 feet in the air and scatter oneself over a wide area."
Alabama, United States
Joined: October 21, 2009
KitMaker: 22 posts
Armorama: 20 posts
Posted: Saturday, November 07, 2009 - 09:26 AM UTC
Truly awesome work for a really awsome tank. I would love to see in a dio crushing a Syrian T-72!
"Fight no battle if you gain nothing by winning"
Erwin Rommel, The Desert Fox
Louisiana, United States
Joined: October 20, 2008
KitMaker: 1,069 posts
Armorama: 1,062 posts
Posted: Wednesday, November 11, 2009 - 10:45 PM UTC
Hay thanks for pointing out what you used to make you nonskid surface. I can get my hands on that here in the upper U.S. An I must say you did an "Outstanding" job on you Merkava tank line.

Building the impossible is my main goal. Build baby build never sleep!!
Panama
Joined: November 15, 2008
KitMaker: 19 posts
Armorama: 18 posts
Posted: Thursday, November 12, 2009 - 01:30 AM UTC
Thank you... As a beginner with less than a year on this hobby I'm still learning and your comments are very rewardings.

#261
North Carolina, United States
Joined: September 12, 2005
KitMaker: 395 posts
Armorama: 365 posts
Posted: Thursday, November 12, 2009 - 12:44 PM UTC
Wow Javier! Only a year?! That's some fantastic work on the Merks and the other projects you have going, where do you find the time? Sheesh!

The true soldier fights not because he hates what is in front of him, but because he loves what is behind him."
G. K. Chesterton
AMPS # 1140
Panama
Joined: November 15, 2008
KitMaker: 19 posts
Armorama: 18 posts
Posted: Friday, November 13, 2009 - 01:43 AM UTC
Little bit from time to time. I play soccer once a week, Surf from time to time... play Paintball and Airsoft on sundays... I work from 8am to 5pm every day and I study with my son every day... but I love to do this modeling hobby. Belive me.
Ontario, Canada
Joined: June 30, 2007
KitMaker: 75 posts
Armorama: 64 posts
Posted: Wednesday, March 03, 2010 - 03:51 PM UTC
Q. JAVIER color referace confusion thought the merkavas were finnished in syiani sand hummbrel 84 looks like you used h93 med. grey
United States
Joined: December 13, 2009
KitMaker: 420 posts
Armorama: 419 posts
Posted: Wednesday, March 03, 2010 - 04:19 PM UTC
Quoted Text
Q. JAVIER color referace confusion thought the merkavas were finnished in syiani sand hummbrel 84 looks like you used h93 med. grey
I can see were you are confused. He said nothing about using Humbrol The colors he used were:
Quoted Text
I used a Mixture of about 2/3 Olive Drab with 1/3 Khaki from Tamiya
Louisiana, United States
Joined: October 20, 2008
KitMaker: 1,069 posts
Armorama: 1,062 posts
Posted: Thursday, March 04, 2010 - 01:23 AM UTC
Hello Tranquilito I'm going to try do something like what you have done here with your Merkava collection. I'm planing on only doing a "Dor-Dalet" Line of Merkavas. An then add to the line up with a Namera line up of APCs and ARVs. So that will give me three Dor-Dalets and four othere tanks. I think that will be a cool collection of heavy IDF armor..

AN hay has any one thought of building the Mk. IV with out it's turrets side armor. Man that turret looks funny and thin.
Building the impossible is my main goal. Build baby build never sleep!!
North Carolina, United States
Joined: June 06, 2006
KitMaker: 4,691 posts
Armorama: 3,509 posts
Posted: Thursday, March 04, 2010 - 01:45 AM UTC
Wow,that is a super looking collection !!
Panama
Joined: November 15, 2008
KitMaker: 19 posts
Armorama: 18 posts
Posted: Thursday, March 04, 2010 - 01:55 AM UTC
Quoted Text
Hello Tranquilito I'm going to try do something like what you have done here with your Merkava collection. I'm planing on only doing a "Dor-Dalet" Line of Merkavas. An then add to the line up with a Namera line up of APCs and ARVs. So that will give me three Dor-Dalets and four othere tanks. I think that will be a cool collection of heavy IDF armor.. 
AN hay has any one thought of building the Mk. IV with out it's turrets side armor. Man that turret looks funny and thin.
Actually I have my Legends "Dor-Dalet" Merkavas IID and IIID in the box. I tried to start one, but working with resin was very different to the standard plastic models and I stoped for a while.
Bogota, Colombia
Joined: February 19, 2008
KitMaker: 8 posts
Armorama: 7 posts
Posted: Thursday, March 04, 2010 - 03:04 AM UTC
Hola Javier
Muy buen trabajo el que hiciste con los Merkavas , tengo algunas preguntas que hacerte, que material utlizaste el la parte superior del Mk IV para darle el efecto antideslizante y como lo aplicaste .
saludos.
Panama
Joined: November 15, 2008
KitMaker: 19 posts
Armorama: 18 posts
Posted: Thursday, March 04, 2010 - 03:15 AM UTC
Hola Luis Miguel:
Para la superficie anti-deslizante utilice Mr Surfacer 500 aplicado con un aerógrafo de esos bien baratos con alimentación inferior. Debes diluir un poco el Mr Surfacer ya que es muy espeso. La clave de todo es colocar el aerógrafo a una distancia como de 30 cm del modelo.
Es importante que tapes las areas que no llevan capa anti-deslizante, como son pernos, manijas, canaletas, etc. Para esto utilicé tiras delgadas de cinta adhesiva del de tamiya ( el amarillo) para las lineas y goma blanca de papel aplicada con brocha sobre el plastico virgen. No le apliques primer antes de la goma o se queda pegado. Esta goma al igual que la cinta luego las remueves cuando la capa antideslizante ya ha secado.
Saludos y suerte.


