German Feldgendarmerie - Miniart, 1/35
Joined: December 23, 2007
KitMaker: 1,596 posts
Armorama: 165 posts
Posted: Wednesday, November 11, 2009 - 09:24 PM UTC
Howdy,
I would like to start my new build-blog here. The topic is, as you see, the German Feldgendarmerie figure set.

Following this
LINK you can read my small review of the kit.
In this thread I would like to continue the building of the other figures.
As a supplement to the review I present here the back side of the bix with the painting schemes and assembly instruction.

Here's what I have so far, nothing more than in the review.


I already started a build of the second figure: soldier in the greatcoat nailing a sign. I'll post pics of it on weekend. See you then.
All constructive criticism and questions welcome!
Joined: December 23, 2007
KitMaker: 1,596 posts
Armorama: 165 posts
Posted: Friday, November 13, 2009 - 09:32 AM UTC
Dublin, Ireland
Joined: November 27, 2004
KitMaker: 6,048 posts
Armorama: 4,619 posts
Posted: Friday, November 13, 2009 - 10:35 AM UTC
Terrific, Looking forward to seeing more.
Pat
work to become not to acquire
Joined: December 23, 2007
KitMaker: 1,596 posts
Armorama: 165 posts
Posted: Tuesday, November 17, 2009 - 08:23 PM UTC
Thank you Pat, I'm doing my best

I hope to finish that guy

first and start to compose the vignette. I have to check the refferences about the greatcoat of the second soldier before I'll do another "upgrades". I'll post the latest pics as soon as possible.
Joined: December 23, 2007
KitMaker: 1,596 posts
Armorama: 165 posts
Posted: Monday, November 23, 2009 - 01:11 AM UTC
Sorry for bothering you, but I would like to ask you for help.
I can't find a picture showing the back of the kradmantel and the tucks marked on the picture. I don't know how should I thin or shade it on the figure... If you have any pics or just know how to do it I will be very gratefull for any support.

Joined: December 23, 2007
KitMaker: 1,596 posts
Armorama: 165 posts
Posted: Tuesday, November 24, 2009 - 03:02 AM UTC
Carlow, Ireland
Joined: June 05, 2006
KitMaker: 438 posts
Armorama: 352 posts
Posted: Tuesday, November 24, 2009 - 05:33 AM UTC
Michal ,
have a look at the pictures in this reenactor web site the is a good picture of a Copy of a motorcycle coat that might be useful to you
lssah.com Best
jerry
Stout, Hey that Bailey crap, you got it amongst this stuff?
Vandeleur, When you refer to Bailey crap I take it you mean that glorious, precision-made, British-built bridge which is the envy of the civilized world?
Joined: December 23, 2007
KitMaker: 1,596 posts
Armorama: 165 posts
Posted: Tuesday, November 24, 2009 - 06:47 PM UTC
Thank you Jerry, you're right - it's helpfull. It was a bit difficult for me to gues how the tucks overlap eachother, but now it's pretty simple. Watch for the next update soon.
Joined: December 23, 2007
KitMaker: 1,596 posts
Armorama: 165 posts
Posted: Saturday, November 28, 2009 - 02:21 AM UTC
Hi again,
well, here's how I solved the problem with the tucks. As you see the figre was primed once but needed "some" sanding so needs priming once again.


I have also removed the MP belt imitation injected in plastic - I'm going to scratch build it again using very thin brass or aluminium foil.


Second guy is already painted with the main colours: uniform green, black boots and the belt. I wonder about painting the trousers in grey to imitate early war uniform but I don't know yet what coulors should I use. If you have any ideas or suggestions I'm be very interested to hear it.
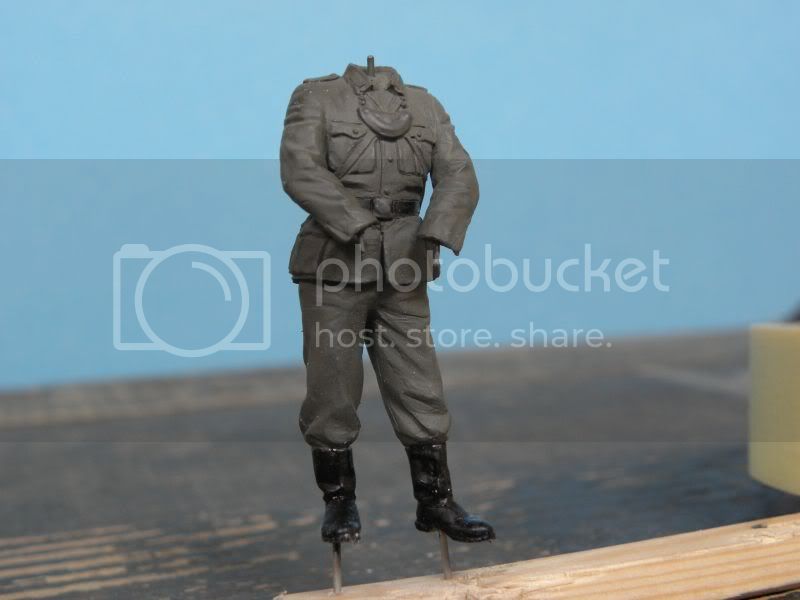

The figure is painted using Model Master enamel "Marine Corps Green" - it's good for painting ww1 british biplane and the german ww2 uniform. Absolutely universal colour
Of course all comments and critiqe is welcome.
England - West Midlands, United Kingdom
Joined: November 03, 2007
KitMaker: 61 posts
Armorama: 56 posts
Posted: Saturday, November 28, 2009 - 04:01 AM UTC
Nice work. The extra effort with aspects such as the collars and straps will really pay off when painting I think.
What filler did you use for areas like arm joints. I am using either green tube pytty or tip-ex
Thanks
Stuart
Joined: December 23, 2007
KitMaker: 1,596 posts
Armorama: 165 posts
Posted: Saturday, November 28, 2009 - 08:58 PM UTC
Thank you Stuart. I used the cheapest putty I could get in the model-shop: Revel Plasto
I applied it with a toothpic and then treated with a fine file and sanding paper, sometimes very sharp knife. So, nothing special as you see...
England - West Midlands, United Kingdom
Joined: November 03, 2007
KitMaker: 61 posts
Armorama: 56 posts
Posted: Sunday, November 29, 2009 - 01:37 AM UTC
Does the job through. I often use plasto as it's available where I live. Other products have to be sourced from father afield.
As well as a toothpick, try using small ofcsuts of plastic card, cut to the required shape. This enables you to 'custom-make' your own tools.
Keep up the good work!
Stuart
Joined: December 23, 2007
KitMaker: 1,596 posts
Armorama: 165 posts
Posted: Thursday, January 14, 2010 - 11:36 PM UTC
Joined: December 23, 2007
KitMaker: 1,596 posts
Armorama: 165 posts
Posted: Sunday, June 13, 2010 - 02:36 AM UTC
Joined: December 23, 2007
KitMaker: 1,596 posts
Armorama: 165 posts
Posted: Saturday, June 19, 2010 - 09:08 PM UTC
Joined: December 23, 2007
KitMaker: 1,596 posts
Armorama: 165 posts
Posted: Friday, March 18, 2011 - 08:36 AM UTC
CMOT
 Editor-in-Chief
England - South West, United Kingdom
Joined: May 14, 2006
KitMaker: 10,954 posts
Armorama: 8,571 posts
Posted: Friday, March 18, 2011 - 09:42 AM UTC
Michal this is excellent work you are doing on these figures, I wish I could match your work on them.
Joined: December 23, 2007
KitMaker: 1,596 posts
Armorama: 165 posts
Posted: Friday, March 18, 2011 - 07:48 PM UTC
Thanks Darren for you very kind words but I didn't do anything special, I just removed some unnecessary plastic to corrugate the uniforms and the imitations of stripes with a sharp knife.
Next step which I'm going to do is to scratch build the shoulder straps using a thin aluminium stripes and then do some priming with the Gunze surfacer.
Joined: December 23, 2007
KitMaker: 1,596 posts
Armorama: 165 posts
Posted: Sunday, October 23, 2011 - 06:19 AM UTC

#130
Noord-Holland, Netherlands
Joined: June 07, 2002
KitMaker: 8,797 posts
Armorama: 4,190 posts
Posted: Sunday, October 23, 2011 - 07:33 AM UTC
Very nice work on this set... I used the two figures on the right hammering signs to the post with my Zundapp KS800 Allthough I didn't put as much effort in it as you did with all the mods. Great job with all the straps and other details. Looking forward to what you are going to do with the other figures.
Greetz Robert "FAUST" Blokker
"Wees niet onverstandig, haastig of voortvarend; alles sal regkom, as ons almal ons plig doen".
FUTBOL KAVGADIR!!!!!!!
Hamilton, New Zealand
Joined: October 18, 2011
KitMaker: 21 posts
Armorama: 19 posts
Posted: Sunday, October 23, 2011 - 02:03 PM UTC
these figs are looking great,nice work. i have built these and i used a decal set as an addition.
az
Joined: December 23, 2007
KitMaker: 1,596 posts
Armorama: 165 posts
Posted: Sunday, October 23, 2011 - 08:16 PM UTC
Thanks guys for your comments.
I'm certainly not satisfied with the helmet so it will be completely reworked this week. There's also missing a hanger hook (I don't know the proper word in english for that) on the short strap of the gas mask. I made it using alumunium fret but it's missing now, I will have to make it again. I will also rework the trigger guard to the proper shape. I plan to use the Tamiya decals for all the straps, insignias, gorget etc. This is my fourth figure ever made so don't expect any fireworks here.
Joined: December 23, 2007
KitMaker: 1,596 posts
Armorama: 165 posts
Posted: Wednesday, December 07, 2011 - 11:53 PM UTC
Barcelona, Spain / España
Joined: August 31, 2005
KitMaker: 1,380 posts
Armorama: 845 posts
Posted: Thursday, December 08, 2011 - 12:13 AM UTC
nice work michal ! Neat and clean.
Best,
Julien
http://leroyaumedekinggeorges.blogspot.fr/
Joined: December 23, 2007
KitMaker: 1,596 posts
Armorama: 165 posts
Posted: Thursday, December 08, 2011 - 08:37 PM UTC
Many thanks Julien. Yesterday I made the last touch-ups to the hands, rifle and on the coat, where the Humbrol enamel chipped from the primer. I hope to spray the last coats of varnish this weekend. All that need to be done is a basic stand and the "HALT" signal board the guy holds in the right hand (it has to be scratchbuild).