_GOTOBOTTOM
Armor/AFV: AA/AT/Artillery
For discussions about artillery and anti-aircraft or anti-tank guns.
Hosted by Darren Baker
Korean Hammer No. 9 - Academys brandnew K-9
Black_sheep
Visit this Community
Bayern, Germany
Joined: December 11, 2009
KitMaker: 823 posts
Armorama: 170 posts
Posted: Sunday, December 13, 2009 - 04:35 AM UTC
Guten Tag,

I´m a long and interest watcher of the forums and blogs here and now I would like to try my very first blog here. Its about the South Korean self propelled howitzer K-9, resembled by the brandnew Academy kit, together with the D-Toys barrel and accessoirs set and WindMarkModels R.O.K. Tank crew. Very much thank you here again to Mr. Kyong-Jae Lee which was so friendly to get these limited items for me. I think I´m the first German who have this set in work now


bison126
Visit this Community
Correze, France
Joined: June 10, 2004
KitMaker: 5,329 posts
Armorama: 5,204 posts
Posted: Sunday, December 13, 2009 - 05:20 AM UTC
Hello,
it's quite an original kit you've got there. You're a lucky man as I don't think it will hit the shelves soon.

Please give us your impressions about it and feel free to share your feeling during the build.

Olivier
Black_sheep
Visit this Community
Bayern, Germany
Joined: December 11, 2009
KitMaker: 823 posts
Armorama: 170 posts
Posted: Friday, December 18, 2009 - 01:56 AM UTC
Well its weekend and I have some time for my K9 . You know boys like guns, big boys like big guns. Oh boy and this is a really huge one. Although its not in the instruction step 1 I decided to finish the gun barrel first and I used the turned aluminium segments and the smoke evacuator out of resin from D-Toys as this is a very useful and timesaving alternative to the multi-parts barrel from the original kit. For the muzzle D-Toys provided us with two different choices: either you will use the muzzle brake or a wrapped up muzzle. I used the last one because I like the look very much. The muzzle brake out of resin is not very useful because there is some cleanup and actually I feel Academy´s part is more nicer here look for yourself:

http://i445.photobucket.com/albums/qq173/Taikyoku_2008/Korean%20Hammer%20K9/Bild005.jpg

http://i445.photobucket.com/albums/qq173/Taikyoku_2008/Korean%20Hammer%20K9/Bild007.jpg

Removed by original poster on 12/18/09 - 18:52:36 (GMT).
Black_sheep
Visit this Community
Bayern, Germany
Joined: December 11, 2009
KitMaker: 823 posts
Armorama: 170 posts
Posted: Friday, December 18, 2009 - 06:59 AM UTC


gcdavidson
Visit this Community
Ontario, Canada
Joined: August 05, 2003
KitMaker: 1,698 posts
Armorama: 1,563 posts
Posted: Friday, December 18, 2009 - 10:59 AM UTC
I wonder if the kits (or the D-toys) muzzle brake could be used for a Dutch 155mm M-139?

RichardM
Visit this Community
Quebec, Canada
Joined: August 13, 2006
KitMaker: 383 posts
Armorama: 358 posts
Posted: Saturday, December 19, 2009 - 05:16 AM UTC
Great subject Thomas. The K-9 is a really nice looking SPG.

I must say I'm not on your side about the muzzle break. While the Dtoys one may need some cleaning I found that it is much more accurate than the one from Academy.

Thanks for the comparison picture. It will help me a lot when it come to try to correct the Academy part.

Does somebody know where that nice Dtoys upgrade can be buy? I did tried a few online store (including eBay) and can't find it? In fact, it's not even listed on Dtoys website
daffyduck
Visit this Community
United States
Joined: September 07, 2006
KitMaker: 164 posts
Armorama: 155 posts
Posted: Saturday, December 19, 2009 - 09:52 AM UTC
Excellent subject...

So, is this a license built SK version of the M109? That's one big ass gun!

Did you open that nice kit box yet?

Photos please....

Paul
eddiem54
Visit this Community
Scotland, United Kingdom
Joined: September 27, 2007
KitMaker: 34 posts
Armorama: 31 posts
Posted: Saturday, December 19, 2009 - 10:31 AM UTC
It is ROK designed and built by Samsung Techwin. Also built under license with some local variations in Turkey as the T-155 Firtina (Storm).
Black_sheep
Visit this Community
Bayern, Germany
Joined: December 11, 2009
KitMaker: 823 posts
Armorama: 170 posts
Posted: Saturday, December 19, 2009 - 05:12 PM UTC
well we have here -13°C during the day and a lot of snow in my part of Germany so I have plentiful time to build today *hehehe*.

@Richard: I´m afraid the D-Toys set is not available at the moment. I had the luck a friendly korean modeller collegue helped me out in optaining this set before it was gone. But as Academy said they will releas this kit in Europe next year I´m sure you will see this set and surely something from Legend also.

First of all I cleaned the resin bits from D-Toys exept the ammunition:
http://s445.photobucket.com/albums/qq173/Taikyoku_2008/Korean%20Hammer%20K9/?action=view¤t=Bild006.jpg

Now I started according to the manual with the undercarriage. The plastic is a litte bit on the soft side but without flash and very nice details. The only headache will be the antislip areas which are better articulated than on their Merkava 4 but still too subtle in my opinion... The booklet and the internet also don´t help you too much here as I don´t find pictures of the vehicles top until now :-(.

But this one later. Now I finished the wheel-madness and continue with the backside of the tank. Until now the building is straightforward and very easy:


Removed by original poster on 12/20/09 - 06:05:50 (GMT).
daffyduck
Visit this Community
United States
Joined: September 07, 2006
KitMaker: 164 posts
Armorama: 155 posts
Posted: Saturday, December 19, 2009 - 05:25 PM UTC
I don't see any pictures......

Make sure you include the image tags...
Black_sheep
Visit this Community
Bayern, Germany
Joined: December 11, 2009
KitMaker: 823 posts
Armorama: 170 posts
Posted: Saturday, December 19, 2009 - 06:04 PM UTC
I get mad with this

breathe deeeep and try again:

">

">
Black_sheep
Visit this Community
Bayern, Germany
Joined: December 11, 2009
KitMaker: 823 posts
Armorama: 170 posts
Posted: Sunday, December 27, 2009 - 12:22 AM UTC
resin parts

undercarriace
Black_sheep
Visit this Community
Bayern, Germany
Joined: December 11, 2009
KitMaker: 823 posts
Armorama: 170 posts
Posted: Sunday, December 27, 2009 - 06:03 AM UTC
Finally it looks like I solved my upload desasters and I can continue with this blog. Sorry for the readers for this delay but I hope these problems are gone now.

In the meantime I was able to continue with the building. The plastic of the kit is a little bit on the soft side but for me its ok and its very good to work with. I didn´t counted the parts of the kit but there are not as many parts like in Dragons boxes.

I continued with the backside of the vehicle and almost finished the hull. Now it was time to have a look on the antislip surface. The antislip surface is there, even a little bit more articulated than on their Merkava 4 but in my eyes still to less:

Photobucket

see also the closer look on the antislip surface of the turret:

Photobucket

Although, from the few clear pictures I have from this vehicle, there is not too much texture on the real antislip surfaces of the real ones but I decided to articulate it more with Cast-A-Coat. I think it worked ok for the first time and we will see how it looks everything after the first coat:

Photobucket

That´s it for today
gariwulf
Visit this Community
Busan, Korea / 대한민국
Joined: May 22, 2008
KitMaker: 40 posts
Armorama: 39 posts
Posted: Sunday, December 27, 2009 - 06:47 AM UTC
Hi Thomas,

Your building the K-9 attracts my attention, as you see, since I am a Korean
One caution; I've heard that there are some dimensionall and position issues on the final-drive housing.
I do not know the details well but you may find some works correcting those issues on the web.

I have been interested in the Bundesheer machines and tried to build the Revell PzH2000 a few years ago
but failed due to some reasons unfortunately.... I wish you could complete the K-9 as the first Germany

Waiting for your next posting!

Cheers,
Seung-il
Gorizont
Visit this Community
Sachsen, Germany
Joined: November 28, 2007
KitMaker: 1,462 posts
Armorama: 1,289 posts
Posted: Sunday, December 27, 2009 - 08:28 AM UTC
Thanks for sharing images and build-log of this interesting vehicle.
I look forward to see the next steps.

greetings...
Soeren

Black_sheep
Visit this Community
Bayern, Germany
Joined: December 11, 2009
KitMaker: 823 posts
Armorama: 170 posts
Posted: Wednesday, January 06, 2010 - 02:02 AM UTC
@ Seung-il and Soeren: Welcome aboard on my building log. I hope you will have a lot fun. If I will continue with the fun I had with this one until now I will start my next ROK project. I also have an K1A1 with some extra goodies for it in stash :-)

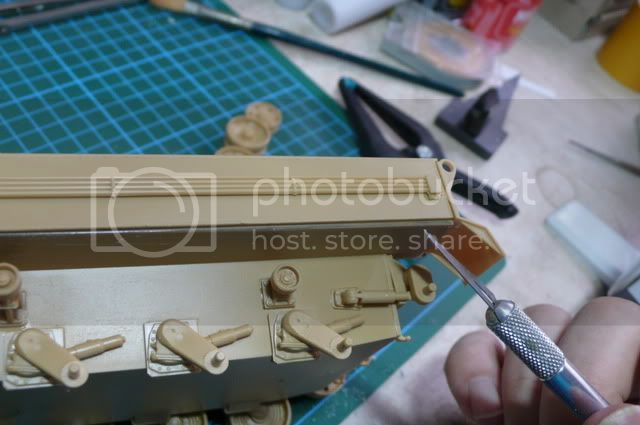
After some time fighting with the christmas goose *burp* (jep here in Germany most doesn´t eat turkey, they will have a goose) I continued with my joyful and smooth build with different small addings on the hull and turret. As I did it I discovered some things ACADEMY made too simple for my taste. I plan to let the hatches open because I have these wonderful Wind Mark Models crew but the hatch inside detail was not existing. Thats why I needed to add some improvement. Here you see the commanders hatch; I also drilled out the pennant holder on the base:

Photobucket

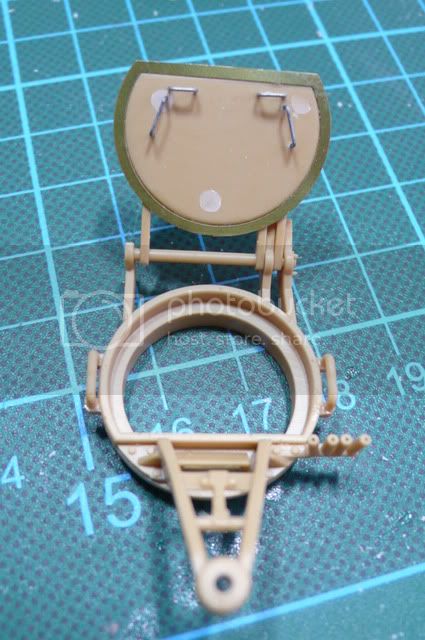
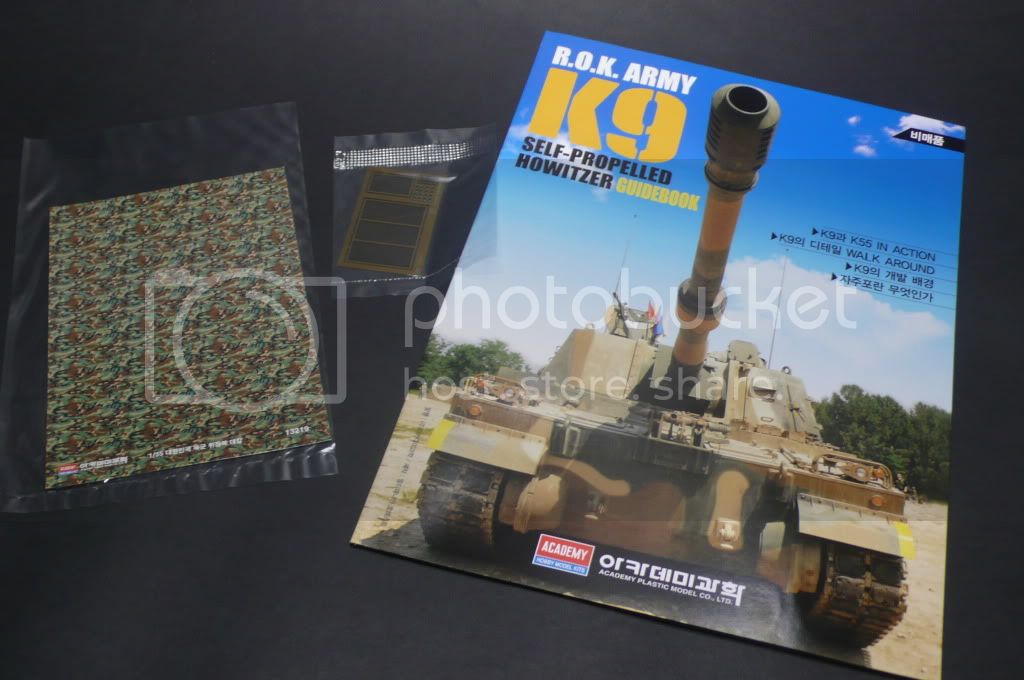
The range optics were also much too simplistic for my taste and I used the booklet and my spare parts box to improve this a little bit; now I´m quite satisfied with it:

Photobucket

ACADEMY´s plastic antenna bases were also too big and clumsy for use. I had a Voyager Models Antenna set at hand and used this for the first time. I paid about 9,-- EURO for this but I was very pleased. The antenna itself I didn´t used because the steel rod inside the small box was bended and I was not able to make it strait again but I also had a glasfibre antenna set from a german company called Bremod. The glasfibre is terriffic; it can be bended and don´t break too easily. Look at the difference:

Photobucket

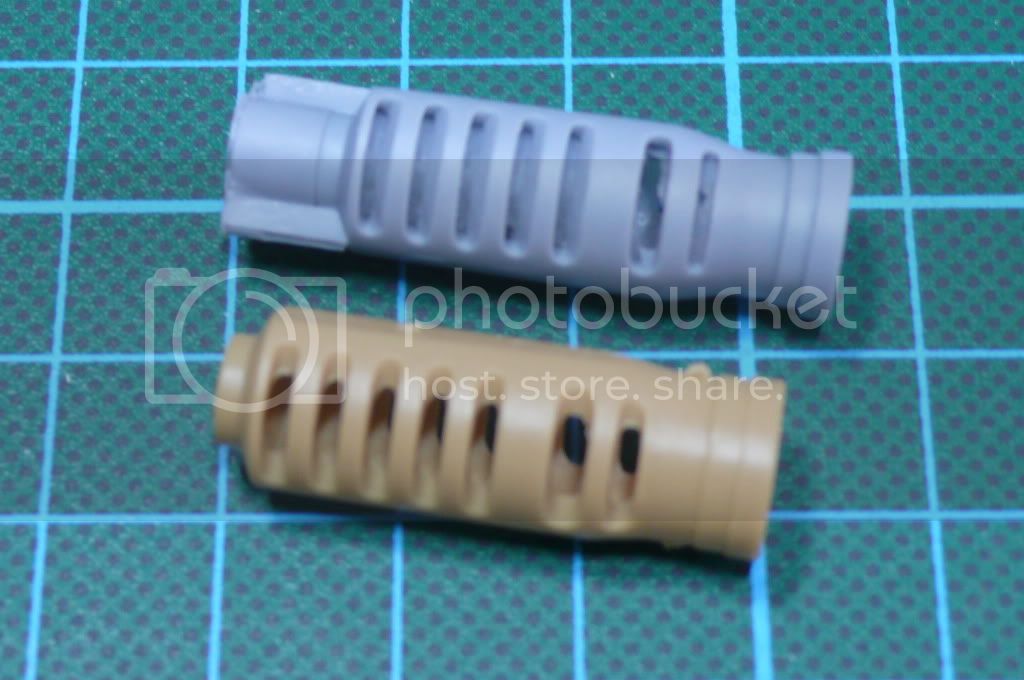
The D-Toys additional parts were also added now on the turret. But I have to say now there is some love-hate between me and this D-Toys kit. The love is because of the very nice turned barrel and the exquisit wrapped up muzzle break for traveling. The stowage for the rear baskets and the roof is also very usable and will improve the look considerably. But the rest of the set is pretty much useless. The tools are not much better then ACADEMY´s one. I just used it because of the straps which are molded on. The photoetch parts are also no big deal as the PE-Parts for the air intake and the exhaust is already inside ACADEMY´s box. The rings for the drivers and commanders hatches are also not exiting; they just should equalize the different material thickness of the hatches. I sanded down both and still used them neverthelless but if you look closely on the pictures there is a rubber running around the inside of the edges of these hatches for sealing. They could have made it easily with photoetch but they didn´t.. I also replaced the tow rope from the kit with a much more competent looking copper rope from MR-Models:

Photobucket

Now before I glued the bottom and top parts of the hull together this morning I discovered bad fitting on the lower part of the hull which needed to be sanded down before gluing:

Photobucket
bison126
Visit this Community
Correze, France
Joined: June 10, 2004
KitMaker: 5,329 posts
Armorama: 5,204 posts
Posted: Wednesday, January 06, 2010 - 03:55 AM UTC
Good job so far. The AM additions are giving a more operational look to your model.

How long is the model with the gun barrel fitted?

Olivier
Black_sheep
Visit this Community
Bayern, Germany
Joined: December 11, 2009
KitMaker: 823 posts
Armorama: 170 posts
Posted: Wednesday, January 06, 2010 - 04:23 AM UTC
Hello Olivier and thanks for your good comment. The barrel itself is about 24 cm long; the complete vehicle about 36 cm. So its not too small
Black_sheep
Visit this Community
Bayern, Germany
Joined: December 11, 2009
KitMaker: 823 posts
Armorama: 170 posts
Posted: Friday, January 08, 2010 - 02:33 AM UTC
Here we are: This morning I finished the building procedure of my howitzer. I made small final touches like the two flags (stolen from my NEOGRADE K1A1 accessoir set) in the pennant holders, some extra stowage on the turret top, one missing handle at the turret near the loaders hatch, the cable from the (to me unknown) device on top of the gun.

The kit itself was a joy and quick to build although there is always room for improvements which I did at some parts. If you want to go more deeper you could also work over the lock handles of the flaps and hatches as they are very simplistic made and too much on the thick side. But I wanted an easy build without too much PE orgy . The only thing which I´m not very pleased with is the tracks are a little bit sturdy and miss the sag; thats the shadow side when you don´t use single link tracks (which wouldn´t be available for this particular kit either) but this is nothing which I can not deal with later.

The M2HB Machine gun is nice (it consisted of 9 parts!) but I think I will replace it with a more sophisticated one because this will be an eyecatcher together with the commander standing inside the hatch. I´ve seen there is a (for me) new one from Voyager Models and I know there is a decent Machine gun set from TASCA. Anybody have already experience with that Voyager Machinegun?

Here are the pics of the finished build; lets start the painting:

Photobucket

Photobucket

Photobucket

Photobucket
Gundam-Mecha
Visit this Community
England - South East, United Kingdom
Joined: August 05, 2009
KitMaker: 1,019 posts
Armorama: 933 posts
Posted: Friday, January 08, 2010 - 11:26 AM UTC
Fantastic looking kit Thomas and a great build.

The resin stowage in particular is very impressive.

What are the tracks? Vinyl included in the kit? They seem to be lower quality than the rest of the build which is why I ask. I guess given the specialist nature of this kit you don't have much in the way of choice for tracks though.
Black_sheep
Visit this Community
Bayern, Germany
Joined: December 11, 2009
KitMaker: 823 posts
Armorama: 170 posts
Posted: Saturday, January 09, 2010 - 12:30 AM UTC
Hello Jon,

yes regrettably these tracks are vinyl but I will improve the look with some needles after I painted everything so that the sag is more realistic. The special edition was just meaning the kit with a small booklet in korean language, a camouflage decal for the figures (I don´t have any clue how to use it) and a small photoetch set for the grille.
Black_sheep
Visit this Community
Bayern, Germany
Joined: December 11, 2009
KitMaker: 823 posts
Armorama: 170 posts
Posted: Sunday, January 17, 2010 - 03:20 AM UTC
Here we are again
Yesterday I found time to prime the whole one. I used Humbrol enamel color to get a good surface for my Vallejo colors:

Photobucket

I´m quite satisfied with the look of the antislip unter paint now:

Photobucket

Now I can dare to paint it with the camouflage colours
bison126
Visit this Community
Correze, France
Joined: June 10, 2004
KitMaker: 5,329 posts
Armorama: 5,204 posts
Posted: Sunday, January 17, 2010 - 05:54 AM UTC
I understand how you're feeling ! But be brave, we still are with you

Olivier
 _GOTOTOP