


Hosted by Darren Baker
Battle in the Low Countries

Plasticbattle

#003

Joined: May 14, 2002
KitMaker: 9,763 posts
Armorama: 7,444 posts

Posted: Saturday, January 23, 2010 - 02:00 AM UTC
Hi Randy. Amazing details for this scale. Looking great already!


retiredbee2

Joined: May 04, 2008
KitMaker: 757 posts
Armorama: 518 posts

Posted: Saturday, January 23, 2010 - 04:26 AM UTC
Hi Randy....here is an idea, Why not illuminate the interior with some tiny ligt bulbs like you can get at the model rail road places. It will probably help show the detail and it in itself would be a novelty.........2 cents. All the same ,this project is sooooo terrific...................Al

Mars_Volta

Joined: March 28, 2005
KitMaker: 145 posts
Armorama: 124 posts

Posted: Saturday, January 23, 2010 - 05:10 AM UTC
A-MA-ZING!
Very original and so gorgeously detailled. I'm really fond of all your timber work.
Peace
Phil
Very original and so gorgeously detailled. I'm really fond of all your timber work.
Peace
Phil
randyd
Joined: July 04, 2009
KitMaker: 241 posts
Armorama: 199 posts
Posted: Saturday, January 23, 2010 - 12:31 PM UTC
Some replies...
Hi Dave, Thank you for looking in on this!
Scott, I am glad you like it...
Thanks Frank, I try not to make too many compromies to scale, but there are always some

Hello Al, I think that this is what you are suggesting?.....


The photos above are of another project where I'm using some minuture 12Volt bulbs. It would help to see the details but I don't think it will fit in to the " after the battle " scene??
Have to think on this, thank you for bringing it up
Randy
pzcreations
Joined: May 24, 2006
KitMaker: 2,106 posts
Armorama: 1,116 posts
Posted: Saturday, January 23, 2010 - 12:39 PM UTC
dang thats some serious work Randy..very nice..wish I had that kind of time

HONEYCUT

Joined: May 07, 2003
KitMaker: 4,002 posts
Armorama: 2,947 posts

Posted: Saturday, January 23, 2010 - 12:57 PM UTC
Geez Randy there is some gorgeous work being done here... The varieties in materials are all presented well. Those last couple of shots with lighting are super! Are they also this scale?
Brad
Brad
Gundam-Mecha

Joined: August 05, 2009
KitMaker: 1,019 posts
Armorama: 933 posts

Posted: Sunday, January 24, 2010 - 08:16 AM UTC
The attention to detail really is amazing. I had no idea it was braille scale either, looking at the pictures I thought it was 1:35, 1:48 at the smallest.
Wow, really equisite work for such a compact size. How do you fit it all in?
Wow, really equisite work for such a compact size. How do you fit it all in?
randyd
Joined: July 04, 2009
KitMaker: 241 posts
Armorama: 199 posts
Posted: Wednesday, January 27, 2010 - 04:29 AM UTC
Hi All,
Phil, I missed thanking you earlier, Glad you like the timber!
Tim, It does take some time, I don't produce much in a year compared to most others

Hi Brad, Those last two are 1/48 scale
Hello Jon, Thank you for commenting
Will post an update soon I hope, Thanks to help from a new friend in Belgium ( Thanks, Steffen, reall appreciate all the photos
) I think I might have to move the location of my dio. Turns out my ref pics of natural stone buildings were all of small private type dwellings like barns and garages. Seems like any kind of commerical buildings in this area of the country, even old structures like what I was protraying, would be of brick and rather ornate. Was not trying to be super accrurate here but wanted it to plausible. It is starting to bug me! Hmmmm, I do have a really cool little vickers 6 ton tank that was used by the poles in 1939, off to mine the web for some pics...
Randy

Gorizont

Joined: November 28, 2007
KitMaker: 1,462 posts
Armorama: 1,289 posts
Posted: Wednesday, January 27, 2010 - 07:50 AM UTC
That´s an interesting project!
I didn´t knew, that there model-kits of machines are available.
There is a lot of stuff and details in this workshop... looks great!
Casting own wall-sections seems to be a good choice... and the results are fantastic!
greetings...
Soeren
I didn´t knew, that there model-kits of machines are available.
There is a lot of stuff and details in this workshop... looks great!
Casting own wall-sections seems to be a good choice... and the results are fantastic!
greetings...
Soeren
barbacanosa

Joined: August 09, 2005
KitMaker: 296 posts
Armorama: 250 posts

Posted: Wednesday, January 27, 2010 - 09:16 AM UTC
Fabulous work, a large building with lots of details and everything
It does this with great quality
Domi
It does this with great quality
Domi

arkhunter
Joined: June 11, 2006
KitMaker: 116 posts
Armorama: 95 posts
Posted: Wednesday, January 27, 2010 - 02:03 PM UTC
Wow!
It looks incredible! Casting your own wall sections sounds like such a great idea. I think I'll be keeping that thought in my mind for my next dio.
Take care,
Austin
It looks incredible! Casting your own wall sections sounds like such a great idea. I think I'll be keeping that thought in my mind for my next dio.
Take care,
Austin
randyd
Joined: July 04, 2009
KitMaker: 241 posts
Armorama: 199 posts
Posted: Tuesday, February 23, 2010 - 04:34 AM UTC
Hi Folks, Finally some sort of update to this project, but first....
Sorry for the late replies guys
Soren, Thank you and in the smaller scales there is alot of machinery kits in the train section. I have to be careful about where stuff goes and what will be next to it. The pieces tucked in the back of the shop are some of the smaller stuff. Figures next to these would not look right. The steam engine outside the back wall is a larger piece and figs or vehicles around it would look fine.
Domi, Thank you for commenting!
Hi Austin, Glad you like it, plaster is a great medium for stone and brick but it is fragile
Making some progress on the structure...


The door and windows are not glued yet. Trying to get a feel for damaging them, checking lots of reference photos. more work to come on the damaged interior framing. I am going to switch to a metal outside staircase. ...
Wanted a break from the building so I started on some armor for the scene.
I am starting with a Pz.Kpfw.IV Ausf. D. Could not find one but did find a really nice F1 by Dragon. Will modify this back to a D......
Started by creating the "bowed out" section for the drivers side and putting in the radio man's machine gun....


The turret needed major work...


The back end needs new mufflers ....


That is all for now, as always your comments are welcome!
Randy

Toffyman

Joined: October 16, 2006
KitMaker: 55 posts
Armorama: 54 posts
Posted: Tuesday, February 23, 2010 - 11:56 PM UTC
Absolutely stunning. Incredible, fantastic, wow!!!!!
randyd
Joined: July 04, 2009
KitMaker: 241 posts
Armorama: 199 posts
Posted: Wednesday, February 24, 2010 - 04:26 AM UTC
Hi Russ, Glad you like it!!
Randy

bobman331
Joined: April 13, 2009
KitMaker: 177 posts
Armorama: 142 posts

Posted: Wednesday, March 03, 2010 - 09:35 AM UTC
1/76? thisz is more insane than my scratchbuilt superdetailed 148 kettn kraftrad. 
randyd
Joined: July 04, 2009
KitMaker: 241 posts
Armorama: 199 posts
Posted: Wednesday, March 03, 2010 - 01:18 PM UTC
Hello Erik, Thank you for commenting!!
Randy
bobman331
Joined: April 13, 2009
KitMaker: 177 posts
Armorama: 142 posts
Posted: Saturday, March 06, 2010 - 06:37 PM UTC
lhow do you get the tiny metal shavings in that workshop? steel wool?
Kuno-Von-Dodenburg

Joined: February 20, 2007
KitMaker: 1,453 posts
Armorama: 1,319 posts

Posted: Saturday, March 06, 2010 - 09:52 PM UTC
I have to be honest Randy, when I clicked on the thread and saw in your opening line "It will be a fairly large diorama... "my immediate reaction was "here we go again, another grand overblown idea that's bound to fizzle out and come to nothing / these big dios seldom work ..." etc. etc.
Then the further I scrolled down through the photos, the more utterly gobsmacked I became not just at your obviously amazing modelling skills but also your attention to detail. Then when I read it was braille scale, I almost fell out of my chair. Once it's finished I can see this one being one of those jaw-dropping dios that every time you look at it, you notice something new.
This piece has echoes of Bob Letterman in his prime. Awesome work. Be sure to keep us updated with your progress!
Steve
randyd
Joined: July 04, 2009
KitMaker: 241 posts
Armorama: 199 posts
Posted: Monday, March 08, 2010 - 02:53 AM UTC
Hi Erik, Not steel wool, just real metal shavings from the various "white metal " kits I am using. They usually need alot of cleanup with files and drills!
Hello Steve, Thank you for the kind words
Speaking of the master, he is still going strong. Check out his latest super dio at TanksandThings.com.Randy
jointhepit

Joined: May 14, 2006
KitMaker: 3,829 posts
Armorama: 881 posts
Posted: Thursday, March 11, 2010 - 10:00 PM UTC
NUTS!
great stuff man!
great stuff man!

randyd
Joined: July 04, 2009
KitMaker: 241 posts
Armorama: 199 posts
Posted: Tuesday, March 16, 2010 - 03:05 AM UTC
Thank you for commenting, Tha Pit
An update on the tank today.....
Work continues on the Pz. IV D. Will use a set of fenders from Part that are for the Revell kit and will use some of the Eduard pe set.
The fenders come up a bit short so I extended them with plastic at the rear. Also soldered some brass angle to the underside for more secure mounting to the hull. The rear fender flaps are rendered flat so I added the sides to them and made up some springs also...


The tools are from the stash or made up from plastic....

Soldered an upright portion to the flat etch antenna deflector and added brass mg barrels from Arber...


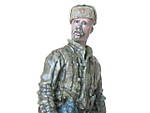
The figs are some of Millicast's early panzer tank crew.
Still more to do on backdating the tracks and running gear along with fixing the cupala.............
That is all for now, as usual all comments are welcome..........Randy
[email protected]
Pavlovsdog
Joined: June 05, 2006
KitMaker: 438 posts
Armorama: 352 posts

Posted: Tuesday, March 16, 2010 - 03:28 AM UTC
Randy,
Your work is fantastic , you get more detail in on 1/72 than i can in 1/35 superb
Jerry
Your work is fantastic , you get more detail in on 1/72 than i can in 1/35 superb
Jerry

AngelleSambre
Joined: March 10, 2010
KitMaker: 3 posts
Armorama: 2 posts
Posted: Tuesday, March 16, 2010 - 04:46 AM UTC
I like the stairwell a lot... I have been casting mine in 1/72 out of resin... and yes... modelling realistic damage is just as, if not more challenging than the actual building! Looks great, keep up the work and posts!
randyd
Joined: July 04, 2009
KitMaker: 241 posts
Armorama: 199 posts
Posted: Wednesday, March 17, 2010 - 04:07 AM UTC
Hi Jerry, Glad you like it
Hi Andrew, Thank you, I think I've decided to switch to a metal staircase for the outside. Hopefully the twisted up metal can give the damaged area a little pop. The wood stairs will be used in the interior.
Randy
randyd
Joined: July 04, 2009
KitMaker: 241 posts
Armorama: 199 posts
Posted: Tuesday, April 20, 2010 - 05:48 AM UTC
Hello All, Finally a small update on this project....
Got some paint on the tank, please ignore the tracks and running gear as they are not complete.....


Markings and stowage are still to come.
The steam engine needs a boiler and water pump along with the piping....


Also getting some work done on the new staircase. Wanted to switch to metal stairs on the outside of the factory. Grantline Products make some nice railings in 1/87th scale that with a little work will be fine...


Working on some walls in the damaged area...


Putting in a loading dock and building up some doors for this area...


That is all for now, as always comments are welcomed , Randy
 |

WEB HOSTING BY


Copyright ©2021 Armorama and Kitmaker Network, a subsidiary of Silver Star Enterprises
All Rights Reserved. Please read our Conditions of Use and Privacy Policy.
All Rights Reserved. Please read our Conditions of Use and Privacy Policy.