This is a project I have been working on and off on for a little while. I wanted to build an M48A3 without its engine to put on my M123A1C w/M15A2 trailer. I used the Tamiya M48A3 and a Verlinden M48A3 engine and compartment set. The model and engine compartment went together without any real issues. I applied a few of the M48A3 tweaks to the kit. I drilled out the mud relief holes on the sprockets, added a 1mm shim to correct the turret height, and replaced the loader's hatch handle with thin wire. I also added A&B putty on the mantlet cover and on the Commander's MG cover. I added lift rings to the commander's cupola as well. I also replaced the crappy kit tracks with AFV Club's excellent workable track set. Lastly, I added a few hoses and wires to the engine compartment to add some details.
Here it is:
More pics here.
As always, all comments welcomed.
Thanks for looking.
Hosted by Darren Baker
M48A3 sans engine - pics
HeavyArty
Florida, United States
Joined: May 16, 2002
KitMaker: 17,694 posts
Armorama: 13,742 posts
Joined: May 16, 2002
KitMaker: 17,694 posts
Armorama: 13,742 posts
Posted: Tuesday, March 09, 2010 - 06:55 AM UTC
rfbaer
Texas, United States
Joined: June 12, 2007
KitMaker: 1,866 posts
Armorama: 1,696 posts
Joined: June 12, 2007
KitMaker: 1,866 posts
Armorama: 1,696 posts
Posted: Tuesday, March 09, 2010 - 08:54 AM UTC
Very nice, and you got to build the suspension without having to lower it........
HeavyArty
Florida, United States
Joined: May 16, 2002
KitMaker: 17,694 posts
Armorama: 13,742 posts
Joined: May 16, 2002
KitMaker: 17,694 posts
Armorama: 13,742 posts
Posted: Tuesday, March 09, 2010 - 12:22 PM UTC
Quoted Text
Very nice, and you got to build the suspension without having to lower it........
Thanks Russ, and yes, that was definitely a plus.
210cav
Virginia, United States
Joined: February 05, 2002
KitMaker: 6,149 posts
Armorama: 4,573 posts
Joined: February 05, 2002
KitMaker: 6,149 posts
Armorama: 4,573 posts
Posted: Tuesday, March 09, 2010 - 01:04 PM UTC
Gino--once again, a superb model! Great job. Pictures are great.
Continue the fine effort.
DJ
Continue the fine effort.
DJ
HeavyArty
Florida, United States
Joined: May 16, 2002
KitMaker: 17,694 posts
Armorama: 13,742 posts
Joined: May 16, 2002
KitMaker: 17,694 posts
Armorama: 13,742 posts
Posted: Tuesday, March 09, 2010 - 02:39 PM UTC
Thanks DJ. It was a fun build.
TankCarl
Rhode Island, United States
Joined: May 10, 2002
KitMaker: 3,581 posts
Armorama: 2,782 posts
Joined: May 10, 2002
KitMaker: 3,581 posts
Armorama: 2,782 posts
Posted: Wednesday, March 10, 2010 - 11:38 AM UTC
Gino, I think it would shift to nose heavy,with the pack removed. Our M60A2's did. I like the addition of the cables in the engine bay.I recall about 4 on the pre-RISE engines.
HeavyArty
Florida, United States
Joined: May 16, 2002
KitMaker: 17,694 posts
Armorama: 13,742 posts
Joined: May 16, 2002
KitMaker: 17,694 posts
Armorama: 13,742 posts
Posted: Wednesday, March 10, 2010 - 03:04 PM UTC
Thanks Karl. The Tamiya kit already has a high stance since it was based on a museum piece w/o an engine it. It is a little higher in the rear as well. You can see it better in this pic:
Posted: Wednesday, March 10, 2010 - 05:59 PM UTC
Nice work Gino!
HeavyArty
Florida, United States
Joined: May 16, 2002
KitMaker: 17,694 posts
Armorama: 13,742 posts
Joined: May 16, 2002
KitMaker: 17,694 posts
Armorama: 13,742 posts
Posted: Thursday, March 11, 2010 - 12:09 AM UTC
Thanks Mark.
martyncrowther
England - West Midlands, United Kingdom
Joined: September 12, 2007
KitMaker: 1,548 posts
Armorama: 1,407 posts
Joined: September 12, 2007
KitMaker: 1,548 posts
Armorama: 1,407 posts
Posted: Thursday, March 11, 2010 - 12:15 AM UTC
Great stuff Gino, I like this a lot.
Kuno-Von-Dodenburg
England - North, United Kingdom
Joined: February 20, 2007
KitMaker: 1,453 posts
Armorama: 1,319 posts
Joined: February 20, 2007
KitMaker: 1,453 posts
Armorama: 1,319 posts
Posted: Thursday, March 11, 2010 - 12:38 AM UTC
Good-looking build, Gino. And that's one neat solution to that kit's too-high suspension issues!
How did you find the AFV Club tracks to assemble? I ask because I had a set of their M-47 tracks and they were a nightmare (I gave up on them in the end).
- Steve
How did you find the AFV Club tracks to assemble? I ask because I had a set of their M-47 tracks and they were a nightmare (I gave up on them in the end).
- Steve
HeavyArty
Florida, United States
Joined: May 16, 2002
KitMaker: 17,694 posts
Armorama: 13,742 posts
Joined: May 16, 2002
KitMaker: 17,694 posts
Armorama: 13,742 posts
Posted: Thursday, March 11, 2010 - 02:50 AM UTC
Thanks Martyn and Steve.
Steve, the AFV Club M48/M60 tracks go together much better than the T80/T84 tracks for the Pershing tanks. They have thicker end pins and the center guides are molded onto the track pads. I too have tried the T80/T84 tracks and gave up on them. They are too fragile and the center guides as separate pieces is nuts.
Kuno-Von-Dodenburg
England - North, United Kingdom
Joined: February 20, 2007
KitMaker: 1,453 posts
Armorama: 1,319 posts
Joined: February 20, 2007
KitMaker: 1,453 posts
Armorama: 1,319 posts
Posted: Thursday, March 11, 2010 - 03:19 AM UTC
Quoted Text
Steve, the AFV Club M48/M60 tracks go together much better than the T80/T84 tracks for the Pershing tanks. They have thicker end pins and the center guides are molded onto the track pads. I too have tried the T80/T84 tracks and gave up on them. They are too fragile and the center guides as separate pieces is nuts.
That's good to know, Gino. Thanks. In that case, I may invest in a set for an M60 build I have lined up.
Your experience with the T80/T84s mirror mine exactly. I wouldn't recommend them to anyone.
- Steve
KoSprueOne
Myanmar
Joined: March 05, 2004
KitMaker: 4,011 posts
Armorama: 1,498 posts
Joined: March 05, 2004
KitMaker: 4,011 posts
Armorama: 1,498 posts
Posted: Thursday, March 11, 2010 - 01:34 PM UTC
I didn't know about the info regarding the museum piece without an engine. Good to know.
fine looking build and paint, Gino. Your handling of the epoxy putty looks realistic too
HeavyArty
Florida, United States
Joined: May 16, 2002
KitMaker: 17,694 posts
Armorama: 13,742 posts
Joined: May 16, 2002
KitMaker: 17,694 posts
Armorama: 13,742 posts
Posted: Thursday, March 11, 2010 - 02:06 PM UTC
Thanks KoSprueOne, it was a fun build.
joegrafton
United Kingdom
Joined: October 04, 2009
KitMaker: 1,209 posts
Armorama: 1,143 posts
Joined: October 04, 2009
KitMaker: 1,209 posts
Armorama: 1,143 posts
Posted: Friday, March 12, 2010 - 10:38 AM UTC
Hiya Gino,
Firstly, a fine looking model you've built there!
Also, what about the truck & trailer rig?
Tell us a little bit about that. Are they from Real Model?
All the best.
Joe.
Firstly, a fine looking model you've built there!
Also, what about the truck & trailer rig?
Tell us a little bit about that. Are they from Real Model?
All the best.
Joe.
HeavyArty
Florida, United States
Joined: May 16, 2002
KitMaker: 17,694 posts
Armorama: 13,742 posts
Joined: May 16, 2002
KitMaker: 17,694 posts
Armorama: 13,742 posts
Posted: Friday, March 12, 2010 - 01:58 PM UTC
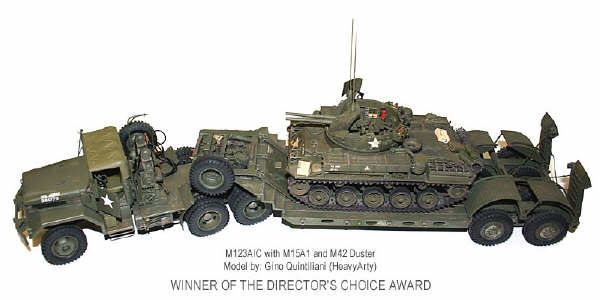
Thanks Joe. The M123A1C and M15A2 trailer were scratch/converted by me. The basis for the truck is the old Revell/Renwall 1/32 5-ton wrecker. I used the forward cab and front fenders and hood. Mated the back of the Italeri M925 cab. Also used the wrecker frame, winches, and rear running gear, with Tamiya Dragon Wagon front axle. I used the Dragon Wagon tires, fifth wheel and many small accessory parts. Wheels are from 1/25th truck kit, sanded down to fit. All other parts are scratch built. The trailer is actually the Tamiya M15 from the Dragon Wagon kit, highly modified. I widened it, widened the steps, scratched the rear wheel covers, added rollers, etc., etc., etc...
More pics (including in-progress) here.
It was a major project that paid off. It took the Directors Choice Award at TamiyaCon IX in 2004.
More pics (including in-progress) here.
It was a major project that paid off. It took the Directors Choice Award at TamiyaCon IX in 2004.
Tigerone
Alabama, United States
Joined: November 12, 2005
KitMaker: 9 posts
Armorama: 6 posts
Joined: November 12, 2005
KitMaker: 9 posts
Armorama: 6 posts
Posted: Wednesday, April 07, 2010 - 05:32 AM UTC
Gino,
Very nicely done. Reminds me of something I seen while in Vietnam back in 67.
email me at [email protected] for a picture.
Bill
Very nicely done. Reminds me of something I seen while in Vietnam back in 67.
email me at [email protected] for a picture.
Bill
newfish
England - West Midlands, United Kingdom
Joined: June 23, 2008
KitMaker: 2,329 posts
Armorama: 2,110 posts
Joined: June 23, 2008
KitMaker: 2,329 posts
Armorama: 2,110 posts
Posted: Wednesday, April 07, 2010 - 08:13 AM UTC
Nice M48 Gino. Looks cool what did you use for the NAM era O.D?
Posted: Wednesday, April 07, 2010 - 12:16 PM UTC
Wow, very nice Gino. Wish more trucks and trailors from that era were out in plastic.
Tankrider
Oklahoma, United States
Joined: October 07, 2002
KitMaker: 1,280 posts
Armorama: 1,208 posts
Joined: October 07, 2002
KitMaker: 1,280 posts
Armorama: 1,208 posts
Posted: Thursday, April 08, 2010 - 05:51 AM UTC
Gino,
Sorry fo the late post but I just noticed that the infantry phone box is placed on the mounting bracket wrong... It should be rotated 90 degrees to the left, so the housing on the top of the box is in line with the hull vice perpendictular. Hopefully fixing it will not be too much work. I can't believe that I didn't see it before now, nor that DJ, that ol' former Tank Battalion Commander, didn't see it. He was pretty good at spotting those items in the motorpool back at Ft Knox...
John