_GOTOBOTTOM
Armor/AFV: Braille Scale
1/72 and 1/76 Scale Armor and AFVs.
Hosted by Darren Baker
Bazooka Joe
orange_3D
Visit this Community
British Columbia, Canada
Joined: July 28, 2005
KitMaker: 602 posts
Armorama: 469 posts
Posted: Sunday, March 21, 2010 - 03:49 AM UTC


Quite some time ago, I bought a bag of short wooden cylinders from a Jap thrift shop. Didn't know what they were for but they looked like they would make nice little bases for 1/72 figures. The wooden cylinders though nice and smooth were in an unfinished light basswood color. More work needed to be done, and of course I needed a figure. That was almost a year ago, a few months after that, I bought a box of valiant miniatures 1/72 WW2 American GI in hard plastic. Even though I knew they were a bit overscale I just couldn't resist.
Fast forward to 3 weeks ago, I came across some nice maple colored varnish from the same thrift shop. I quickly bought some and tried it. I loved the results and this provided the momentum I needed to do this little piece.
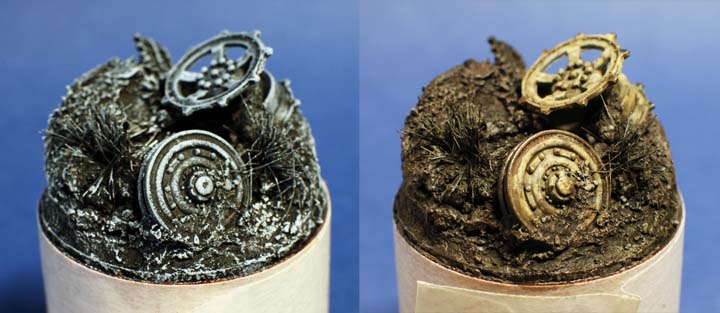
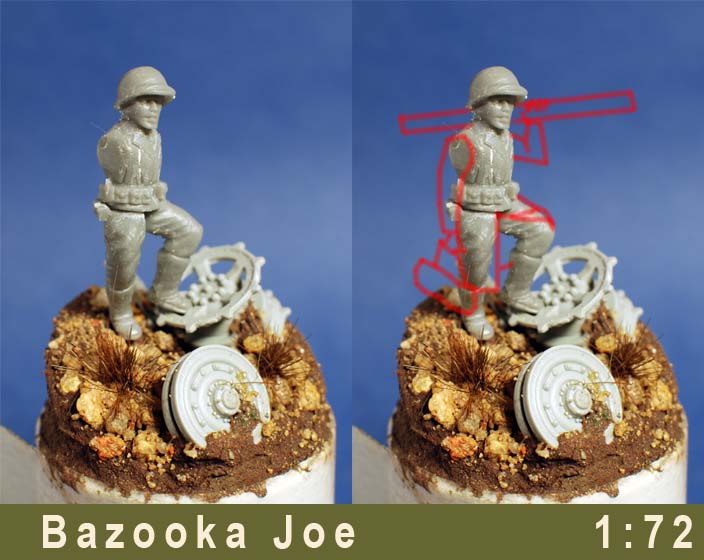
Another idea that languished in my mind was to show how a lone infantryman can take out a giant mighty tank. The best way I thought was to use a tank's drive sprocket as a base for the guy to stand on. I initially wanted to use parts from an airfix sherman kit which I suspected I'll never build, but the detail on those sprockets were a lot worse than I expected. I then turned to a spare ESCI sherman but decided that these sprokets were too small. I need something big to emphasize the David slaying Goliath theme. So hard as it was, I eventually relented and raided my unbuilt dragon King Tiger kit. The sprockets were twice as huge as the sherman's and were perfect for the job at hand.
Some day I'll try to build that king tiger and I'll have to somehow find a replacement for those parts.
What you see in the photo is the base before painting. The ground was built up with styrofoam covered with celluclay. The sprocket and roadwheel was embedded while the groundwork was still wet.
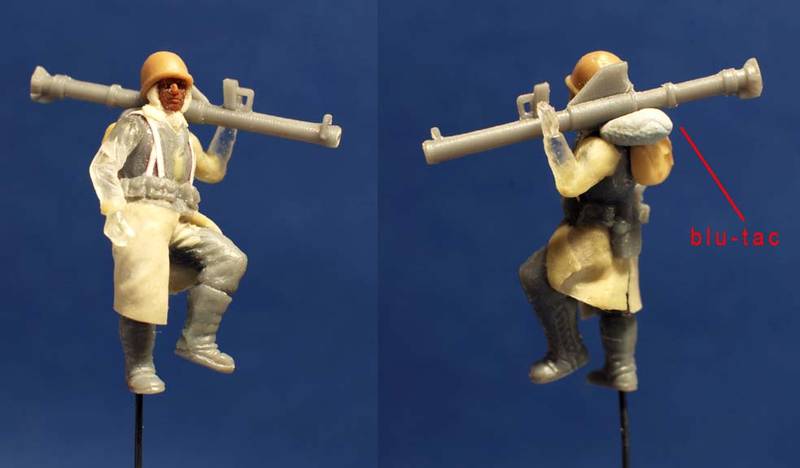
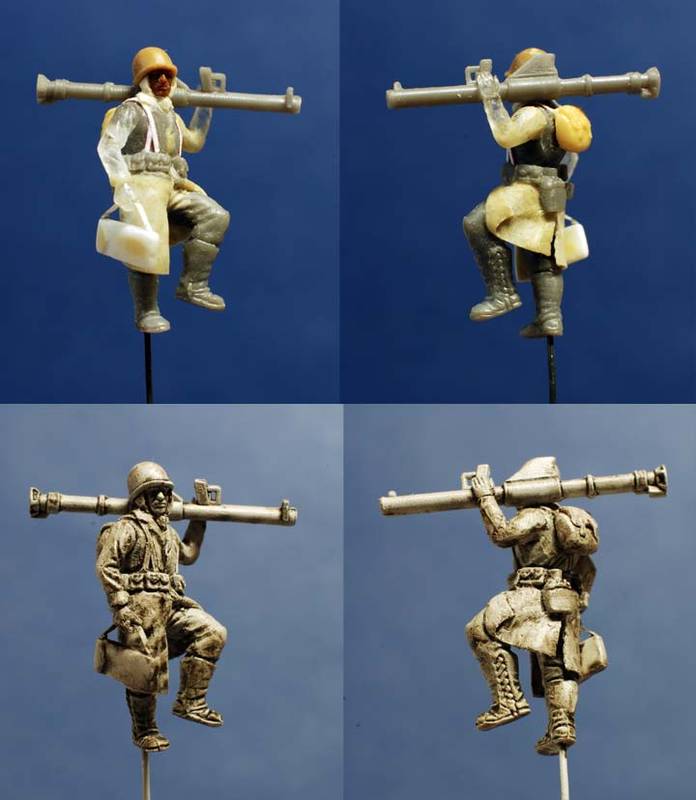
The figure will eventually become a GI in winter gear (long coat), set somewhere in the Ardennes region in 1944. I need to dig up some reference.

So actually you don't see much of the wooden cylinder base - but it's down there under the masking tape.
orange_3D
Visit this Community
British Columbia, Canada
Joined: July 28, 2005
KitMaker: 602 posts
Armorama: 469 posts
Posted: Sunday, April 11, 2010 - 04:26 AM UTC
I wanted to share my progress, I wanted to put up the pic on my photo gallery so I can link to here but the site had some technical problems.
I'll try again tomorrow, but in the meantime you can check it out on my blog:
http://orange3dplastic.blogspot.com/2010/04/bazooka-joe-2.html
exer
Visit this Community
Dublin, Ireland
Joined: November 27, 2004
KitMaker: 6,048 posts
Armorama: 4,619 posts
Posted: Sunday, April 11, 2010 - 05:03 AM UTC
I thought I commented on this when you showed it first but anyway- I think it's great. The pose is just right and all the extra work has really paid off. I wish you continued success.
Dangeroo
#023
Visit this Community
Zurich, Switzerland
Joined: March 13, 2009
KitMaker: 2,058 posts
Armorama: 1,656 posts
Posted: Sunday, April 11, 2010 - 07:55 PM UTC
1/72, you're kidding, right? Looks great so far, keep us posted!

Cheers!
Stefan
orange_3D
Visit this Community
British Columbia, Canada
Joined: July 28, 2005
KitMaker: 602 posts
Armorama: 469 posts
Posted: Wednesday, April 14, 2010 - 06:02 AM UTC
Thanks guys!
Finally able to upload the photo, here it is:


Some good progress on B. Joe. I decide he'll be wearing a winter coat with his web gear worn over it. He's got a scarf wrapped around his head too.
All courtesy of my ever trusty magic sculp. I've replaced the head with a more detailed and "to scale" resin copy of a soft plastic head from an esci spetnatz figure. Helmet came from a really old esci hard plastic G.I. fig. Arms are more resin copies from miscalleneous 1/72 scale figure manufacturers.

The backpack is a resin cast of an original sculpt I made. Added some webbing gear made from copy paper. The bazooka itself is from the Valiant miniatures figure set. I drilled out the ends with a pin vise. It's temporarily attached by a bit of blu tac.

He's still missing his ammo bag for the bazooka rounds and the left hand has to be rotated to sit better on the bazooka.
orange_3D
Visit this Community
British Columbia, Canada
Joined: July 28, 2005
KitMaker: 602 posts
Armorama: 469 posts
Posted: Sunday, April 25, 2010 - 05:21 AM UTC
I've really wanted to get this one done, and I've managed to get some good progress this weekend.

I mixed some celluclay with white glue and acrylic paint, plopped that on top of a styrofoam slope. A dragon king tiger drive sprocket, road wheel and spare track was buried along with some sand, pebbles and the bristles from a cheap paintbrush. (see above)
Paint technique is based of Calvin Tan's method. http://zyclyon.blogspot.com/
I spray painted with flat black and drybrushed white oil paint on top. I started painting the tank parts with vallejo paint followed by the groundwork. Now all it needs is some drybrushing and a dusting of pigments which will be done once the figure is in place.
orange_3D
Visit this Community
British Columbia, Canada
Joined: July 28, 2005
KitMaker: 602 posts
Armorama: 469 posts
Posted: Sunday, April 25, 2010 - 05:27 AM UTC
Finally completed the build on the figure:


I have to admit it's not the cleanest build ever, especially looking at it from a macro photograph.
He's also been primed with Gunze Mr. Surfacer 1200, followed by a wash of black oil paint. Trying out a variation of paint techniques. Can't wait to start painting him, but sadly the weekend is over and the coming weekdays will be filled with overtime.

Comments and Crits are of course welcome.
jagd654
Visit this Community
Singapore / 新加坡
Joined: July 14, 2008
KitMaker: 296 posts
Armorama: 280 posts
Posted: Sunday, April 25, 2010 - 06:05 AM UTC
Hi Sonny !
VERY NICE work, my friend !!! I must say, you are certainly the master of 1/72 scale vignettes . Looking forward to the completion shots, Sonny. Cheers !
Kenneth .
PanzerAlexander
Visit this Community
Attica, Greece / Ελλάδα
Joined: February 17, 2010
KitMaker: 625 posts
Armorama: 608 posts
Posted: Sunday, April 25, 2010 - 06:41 AM UTC
Excelent result Sonny.
You created a small wonder out of very little.
dioman13
Visit this Community
Indiana, United States
Joined: August 19, 2007
KitMaker: 2,184 posts
Armorama: 1,468 posts
Posted: Sunday, April 25, 2010 - 07:00 AM UTC
Hey Sonny. Very good, especialy for 1/72. I couldn't work that small if my life depended on it. Nice grond work too. Will keep my eye on this one for sure.
4444Design
Visit this Community
Germany
Joined: April 18, 2010
KitMaker: 25 posts
Armorama: 24 posts
Posted: Tuesday, April 27, 2010 - 03:05 AM UTC
impressive with all the small details!
orange_3D
Visit this Community
British Columbia, Canada
Joined: July 28, 2005
KitMaker: 602 posts
Armorama: 469 posts
Posted: Sunday, May 02, 2010 - 04:11 AM UTC
Thanks for all the nice comments!
The weekend proved to be as if not more hectic than the weekday. Lucky to have managed to do 95% of the painting done in 2 sittings, I guess that's the beauty of 1/72 scale figure modelling. Here he is:


I used vallejo acrylics, they're pretty good for a quick sit n paint. And clean ups are a breeze.

Next step would be to spray a dullcote, mount on the base and dirty up his boots to sit with the environment. As usual the week ahead is gonna be hectic and I foresee the weekend will be as well. Fingers crossed I can get him finished.
orange_3D
Visit this Community
British Columbia, Canada
Joined: July 28, 2005
KitMaker: 602 posts
Armorama: 469 posts
Posted: Saturday, May 08, 2010 - 06:11 AM UTC
Done


The actual title for this piece is "david beats goliath".
The base was finished off with some drybrushing and pigment dusting. Also found a nice 1/48 scale photoetch barbed wire set from Eduard which seems to work for 1/72 and just nicely rounds off the base.
I'm quite happy to finish this in a reltively short amount of time. The final result was close to what I originally envisioned and I hope you all enjoyed it.

ChaosXVI
Visit this Community
Metro Manila, Philippines
Joined: October 24, 2009
KitMaker: 128 posts
Armorama: 126 posts
Posted: Thursday, May 13, 2010 - 05:28 PM UTC
Amazing! Another great figure. Thanks for some info how you made the figure. Btw, I got a copy of your ORANGE resin bags at JMN probably 12 years ago. I also made resin copies of them so I never run out. Hope you can make new sets and bring some over to PINAS when you get to visit
orange_3D
Visit this Community
British Columbia, Canada
Joined: July 28, 2005
KitMaker: 602 posts
Armorama: 469 posts
Posted: Saturday, May 15, 2010 - 04:29 AM UTC
Hi Toby,

Thanks! Wow, the resin bags, that's a pretty long time ago. Amazing that you still remember.
You can PM me your email address and I can let you know if I come up with something new.
Btw, what era do you model in braille?
Have a look at my blog too for some of the stuff I'm working on:
http://orange3dplastic.blogspot.com
ChaosXVI
Visit this Community
Metro Manila, Philippines
Joined: October 24, 2009
KitMaker: 128 posts
Armorama: 126 posts
Posted: Saturday, May 15, 2010 - 02:46 PM UTC
Yes. A very long time ago. So long ago that when I bought it I was still single and 55lbs lighter


Just saw your blog and WOW! I just realized I have a lot to learn. Good thing I have your blog and many others to get tips. As to what era do I build. I have Zvezda's War Elephants up to modern AFV's and figures. Anything 1/72nd. I've posted a few here like my WW2 Italian Lancia + AA gun and BAR armor Stryker.

Thanks again for sharing your techniques. Mabuhay ka!
orange_3D
Visit this Community
British Columbia, Canada
Joined: July 28, 2005
KitMaker: 602 posts
Armorama: 469 posts
Posted: Tuesday, May 18, 2010 - 02:50 AM UTC
Ooh, I just saw it, nice stryker!
One thing though, you said you made resin copies of my resin bags to ensure you don't run out, but I don't see them on your models hehe
ChaosXVI
Visit this Community
Metro Manila, Philippines
Joined: October 24, 2009
KitMaker: 128 posts
Armorama: 126 posts
Posted: Tuesday, May 18, 2010 - 02:10 PM UTC
Nyahaha! You got me


I have been using them for the longest time in older builds. Until recently I have been purchasing resin accessories from Planet, Goffey and CMK. Sadly, I gave your Orange Bags a short leave. Worry not. On my next project w/c are WW2 vehicles, I'll employ their services once again

flipper21
Visit this Community
Delaware, United States
Joined: October 29, 2006
KitMaker: 268 posts
Armorama: 144 posts
Posted: Wednesday, May 19, 2010 - 04:54 AM UTC
Simply Amazing. Thanks for sharing....Vince
PanzerAlexander
Visit this Community
Attica, Greece / Ελλάδα
Joined: February 17, 2010
KitMaker: 625 posts
Armorama: 608 posts
Posted: Wednesday, May 19, 2010 - 08:08 AM UTC
Excellent build Sonny.


If you can make models like this with materials out of the spares box I wonder what can you do with proper stuff??

Best regards, Alexander
 _GOTOTOP