

Warren: That sounds like a great way to approach things, I'll give that a try on my build.
Sal: PE looks great bud, those little bits can be a real pain in the rear. What kind of glue are you using to attach them?
Campaigns
Where Armorama group builds can be discussed, organized, and updates posted.
Where Armorama group builds can be discussed, organized, and updates posted.
Hosted by Darren Baker, Richard S.
Killer KVs

vonHengest

Joined: June 29, 2010
KitMaker: 5,854 posts
Armorama: 4,817 posts

Posted: Sunday, January 30, 2011 - 06:56 PM UTC
Removed by original poster on 01/31/11 - 14:29:39 (GMT).
Removed by original poster on 01/31/11 - 14:40:29 (GMT).
Removed by original poster on 01/31/11 - 14:47:28 (GMT).

Maeusemelker

Joined: January 10, 2011
KitMaker: 122 posts
Armorama: 113 posts

Posted: Monday, January 31, 2011 - 02:53 AM UTC
 everybody,
I'm pretty close to putting my GAZ-AA (Zvedzda) with MiniArt wheels, PlusModel Maxim M-4 and scratch-built seat/ammo box to bed, which I entered in the 'soft skin campaign' (although very late - I hadn't taken a 'before' picture, had only just joined and was still finding my feet). After that, I'll start on this little lot:

The venerable (OK old) KV-1 by Tamiya - couldn't say no as it was only 10 Euro
Model Kasten tracks
Verlinden engine kit (not too impressed by it: very basic and needing a lot of cleaning considering the cost, but the fuel tanks look good - apart from the welds that looked like casting seams)
Aber barrel
On The Mark PE
Tow-cables by ?
MG mounts and horn by MORI
Welds by E.T.
Dry transfers by MB
KV-1 crew by TANK
Still need to source some hex bolt heads, and some other bits and pieces may be added.
All I've done so far is removing the engine cover and cleaning up most of the resin.
Hopefully, I won't embarrass myself - it's only my second model after over 30 years of doing other stuff.


Bigrip74
Joined: February 22, 2008
KitMaker: 5,026 posts
Armorama: 1,604 posts

Posted: Monday, January 31, 2011 - 09:00 AM UTC
Sal, what was so hard you made it look easy  nice job.
Bob
nice job.Bob
bmikk1
Joined: February 15, 2008
KitMaker: 199 posts
Armorama: 136 posts
Posted: Monday, January 31, 2011 - 10:40 AM UTC
Here is my contribution, Trumpeter 1/35 KV-2 captured by the Germans. I love these Trumpy kits and look forward to this build. It will be out of the box with the kit supplied link and length tracks. Here is a shot of the unbuilt kit....more to follow as I move along.


ltb073
Joined: March 08, 2010
KitMaker: 3,662 posts
Armorama: 3,078 posts
Posted: Tuesday, February 01, 2011 - 01:48 AM UTC
Quoted Text
Sal, what was so hard you made it look easy
Bob
I don't know I guess the instructions were a little confusing
 the fear of cutting plastic off the top of the hull
But it all went on with copious amounts of Super Glue and I may shoot it with primer this afternoon

Marnix

Joined: July 29, 2008
KitMaker: 799 posts
Armorama: 63 posts
Posted: Saturday, February 05, 2011 - 09:13 AM UTC
Hi all,
I'm getting ready to start building Tamiya's KV-2 (updated with some aftermarket PE). I'm not really happy about the tracks provided in the kit, so I want to replace them with aftermarket tracks. I've seen that there are several types of Friul tracks for the KV-2, which ones are suitable for Tamiya's KV-2? And are there cheaper alternatives to replace the tracks?
Greetings,
Max

warreni

Joined: August 14, 2007
KitMaker: 5,926 posts
Armorama: 712 posts

Posted: Saturday, February 05, 2011 - 10:18 AM UTC
If you buy a Trumpeter KV-1 or 2 you get a set of link and length tracks and some rubber band tracks. Rubber band ones are good as well so for a measely $14 or so you get another KV to finish AND a replacement set of tracks! Win win!!
Marnix
Joined: July 29, 2008
KitMaker: 799 posts
Armorama: 63 posts
Posted: Saturday, February 05, 2011 - 10:43 AM UTC
Hi Warren,
Thanks for the tip. I did some surfing on the internet and buying a Trumpeter KV is definately a cheaper alternative than buying Friuls! Are there different types of tracks for the KV or can I buy for example a 1942 era KV-1 and use those tracks for the Tamiya KV-2?
Greetings,
Max
Thanks for the tip. I did some surfing on the internet and buying a Trumpeter KV is definately a cheaper alternative than buying Friuls! Are there different types of tracks for the KV or can I buy for example a 1942 era KV-1 and use those tracks for the Tamiya KV-2?
Greetings,
Max
warreni
Joined: August 14, 2007
KitMaker: 5,926 posts
Armorama: 712 posts
Posted: Saturday, February 05, 2011 - 12:05 PM UTC
My tip would be to buy a Trumpeter KV-2... I believe they will all be the same, but I am definitely no expert.
I believe they will all be the same, but I am definitely no expert.ltb073
Joined: March 08, 2010
KitMaker: 3,662 posts
Armorama: 3,078 posts
Posted: Saturday, February 05, 2011 - 12:36 PM UTC
Hi guys, been making some progress since I got over my PE fears 
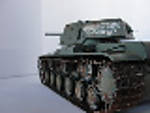
The build is complete minus the tow cables and the base coat of model masters Dark green is sprayed on Just need to touch up a few more spots with the paint


Found this photo which has the same marking that the kit comes with

Should have some time this Monday to get more work done on this after I fix my snow blower
vonHengest
Joined: June 29, 2010
KitMaker: 5,854 posts
Armorama: 4,817 posts
Posted: Saturday, February 05, 2011 - 03:31 PM UTC
Way cool to see a rl photo of your KV on the testing grounds 
And don't fear the etch, embrace it! Btw, what glue are you using to attach the PE bits to your build?
And don't fear the etch, embrace it! Btw, what glue are you using to attach the PE bits to your build?
Marnix
Joined: July 29, 2008
KitMaker: 799 posts
Armorama: 63 posts
Posted: Sunday, February 06, 2011 - 06:44 AM UTC
Hi Warren,
After comparing all the different KV's that Trumpeter offers, I decided to go for the Beute KV-2. IMHO this will be a nice comparison to the standard KV-2 I'll be building for this campaign. I allready need to fight the urge to build the beute KV instead of the regular one...
Greetings,
Max
Quoted Text
My tip would be to buy a Trumpeter KV-2...
After comparing all the different KV's that Trumpeter offers, I decided to go for the Beute KV-2. IMHO this will be a nice comparison to the standard KV-2 I'll be building for this campaign. I allready need to fight the urge to build the beute KV instead of the regular one...
Greetings,
Max
ltb073
Joined: March 08, 2010
KitMaker: 3,662 posts
Armorama: 3,078 posts
Posted: Monday, February 07, 2011 - 03:58 PM UTC
Progress,
Drilled out the exhaust, made new tow cables, the 1's that came with the kit were too brittle and too short and added a black wash. So this is what its looking like

Also added the decals and put a rust wash on the tracks after the picture was taken. Hopefully I will get some work done on the commander tomorrow

CMOT


Joined: May 14, 2006
KitMaker: 10,954 posts
Armorama: 8,571 posts

Posted: Monday, February 07, 2011 - 06:07 PM UTC
I am finally getting around to starting my build for this campaign and I will have to make a late change as I cannot find the base model for scratchbuild. I have grabbed another KV from the stash which in this case is 00356 KV1 (model 1941) small turret. If I manage to find where I have put the model I need for the scratch build I will build it, if not I will buy another and blog it in the future. So due to my unexpected forced change is there anything I need to watch for as I have done no real research on this specific model.
warreni
Joined: August 14, 2007
KitMaker: 5,926 posts
Armorama: 712 posts
Posted: Monday, February 07, 2011 - 08:51 PM UTC
Great work fellow KVers.
I managed to pick a German KV-2 on Ebay for cheap so I have the full set now.
Cheers
Warren
I managed to pick a German KV-2 on Ebay for cheap so I have the full set now.
Cheers
Warren
Bigrip74
Joined: February 22, 2008
KitMaker: 5,026 posts
Armorama: 1,604 posts
Posted: Tuesday, February 08, 2011 - 05:55 AM UTC
Sal I want those tow cables, mine broke while trying to bend them to shape .or did I lose them while trying to bend them or maybe the carpet monster ate them to tell you the truth I do not remember  so hand yours over and there will be no trouble
  except when I fall down . Nice job so far I am at the stage of waiting for some inspiration to go paint
Bob
.or did I lose them while trying to bend them or maybe the carpet monster ate them to tell you the truth I do not remember so hand yours over and there will be no trouble except when I fall down . Nice job so far I am at the stage of waiting for some inspiration to go paint Bob
CMOT
Joined: May 14, 2006
KitMaker: 10,954 posts
Armorama: 8,571 posts
Posted: Tuesday, February 08, 2011 - 06:21 AM UTC
Bob get some picture hanging cable, cut the eyes off of the plastic affair and then drill a hole in each to recieve the cable. Easy.
ltb073
Joined: March 08, 2010
KitMaker: 3,662 posts
Armorama: 3,078 posts
Posted: Tuesday, February 08, 2011 - 07:19 AM UTC
Quoted Text
Sal I want those tow cables, mine broke while trying to bend them to shape
Bob
Bob, all I did was cut the ends off, filed out the back and used some string then I used some elmers glue to stiffen it up. Then added the paint. They are held on by thin brass wire.

Got some more work done on it today maybe get a few pic up later
Bigrip74
Joined: February 22, 2008
KitMaker: 5,026 posts
Armorama: 1,604 posts
Posted: Tuesday, February 08, 2011 - 07:44 AM UTC
Sal and Darren, thanks for the tips. I will try them and get back to ya.
Bob
Bob
ltb073
Joined: March 08, 2010
KitMaker: 3,662 posts
Armorama: 3,078 posts
Posted: Tuesday, February 08, 2011 - 08:37 AM UTC
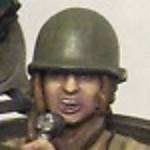
Ok todays up date here is what the beast is looking like now

The figures are from Dragons Soviet Infantry Tank Riders the commander is from the spare parts box

Comments are always welcome.
Need to finish their faces and add weapons and weathering but its time for bed have to work tonight

The figures are from Dragons Soviet Infantry Tank Riders the commander is from the spare parts box

Comments are always welcome.
Need to finish their faces and add weapons and weathering but its time for bed
have to work tonight tread_geek

Joined: March 23, 2008
KitMaker: 2,847 posts
Armorama: 2,667 posts
Posted: Tuesday, February 08, 2011 - 08:47 AM UTC
Warren reshaped the electrons to say:
Thanks Warren and all those that supported the SU-152 being acceptable. I finally had some time from other projects to take some initial pictures. Below is the kit box.

Here is the sprue shots.

Might look like a lot of sprues and parts but it actually builds two vehicles. It's my first exposure to the Pegasus Hobbies kits and I am rather pleasantly surprised. The detail is quite nice and from inspecting it (for an upcoming review) I am mildly amazed at the thought that went into it's manufacture. The suspension is very intricate and has attachment points engineered into it that I never would have though possible in this scale. I hope to get started this evening. It looks quite good as it is so I don't see adding too much other than some wire grad rails.
Cheers,
Jan
Quoted Text
Looks like the SU-152 is fine then, but not the ISU-152..
Thanks Warren and all those that supported the SU-152 being acceptable.
I finally had some time from other projects to take some initial pictures. Below is the kit box.Here is the sprue shots.
Might look like a lot of sprues and parts but it actually builds two vehicles. It's my first exposure to the Pegasus Hobbies kits and I am rather pleasantly surprised. The detail is quite nice and from inspecting it (for an upcoming review) I am mildly amazed at the thought that went into it's manufacture. The suspension is very intricate and has attachment points engineered into it that I never would have though possible in this scale. I hope to get started this evening. It looks quite good as it is so I don't see adding too much other than some wire grad rails.
Cheers,
Jan
tread_geek
Joined: March 23, 2008
KitMaker: 2,847 posts
Armorama: 2,667 posts
Posted: Wednesday, February 09, 2011 - 09:31 AM UTC
I made a dent in the SU-152 kit yesterday and today. It didn't go as quickly as I had anticipated. It's going to require a bit of thought about how to paint the suspension as due to the small size, the spray from the airbrush may not reach all the little nooks and crannies.
The main bogie halves and their suspension arms.

Attaching the above to the suspension piece. The tracks have a natural built in sag and I was surprised to notice that the guide horns have a hole through them (a couple had some flash in the hole and had to be bored out).

Attaching most of the road wheels but the idler needed to be placed before the last one.

The completed suspension pieces. I am putting a green wash on them with a brush prior to spraying the Russian green.

I am quite amazed at all the fine and minute detail on this kit. The cast parts of the superstructure even have a rough cast texture.
Cheers,
Jan
The main bogie halves and their suspension arms.
Attaching the above to the suspension piece. The tracks have a natural built in sag and I was surprised to notice that the guide horns have a hole through them (a couple had some flash in the hole and had to be bored out).
Attaching most of the road wheels but the idler needed to be placed before the last one.
The completed suspension pieces. I am putting a green wash on them with a brush prior to spraying the Russian green.
I am quite amazed at all the fine and minute detail on this kit. The cast parts of the superstructure even have a rough cast texture.
Cheers,
Jan
 |

WEB HOSTING BY


Copyright ©2021 Armorama and Kitmaker Network, a subsidiary of Silver Star Enterprises
All Rights Reserved. Please read our Conditions of Use and Privacy Policy.
All Rights Reserved. Please read our Conditions of Use and Privacy Policy.