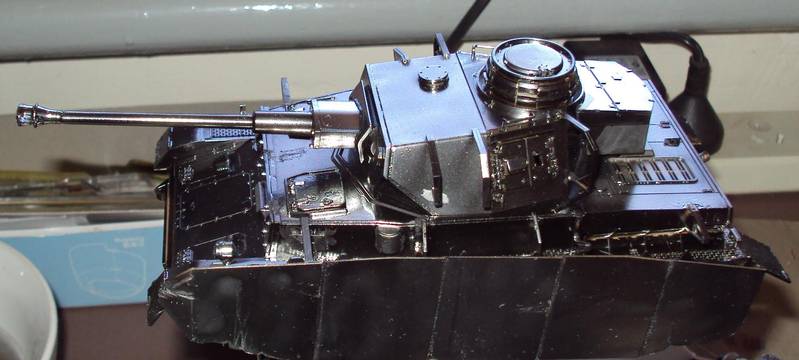
Hi guys,
Here is my first attempt of doing armor - hopefully it not too over done with the weathering ..
Bozz~
Hosted by Darren Baker
First armor model - overdone?
Bozzaroo
South Australia, Australia
Joined: December 07, 2009
KitMaker: 4 posts
Armorama: 3 posts
Joined: December 07, 2009
KitMaker: 4 posts
Armorama: 3 posts
Posted: Monday, June 14, 2010 - 07:24 PM UTC
35th-scale
Kildare, Ireland
Joined: November 21, 2007
KitMaker: 3,212 posts
Armorama: 2,807 posts
Joined: November 21, 2007
KitMaker: 3,212 posts
Armorama: 2,807 posts
Posted: Monday, June 14, 2010 - 08:47 PM UTC
Looks very good and "battle worn".
However, compared to the upper surfaces the wheels and tracks look too clean
Gorizont
Sachsen, Germany
Joined: November 28, 2007
KitMaker: 1,462 posts
Armorama: 1,289 posts
Joined: November 28, 2007
KitMaker: 1,462 posts
Armorama: 1,289 posts
Posted: Monday, June 14, 2010 - 09:12 PM UTC
It looks good!
This vehicle has seen a lot of wartime.
For the tracks... I´m not sure. For me, they are okay.
Hmm, perhaps some dirt parts or something like that?
greetings...
Soeren
This vehicle has seen a lot of wartime.
For the tracks... I´m not sure. For me, they are okay.
Hmm, perhaps some dirt parts or something like that?
greetings...
Soeren
Kuno-Von-Dodenburg
England - North, United Kingdom
Joined: February 20, 2007
KitMaker: 1,453 posts
Armorama: 1,319 posts
Joined: February 20, 2007
KitMaker: 1,453 posts
Armorama: 1,319 posts
Posted: Monday, June 14, 2010 - 11:49 PM UTC
For my taste the contrast between the dark yellow paint-job and the patches of bare metal is too harsh. Maybe more subtle chips & scratches would work better than large blotchy areas of scraped-off paint.
But overall, pretty good for a first attempt. The commander looks good - nice relaxed pose.
- Steve
But overall, pretty good for a first attempt. The commander looks good - nice relaxed pose.
- Steve
Posted: Tuesday, June 15, 2010 - 12:20 AM UTC
Quoted Text
Here is my first attempt of doing armor - hopefully it not too over done with the weathering ..
Honestly, it is in my opinion. But this is not a bad thing. Its better to try and fail, than never try at all.
All those brillinat weathered models you´ve seen so far were not first attempts either ... many years of hard work and experiment went into getting skills to this level, and there are no real shortcuts ... you gotta attempt the techniques for yourself to really understand and get a feel for it.
I think you have the right attitude though ... go all in and dont have any fear of how it turns out. Listen to the feedback and keep showing your work .. it will improve.
I see lots of promise in what you´ve done, but remember one simple rule; Less is more. Some smaller chipping/wear patches and less contrast and size in the scratches, would look much better. Also try to get some depth in your base colour by using pre or post shading, and some pin washes around details. Definatly not a bad first attempt.
slodder
North Carolina, United States
Joined: February 22, 2002
KitMaker: 11,718 posts
Armorama: 7,138 posts
Joined: February 22, 2002
KitMaker: 11,718 posts
Armorama: 7,138 posts
Posted: Tuesday, June 15, 2010 - 02:11 AM UTC
Quantity - I think that's ok. Maybe a bit much for my personal taste. What I would like to see you work on is planning it out a bit more. It seems a bit random. The horizontal scratching on the front glacies plates. How did they get there? The soot on the rear plate is a bit random.
And I do like the techniques that you are using, keep up the efforts and keep doing what your doing. More practice and these things will work themselves out.
ericadeane
Michigan, United States
Joined: October 28, 2002
KitMaker: 4,021 posts
Armorama: 3,947 posts
Joined: October 28, 2002
KitMaker: 4,021 posts
Armorama: 3,947 posts
Posted: Tuesday, June 15, 2010 - 02:18 AM UTC
Something I've found that has enhanced my finished works is really just looking and looking and examining and examining and noting photos. Top figure painters study famous works -- to see how light and shadows and hues come together. The same for miniature modelers. Surf the net and look at color photos of modern AFVs out in the field. Also look at photos of construction equipment. Note how and where dirt accumulates. Note how wear on the paint finish looks. Note how dirt gets rubbed off. The more you look the more you'll be able to incorporate into your models. I'd say looking at color photos of the real things is superior to looking at others' models, IMHO. Good luck to you
scratchmod
Massachusetts, United States
Joined: November 07, 2008
KitMaker: 796 posts
Armorama: 763 posts
Joined: November 07, 2008
KitMaker: 796 posts
Armorama: 763 posts
Posted: Tuesday, June 15, 2010 - 04:11 AM UTC
Well I have to agree with the others and what has been said. But for a first it does look good, much better than the first tank I build way back when.
You have the right mind set so it's just a matter of time and practice.
Rob
www.scratchmod.com
You have the right mind set so it's just a matter of time and practice.
Rob
www.scratchmod.com
Posted: Tuesday, June 15, 2010 - 09:04 AM UTC
A little overdone for my taste perhaps but a more advanced first effort than most. As above,the gouge and scratch detail on the front would be logically vertical from breaching walls,stumps,etc. The transition from healthy,dirty paint to worn,bright metal is too severe and not all in likely locations.
Researching more period photos as well as more experianced builds of armor will give you a better feel for how much weathering and where it's located on the subject.
Less is more. It's easier to add more weathering than remove it. Better to do it over multiple sessions and moods than one event so you can have more control and objective thought on it.
Severe weathering as in detroyed hulks/combat losses are probably the very hardest to depict in a realistic manner and very few of us accomplish it.
Hope this helps in some way. Keep going and.....
Model On!
Rick
lukiftian
British Columbia, Canada
Joined: March 12, 2010
KitMaker: 791 posts
Armorama: 592 posts
Joined: March 12, 2010
KitMaker: 791 posts
Armorama: 592 posts
Posted: Tuesday, June 15, 2010 - 10:48 AM UTC
Not bad for a first try, and in fact you could take it a little further with some pastels.
Or you could leave it and on to the next one.
Bozzaroo
South Australia, Australia
Joined: December 07, 2009
KitMaker: 4 posts
Armorama: 3 posts
Joined: December 07, 2009
KitMaker: 4 posts
Armorama: 3 posts
Posted: Tuesday, June 15, 2010 - 11:01 AM UTC
Thanks guys - Yeah I think I got a little carried away, but once I started it was hard to stop .. and yes the wheels and track needs something but at the moment all I have is rust in different shades so for the next one I'll get some more stuff.
Bozz~
Bozz~
ninjrk
Alabama, United States
Joined: January 26, 2006
KitMaker: 1,381 posts
Armorama: 1,347 posts
Joined: January 26, 2006
KitMaker: 1,381 posts
Armorama: 1,347 posts
Posted: Wednesday, June 16, 2010 - 03:56 AM UTC
I think it's pretty good for a first job. Some points though:
1) While it may not be accurate, there is a lot of visual appeal to a beat up tank. However, it's worth thinking about how the damage would have gotten there. For instance, scratching along the side makes sense, horizontal scratches on the front of the hull less so, what wouldd the tank have hit to tear the paint in that direction?
2) IMHO, if you're goingg to beat the sucker up, don't forget dust, dirt, and mud. If the crrew hasn't been able to maintain the tank better, there would probably be an awful lot of dirt and rainmarks on the vehicle. I'va also found those tend to tone down the damage and make it look a bit more organic.
3) In a similar vein, beat up those tracks as well. lots of ground in dirt and mud with some nice steel shine on the raised surfaces.
For what it's worth,
Matt
cdharwins
New Jersey, United States
Joined: October 28, 2006
KitMaker: 491 posts
Armorama: 462 posts
Joined: October 28, 2006
KitMaker: 491 posts
Armorama: 462 posts
Posted: Thursday, June 17, 2010 - 10:21 AM UTC
I like it. I'm not brave enough to beat my models up like that.
Bozzaroo
South Australia, Australia
Joined: December 07, 2009
KitMaker: 4 posts
Armorama: 3 posts
Joined: December 07, 2009
KitMaker: 4 posts
Armorama: 3 posts
Posted: Thursday, June 17, 2010 - 11:35 AM UTC
Yeah it wasn't suppose to be as weathered as it became, but I had an idea that in Italy late in the war they wouldn't have much time to maintain it .. this is how it started out, something I started to do on my airplanes as a base.
And again thanks for all the comments - will do some more research before I start another one ..
Bozz~
And again thanks for all the comments - will do some more research before I start another one ..
Bozz~
AJLaFleche
Massachusetts, United States
Joined: May 05, 2002
KitMaker: 8,074 posts
Armorama: 3,293 posts
Joined: May 05, 2002
KitMaker: 8,074 posts
Armorama: 3,293 posts
Posted: Thursday, June 17, 2010 - 11:59 AM UTC
I'm not a fan of heavy weathering (so I'm admittedly biased) unless there's a reference photo to back up the effect or the modeler is depicting a derelict sitting in a field for a number of years.
someone mentioned construction equipment. I'd say avoid using that as a reference. First, that stuff is intentionally slammed into dirt. If it breaks down, you might lose a day or two of work, if a tank breaks down, you could lose your life. Also, construction equipment is used for years. Tanks had a much shorter life, either due to being knocked out or sent to the rear as newer varints were introduced. A tank that's recovered and rebuilt may have differently colored parts but it will be repainted. heavily rusted parts would need to be rppalced, especially if they were supposed to be movable...ever try to move a really rusty hinge?
Others have mentioned the horizontal scratches on the front...I could live with them if they came from previously stored spare tracks. You want to make sure the locks for the tracks are devoid of paint but not rusty since they'd get moved around alot. The tracks, where tehy touch the ground should be darly polished metal, like the rotor on yoyr disk brakes, rusty in the morning after you washed the car the night before but polished by the brake pads after a couple taps on the brak pedal.
The shutzen are very thin metal and that amount of paint loss would have resulted in loss of the skirt as well. Placing on oor two with a different camo pattern would work nicely to indicate a field replacedment.