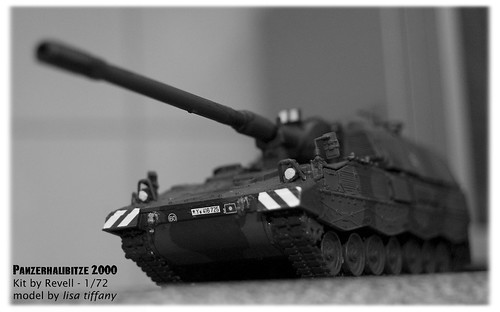
i finally got some pics of my latest completed model up. its the 1/72nd scale kit by revell. the only problem i had was losing one of the headlights so i just made one myself. the decals even went on smoothly & its all brush painted. after finishing the smaller scale one i'm thinking about trying the 1/35 soon - any feedback would be nice as i'm still really new to all this = )
Hosted by Darren Baker
panzerhaubitze 2000 (finished piece)
lisatiffany
Dublin, Ireland
Joined: May 26, 2010
KitMaker: 20 posts
Armorama: 4 posts
Joined: May 26, 2010
KitMaker: 20 posts
Armorama: 4 posts
Posted: Thursday, July 01, 2010 - 06:49 AM UTC
Posted: Thursday, July 01, 2010 - 08:47 AM UTC
It looks a good build and paint job, I can see a seam on the top of the barrel though.
Sudzonic
Scotland, United Kingdom
Joined: December 07, 2007
KitMaker: 2,096 posts
Armorama: 1,983 posts
Joined: December 07, 2007
KitMaker: 2,096 posts
Armorama: 1,983 posts
Posted: Thursday, July 01, 2010 - 09:07 AM UTC
Hi Lisa not a bad build at all, and welcome to the hobby . just a small pointer tho! the paint could do with being thinned down a bit before you apply it to the model, if you use a few thin coats of paint it will give you smother result in the end
Scott
Scott
lisatiffany
Dublin, Ireland
Joined: May 26, 2010
KitMaker: 20 posts
Armorama: 4 posts
Joined: May 26, 2010
KitMaker: 20 posts
Armorama: 4 posts
Posted: Friday, July 02, 2010 - 01:55 AM UTC
ah the paint, yep my boyfriend was making a tank beside me & kept mentioning paint thinner. the main problem with the paint was the original brown i used was too bright so when i painted over it with the correct brown the paint was kind of clumpy. for some of the detail i used a pin-head to paint as even the tiniest brush seemed to be a little too big. i left the barrel end a little faded to make it look a bit more steel-ish. gawd its such an addictive hobby!
= )
= )
Posted: Friday, July 02, 2010 - 04:21 AM UTC
Lisa I hope our comments have given you an idea of what to watch for and quick fixes for some of these problems. To fix seams that are visible you can use various types of filler and then sand them down (be sure to remove any flash before assembly), there are also filler paints which are a bit like Tip-ex in that they are thicker than paint which are used to fill minor seams (they may still need to be lightly sanded)
It is good to see another woman coming into the hobby (even better you are building AFV's) long may it continue.
Sudzonic
Scotland, United Kingdom
Joined: December 07, 2007
KitMaker: 2,096 posts
Armorama: 1,983 posts
Joined: December 07, 2007
KitMaker: 2,096 posts
Armorama: 1,983 posts
Posted: Friday, July 02, 2010 - 04:53 AM UTC
Hi Lisa
I don't know if this will help you or not? This is a PHZ2000 i build last year, i used Tamiya paint which my be better for you to use as they can be thinned down using water. And I think the colours are a better match for the real thing. I use squadron green putty as filler, as it seems to the best filler i have found but others my have better suggestions for you?

Hope to see more of your builds in the future, it just takes a little time to develop the skills to build models, and you will get better with time and practice .