United Kingdom
Joined: May 20, 2010
KitMaker: 269 posts
Armorama: 243 posts
Posted: Thursday, July 08, 2010 - 11:49 AM UTC
Hi everyone,
I have noticed there seems to be very few build logs for 48th scale armor. So seeing as I am about to start my Tamiya Panzer III Ausf L, i'm going to take the opportunity to do a build log. Im am going to build mainly OOB except for the Voyager upgrade set which includes 3 PE frets, some ABS rod, wire and a gun barrel. All of it seems of good quality. Im also going to replace the tow cable with some spare wire from the spares box.
Well heres the kits im using. Next post I will start work on the turret

Matt
On the bench:
Trumpeter 1/16 King Tiger
Dragon 1/35 Sherman Firefly 1c
United States
Joined: December 01, 2001
KitMaker: 3,172 posts
Armorama: 2,495 posts
Posted: Friday, July 09, 2010 - 01:09 PM UTC
Matt
It's great to see more 1/48 built. Have fun with the PE.
To fight the hordes,singing and crying,Valhalla I am coming
United Kingdom
Joined: May 20, 2010
KitMaker: 269 posts
Armorama: 243 posts
Posted: Saturday, July 10, 2010 - 02:14 AM UTC
Hi guys,
First update. I have completed the turret. The parts just fall together with no problems. The PE is fine to work with and quite well detailed. The gun barrel fits perfectly.
The only down side is that the turret side doors and rain guards are moulded as one piece which makes it very difficult to open them. Not that theres much point opening them as there is no interior at all.
Heres the pics.


Lower hull to come next
On the bench:
Trumpeter 1/16 King Tiger
Dragon 1/35 Sherman Firefly 1c
United Kingdom
Joined: May 20, 2010
KitMaker: 269 posts
Armorama: 243 posts
Posted: Saturday, July 10, 2010 - 06:41 AM UTC
Lastest update,
I have completed the lower hull and attached the upper hull. I have also started some of the details for the upper hull. Just a couple of odd things I have noticed. Firstly Tamiya provides almost all the on vehicle equipment as seperate parts bar 2 of the tools. Secondly Voyager somehow forgot to include the grill for the rear overhang which is strange considering the quality of the rest of the kit.
The Voyager kit also includes parts to make the spaced armor but to be honest in this scale I didn't see the point in using it. The kit parts are fine so why spend all that time building replacements!
Hers the latest pics. Build time is about 3 hours now.


My next session will be detailing the upper hull
Matt
On the bench:
Trumpeter 1/16 King Tiger
Dragon 1/35 Sherman Firefly 1c
United States
Joined: December 01, 2001
KitMaker: 3,172 posts
Armorama: 2,495 posts
Posted: Saturday, July 10, 2010 - 09:06 AM UTC
Matt
I am not sure if this is your first panzer III in 1/48.If it is,watch the tracks.They can be a bit fiddly.Test fit is the key phrase. This pic shows the main area of concern where track alignment can be a pain.I have black lines to show what I mean.
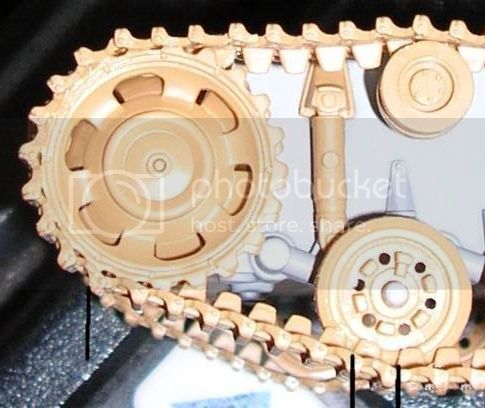
To fight the hordes,singing and crying,Valhalla I am coming
United Kingdom
Joined: May 20, 2010
KitMaker: 269 posts
Armorama: 243 posts
Posted: Saturday, July 10, 2010 - 10:36 AM UTC
Hi Chad,
Yep, my first go at a 1/48 panzer III
Thanks for the heads up on the tracks, I will unscrew the upper hull to give me plenty of room to work on them.
Thanks again

Matt
On the bench:
Trumpeter 1/16 King Tiger
Dragon 1/35 Sherman Firefly 1c
Removed by original poster on 07/12/10 - 15:44:34 (GMT).
California, United States
Joined: June 30, 2008
KitMaker: 2,408 posts
Armorama: 2,394 posts
Posted: Monday, July 12, 2010 - 04:44 AM UTC
You might want to check out Track48.com 'gallery' and 'assembly line' to see examples of finished panzer III's. nice work so far


North Carolina, United States
Joined: June 06, 2006
KitMaker: 4,691 posts
Armorama: 3,509 posts
Posted: Monday, July 12, 2010 - 05:56 AM UTC
I love that little kit !! Lookin good so far.
United Kingdom
Joined: May 20, 2010
KitMaker: 269 posts
Armorama: 243 posts
Posted: Monday, July 12, 2010 - 11:14 AM UTC
Hi guys,
Spent a couple of hours on the left fender tonight. I just got the stowage on the fender done as the PE is quite time consuming.
Hi Greg,
I checked out track48. there is some very impressive work on there. I'll be happy if mine comes out half as good!
I've now decided to go for the box art paint scheme of tank 133, sPzAbt 502, Russia
Heres the progress


On the bench:
Trumpeter 1/16 King Tiger
Dragon 1/35 Sherman Firefly 1c
Texas, United States
Joined: June 29, 2010
KitMaker: 5,854 posts
Armorama: 4,817 posts
Posted: Monday, July 12, 2010 - 12:07 PM UTC
Matt, thanks for posting your project. I just recently ordered one of these kits along with the Voyager PE set. I'm not sure what to expect, so I look forward to watching your build progress.
United Kingdom
Joined: May 20, 2010
KitMaker: 269 posts
Armorama: 243 posts
Posted: Tuesday, July 13, 2010 - 10:55 AM UTC
Hi guys,
Well i decided to give the PE a rest tonight and crack on with the running gear. I managed to complete all the wheels, tracks etc in about 2 hours.
The tracks proved to be a bit of a pain as im sure the instruction tell you to add more links then are needed!
Heres the pics, starting to look like a panzer now


Back to the upper hull next.
Nice to see people taking an interest in 1/48, im fast becoming a convert! Jeremy, you wont be disappointed, they are cracking little kits
On the bench:
Trumpeter 1/16 King Tiger
Dragon 1/35 Sherman Firefly 1c
Texas, United States
Joined: October 17, 2009
KitMaker: 86 posts
Armorama: 82 posts
Posted: Tuesday, July 13, 2010 - 11:15 AM UTC
Nice lookin' kit. Tamiya stuff is always such a joy to assemble.
What scheme are you going to do? Is this model exclusive to any theater of operations? Still learning all this armor stuff!
Texas, United States
Joined: June 29, 2010
KitMaker: 5,854 posts
Armorama: 4,817 posts
Posted: Tuesday, July 13, 2010 - 12:13 PM UTC
Matt: Cracking is good
It looks like a really fun build, and I'm tempted to order another one even though my first one hasn't come in yet.
United Kingdom
Joined: May 20, 2010
KitMaker: 269 posts
Armorama: 243 posts
Posted: Wednesday, July 14, 2010 - 12:00 AM UTC
Hi Justin,
I keep changing my mind on what scheme i'm going to do! there are 3 options in the kit, 1 in overall dark yellow for Afrika Korps, 1 in overall dark yellow with thin green camo stripes (like the box art) for sPzAbt 502 in russia and 1 in overall panzer gray for the Hermann Goering division.
I'm now thinking of painting it panzer gray.
I think you could make a panzer operating in Russia, Italy, Sicily or North Africa from this kit if you have the right decals.
Hi Jeremy,
I have also been tempted to buy more kits but different pz III based vehicles. Maybe a stug G or the pz III ausf N. However I think I may just be tempted to get AFV clubs Tiger 1 late with their workable tracks and some PE
On the bench:
Trumpeter 1/16 King Tiger
Dragon 1/35 Sherman Firefly 1c
Texas, United States
Joined: October 17, 2009
KitMaker: 86 posts
Armorama: 82 posts
Posted: Wednesday, July 14, 2010 - 02:11 AM UTC
I definitely have a thing for Panzers in Panzer Gray! Good choice, IMO. Looking forward to seeing some more progress.
California, United States
Joined: May 04, 2009
KitMaker: 123 posts
Armorama: 121 posts
Posted: Wednesday, July 14, 2010 - 06:59 AM UTC
The first tanks I built were the old Aurora 1/48th scale kits, and then the Tamiya 1/48th with the motors. This newer Tamiya line is enticing, I may have to give one a try someday.
BTW your Panzer is looking good so far!
United Kingdom
Joined: May 20, 2010
KitMaker: 269 posts
Armorama: 243 posts
Posted: Wednesday, July 14, 2010 - 10:28 AM UTC
Well after about 10 hours of build time the construction is complete. I decided to use the kit parts for the tow cables in the end. I have left the upper and lower hulls unscrewed to make painting easier. The covers over the screw points are not glued down.
I also corrected an error I made. The idlers I originally fitted were the wrong ones! luckily they came off easily and the new idlers do not effect the shape of the tracks.
Tomorrow its time for the airbrush. Just itching to get started!


And tomorrow I WILL decided on a paint scheme!

On the bench:
Trumpeter 1/16 King Tiger
Dragon 1/35 Sherman Firefly 1c
United Kingdom
Joined: May 20, 2010
KitMaker: 269 posts
Armorama: 243 posts
Posted: Friday, July 16, 2010 - 03:39 AM UTC
Hi guys,
Painting has started
I first coated everything with nato black. Then I sprayed on the german gray. The tracks were sprayed with a mix of nato black and red brown. The tyres were painted in revell matt black.
Next on to the on vehicle equipment, clear coat and decals. The the fun starts with the weathering


On the bench:
Trumpeter 1/16 King Tiger
Dragon 1/35 Sherman Firefly 1c
Tel Aviv-Yafo, Israel
Joined: October 25, 2007
KitMaker: 14 posts
Armorama: 13 posts
Posted: Friday, July 16, 2010 - 05:13 AM UTC
Good to see a great work... as I know it's quite nice kit from Tamyia and pleaseure to build
waiting to see after painting
good luck !!!
Texas, United States
Joined: June 29, 2010
KitMaker: 5,854 posts
Armorama: 4,817 posts
Posted: Saturday, July 17, 2010 - 07:10 PM UTC
Nice choice of color, it's hard to resist an early Panzer in grey
My kit + PE just came in today, I'm soaking the parts in the off chance that I may get to start working on it in the next few days or so. Really looking forward to building this kit, and looking forward to your next update. I'm very curious to see how you're going to weather yours.
Texas, United States
Joined: October 17, 2009
KitMaker: 86 posts
Armorama: 82 posts
Posted: Saturday, July 17, 2010 - 08:54 PM UTC
Matt-
Solid work there, buddy. Really looking forward to some more work!
As has been said, that Panzer Gray scheme is top notch!


