Hosted by Darren Baker
A Danish Leopard 2A5DK
keo
Nordjylland, Denmark
Joined: January 30, 2006
KitMaker: 613 posts
Armorama: 508 posts
Joined: January 30, 2006
KitMaker: 613 posts
Armorama: 508 posts
Posted: Monday, July 19, 2010 - 04:39 AM UTC
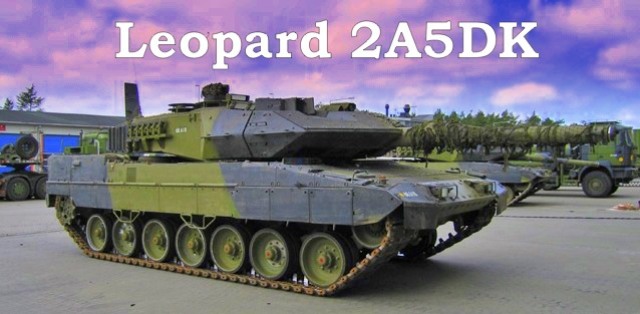
This build log will end – hopefully – with a Leopard 2A5DK. It’ll be based upon the Tamiya Leopard 2A6 (35271) with parts from Hobby Boss’ Danish Leopard 2A5DK (82405). It’ll be portrayed with the engine deck removed and the power pack placed on a trolley with a test panel. The kit for this will be Perfect Scale Modellbau Leopard 2 engine and engine room (35001).
At the moment I still haven’t decided which set of track I’ll use; I have a set of Elite Minitatures’, however after I made a set for a Challenger 2 from Bronco I think I’ll give it a go on these once more. Though very expensive I’ll use Voyager Models etch set for the Leopard 2A5 (35011), but it awaits better financial times.
Those who want to follow this project have to show patience as I tend to build in concentrated periods with pauses in-between. Please feel free to comment all you like as it progress. I have absolutely no experiences with tanks myself and even though I have around 1000 pics of the Danish Leopards there are always areas that are missing or even areas I’m not aware of.
:-H
bison126
Correze, France
Joined: June 10, 2004
KitMaker: 5,329 posts
Armorama: 5,204 posts
Joined: June 10, 2004
KitMaker: 5,329 posts
Armorama: 5,204 posts
Posted: Monday, July 19, 2010 - 06:18 AM UTC
Hi Kenneth,
I'll be in for this one. Just a question, why don't you simply build the Hobby Boss model. What's so wrong that you need to make this large kitbashing with the Tamiya Leo ?
Olivier
I'll be in for this one. Just a question, why don't you simply build the Hobby Boss model. What's so wrong that you need to make this large kitbashing with the Tamiya Leo ?
Olivier
keo
Nordjylland, Denmark
Joined: January 30, 2006
KitMaker: 613 posts
Armorama: 508 posts
Joined: January 30, 2006
KitMaker: 613 posts
Armorama: 508 posts
Posted: Monday, July 19, 2010 - 07:02 AM UTC
In my point of view Hobby Boss’ kit is inferior in almost every aspect to Tamiya’s kit. The Tamiya kit is much more detailed but the most dreadful about the Hobby Boss kit is the raised anti slip panels. I can’t see how they can be sanded down without signs of the process– at least I wouldn’t be able to do so.
The parts that has to be transferred from Hobby Boss’ kit fits surprisingly well to Tamiya’s kit, so it’s not that difficult. It’ll only be the parts for the hull I'll use. The rear turret stowage bins will be scratched as the Hobby Boss ones are inaccurate and flawed.
chnoone
Armed Forces Europe, United States
Joined: January 01, 2009
KitMaker: 1,036 posts
Armorama: 1,033 posts
Joined: January 01, 2009
KitMaker: 1,036 posts
Armorama: 1,033 posts
Posted: Monday, July 19, 2010 - 07:59 AM UTC
Now that is what I call a nice project for a change !
I have to disagree with Olivier, the HB kit is only good for the characteristic parts, and trash the rest.
Did mine about four years ago with the same approach, was a little difficult back then, without the proper ref. material, but today you have the excellent book from Babarossa Publications.
The anti-slip pattern on the HB parts was the only real tackle, otherwise you just have to check what year the Danish Army fitted the "3rd. Generation Sideskirts".
I did use the first "triangle" sort of armour section from the HKCW swedish Leo 122 upgrade kit, the HB ones are too short when using the Tamiya sideskirts. Echelon decals came very handy for my Danish Leo.
Here is a WIP pic :
And the result of all the efforts:
Please keep us posted on your progress!
Cheers
Christopher
gcdavidson
Ontario, Canada
Joined: August 05, 2003
KitMaker: 1,698 posts
Armorama: 1,563 posts
Joined: August 05, 2003
KitMaker: 1,698 posts
Armorama: 1,563 posts
Posted: Monday, July 19, 2010 - 12:42 PM UTC
Nailed that Danish Green colour!
keo
Nordjylland, Denmark
Joined: January 30, 2006
KitMaker: 613 posts
Armorama: 508 posts
Joined: January 30, 2006
KitMaker: 613 posts
Armorama: 508 posts
Posted: Tuesday, July 20, 2010 - 05:54 AM UTC
Log entry #1
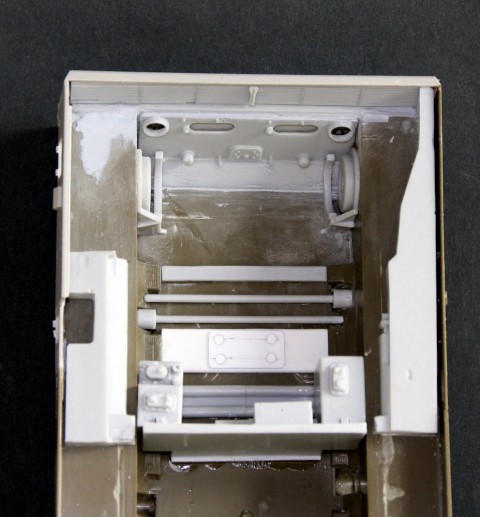
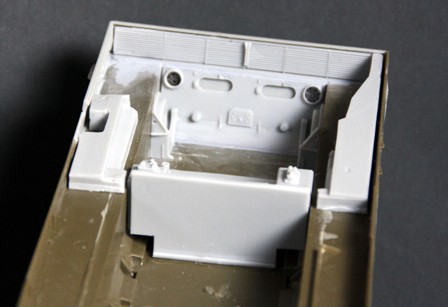
I’ve started with the engine bay and the rear of the tank.
Most of this is rather straight forward as per instructions. The center part between the torsion bars had an air bobble that would take more time to fix than to make a new one; thus I made one myself. You’ll notice that a part is missing at the right side of the bay. That’s because the Danish Leopard 2 has an APU there. I’m not going to make this but the muffler is placed here on a “wall” and I haven’t made this yet. I have had to use some filler at the rear but this is more because of the kit bashing between Tamiya and Hobby Boss than pore fit between the resin parts and the kit.
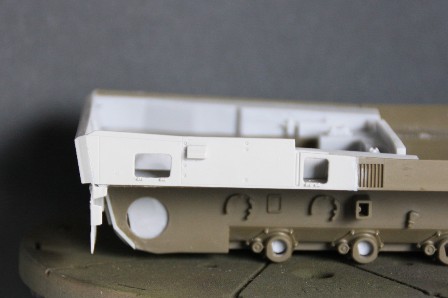
I’ve chosen to open two hatches on the right side of the tank. The first (from the rear) is a compartment for externally electrical plugs*. The later holds various equipment for cleaning the vehicle*. I’ve chosen to drill out the exhaust outlets too.
* reference from Thomas Antonsen's book "The Danish Leopard 2A5"
ptruhe
Texas, United States
Joined: March 05, 2003
KitMaker: 2,092 posts
Armorama: 1,607 posts
Joined: March 05, 2003
KitMaker: 2,092 posts
Armorama: 1,607 posts
Posted: Tuesday, July 20, 2010 - 07:52 AM UTC
Nice. A good amount of detail shoved into the engine bay.
So the engine will be shown out? How much does this effect the height of roadwheel arms?
Paul
So the engine will be shown out? How much does this effect the height of roadwheel arms?
Paul
keo
Nordjylland, Denmark
Joined: January 30, 2006
KitMaker: 613 posts
Armorama: 508 posts
Joined: January 30, 2006
KitMaker: 613 posts
Armorama: 508 posts
Posted: Tuesday, July 20, 2010 - 08:20 AM UTC
Quoted Text
So the engine will be shown out? How much does this effect the height of roadwheel arms?
I have absolutely no idea!
However, since the power pack is around 5½ ton out of a total of 62½ ton I do not think is has much effect on the height of the road wheels. But if anyone know of this please tell me before I start working on the road wheels
ptruhe
Texas, United States
Joined: March 05, 2003
KitMaker: 2,092 posts
Armorama: 1,607 posts
Joined: March 05, 2003
KitMaker: 2,092 posts
Armorama: 1,607 posts
Posted: Thursday, July 22, 2010 - 06:48 AM UTC
I'm sure someone has a good shot of a Leo 2A6M getting it's pack pulled.
I looked at the Spielberger book and found some minus the turret which makes it a little higher. You'd think pulling the engine would make it a little light in the rear.
Paul
I looked at the Spielberger book and found some minus the turret which makes it a little higher. You'd think pulling the engine would make it a little light in the rear.
Paul
ptruhe
Texas, United States
Joined: March 05, 2003
KitMaker: 2,092 posts
Armorama: 1,607 posts
Joined: March 05, 2003
KitMaker: 2,092 posts
Armorama: 1,607 posts
Posted: Thursday, July 22, 2010 - 08:57 AM UTC
I stand corrected. I don't see any difference:
http://data.primeportal.net/tanks/glaubitz/leo2a4_chg/leo2a4_chg_09_of_10.jpg(I intentionally didn't link directly to the image)
Paul
http://data.primeportal.net/tanks/glaubitz/leo2a4_chg/leo2a4_chg_09_of_10.jpg(I intentionally didn't link directly to the image)
Paul
keo
Nordjylland, Denmark
Joined: January 30, 2006
KitMaker: 613 posts
Armorama: 508 posts
Joined: January 30, 2006
KitMaker: 613 posts
Armorama: 508 posts
Posted: Sunday, July 25, 2010 - 08:29 AM UTC
Log entry #2
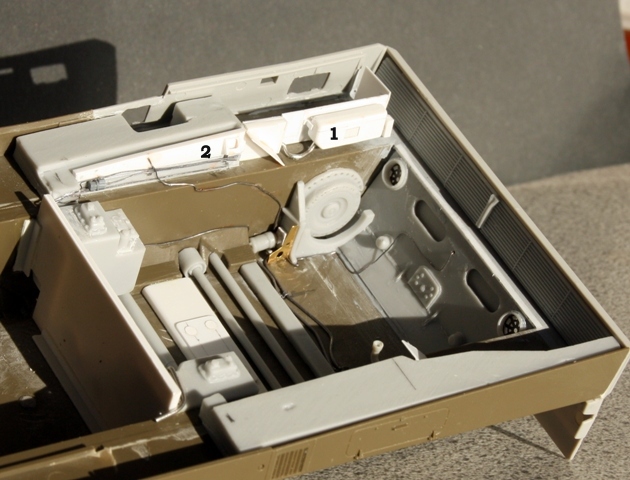
I’ts been a busy week and the engine compartment is materializing. I’ve started wiring it all up which is something that challenged my patience to its outmost. Those d…….. strings of lead never seems to want to stay where I put ‘em.
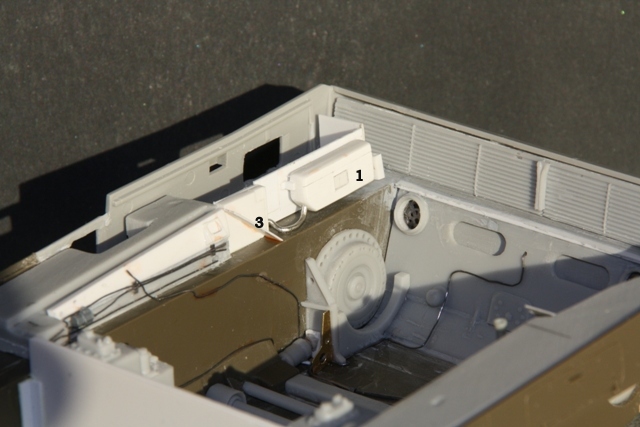
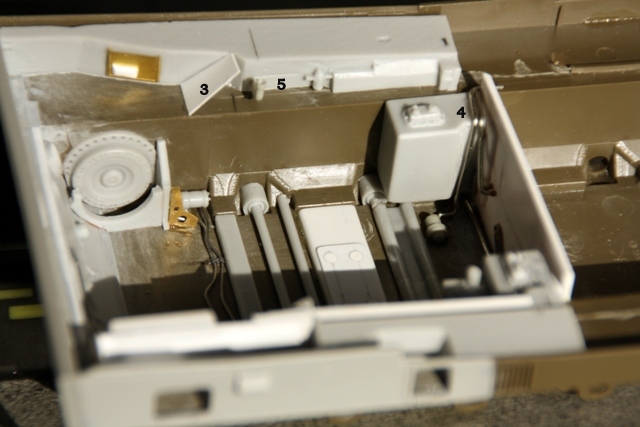
On the right side the upper side wall is completed. (1) shows the APU muffler in place with its tubes. Further inwards (2) I altered the angle of the wall as it didn’t look like my references. I also made the pipes running here with .2mm lead wire from Plus Model. On the floor I made some thicker cables connected to the what-ever-it-is-close-to-the-transmission; this is made with .5mm lead wire. The real compartment has some rubber sealing around the entire area which are provided in the form of etch pieces. However they had a very prominent open gab in both sides so I chose to replace them (3). Until the compartment is closed all together the replacement is only a piece of plastic, but when it is complete I’ll make the actual sealing with a flattened lead wire. Another reason for this replacement is the poor fit of these parts. The etch part for the upper hull part is appalling which I’ll show later.
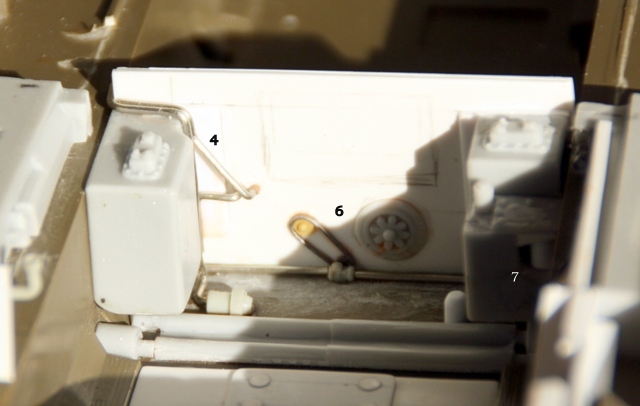
In the left side this replacement is carried out too (3). In the middle of the side walls (in both sides) there is a “plug” of so kind; this is not in the set and I therefore made ‘em; however only one is attached (wonder where the other one is though??). The biggest change I made so fare is to replace the fire wall all together. I don’t know if the Danish Leopard has a different end wall than other Leopards but the one provided in the kit does not resembles the real one at all. Not only the wall itself is wrong but the diesel tanks are fare to crudely made. I made some improvement and alterations) on ‘em (4 and 7), however they are not finished as shown. The upper part is wrong too on both ones. (6) shows the relocation of the round cover and the scratch build chain for the pump arrangement (I think)
As can be told from the pictures it is beginning to be a little narrow in there all ready. My aim is not to make an exact replica of an engine compartment with a complete set of tubes and wiring. I want my engine room to believably busy to look at, and recognizable as a Danish tank.
Posted: Sunday, July 25, 2010 - 08:58 PM UTC
Very nice progress so far, Kenneth.
Ambitious project. I am sure it will be worth the effort. Nice to see one of the Danish leo IIs. Will you make it in Afghanistan camo or domestic camo?
keo
Nordjylland, Denmark
Joined: January 30, 2006
KitMaker: 613 posts
Armorama: 508 posts
Joined: January 30, 2006
KitMaker: 613 posts
Armorama: 508 posts
Posted: Sunday, July 25, 2010 - 09:23 PM UTC
Domestic!
I’m still working on a solution for the barracuda ”coatings”. So far no luck.