

Dioramas
Do you love dioramas & vignettes? We sure do.
Do you love dioramas & vignettes? We sure do.
Hosted by Darren Baker, Mario Matijasic
countryside wall

stansmith

Joined: July 18, 2010
KitMaker: 611 posts
Armorama: 584 posts

Posted: Tuesday, July 27, 2010 - 06:31 AM UTC
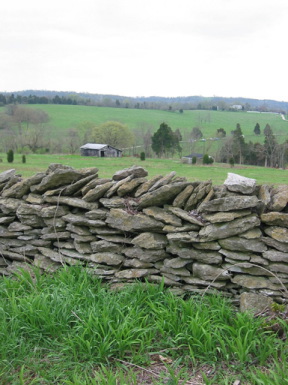
hi, i'm making a franse diorama and i want to put a countryside wall in it, but wondered whats the best way of making a wall like this


brynje

Joined: June 28, 2010
KitMaker: 176 posts
Armorama: 175 posts

Posted: Tuesday, July 27, 2010 - 07:38 AM UTC
Im planning on doing one of those in my own normandy countryside dio... still don't know how either.
Thought of making the stones in clay... but I don't think that would work well. Also thought of making the stones in foam or just find a [auto-censored]load of flat stones outside and and paint them in the right colors... another one is to use charcoal. If you cut it out like the flat stones they look alot alike in texture and all. Theb you just gotta paint them.
Anyway I hope somebody comes up with something good.


mmeier

Joined: October 22, 2008
KitMaker: 1,280 posts
Armorama: 1,015 posts
Posted: Tuesday, July 27, 2010 - 07:57 AM UTC
There are some companies that provide rubber molds for making such stones as well as the stones themselfs. This one delivers within the EU and Hirst Arts seems to be quite popular with wargamers
stansmith
Joined: July 18, 2010
KitMaker: 611 posts
Armorama: 584 posts
Posted: Tuesday, July 27, 2010 - 08:07 AM UTC
thanks for the help, i'll probably buy a mould for it. 

captnenglish

Joined: May 20, 2008
KitMaker: 1,184 posts
Armorama: 770 posts

Posted: Tuesday, July 27, 2010 - 08:16 AM UTC
Bayardi and I think mk35 make ready made country walls

ltb073
Joined: March 08, 2010
KitMaker: 3,662 posts
Armorama: 3,078 posts
Posted: Tuesday, July 27, 2010 - 09:27 AM UTC
Stanly,
The most inexpensive way would be to mix up some Plaster of Paris on the wet side in an aluminum pan. Let it dry then crack it with a hammer. You would get more natural looking pieces that you could then stack and glue together. Pain with a base coat then add a little shadows to mix it up
The most inexpensive way would be to mix up some Plaster of Paris on the wet side in an aluminum pan. Let it dry then crack it with a hammer. You would get more natural looking pieces that you could then stack and glue together. Pain with a base coat then add a little shadows to mix it up


exer

Joined: November 27, 2004
KitMaker: 6,048 posts
Armorama: 4,619 posts

Posted: Tuesday, July 27, 2010 - 10:13 AM UTC
Quoted Text
Stanly,
The most inexpensive way would be to mix up some Plaster of Paris on the wet side in an aluminum pan. Let it dry then crack it with a hammer. You would get more natural looking pieces that you could then stack and glue together. Pain with a base coat then add a little shadows to mix it up
If I can just add to this- Mix up a small amount of plaster adding some water based black or dark brown paint to the mix. Keep mixing til it has the consistency of whipped cream and then pour it out on to an empty plastic bag. When dry crack it- you shouldn't need a hammer. You could do several small pours of plaster altering the colour mix to give variety to the stone colours.


slodder
Joined: February 22, 2002
KitMaker: 11,718 posts
Armorama: 7,138 posts
Posted: Tuesday, July 27, 2010 - 11:03 AM UTC
I"ve got two ideas.
1. A spin on Pats idea - I would pour a thin layer of plaster into the bottom of a prefab/shaped aluminum foil (kitchen foil) 'tub' about 8"x10". then once dry break it up into the desired shapes. Assemble as individual stones.
2. Some pine trees have bark that is thin and 'stone' like. Maybe you can experiment with that...?


pigsty

Joined: January 16, 2007
KitMaker: 1,226 posts
Armorama: 451 posts
Posted: Tuesday, July 27, 2010 - 09:20 PM UTC
Hang on a moment, though ... The first question you need to answer is, do they use dry-stone walls like that in the part of France you want to depict? Dry-stone walls are generally a feature of higher ground with poorer soil, where there's abundant stone available on the surface and it's easier to assemble it dry than to drag a load of mortar and water all the way up the side of the hill.
In large parts of northern France, the main field boundary is the hedge rather than the wall, although it may have a stone core like the well-known Cornish hedge. If there are walls, they're more likely to be mortared than dry.
The next question is, what's the right stone for the area you're interested in? If your photo comes from Britain, it looks to me like the Cotswolds, where the stone is a browny-grey sandstone. That's not necessarily right for France. For instance, the north-east (where the champagne comes from) is chalk, which is utterly different from sandstone (and is, incidentally, unsuitable for dry-stone walling).
Then, after all that, it's time to think about how to make the stones you need.
mmeier
Joined: October 22, 2008
KitMaker: 1,280 posts
Armorama: 1,015 posts
Posted: Tuesday, July 27, 2010 - 09:48 PM UTC
It seems like everybody is using stone walls.
From my experience you can find both i.e the fields in Westfalia have/had hedgerows as separators if they are large enough but people would use dry stone walls similar to the above for fencing in the farm, roadwalls etc. Seems like the wall was used when it was needed quick of look fancy/representative.
From my experience you can find both i.e the fields in Westfalia have/had hedgerows as separators if they are large enough but people would use dry stone walls similar to the above for fencing in the farm, roadwalls etc. Seems like the wall was used when it was needed quick of look fancy/representative.

martyncrowther

Joined: September 12, 2007
KitMaker: 1,548 posts
Armorama: 1,407 posts

Posted: Tuesday, July 27, 2010 - 11:47 PM UTC
hi guys, I built one out of cat litter, you can buy it from any supermarket, a lot of people use it for rubble but I used it for dry stone walling it worked out pretty good.

alanmac
Joined: February 25, 2007
KitMaker: 3,033 posts
Armorama: 2,953 posts
Posted: Tuesday, July 27, 2010 - 11:58 PM UTC
Hi Stanley
Sean makes some valid points as regards location etc. In the days before high levels of transport etc. most building materials were sourced at a local level for the lower end of the building industry.
I'm sure you've seen this article of wall building but if not it's well worth a read. Uses methods already described but the pictures help to show what can be achieved.
Stone Wall
Hope it helps.
Alan
brynje
Joined: June 28, 2010
KitMaker: 176 posts
Armorama: 175 posts
Posted: Wednesday, July 28, 2010 - 04:08 AM UTC
Im gonna try the aluminum pan thing. Sounds cheap and easy... if it fails I today observed that a house near me has some stones in the driveway that looks good and is the right scale... Im gonna jack some of those lol 

Plasticbattle

#003
Joined: May 14, 2002
KitMaker: 9,763 posts
Armorama: 7,444 posts

Posted: Wednesday, July 28, 2010 - 04:59 AM UTC
Quoted Text
Im gonna try the aluminum pan thing.
One thing extra Id recommend is to make at least 2 pours. The one thing "wrong" .... or better said .... could be improved upon with the Dave Creel method (see the link on Alan Mac´s post above), is to have stones of different thicknesses.
Make each consecutive pour thicker/deeper. This will look even better and be more natural/realistic. Use the same aluminum pan thingy ... doesn´t matter if it gets roughed up when you´ve removed the dried layer ... this will only help. Even add some colouring and vary this with each pour, so the wall only needs weathering when built!
Brreaking some with a hammer is OK but score and break some like when cutting a tile or glass. Many stones were cut to fit and its OK to have a straight brick. Make a score along the length using a tool and ruler, and place something solid underneath and then break off along the score line.


brynje
Joined: June 28, 2010
KitMaker: 176 posts
Armorama: 175 posts
Posted: Wednesday, July 28, 2010 - 08:20 AM UTC
Quoted Text
Quoted TextIm gonna try the aluminum pan thing.
One thing extra Id recommend is to make at least 2 pours. The one thing "wrong" .... or better said .... could be improved upon with the Dave Creel method (see the link on Alan Mac´s post above), is to have stones of different thicknesses.
Make each consecutive pour thicker/deeper. This will look even better and be more natural/realistic. Use the same aluminum pan thingy ... doesn´t matter if it gets roughed up when you´ve removed the dried layer ... this will only help. Even add some colouring and vary this with each pour, so the wall only needs weathering when built!
Brreaking some with a hammer is OK but score and break some like when cutting a tile or glass. Many stones were cut to fit and its OK to have a straight brick. Make a score along the length using a tool and ruler, and place something solid underneath and then break off along the score line.
Thx for the details Frank. You can check out my result in my dio thread. But I think it will take some time before im getting to the wall building. Still working on the shack, and begun building an outside loo.

dioman13
Joined: August 19, 2007
KitMaker: 2,184 posts
Armorama: 1,468 posts

Posted: Wednesday, July 28, 2010 - 09:32 AM UTC
Here's another idea for you. Hard coal chunks smashed into small size pieces and painted works also. When broken up, you have that rough stone edge look.
stansmith
Joined: July 18, 2010
KitMaker: 611 posts
Armorama: 584 posts
Posted: Saturday, July 31, 2010 - 01:41 AM UTC
thanks for all the help guys
 |

WEB HOSTING BY


Copyright ©2021 Armorama and Kitmaker Network, a subsidiary of Silver Star Enterprises
All Rights Reserved. Please read our Conditions of Use and Privacy Policy.
All Rights Reserved. Please read our Conditions of Use and Privacy Policy.