strictly out of the box campaign.
Ontario, Canada
Joined: March 23, 2008
KitMaker: 2,847 posts
Armorama: 2,667 posts
Posted: Thursday, August 25, 2011 - 05:21 AM UTC
England - South East, United Kingdom
Joined: September 11, 2002
KitMaker: 1,933 posts
Armorama: 985 posts
Posted: Thursday, August 25, 2011 - 05:59 AM UTC
Hi Jan the build is looking good,Re the track have you tried using a paper staple on it I had this happen to me once so I stapled it together placed the joint on the bottom, little bit of mud and you couldnt see the join.

Ontario, Canada
Joined: March 23, 2008
KitMaker: 2,847 posts
Armorama: 2,667 posts
Posted: Thursday, August 25, 2011 - 06:52 AM UTC
@Easy_Co - Thanks John, I am glad that you like the little beast.
It is perhaps the easiest Dragon kit that I have encountered so far. As for paper staples, I have used them in the past, especially with Airfix kits.

At this point I still want to find an alternative as these tracks are particularly delicate and thin. There is actually very little surface area for a staple to grab and the rather nice guide horns would also prove a problem. I had a couple of pictures of them in my
Chi Ha Review but for some reason they didn't post them. If you are interested I can post them here.
Cheers,
Jan

Scotland, United Kingdom
Joined: December 07, 2007
KitMaker: 2,096 posts
Armorama: 1,983 posts
Posted: Thursday, August 25, 2011 - 07:09 AM UTC
Nice work guys keep it up, it is nice to see a real verity of builds going on here well done everyone.
CUIDICH 'N RIGH
life is a river, it always runs.
Joel_W
 Associate Editor
New York, United States
Joined: December 04, 2010
KitMaker: 11,666 posts
Armorama: 1,143 posts
Posted: Friday, August 26, 2011 - 02:14 AM UTC
I've never had much luck with staples, as I only have the large standard size stapler and staples. What works nicely is a small sewing needle and black thread. You just need to push the needle & thread though both links, then tie a simple knot. I use two such loops, one on each side of the track. Once painted, you can't see the thread.
On my Workbench:
Monogram 1/24 scale 427 Shelby Cobra
Just Completed:
Beemax 1/24 scale BMW M3 E30 1992 Evolution II
Maryland, United States
Joined: October 10, 2002
KitMaker: 352 posts
Armorama: 309 posts
Posted: Friday, August 26, 2011 - 04:19 AM UTC
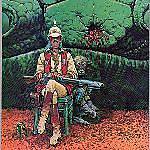
ok as per regs, photo pre-primer.

War pig number 8, Armorer of the Potomac
speak softly and carry an 88mm persuader
olive drab sux, Camo Is King !!!!
Cape Province, South Africa
Joined: July 20, 2010
KitMaker: 10 posts
Armorama: 9 posts
Posted: Saturday, August 27, 2011 - 01:40 AM UTC
Hi everyone
normal everyday 1:1 stuff has kept me from modelling. I have eventually got a start on my build and put most of the chassis together.
Below are 2 pics of where i am at presently. Ive found the instructions to be a bit confusing and vague at times. Anyone else had this problem with AFV kits?


Let me know what you think.
Dont leave for tomorrow, what you can do today.
OOB Campaign - AFV Club M35A2 2-1/2 Ton Cargo Truck
Scotland, United Kingdom
Joined: November 16, 2009
KitMaker: 23 posts
Armorama: 23 posts
Posted: Saturday, August 27, 2011 - 06:40 AM UTC
Hi gents,
Well im back from me hols now and ready to continue. At last i got on with a late war cam on my vehicle. The base colour is Revell Afrika braun .
I used a reverse masking with Blutac, and i put a coat over parts of the vehicle with Tamiya olive green.

Once that had dried, some more blutac was applied and the vehicle was sprayed with a full coating of Revell zeigel rot, which is a deep redbrown.

Once that had dried it was time to remove the bluetac. Note to self, the redbrown was slightly runny and bled in places. So when this dries, i can see me touching up with some gentle colours and a fine brush. The wheels, idlers and sprockets were done at the same time.
The barrel was left afrika braun.


At this stage, i feel the cam looks slightly off, but once the rest is done, it'll look good. (Positive thoughts)

Scotland, United Kingdom
Joined: December 07, 2007
KitMaker: 2,096 posts
Armorama: 1,983 posts
Posted: Saturday, August 27, 2011 - 06:52 AM UTC
Great work guys your builds are looking good.
CUIDICH 'N RIGH
life is a river, it always runs.
Joel_W
Associate Editor New York, United States
Joined: December 04, 2010
KitMaker: 11,666 posts
Armorama: 1,143 posts
Posted: Saturday, August 27, 2011 - 11:03 AM UTC
never tried the blue tac for masking. Looks like it works really well for a hard line camo.
On my Workbench:
Monogram 1/24 scale 427 Shelby Cobra
Just Completed:
Beemax 1/24 scale BMW M3 E30 1992 Evolution II

#047
England - East Anglia, United Kingdom
Joined: September 13, 2005
KitMaker: 2,016 posts
Armorama: 1,187 posts
Posted: Saturday, August 27, 2011 - 05:09 PM UTC
Hi all
started the weathering on the underside,

the fit of the parts is perfect,the only filler used was on the body to legs joint on Grommet

Heres the star of the show with bunny


.
its allmost complete I should finish it today

more pics later
Andy
Major Caryle,
"Shall we have a go at the far end now,sir?"
Lt Colonel "Johnny" Frost,
"Having a go,is hardly text book terminology Harry"
Major Caryle,
"But you'll let us try sir?"
A Bridge Too Far
Lottery Campaign "Oh de Vichy"
#047
England - East Anglia, United Kingdom
Joined: September 13, 2005
KitMaker: 2,016 posts
Armorama: 1,187 posts
Posted: Sunday, August 28, 2011 - 12:36 AM UTC
Hi chums,
calling this one done


I really loved building this kit ,so simple yet so difficult to get it right,ie the finish on the figures and the battered look to the van.
I think I've got it near enought.
I will build another with extras !!!
Hope you like
Andy
Major Caryle,
"Shall we have a go at the far end now,sir?"
Lt Colonel "Johnny" Frost,
"Having a go,is hardly text book terminology Harry"
Major Caryle,
"But you'll let us try sir?"
A Bridge Too Far
Lottery Campaign "Oh de Vichy"
Isere, France
Joined: April 23, 2011
KitMaker: 735 posts
Armorama: 606 posts
Posted: Sunday, August 28, 2011 - 01:46 AM UTC
hello,andy.
I love, great achievement, especially in terms of rust.
how did you do.
cordially steph
Joel_W
Associate Editor New York, United States
Joined: December 04, 2010
KitMaker: 11,666 posts
Armorama: 1,143 posts
Posted: Sunday, August 28, 2011 - 04:13 AM UTC
Andy, nicely done. It's nice to see some thing besides armor.
On my Workbench:
Monogram 1/24 scale 427 Shelby Cobra
Just Completed:
Beemax 1/24 scale BMW M3 E30 1992 Evolution II
Joel_W
Associate Editor New York, United States
Joined: December 04, 2010
KitMaker: 11,666 posts
Armorama: 1,143 posts
Posted: Sunday, August 28, 2011 - 04:33 AM UTC
Finally started the M7 Priest.
It took 3 days of 6 hour work sessions just to put together the bogies, drive sprockets, and the transmission. Still need to do some puty work on the axles gear housings. Just couldn' t get the fit to be perfit.


On my Workbench:
Monogram 1/24 scale 427 Shelby Cobra
Just Completed:
Beemax 1/24 scale BMW M3 E30 1992 Evolution II
#047
England - East Anglia, United Kingdom
Joined: September 13, 2005
KitMaker: 2,016 posts
Armorama: 1,187 posts
Posted: Sunday, August 28, 2011 - 06:06 AM UTC
thanks mates for your feedback
Stepth,,, the rust was done by a 1st layer of tamiya hull red,then rubbed over with a HB pencil,and finished with MIG Pigs std,and light rust.
The pics don't look great

,it really does look better in the flesh
Joel... I'm with you on the Sherman bogies,been there and done that
well worth it in the end ,the transmission looks A1
Andy
Major Caryle,
"Shall we have a go at the far end now,sir?"
Lt Colonel "Johnny" Frost,
"Having a go,is hardly text book terminology Harry"
Major Caryle,
"But you'll let us try sir?"
A Bridge Too Far
Lottery Campaign "Oh de Vichy"
Scotland, United Kingdom
Joined: December 07, 2007
KitMaker: 2,096 posts
Armorama: 1,983 posts
Posted: Sunday, August 28, 2011 - 09:23 AM UTC
Andy. Well done mate that looks fantastic its not something we see everyday on the forums a great subject and a great build, just remember to post your pics in the gallery,
Joel. great start looking forward to more.
Scott, nice work with the camo well done.
CUIDICH 'N RIGH
life is a river, it always runs.
Kobenhavn, Denmark
Joined: January 16, 2005
KitMaker: 878 posts
Armorama: 697 posts
Posted: Sunday, August 28, 2011 - 09:46 AM UTC
A lot of things are going on in this campaign. It seems that all are getting along quite good. Great!
Here's an update on my Quad:

I really want to replace his head, and even perhaps use a figure from MINIARTs set "British armoured car crew", and see if any of those might fit, but that would be AGAINST THE RULES of this campaign, so I just have to go with the driver provided in the kit

. Enough said.
He's ok but I had some problems with his arms/hands to fit the wheel. Eventually it all worked out well.

He fits nicely into the seats though it seems to me that he is a bit out of scale.

I must admit, that I havn't suffered any problems (yet!!!) with this kit. Everthing fits nicely, and I havn't been doing alot of sanding. Perhaps I should have done more here and there, but untill now this is really a nice kit to work with.
Now the cab will be fitted, and then on to the 25pdr gun.
Cheers
Scotland, United Kingdom
Joined: December 07, 2007
KitMaker: 2,096 posts
Armorama: 1,983 posts
Posted: Sunday, August 28, 2011 - 10:22 AM UTC
Nice work Simon keep it going mate.
CUIDICH 'N RIGH
life is a river, it always runs.
Auckland, New Zealand
Joined: June 01, 2011
KitMaker: 1,716 posts
Armorama: 1,638 posts
Posted: Monday, August 29, 2011 - 12:00 AM UTC
I'm seeing some truly great builds going on here .. to think that they are all stock standard with no mods or AM at all ,,brilliant work guys ..all of you

me on the other hand is still working on this very large scratch built Beast i'm building for a mate ,,still afew weeks work left in this monster but hell it will look super nasty ..then its on to the Dana ..i am looking forward to building that after this thing
I know the voices ain't real but they do come up with some great ideas
Never trust a man who left alone with a tea cozy and doesn't try it on ( Billy Connolly )
Overkill is often very understated
#110
Florida, United States
Joined: September 20, 2005
KitMaker: 248 posts
Armorama: 224 posts
Posted: Monday, August 29, 2011 - 02:26 AM UTC
@ Torchy -
Excellent work on the Anti-Pesto Van! I am a big W&G fan, so the model was right up my alley. The rust and weathering on the vehicle is excellent and you finished the figures very nicely. Very refreshing to see an "out-of-the-box" OOB build - a change from all the planes and armor.
Cheers,
Stephen
Moscow City, Russia
Joined: February 03, 2009
KitMaker: 14 posts
Armorama: 13 posts
Posted: Tuesday, August 30, 2011 - 04:03 AM UTC
Scotland, United Kingdom
Joined: December 07, 2007
KitMaker: 2,096 posts
Armorama: 1,983 posts
Posted: Tuesday, August 30, 2011 - 08:45 AM UTC
Nice work Andrey, another one past the post well done.
CUIDICH 'N RIGH
life is a river, it always runs.
New York, United States
Joined: March 08, 2010
KitMaker: 3,662 posts
Armorama: 3,078 posts
Posted: Tuesday, August 30, 2011 - 03:46 PM UTC
Active Campaigns on the bench:
Operation Fall Gelb - Pz.Kpfw. IV Ausf. C
Engineering the Future - M-26 Recovery Vehicle
115 Campaigns completed
Ontario, Canada
Joined: January 24, 2011
KitMaker: 470 posts
Armorama: 12 posts
Posted: Thursday, September 01, 2011 - 09:09 PM UTC
Wow some awesome armour being done. My little 1/72 190 feels kind of lame when compared to all the really big and kick ass stuff being done lol
Did the underside colour today. Have to do the light grey upperside and then the dark grey hopefully tomorrow. Not to far off finishing it.


 It is quite true that you can use regular glue with the DS styrene but so far I have had no success in rejoining the broken area. The track is so thin and fine featured that there is hardly enough surface area for glue to hold onto between the two pieces. I'll continue on with the painting and worry about the problem later.