

Karl, thanks for your input and the pictures. I´ve also seen some indian tankers in black uniform - I think they use it for training/drill purposes. I think I´d better go with a camo style uniform. Not easy.
Mauro, thx for your nice words and the pictures.
cheers
Walter
Hosted by Darren Baker
T-72M1 UNOSOM II Mineplough - Tamiya 1/35

flugwuzzi

Joined: November 02, 2007
KitMaker: 633 posts
Armorama: 599 posts
Posted: Sunday, February 06, 2011 - 02:32 AM UTC
flugwuzzi
Joined: November 02, 2007
KitMaker: 633 posts
Armorama: 599 posts
Posted: Sunday, February 06, 2011 - 03:31 AM UTC
Chemical surprise
Shocking color-effects occoured after the turret was painted with the white basecolor.
After the Vallejo Primer had dried for 24 hours I sprayed the model with the white base color (Tamiya XF2 white + some drops XF59 desert yellow to buff it down a bit + Tamiya X20A Thinner).
Then suddenly RED Markings appeared on the turret!
I think there was a chemical reaction with the red Sharpie Permanet Marker which I used to mark all the flaws an errors on the resin turret. After the AV Primer Coat no red color was seen. But when I sprayed the Tamiya color the red Sharpie markings went troug all coats. Crazy!

After another 24 hours of drying time I wanted to sand away all the red markings on the resin parts. But then I saw that the resin fairly deep resorbed the red Sharpie color. So it did not make sense to sand away more of the resin. I had to try another way.
I used Mr. Surfer 1200 an dabbed it with a Q-tip over all the red markings and let it dry for 24 hours.

Then I sprayed again a white basecoat - until now It worked and no red colour is comming through.

The running wheels were also painted in white - again with help of the Royal Model stencil.
Color for the rubber is Tam. Flat Black and Tam. German Grey 1:1

Hope the rest of the painting and weathering will be without more crazy color effects ;-)
Thanks for watching.
cheers
Walter
Shocking color-effects occoured after the turret was painted with the white basecolor.
After the Vallejo Primer had dried for 24 hours I sprayed the model with the white base color (Tamiya XF2 white + some drops XF59 desert yellow to buff it down a bit + Tamiya X20A Thinner).
Then suddenly RED Markings appeared on the turret!
I think there was a chemical reaction with the red Sharpie Permanet Marker which I used to mark all the flaws an errors on the resin turret. After the AV Primer Coat no red color was seen. But when I sprayed the Tamiya color the red Sharpie markings went troug all coats. Crazy!
After another 24 hours of drying time I wanted to sand away all the red markings on the resin parts. But then I saw that the resin fairly deep resorbed the red Sharpie color. So it did not make sense to sand away more of the resin. I had to try another way.
I used Mr. Surfer 1200 an dabbed it with a Q-tip over all the red markings and let it dry for 24 hours.
Then I sprayed again a white basecoat - until now It worked and no red colour is comming through.
The running wheels were also painted in white - again with help of the Royal Model stencil.
Color for the rubber is Tam. Flat Black and Tam. German Grey 1:1
Hope the rest of the painting and weathering will be without more crazy color effects ;-)
Thanks for watching.
cheers
Walter
flugwuzzi
Joined: November 02, 2007
KitMaker: 633 posts
Armorama: 599 posts
Posted: Tuesday, February 08, 2011 - 04:26 AM UTC
Not much feedback these days ... wondering if my bulid blog is a little bit boring?
cheers
Walter
cheers
Walter
flugwuzzi
Joined: November 02, 2007
KitMaker: 633 posts
Armorama: 599 posts
Posted: Tuesday, February 08, 2011 - 04:26 AM UTC
Markings and Decals
I sprayed the black UN Markings for frontplate and the two toolboxes with self cut masks (Revell Airbrush Masking Film).


The indian national flag and the small blue un-symbol are self printed decals - they caused a lot of problem. They are very thick and always peeld upwards they didn´t want to stick on the model ..... it´s a pity that the Echelon Decals are not ready yet!!
Finally I glued the decals on the model with Tamiya Clear. Now they don´t peel away any more ;-)


Next days I will paint all the small details and will do weathering effects on the model. Don´t want to make too much pictures and updates in this stage want to concentrate on the model.
In the next update the Model will probably be nearly finished.
Thanks for watching.
cheers
Walter
I sprayed the black UN Markings for frontplate and the two toolboxes with self cut masks (Revell Airbrush Masking Film).
The indian national flag and the small blue un-symbol are self printed decals - they caused a lot of problem. They are very thick and always peeld upwards they didn´t want to stick on the model ..... it´s a pity that the Echelon Decals are not ready yet!!
Finally I glued the decals on the model with Tamiya Clear. Now they don´t peel away any more ;-)
Next days I will paint all the small details and will do weathering effects on the model. Don´t want to make too much pictures and updates in this stage want to concentrate on the model.
In the next update the Model will probably be nearly finished.
Thanks for watching.
cheers
Walter

AgentG

Joined: December 21, 2008
KitMaker: 1,109 posts
Armorama: 1,095 posts

Posted: Tuesday, February 08, 2011 - 05:29 AM UTC
This is a fabulous piece of work. I cannot wait for the finish!
A tip if I may regarding the sharpie incident. I too have experienced the dreaded "bleed through". One thing I was told is to spot paint or prime the entire model with a silver enamel. The metallic pigments effectively block the bleed through.
Good save with the Mr Surfacer.
G
A tip if I may regarding the sharpie incident. I too have experienced the dreaded "bleed through". One thing I was told is to spot paint or prime the entire model with a silver enamel. The metallic pigments effectively block the bleed through.
Good save with the Mr Surfacer.
G

Spiderfrommars

Joined: July 13, 2010
KitMaker: 3,845 posts
Armorama: 3,543 posts
Posted: Tuesday, February 08, 2011 - 05:29 AM UTC
Well done Walter
A stanning and clean work, as usual
A stanning and clean work, as usual

Karl187

#284

Joined: October 04, 2006
KitMaker: 3,094 posts
Armorama: 2,942 posts

Posted: Tuesday, February 08, 2011 - 08:53 AM UTC
I was looking forward to seeing the painting stage and you didn't dissappoint Walter. Clean and pristine as always!
What are you going for weathering wise?
What are you going for weathering wise?

Shanelangston
Joined: October 27, 2010
KitMaker: 85 posts
Armorama: 84 posts
Posted: Tuesday, February 08, 2011 - 02:19 PM UTC
It's like a clinic! Excellent build !

hliu24
Joined: November 19, 2010
KitMaker: 798 posts
Armorama: 797 posts
Posted: Tuesday, February 08, 2011 - 03:00 PM UTC
Wow, THis one is Good!!!! 
Jay
Jay
flugwuzzi
Joined: November 02, 2007
KitMaker: 633 posts
Armorama: 599 posts
Posted: Tuesday, February 08, 2011 - 11:21 PM UTC
@AgentG
great - thanks for the good tip with the silver enamel - next time I try this!
@Mauro, Shane, Jay
Thx a lot for your comments
@Karl
for weathering I will use Oil - colors for filters and washes. And then I´ll add some pigments.
Cheers
Walter
great - thanks for the good tip with the silver enamel - next time I try this!
@Mauro, Shane, Jay
Thx a lot for your comments
@Karl
for weathering I will use Oil - colors for filters and washes. And then I´ll add some pigments.
Cheers
Walter

koenele

Joined: January 17, 2006
KitMaker: 4,194 posts
Armorama: 408 posts

Posted: Tuesday, February 08, 2011 - 11:38 PM UTC
very nice work!
flugwuzzi
Joined: November 02, 2007
KitMaker: 633 posts
Armorama: 599 posts
Posted: Sunday, February 13, 2011 - 05:03 AM UTC
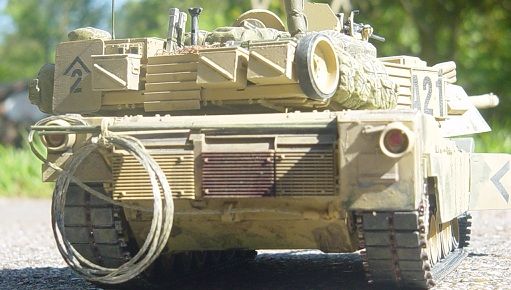
Barbwire and Sideskirts
Next step is to attach the barbwires on the sideskirts. The skirts were painted, chipped an a little bit weathered before, also the exaust soot was sprayed on.
First I tried to glue the barbwire with small dots directly on the sideskirts. But on my scrap-test-model this didn´t look good. So I drilled small holes into the sideskirts an attached the barbwire there with small wire. A cheat-sheet helped me planning where to drill the holes.

Tis was kinda fiddly work - the model barbwire behaved like it´s big brother and hoocked everywhere ;-)
After attaching the small wire-loops were retouched with small dots of color.

Weathering
Tracks were painted with Tamiya Black Flat. Then I used Mig Pigments (African Earth and Gulfwar Sand) and fixed all with the Mig Pigment Fixer (blue bottle). The black was also sanded away to create a worn look.

The wheels were chipped with the sponge method. Then I used Oil colors for filters and washing around the Details. Finally also Mig Pigments were used.

Wehen the wheels, tracks and sideskirts were attached I started weathering with chipping of the base color. As usual I use the sponge method (I already described this in my build blog of the UN Leclerc).


More weathering was done only with Oil colors and AK White Spirit.
For this step the models surface was completely flat - I didn´t spray any glossy coat on the model. But I had to be very careful with the dilution of the oils. On the matt surface you see EVERY spot of color.

First I applyed some filter with Burnt Umbra/Burnt Siena (thinned with AK White Spirit). Then I did a wash around the details with Vandyke Braun.
Other small detail were painted with different acrylic colors from AV Vallejo.
A little bit difficult was the final assembling on the front plate. All the cables of the mineplow and the lights had to be attached in the right order.
Thats it.


After 120 hours working on this model it is finished. Only the base is missing and the tank command will also find his way into the model in the next weeks (I´m still not sure about the right figure and paintjob).
Thanks for watching and all your fine comments. For me it was a challenge and also a lot of fun to build this unusual T-72 and I hope you enjoyed this this build blog.
Cheers
Walter
Next step is to attach the barbwires on the sideskirts. The skirts were painted, chipped an a little bit weathered before, also the exaust soot was sprayed on.
First I tried to glue the barbwire with small dots directly on the sideskirts. But on my scrap-test-model this didn´t look good. So I drilled small holes into the sideskirts an attached the barbwire there with small wire. A cheat-sheet helped me planning where to drill the holes.
Tis was kinda fiddly work - the model barbwire behaved like it´s big brother and hoocked everywhere ;-)
After attaching the small wire-loops were retouched with small dots of color.
Weathering
Tracks were painted with Tamiya Black Flat. Then I used Mig Pigments (African Earth and Gulfwar Sand) and fixed all with the Mig Pigment Fixer (blue bottle). The black was also sanded away to create a worn look.
The wheels were chipped with the sponge method. Then I used Oil colors for filters and washing around the Details. Finally also Mig Pigments were used.
Wehen the wheels, tracks and sideskirts were attached I started weathering with chipping of the base color. As usual I use the sponge method (I already described this in my build blog of the UN Leclerc).
More weathering was done only with Oil colors and AK White Spirit.
For this step the models surface was completely flat - I didn´t spray any glossy coat on the model. But I had to be very careful with the dilution of the oils. On the matt surface you see EVERY spot of color.
First I applyed some filter with Burnt Umbra/Burnt Siena (thinned with AK White Spirit). Then I did a wash around the details with Vandyke Braun.
Other small detail were painted with different acrylic colors from AV Vallejo.
A little bit difficult was the final assembling on the front plate. All the cables of the mineplow and the lights had to be attached in the right order.
Thats it.
After 120 hours working on this model it is finished. Only the base is missing and the tank command will also find his way into the model in the next weeks (I´m still not sure about the right figure and paintjob).
Thanks for watching and all your fine comments. For me it was a challenge and also a lot of fun to build this unusual T-72 and I hope you enjoyed this this build blog.
Cheers
Walter

SHarjacek

Joined: January 29, 2011
KitMaker: 977 posts
Armorama: 553 posts

Posted: Sunday, February 13, 2011 - 09:47 AM UTC
so amazing,what are you doing next?
Cheers
Cheers

dvarettoni
Joined: September 28, 2005
KitMaker: 778 posts
Armorama: 763 posts
Posted: Sunday, February 13, 2011 - 10:40 AM UTC
Out standing lover the weathering another great build
Dave
Dave
Spiderfrommars
Joined: July 13, 2010
KitMaker: 3,845 posts
Armorama: 3,543 posts
Posted: Sunday, February 13, 2011 - 11:30 AM UTC
Amazing!
It was very difficult in my opinion, getting a convincing appearance to an overall white tank
Well you've done in a stunning way
congrats!
It was very difficult in my opinion, getting a convincing appearance to an overall white tank
Well you've done in a stunning way
congrats!
Karl187
#284
Joined: October 04, 2006
KitMaker: 3,094 posts
Armorama: 2,942 posts
Posted: Monday, February 14, 2011 - 04:24 AM UTC
Like Mauro said- getting a convincing finish on a white tank is difficult. I had to really plan ahead when I built my UN Leclerc.
But you nailed the Leclerc and you nailed this one aswell. All the detail at the front with the plough and the cables, when weathered, look really stunning. Great job Walter.
Are you planning a diorama of some kind or just having the tank itself?
But you nailed the Leclerc and you nailed this one aswell. All the detail at the front with the plough and the cables, when weathered, look really stunning. Great job Walter.
Are you planning a diorama of some kind or just having the tank itself?
flugwuzzi
Joined: November 02, 2007
KitMaker: 633 posts
Armorama: 599 posts
Posted: Monday, February 14, 2011 - 08:41 PM UTC
Hello my friends - thx a lot for your feedback.
@Sven
I´m not sure about my next Project ... I´ve a BTR70 UNPROFOR Project 60% finished but ran out of steam in the past - maybe I´ll work again on this.
But I´ve also planned to do an AMX30 AUF1 UNIFIL and an UNIFIL Centauro.
@Karl
for my series of UNwhite Main Battle Tanks I use only nyce wooden finished bases. I know that a small diorama would look great .. but truth to be told .. I never did one and must do some practice before ;-)


cheers
Walter
@Sven
I´m not sure about my next Project ... I´ve a BTR70 UNPROFOR Project 60% finished but ran out of steam in the past - maybe I´ll work again on this.
But I´ve also planned to do an AMX30 AUF1 UNIFIL and an UNIFIL Centauro.
@Karl
for my series of UNwhite Main Battle Tanks I use only nyce wooden finished bases. I know that a small diorama would look great .. but truth to be told .. I never did one and must do some practice before ;-)
cheers
Walter
Spiderfrommars
Joined: July 13, 2010
KitMaker: 3,845 posts
Armorama: 3,543 posts
Posted: Monday, February 14, 2011 - 09:36 PM UTC
stunning UN tanks series
Which will be the next?
I hope the Centauro
cheers and congrats again
Which will be the next?
I hope the Centauro
cheers and congrats again
flugwuzzi
Joined: November 02, 2007
KitMaker: 633 posts
Armorama: 599 posts
Posted: Monday, February 14, 2011 - 10:02 PM UTC
Quoted Text
stunning UN tanks series
Which will be the next?
I hope the Centauro
cheers and congrats again
thanks mauro - maybe the centauro, do you have a special italian hint for me;) ? I´m still looking for a tank commander figure in 1/35 which can be used for the unifil centauro.
cheers
Walter
Spiderfrommars
Joined: July 13, 2010
KitMaker: 3,845 posts
Armorama: 3,543 posts
Posted: Tuesday, February 15, 2011 - 01:11 AM UTC
Quoted Text
Quoted Textstunning UN tanks series
Which will be the next?
I hope the Centauro
cheers and congrats again
thanks mauro - maybe the centauro, do you have a special italian hint for me;) ? I´m still looking for a tank commander figure in 1/35 which can be used for the unifil centauro.
cheers
Walter
Yes of course Walter, i'm glad to help you
Here some pics
http://digilander.libero.it/en_mezzi_militari/html/centauro.html
Here you can find the pics of italian army missions
http://www.esercito.difesa.it/root/media/immagini.asp
Here some treads of italian modeller forums
http://ffz.leonardo.it/lofi/VRC-105-Centauro-Spagnolo/D9644536.html
http://freeforumzone.leonardo.it/lofi/WIP-Collettivo-Centauro-Trumpeter/D9246626-1.html
http://www.cmpr.it/centauro/Centauro.htm
http://www.smf-modellismo.net/olympus/viewtopic.php?f=28&t=3107&st=0&sk=t&sd=a
About the figures, Model Victoria sells 3 Centauro Tankers...
http://www.modelvictoria.it/figurini/0004.html
and a very nice set of resin wheels
http://www.modelvictoria.it/accessori/Cod_0005.html
Also Royal model sells a set of italian figures, but i don't know if they are right for UN missions
http://www.royalmodel.com/it/catalogo_dettaglio.php?id_art=577
I hope that's will be useful for you. If I found anything else, I'll give you
Cheers
Karl187
#284
Joined: October 04, 2006
KitMaker: 3,094 posts
Armorama: 2,942 posts
Posted: Tuesday, February 15, 2011 - 01:32 AM UTC
What a series of tanks- excellent. Makes me think I should do a companion for my lonely white Leclerc!
Spiderfrommars
Joined: July 13, 2010
KitMaker: 3,845 posts
Armorama: 3,543 posts
Posted: Tuesday, February 15, 2011 - 02:15 AM UTC
Otherwise next one could be the strangest tank that operated in UN forces...

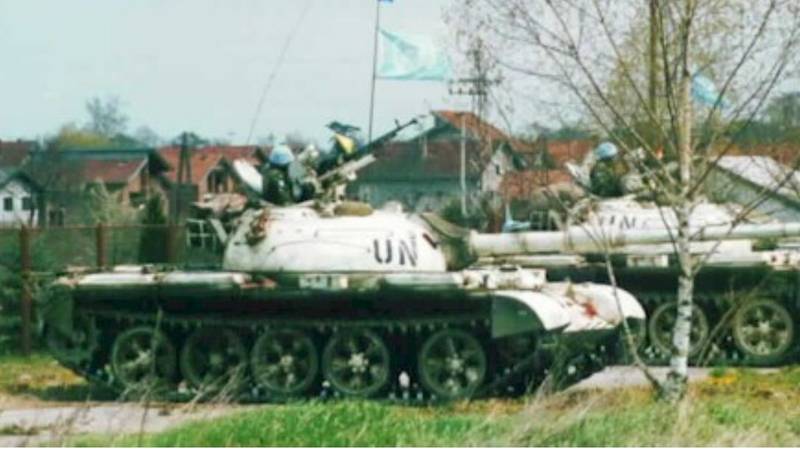
Pakistan t54 in Croatia
Pakistan t54 in Croatia
SHarjacek
Joined: January 29, 2011
KitMaker: 977 posts
Armorama: 553 posts
Posted: Tuesday, February 15, 2011 - 02:30 AM UTC
what a nice "wolfpack" looks really good all in un color schemes.
I cheer for the UNIFIL Centaruo too
Cheers,Sven!
I cheer for the UNIFIL Centaruo too
Cheers,Sven!
SHarjacek
Joined: January 29, 2011
KitMaker: 977 posts
Armorama: 553 posts
Posted: Tuesday, February 15, 2011 - 02:32 AM UTC
i've now seen that Mauro posted a t54 that was used in Croatia-i hope you make that one too
Cheers,Sven
Cheers,Sven
flugwuzzi
Joined: November 02, 2007
KitMaker: 633 posts
Armorama: 599 posts
Posted: Tuesday, February 15, 2011 - 02:58 AM UTC
@Mauro
wow, thanks a lot for your hints. The ressources are really great and will help a lot with the Centauro project. The UN T-54 also looks very interesting.
@Karl
Definitely YES ... your white Leclerc needs a companion too!!
@Sven
The T54 is also a nice un project - maybe you will do this one
cheers
Walter
wow, thanks a lot for your hints. The ressources are really great and will help a lot with the Centauro project. The UN T-54 also looks very interesting.@Karl
Definitely YES ... your white Leclerc needs a companion too!!
@Sven
The T54 is also a nice un project - maybe you will do this one
cheers
Walter
 |

WEB HOSTING BY


Copyright ©2021 Armorama and Kitmaker Network, a subsidiary of Silver Star Enterprises
All Rights Reserved. Please read our Conditions of Use and Privacy Policy.
All Rights Reserved. Please read our Conditions of Use and Privacy Policy.