_GOTOBOTTOM
Armor/AFV: AA/AT/Artillery
For discussions about artillery and anti-aircraft or anti-tank guns.
Hosted by Darren Baker
1/35 DML T19 105mm HMC, WIP, 10/05/10, Frame
redleg12
Visit this Community
New Jersey, United States
Joined: March 11, 2007
KitMaker: 872 posts
Armorama: 831 posts
Posted: Monday, October 04, 2010 - 02:50 PM UTC
Fire Mission…..

1/35 DML T19 Howitzer Motor Carriage


Along with the kit I will add Griffon PE kits for the suspension, the PE kit for the driving compartment and may look at the voyager set for the hood and front end. I also will be using the new AFV Kit for 105mm ammunition packaging and new AFV 105mm brass ammunition (not shown).

Research

If you are going to build a US Halftrack then you need the bible for the vehicle and the variants, Half Track by R. Hunnicuitt


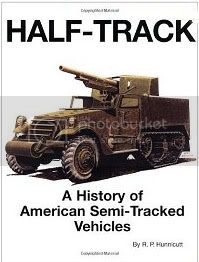
A little over 300 were manufactured and were used by the US extensively in North Africa and a bit in Italy.

The build

Before building the kit, a good background was to read Tim Streeter’s web blog on the build.

http://www.usarmymodels.com/MANUFACTURERS/DML/DML6496/dml6496%201%20intro.html

Step 1 on the kit builds a number of small assemblies including the axels, radiator, engine, front wheels, track driver wheels and track idler wheel.

The kit instructions are a bit off in two parts. The picture would lead you to believe the fan goes on the lower pulley, but it actually goes on the upper pulley. I learned that one the hard way. The brake shoes A8 & A9 are reversed from what the directions show….that was a freebie from Tim

After that everything assembled well


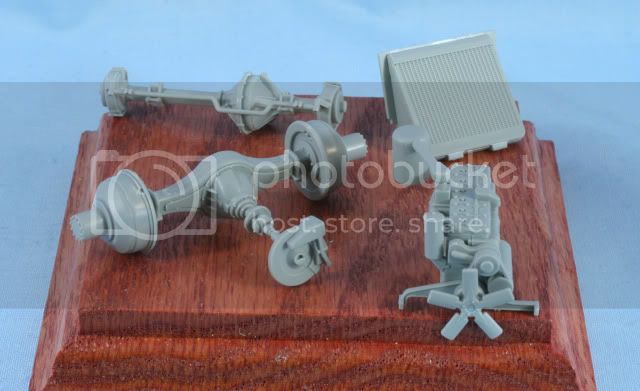
Here are all the wheel assemblies


Step 2 & 3 assemble the track assemblies. I will skip those for now to do a little paint with the wheels. Some people prefer to totally assemble then paint. I am the sub assembly painted and then assembled modeler. I will try to work a method for the DML half track assembly

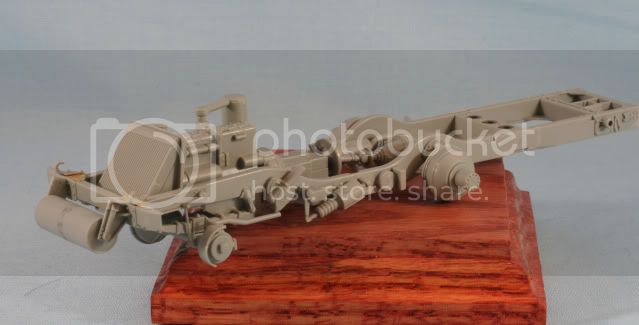
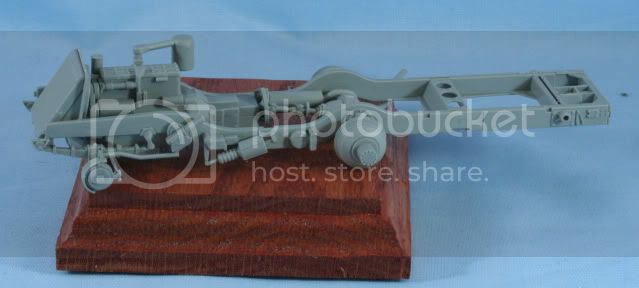
Step 4 takes the frame and begins mounting parts and assemblies. I mounted the transmission, front suspension, steering box and track drive axel mounts

The T19 was assembled early in the war, prior to the modification for a double coil spring idler on the track. To build what was typically fielded, we are lucky that the parts are in the kit. This is done by replacing parts C34 and C35 with parts C43 and C44 respectively. This allows you to now leave of part A22 and A21. Thanks again Tim. Design information can be found in Hunnicutt.
These parts (C34 & C35) will require a bit of seam work to the frame.

The remaining rear adjusting idler parts were left off until the tracks are mounted.


Step 5

This step adds the engine, radiator, exhaust system, front and rear axels, drive shaft and steering arm. The instructions don’t give the details but install the exhaust system before the engine or the rear axel. These all assembled nicely. The track wheel assembly is also to be put on in this step but as stated earlier, the will wait until later.


That’s it for now. I’m off and running.

As always thanks for stopping by. Your comments good or bad are always appreciated.

Rounds Complete!!
TimStreeter
Visit this Community
Minnesota, United States
Joined: October 19, 2008
KitMaker: 91 posts
Armorama: 80 posts
Posted: Monday, October 04, 2010 - 03:57 PM UTC
You're off to a good start Mike! Where did you get your hands on the AFV Club ammo sets?

Tim
redleg12
Visit this Community
New Jersey, United States
Joined: March 11, 2007
KitMaker: 872 posts
Armorama: 831 posts
Posted: Monday, October 04, 2010 - 04:06 PM UTC
Tim - Thanks. The ammo kit are from China by way of ebay. I picked up a couple of the 105mm packaging sets from one vendor and the ammunition sets from another vendor.

As an artilleryman....you can never have enough ammo!!

This gives me the basic load from AFV....just have to manage my re-supply rate!!

Thanks Tim

Rounds Complete!!
Dangeroo
#023
Visit this Community
Zurich, Switzerland
Joined: March 13, 2009
KitMaker: 2,058 posts
Armorama: 1,656 posts
Posted: Monday, October 04, 2010 - 07:37 PM UTC
Mike, good to see one of those being built up and good to have some warning about the instructions. I still haven't gotten around to building one of Dragon's halftracks even though I have all of them in the stash...

Could you post some pics of the ammo? Or even a review? Looks like something I will have to get for my M7 and T19.

Feuer durch! (Swiss Army for "Rounds Complete!" )
redleg12
Visit this Community
New Jersey, United States
Joined: March 11, 2007
KitMaker: 872 posts
Armorama: 831 posts
Posted: Tuesday, October 05, 2010 - 12:01 AM UTC
Stephan - I will get a quick review together and get it posted.

Thanks for the comments and for stopping in

Rounds Complete!!
GALILEO1
Visit this Community
Maryland, United States
Joined: April 18, 2006
KitMaker: 1,794 posts
Armorama: 1,431 posts
Posted: Tuesday, October 05, 2010 - 01:49 AM UTC
Looking really good so far, Mike. I'm not really into half-tracks but that 105mm gun there surely makes it tempting.

Will stay tuned...

Rob
redleg12
Visit this Community
New Jersey, United States
Joined: March 11, 2007
KitMaker: 872 posts
Armorama: 831 posts
Posted: Tuesday, October 05, 2010 - 02:20 AM UTC
Rob - Thanks for stopping by. By itself its ok......but all the variants with a weapon....priceless.

Thanks for coming on the ride!!

Rounds Complete!!
HeavyArty
Visit this Community
Florida, United States
Joined: May 16, 2002
KitMaker: 17,694 posts
Armorama: 13,742 posts
Posted: Tuesday, October 05, 2010 - 02:46 AM UTC
Looks like it is off to a good start Mike. Keep it up.
PantherF
Visit this Community
Indiana, United States
Joined: June 10, 2005
KitMaker: 6,188 posts
Armorama: 5,960 posts
Posted: Tuesday, October 05, 2010 - 02:53 AM UTC
I have this kit, but didn't realize it was so detailed around the frame and suspension. I originally was going to use it as a basis for my scratch build 1/16 project (that now is in the trash) so I may have to build it after looking at how nice a start you have.

Bring on more pics when you get the chance!


- Jeff
redleg12
Visit this Community
New Jersey, United States
Joined: March 11, 2007
KitMaker: 872 posts
Armorama: 831 posts
Posted: Tuesday, October 05, 2010 - 03:43 AM UTC
Gino - Thanks for stopping in.

Jeff - Yes, the detail is nice on this kit....we will go along with plenty of pics.

Thanks for stopping in.

Rounds Complete!!
redleg12
Visit this Community
New Jersey, United States
Joined: March 11, 2007
KitMaker: 872 posts
Armorama: 831 posts
Posted: Sunday, October 10, 2010 - 02:25 PM UTC
This has been a slow week with not a lot of bench time. Here are the few things I was able to move forward.

Moving on to step 6, which is the last step for the frame assembly. This step is essentially the front bumper and roller, along with mounting the tracks which I will do later. The roller is two piece split in half and a couple of coats of Mr. Surfacer 500 makes the seam disappear. Here is the frame ready for priming and painting.


I skipped over to step 13 to begin assembly of the fighting compartment. The fighting compartment is 3 flat side panels and the bottom hull. First I assembled the two side panels. I clamped them in the correct straight position, the applied some liquid cement to the seams and let dry overnight.


After the sides I repeated the same operation with the rear panel and let dry overnight.


I then installed the seats and the front cargo boxes. The ready ammunition, gas cans and 50 cal will go in later.


As I said this was a short week. Nest up will be the driver’s compartment.

As always thanks for stopping by. Your comments good or bad are always appreciated.

Rounds Complete!!
redleg12
Visit this Community
New Jersey, United States
Joined: March 11, 2007
KitMaker: 872 posts
Armorama: 831 posts
Posted: Sunday, October 24, 2010 - 04:57 PM UTC
It has been a busy time so getting to the bench has been tough these past few weeks.

Step 10 assembles the howitzer barrel, recoil system, metal barrel end and rails. The top of the recoil cylinder has a nice mold seam the length of the cylinder which needed attention. The breech and breech block are also assembled in this step but I left them separate for ease of painting.


The breech is molded in 2 parts with a seam in the middle. After taking care of the seam with Mr. Surfacer, I check the seam using a silver calligraphy pen from Michael’s. I love using these pens for this and it is a handy little tool.


Step 11 assembles the sled and gears with mounts. The sled is in two halves and has a nice seam in the middle. Since I plant to have the weapon elevated, I needed to seal up the bottom half. The top half of the seam is inside the C shaped sled. I used a strip of .010 styrene to cover the seam and some Mr. Surfacer to seal it in place. I finished the assembly leaving off the sights to be painted separate and mounted once the elevation is set.


The rest of my time has been spent cleaning up the mold seam on all the road wheels in preparation for painting and roughing up the tracks.

Next up the PE for the suspension and then onto the cab.

As always thanks for stopping by. Your comments good or bad are always appreciated.

Rounds Complete!!

HEINE-07
Visit this Community
Ohio, United States
Joined: February 28, 2007
KitMaker: 392 posts
Armorama: 198 posts
Posted: Sunday, October 24, 2010 - 06:25 PM UTC
It all looks so beautiful! Will dragon ever come out with the 75mm HMC-T30?
redleg12
Visit this Community
New Jersey, United States
Joined: March 11, 2007
KitMaker: 872 posts
Armorama: 831 posts
Posted: Monday, October 25, 2010 - 12:22 AM UTC
Rick - Thanks for stopping by...we can only hope. It would mainly be an investment in the 75mm howitzer sprue. Maybe they cut a deal with Vision....we can only hope.

Thanks for stopping by

Rounds Complete!!
GALILEO1
Visit this Community
Maryland, United States
Joined: April 18, 2006
KitMaker: 1,794 posts
Armorama: 1,431 posts
Posted: Monday, October 25, 2010 - 12:57 AM UTC
Excellent progress so far, Mike! I really like that silver calligraphy pen trick. I always find myself shooting a primer to the area to check for seams and it sure is time-consuming. I will give this a go for sure!

Keep up the good work!

Rob
redleg12
Visit this Community
New Jersey, United States
Joined: March 11, 2007
KitMaker: 872 posts
Armorama: 831 posts
Posted: Monday, October 25, 2010 - 02:51 AM UTC
Rob - The clligrapghy pen was something I picked up to do some small chips and metal spots and found I love it for checking a seam. Use it all the time. Thinner than paint, also don't have to charge up the air brush. Allows a quick check after sanding and dries in seconds.

Thanks for stopping by

Rounds Complete!!
HeavyArty
Visit this Community
Florida, United States
Joined: May 16, 2002
KitMaker: 17,694 posts
Armorama: 13,742 posts
Posted: Monday, October 25, 2010 - 03:06 AM UTC
Its looking great Mike. That cradle is a little gem. Great work.
redleg12
Visit this Community
New Jersey, United States
Joined: March 11, 2007
KitMaker: 872 posts
Armorama: 831 posts
Posted: Monday, October 25, 2010 - 08:25 AM UTC
Gino - Thanks, the DML 105mm Howitzer is a nice little kit. I need to build the towed version soon. It would make a nice quickie build!!

Thanks for stopping by and for the comments

Rounds Complete!!
tread_geek
Visit this Community
Ontario, Canada
Joined: March 23, 2008
KitMaker: 2,847 posts
Armorama: 2,667 posts
Posted: Monday, October 25, 2010 - 10:15 AM UTC
Really looks like a nice kit and you are doing it justice, Mike. The calligraphy pen tip sounds like it would have potential even in my preferred scale. I've an M7 in the stash and this build has me wondering what I could do with that.

Cheers,
Jan
redleg12
Visit this Community
New Jersey, United States
Joined: March 11, 2007
KitMaker: 872 posts
Armorama: 831 posts
Posted: Monday, October 25, 2010 - 01:04 PM UTC
Jan - Thanks for stopping in.....I think it could be handy....at any size...this is one where size does not matter

Rounds Complete!!
newfish
Visit this Community
England - West Midlands, United Kingdom
Joined: June 23, 2008
KitMaker: 2,329 posts
Armorama: 2,110 posts
Posted: Monday, October 25, 2010 - 01:05 PM UTC
Hey Mike nice choice with this kit. Looks like your having fun. Good job so far the calligraphy pen is a neat trick keep it coming

Jaymes
TankCarl
Visit this Community
Rhode Island, United States
Joined: May 10, 2002
KitMaker: 3,581 posts
Armorama: 2,782 posts
Posted: Monday, October 25, 2010 - 01:22 PM UTC
Hi Mike. In the view of the rear compartment, did you like the plastic handles under the seats by the gas tank? I usually will replace anything like that with wire,because I can bend a sharper corner.. Nice work so far.
redleg12
Visit this Community
New Jersey, United States
Joined: March 11, 2007
KitMaker: 872 posts
Armorama: 831 posts
Posted: Monday, October 25, 2010 - 01:44 PM UTC
Jaymes - Thanks for stopping in. I am always having fun.....if I stop having fun it is time to change hobbies. glad you like my little tip

Carl - I agree....normally I would replace them but quite frankly, I did not think these looked so bad. So if I can save myself some work!!
Thanks for stopping in and for the comments.

Rounds Complete!!
redleg12
Visit this Community
New Jersey, United States
Joined: March 11, 2007
KitMaker: 872 posts
Armorama: 831 posts
Posted: Wednesday, October 27, 2010 - 01:54 PM UTC
Stefan - Check out the review section for the AFV 105mm Ammunition Crate review. I will get a review up in the next week or so for the new AFV 105mm Ammunition. I will be using both new kits somewhat in this build.

Hope the review is what you were looking for??

Rounds Complete!!
Dangeroo
#023
Visit this Community
Zurich, Switzerland
Joined: March 13, 2009
KitMaker: 2,058 posts
Armorama: 1,656 posts
Posted: Wednesday, October 27, 2010 - 08:12 PM UTC
thanks Mike, exactly what I was looking for, especially with the links. I will have to get some of those. They don't seem readily available yet though... At least not in the (online) shops I go to.

Cheers and keep up the good work!
Stefan
 _GOTOTOP