a very complex diorama Simon and the challenge to keep the project moving to completion deserves a huge congratulations. Overall nice job mate.
if you would like some feedback i would take some diluted white glue/water and rub some with your fingers over the thread you used on the stowage of the Stug to help with its fuzziness.
if you aren't pleased with how the headphones are sitting on the Stug commander reposition them around his neck or on the deck in front of him.
there is lots to see in your scene and you definitely raised the bar for your next project. cheers, bd.
Dioramas
Do you love dioramas & vignettes? We sure do.
Do you love dioramas & vignettes? We sure do.
Hosted by Darren Baker, Mario Matijasic
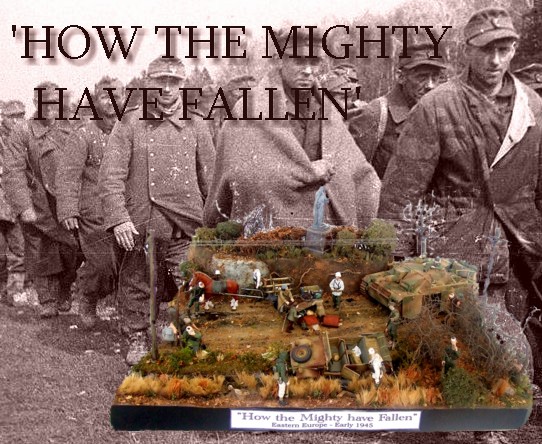
'How the Mighty have Fallen'

meaty_hellhound

Joined: July 23, 2010
KitMaker: 786 posts
Armorama: 753 posts

Posted: Saturday, April 16, 2011 - 04:02 AM UTC
retiredbee2

Joined: May 04, 2008
KitMaker: 757 posts
Armorama: 518 posts

Posted: Saturday, April 16, 2011 - 02:29 PM UTC
I would like to know why some folks think that if it is winter, there must be snow on the ground. Even in the southern states, USA, winter can be bitter cold as crap and with no snow and even some of the plants and trees still have some green foliage. In this dio the foliage is about half dried up and half still green. Nothing unusual about that in winter. Those winter coats look perfectly fine to me.......................Al
senojrn

Joined: April 26, 2010
KitMaker: 15 posts
Armorama: 8 posts

Posted: Saturday, April 16, 2011 - 03:05 PM UTC
Very nice dio! Well done!

jccraemer

Joined: December 24, 2007
KitMaker: 462 posts
Armorama: 262 posts

Posted: Saturday, April 16, 2011 - 04:35 PM UTC
simon, nice job on your dio
jphillips

Joined: February 25, 2007
KitMaker: 1,066 posts
Armorama: 789 posts

Posted: Saturday, April 16, 2011 - 05:43 PM UTC
What a grim scene. Your diorama conveys a feeling of hopelessness very well. You just know that most of these poor guys are doomed, and will never see their loved ones again.
The discarded "Signal" mags are an excellent touch. Symbolism: like all the stuff abandoned in the desperate retreat from the Red Army, these unfortunate Landsers have themselves been thrown away, by an uncaring Hitler.
This is everything a diorama should be.
The discarded "Signal" mags are an excellent touch. Symbolism: like all the stuff abandoned in the desperate retreat from the Red Army, these unfortunate Landsers have themselves been thrown away, by an uncaring Hitler.
This is everything a diorama should be.

GregCloseCombat

Joined: June 30, 2008
KitMaker: 2,408 posts
Armorama: 2,394 posts

Posted: Saturday, April 16, 2011 - 06:06 PM UTC
I love this. You got so much action but it all works well - very interesting. The guy taking a dump had me cracking up!
I would agree that the white smocks stand out too much as a Target in this terrain. Maybe you could just dirty them up more to show a long retreat.
Great dio
I would agree that the white smocks stand out too much as a Target in this terrain. Maybe you could just dirty them up more to show a long retreat.
Great dio


Barbarossa

Joined: August 25, 2005
KitMaker: 216 posts
Armorama: 215 posts

Posted: Saturday, April 16, 2011 - 10:32 PM UTC
Hello again everyone.... 
Well firstly can I just say a big 'thank you' to everyone who took time to leave a message about my dio. All input, good & bad, is much appreciated.
Firstly, the issue about 'winter'. I was abit perplexed about what Matt mentioned about the uniforms not matching the sturmgeschultz or the base? I included the white smocks & trousers on some of the figures to add alittle variety to the uniforms. Obviously there's no snow on the ground to act as camouflage, but then if there were, wouldn't any field grey uniforms stand out a mile? I toyed with the idea of adding alittle light snow or frost on the ground, nothing heavy, but then that would cover a certain amount of groundwork which seemed to take 'forever' to detail in the first place. I tried to convey a winter climate by including leafless shrubs & trees, dead leaves, winter clothing on the figures etc... Then James & Alfred summed it up perfectly!!!!
Greg mentioned quite rightly about the white being a target for the enemy. I did try to dirty up the white by adding a little grey & earth toned pigments. Looking back at photos from the period the white smocks are as good as grey & filthy due to the constant use, so maybe I could try to mess them up abit more. As I've tried to portray a retreating army, after months of being beaten back, they could be wearing the same thing they've had on for weeks.
Bruce, I appreciate the tip on losing the fuzziness on the thread used to tie down the stowage. I didn't think it was that visible....... Yesterday I added the telegraph poles & used the same thread for the wires. It looked pretty convincing I thought, with the problem being slightly fuzzy wires, so that tip will hopefully correct that one, cheers! I appreciate the headphones on the commander do look alittle high up' on his head, I just copied the box photo the figures came in.
Jerry I'd already used MB prisoners set for an earlier diorama, they would have suited this one well too, the despondent look of them would have been perfect. I did have a couple more Verlinden wounded guys in mind to add, but I really ran out of room in the end. I wanted to leave abit of space in the centre to isolate the cart & refugees, leaving everyone else to be looking on from the sidelines.
Thanks again to everyone who left a comment....., abit more now to add to finish off the scene, thanks for reading!!
SIMON.

Well firstly can I just say a big 'thank you' to everyone who took time to leave a message about my dio. All input, good & bad, is much appreciated.
Firstly, the issue about 'winter'. I was abit perplexed about what Matt mentioned about the uniforms not matching the sturmgeschultz or the base? I included the white smocks & trousers on some of the figures to add alittle variety to the uniforms. Obviously there's no snow on the ground to act as camouflage, but then if there were, wouldn't any field grey uniforms stand out a mile?
 I toyed with the idea of adding alittle light snow or frost on the ground, nothing heavy, but then that would cover a certain amount of groundwork which seemed to take 'forever' to detail in the first place. I tried to convey a winter climate by including leafless shrubs & trees, dead leaves, winter clothing on the figures etc... Then James & Alfred summed it up perfectly!!!!
Greg mentioned quite rightly about the white being a target for the enemy. I did try to dirty up the white by adding a little grey & earth toned pigments. Looking back at photos from the period the white smocks are as good as grey & filthy due to the constant use, so maybe I could try to mess them up abit more. As I've tried to portray a retreating army, after months of being beaten back, they could be wearing the same thing they've had on for weeks.
Bruce, I appreciate the tip on losing the fuzziness on the thread used to tie down the stowage. I didn't think it was that visible.......
 Yesterday I added the telegraph poles & used the same thread for the wires. It looked pretty convincing I thought, with the problem being slightly fuzzy wires, so that tip will hopefully correct that one, cheers! I appreciate the headphones on the commander do look alittle high up' on his head, I just copied the box photo the figures came in.
 Jerry I'd already used MB prisoners set for an earlier diorama, they would have suited this one well too, the despondent look of them would have been perfect. I did have a couple more Verlinden wounded guys in mind to add, but I really ran out of room in the end. I wanted to leave abit of space in the centre to isolate the cart & refugees, leaving everyone else to be looking on from the sidelines.
Thanks again to everyone who left a comment....., abit more now to add to finish off the scene, thanks for reading!!
SIMON.

filthpig

Joined: March 16, 2011
KitMaker: 13 posts
Armorama: 12 posts

Posted: Sunday, April 17, 2011 - 01:25 AM UTC
Truly astounding work. I'm impressed. Keep it up! I'll be bookmarking this one for inspiration.

mharris79

Joined: March 22, 2011
KitMaker: 51 posts
Armorama: 42 posts

Posted: Sunday, April 17, 2011 - 01:34 AM UTC
Nice work 

tommy1drop

Joined: February 07, 2011
KitMaker: 131 posts
Armorama: 116 posts

Posted: Sunday, April 17, 2011 - 02:53 AM UTC
Really good dio Simon, excellent groundwork and i love the theme of the dio......well done.
Tom
Tom

reccymech

Joined: February 20, 2011
KitMaker: 87 posts
Armorama: 74 posts

Posted: Saturday, April 23, 2011 - 01:07 AM UTC
Not that I'm an authority on retreating armies, or that my modeling skills are anywhere near yours Barbarossa, however.......you have a Kubelwagon 'abandoned'. It is depicted, to me anyway, as still serviceable, and knowing the resourcefulness of soldiers in any army it would of been put back to service ASAP.
I only say this, as a Recovery Mechanic, any vehicle abandoned would be repatriated back into service especially in a 'withdrawal'. I know I'm probably being too technical but it was the first thing I was drawn to.
I only say this, as a Recovery Mechanic, any vehicle abandoned would be repatriated back into service especially in a 'withdrawal'. I know I'm probably being too technical but it was the first thing I was drawn to.

Barbarossa

Joined: August 25, 2005
KitMaker: 216 posts
Armorama: 215 posts

Posted: Saturday, April 23, 2011 - 05:05 AM UTC
Hiya everyone.
Well that last comment made me laugh Mark, I guess they'd have appreciated you being around there at the time...!!!
Hadn't really put much thought into the reason why it would've been left there, I could've 'shot it up abit', but just left it as it was. I suppose any budding mechanic wandering back could get it going again, but typically they might have to wait a couple of weeks for the parts!!!
Thanks too to Mike, Mark & Tom for their kind remarks. I'm just waiting on my 'Woodland Scenics' water to arrive, & I'll be finished. Will post the final photo's as soon as.
Cheers for now,
SIMON.
Well that last comment made me laugh Mark, I guess they'd have appreciated you being around there at the time...!!!

Hadn't really put much thought into the reason why it would've been left there, I could've 'shot it up abit', but just left it as it was. I suppose any budding mechanic wandering back could get it going again, but typically they might have to wait a couple of weeks for the parts!!!

Thanks too to Mike, Mark & Tom for their kind remarks. I'm just waiting on my 'Woodland Scenics' water to arrive, & I'll be finished. Will post the final photo's as soon as.
Cheers for now,
SIMON.

Barbarossa

Joined: August 25, 2005
KitMaker: 216 posts
Armorama: 215 posts

Posted: Monday, May 09, 2011 - 12:05 AM UTC
Hello everyone...
Just posting the final few photo's of the now finished dio.


All that's been finally added are the telegraph poles, dirtied up the side of the kubelwagon, dead leaves from 'Plus Models' & the water.................., oh dear, the water................
Bought a bag of EZ Water from 'Woodland Scenics, that's the one which you melt little clear pellets over heat, and then just 'simply' pour into the pond/river/puddle etc... Never tried this one before, but the idea of how easy it is to use appealed. The melting part was easy enough, took afew minutes on an electric hob in a disposable tin. As soon as it was poured into the stream though, it began to cool & set immediately. So any chance of spreading it evenly was impossible, it just began to go stringing as it went cold!!! The parts that did go where they were supposed to set in a slight 'rise', i.e. it doesn't find it's own level, it just set where it lay. To sum it up it was a nightmare.. Problem is I couldn't even add any colour tint ot it, it just spits & boils up.
So went back to my trusted pots of 'Deluxe' Solid Water, 2 parts that when mixed together set over a period of time. This in comparison was a huge difference. Although it took 12+ hours to fully set, it could be tinted with oil paint & white spirits, it found it's own level into all the gaps & holes and was so much better to work with. You do have to keep returning to it to create the ripples on the surface as it's setting. The suggestion with the 'melted' water was to heat it the surface with a heat gun & create ripples & movement that way........well that was fine if I wanted to set fire to the rest of the river bank....


The telegraph poles were just wooden dowels, matchsticks & thread. I tried Bruce's suggestion in an earlier post to rub the thread with diluted PVA glue to remove the fuzziness, but it didn't seem to make alot of difference.

As always thanks for looking everyone, look forward to any comments, suggestions, critiques........
Cheers for now,
SIMON.
Just posting the final few photo's of the now finished dio.

All that's been finally added are the telegraph poles, dirtied up the side of the kubelwagon, dead leaves from 'Plus Models' & the water.................., oh dear, the water................

Bought a bag of EZ Water from 'Woodland Scenics, that's the one which you melt little clear pellets over heat, and then just 'simply' pour into the pond/river/puddle etc... Never tried this one before, but the idea of how easy it is to use appealed. The melting part was easy enough, took afew minutes on an electric hob in a disposable tin. As soon as it was poured into the stream though, it began to cool & set immediately. So any chance of spreading it evenly was impossible, it just began to go stringing as it went cold!!! The parts that did go where they were supposed to set in a slight 'rise', i.e. it doesn't find it's own level, it just set where it lay. To sum it up it was a nightmare..
 Problem is I couldn't even add any colour tint ot it, it just spits & boils up.
 So went back to my trusted pots of 'Deluxe' Solid Water, 2 parts that when mixed together set over a period of time. This in comparison was a huge difference. Although it took 12+ hours to fully set, it could be tinted with oil paint & white spirits, it found it's own level into all the gaps & holes and was so much better to work with. You do have to keep returning to it to create the ripples on the surface as it's setting. The suggestion with the 'melted' water was to heat it the surface with a heat gun & create ripples & movement that way........well that was fine if I wanted to set fire to the rest of the river bank....

The telegraph poles were just wooden dowels, matchsticks & thread. I tried Bruce's suggestion in an earlier post to rub the thread with diluted PVA glue to remove the fuzziness, but it didn't seem to make alot of difference.
As always thanks for looking everyone, look forward to any comments, suggestions, critiques........
Cheers for now,
SIMON.

 |


