Thanks Carmen

Today I decided to finish the Glacis. Gordon did indeed get me a replacement very quickly for the missing one. However, I had already started on my own so decided to stick with that as mine had more interior details.
As we have seen, I've already done the inside bit, so now I had to scratch the outside bit. This was actually a bit tricky as I had to cut two holes in it which are each round cornered and flared. Then add some bolts, then some countersunk bolts. Got there in the end though:

Here it is in place:

Now I have a confession to make When I got this on I noticed the gun did not (at all) line up with the hole for the barrel!
Luckily the deck was not completely welded on as I only used a very small amount of glue to add it. So it came off without damage and I got the opportunity to reposition the gun
While I was at it I fixed something else. The churchill has two supporting arms that run from just inside the panniers by the doors up to near the centre of the deck to support it. I had forgotten to do these before I put the deck on, and was going to try to get them in through the turret ring. So while I had the deck off I fixed these too

I went to put the Cromwell 3in howitzer on, and to be frank, it seemed a bit undersized. I checked it against scale plans and it is around 16% too small. So looking through my stock styrene rod pot I found I had nothing at the right diameter of 3mm
As luck would have it though, the sprue carrying the kit's turret base is 3mm so after some measuring cutting and drilling I ended up with this:

I added a slimmer rod in one end to allow a good joint and got it on the tank:


After that I added the two pieces of mudguard on the inside of the suspension horns.
These were designed to prevent mud flying off the tracks and idler all over the bow, and glacis blinding the driver and getting all over the bow armament.
Initially there were also two triangular pieces in the corners between these and the hull, but these disappeared in the rework scheme with the guardfs switching over to the new type seen on later MkIIIs, IVs, Vs all the way to the final XI
However, COMPANY, and the other tanks at Dieppe occupy a very narrow window of production which I think must be somewhere in the middle of the rework scheme, because while she does have the new pattern guard section behind the air intakes, she has the earlier inner horn guards (but without the triangles) and the early rearmost sections over the idler
Anyway, the kit comes with the later pattern mudguards so the inner horn guards are the wrong pattern, so I scratched new ones:

I also added the sections inside the air intakes from the kit, filling the holes for the long crow bar as it wasn't stowed here on MkIs:

COMPANY has a track in the spare track holder on the rear left pannier, and Cromwell supply a nice piece with the clamps molded on, and impressively (considering how many people get it wrong) the clamp is perfectly accurate.
On the right hand pannier though, the clamps are empty, so I used the kit etch for this:

And I added the rivets seen on Dieppe churchills along the top edges of the pannier

incidentally, you may notice now the guards are on that my air intakes seem a bit low.
They are lowered from the AFV Club position quite considerably. The kit gives you options for a Kingforce Churchill, Pre-Raid Dieppe Churchill or Tunisia Churchill. The given air intake position is only suitable for the last as Dieppe and El Alamein tanks have them much lower.
I can only imagine this is due to the original air intake design and that they were lower, away from the open track run. Changing them eventually lead to them also being raised
To get them in the right position cut off the raised line under the air intake apperture and cut the locating tabs off the inside of the air intakes themselves then drop them to the desired position. The holes for the locating tabs are at the oustide edges of the correct postion, so if you can't see them, you've got it right
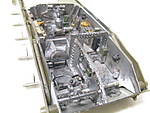
So this is where we are at the moment:

More soon