Sorry able the crap iphone pictures and the crappy surroundings !! Comments/questrions are welcome. Some more pictures to come of hopefully much better quality. I'll also chat about the kit and give some thoughts.............
Hosted by Darren Baker
Tamiya Kubelwagen
tominizer

Joined: September 26, 2006
KitMaker: 210 posts
Armorama: 81 posts

Posted: Wednesday, December 29, 2010 - 01:14 AM UTC
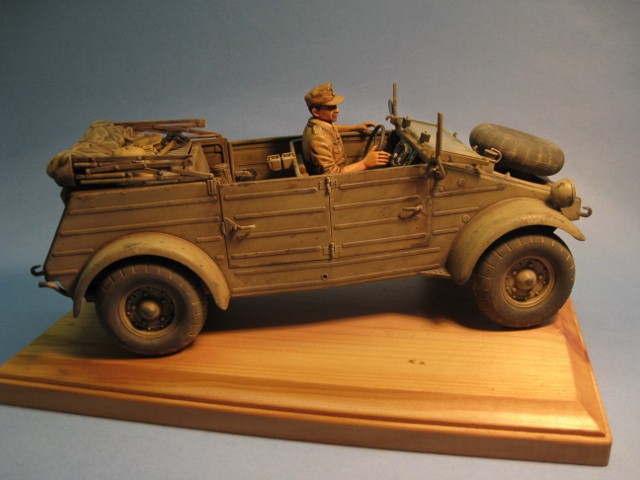
Here's some pictures of my finihsed Tamiya Kubelwagen in 1/16th scale..... an out of the box build. Actually, as the story goes, this kit was started by another chap. He assembled a few parts on the under chassis and then never finished the kit. I had to disassemble some of his work to "repair" it and then continued on to finish the build. This is the first time I've asembled a 1/16th scale piece.
Sorry able the crap iphone pictures and the crappy surroundings !! Comments/questrions are welcome. Some more pictures to come of hopefully much better quality. I'll also chat about the kit and give some thoughts.............


Sorry able the crap iphone pictures and the crappy surroundings !! Comments/questrions are welcome. Some more pictures to come of hopefully much better quality. I'll also chat about the kit and give some thoughts.............

SDavies

Joined: January 09, 2010
KitMaker: 979 posts
Armorama: 959 posts

Posted: Wednesday, December 29, 2010 - 01:22 AM UTC
Very nice build, like the paint scheme and the helmets in the back
Posted: Tuesday, January 04, 2011 - 12:30 PM UTC
 Very nice Tom. Looks like it just rolled out of the Libyan desert. I really like the worn look of the vehicle...it's not overdone. Very nice.
Jeff

biffa

Joined: September 07, 2005
KitMaker: 881 posts
Armorama: 826 posts

Posted: Wednesday, January 05, 2011 - 12:04 PM UTC
i like it a lot i almost got this one time when it was on sale wish i had now the painting and weathering looks great i look forward to some nicer pics and info on the kit. 

tominizer

Joined: September 26, 2006
KitMaker: 210 posts
Armorama: 81 posts

Posted: Thursday, January 06, 2011 - 03:26 AM UTC
I promise to try and take a bunch of better shots in the next day or two. Just been swamped time wise. Haven't even gotten around to making any progress on the campaign work lately either.
tominizer

Joined: September 26, 2006
KitMaker: 210 posts
Armorama: 81 posts

Posted: Thursday, January 06, 2011 - 01:49 PM UTC
As promised gents............. I've just taken a bunch of random shots. First time I've ever done it on a background. I'm no expert with the camera at all. Total rookie, so sorry for some of the so-so shots !!
Comments as usual are welcome.
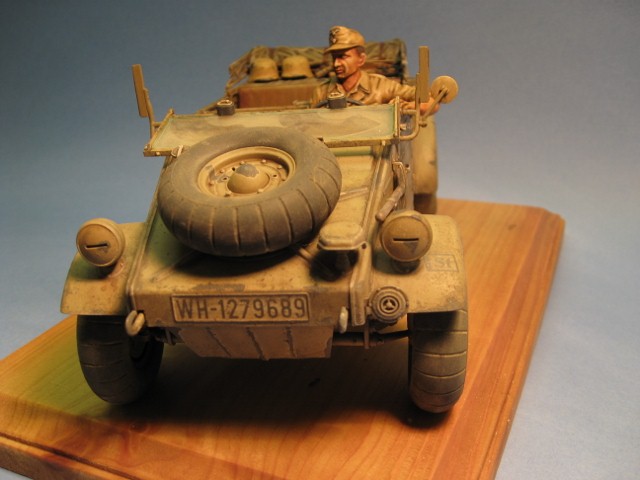
In this shot, that back seat looks to have some left to right streakage. It doesn't show up until photographed, but it does tell the tail that I was messing around with a brush on it during the weathering process. Oops!!
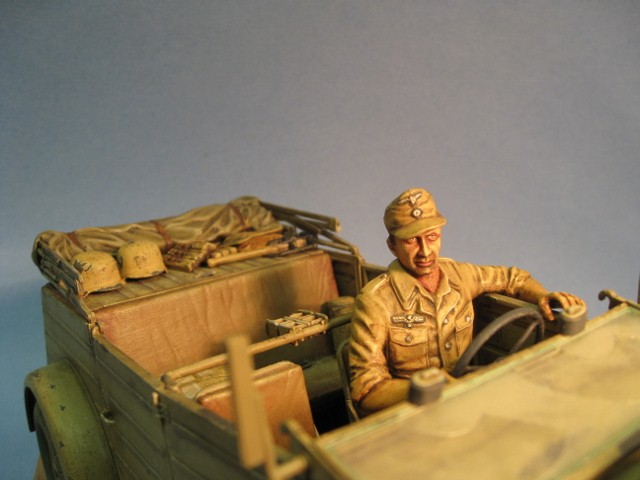
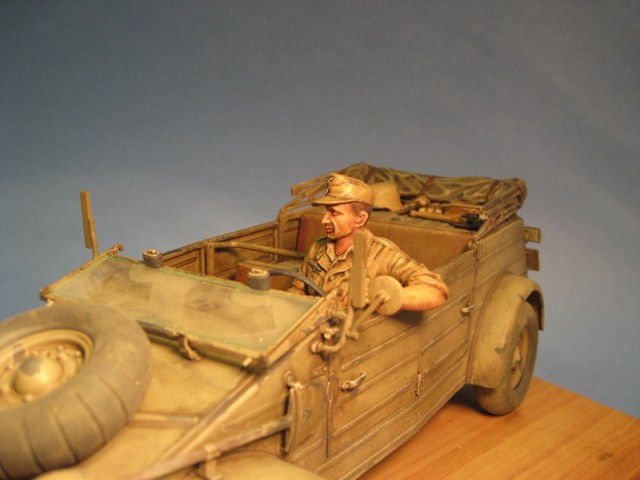
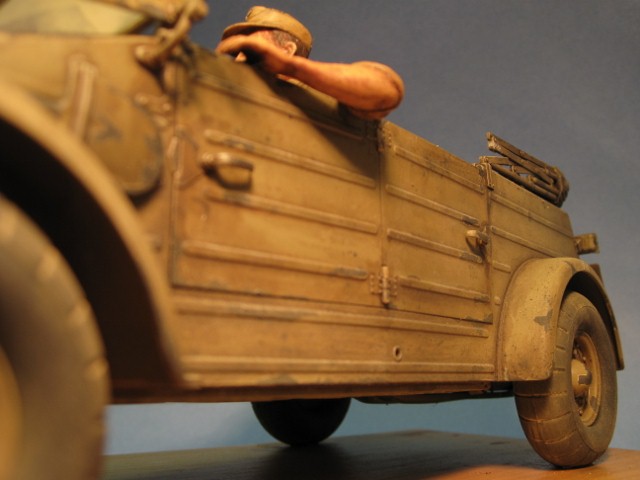
The tires on this kit have a nasty seem. I worked on it for a while but eventually gave up as the casting of the thing was misaligned slightly as can be clearly noted by the groove in the tire that's suppose to be there.
Comments as usual are welcome.


In this shot, that back seat looks to have some left to right streakage. It doesn't show up until photographed, but it does tell the tail that I was messing around with a brush on it during the weathering process. Oops!!


The tires on this kit have a nasty seem. I worked on it for a while but eventually gave up as the casting of the thing was misaligned slightly as can be clearly noted by the groove in the tire that's suppose to be there.
tominizer

Joined: September 26, 2006
KitMaker: 210 posts
Armorama: 81 posts

Posted: Thursday, January 06, 2011 - 01:54 PM UTC
Remember ......... it's 1/16th scale!! My eye/hand coordination isn't that good for this to be 1/35......... which is the scale I usually work in.
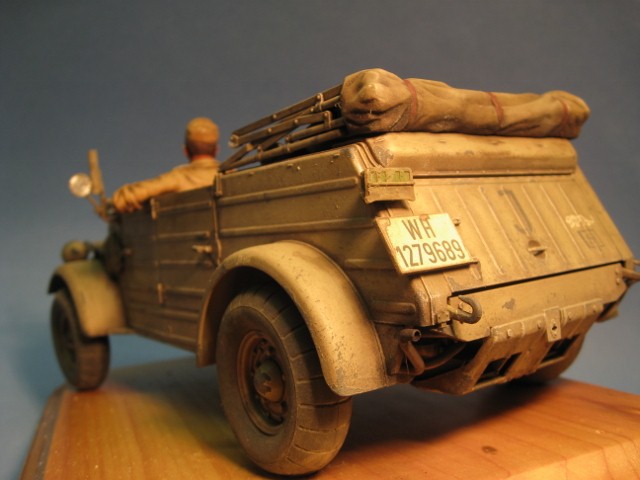
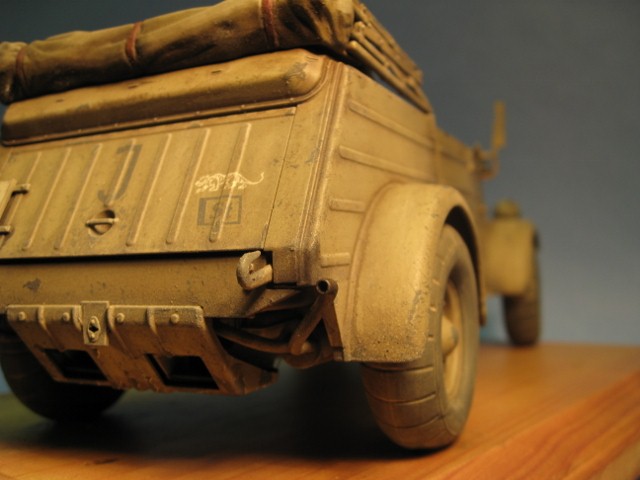
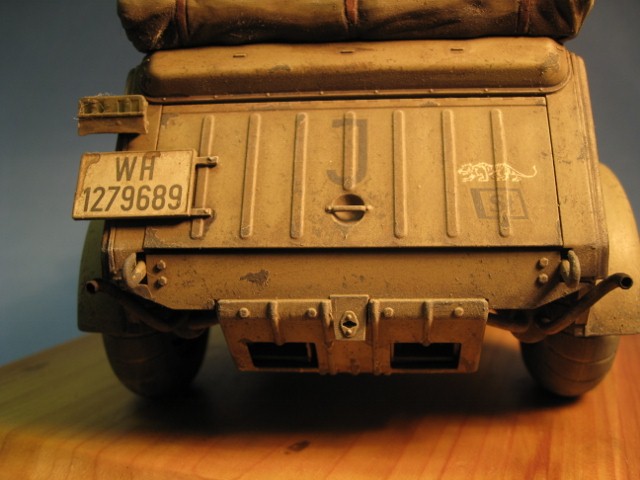
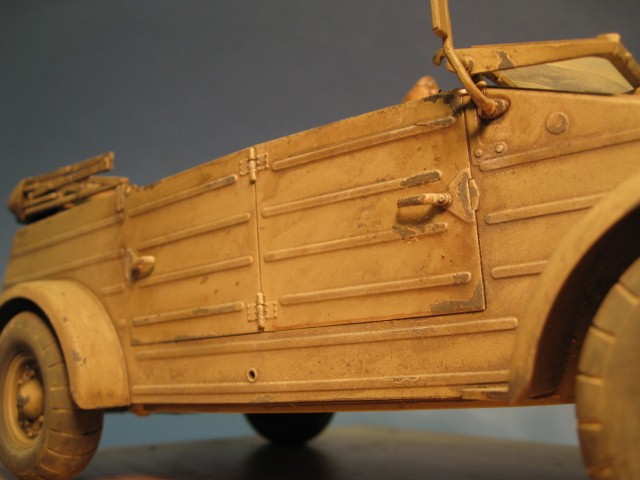
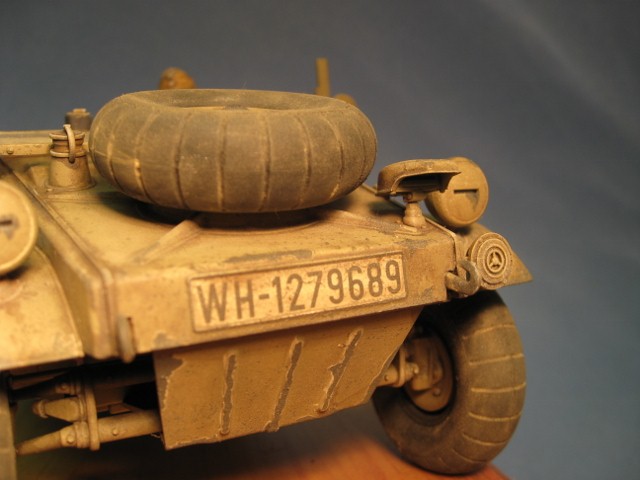
tominizer

Joined: September 26, 2006
KitMaker: 210 posts
Armorama: 81 posts

Posted: Thursday, January 06, 2011 - 01:58 PM UTC
Last bunch......
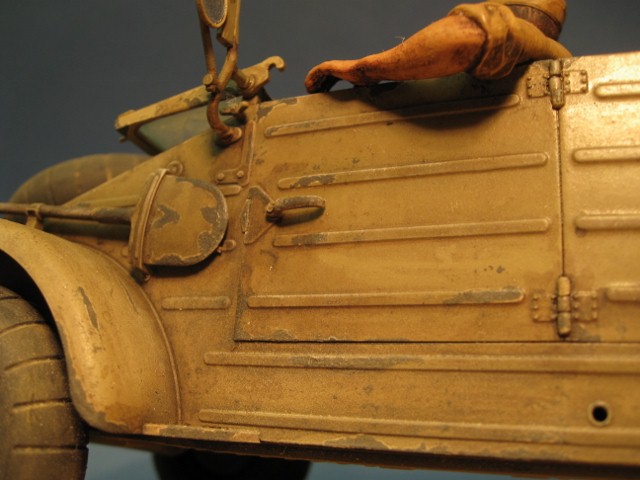
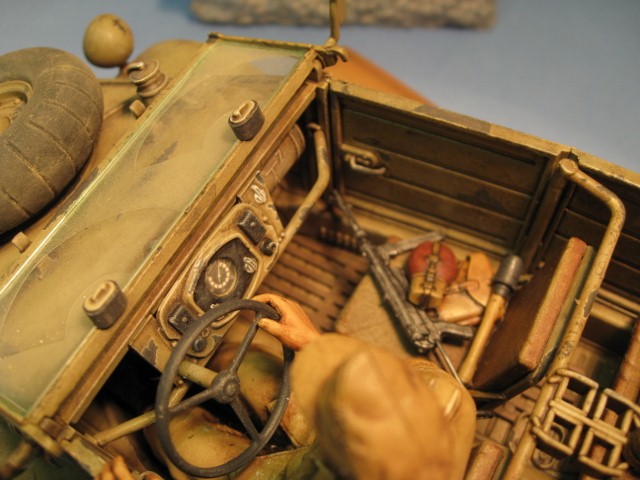
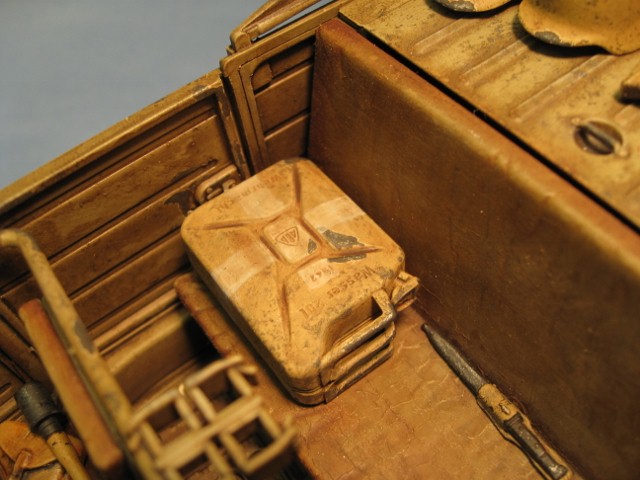
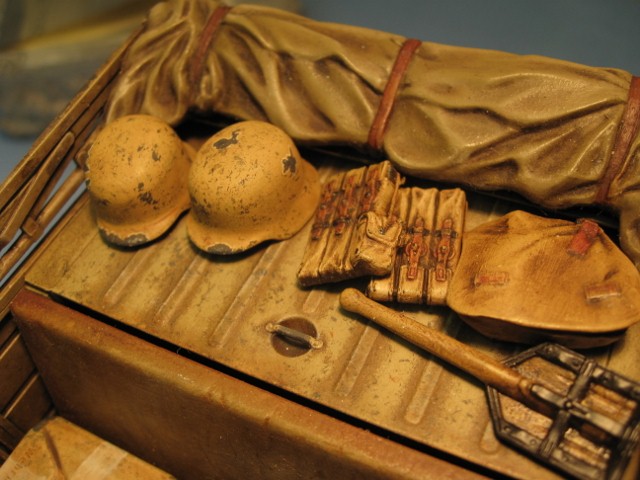
One thing I'd like to mention. This is my first time at this scale. It's a LOT more paint and a LOT more time to cover the areas in the weathering department, without over doing it in relation to the scale. You can cover the big areas with damage and weathering quickly but it ends up looking way off. The level of tiny detail is just as high on these larger scale models in order to get the look right.............. for me anyways. It was challenging and a learning experience for sure.
thanks for looking..............
tominizer

Joined: September 26, 2006
KitMaker: 210 posts
Armorama: 81 posts

Posted: Monday, January 10, 2011 - 11:15 AM UTC
No comments ................... say it ain't so. I luv comments. There's gotta be something here I monkey-d up ?!!??!??
Ok, how about this. Something actually is wrong. There's a piece of the model that fell off and got swallowed up by the floor monster. It's small-ish. Can you spot it ? Clue is this............. it's on the back half of the model.

lukiftian

Joined: March 12, 2010
KitMaker: 791 posts
Armorama: 592 posts

Posted: Monday, January 10, 2011 - 11:21 AM UTC
That's pretty good work, Tom.
The only critcism I have is that the figure's clothes have a bit of a sheen to them, which might be the case if they're dirty in tropics or a temperate zone but not in the desert. A bit more pastel work might be necessary. Otherwise, looks fine.
The only critcism I have is that the figure's clothes have a bit of a sheen to them, which might be the case if they're dirty in tropics or a temperate zone but not in the desert. A bit more pastel work might be necessary. Otherwise, looks fine.
tominizer

Joined: September 26, 2006
KitMaker: 210 posts
Armorama: 81 posts

Posted: Monday, January 24, 2011 - 02:23 PM UTC
Yup....... similar with the rear canopy actually. Although the pictures make it look worse then it is in real life as a lot of the high points on both the figure and the rear canopy were substantially high lighted. So that whit-ish area is not *sheen* in most cases but high lighting.
Thanks for the comment.
Thanks for the comment.

meaty_hellhound

Joined: July 23, 2010
KitMaker: 786 posts
Armorama: 753 posts

Posted: Tuesday, January 25, 2011 - 04:29 AM UTC
that's a cool model to have on display at the house Tom, really nice subtle detailing and figure painting.
a small suggestion might be to sand the bottom of the tires so it sits on the base a bit more realistically (i'd just rub it against a sheet of 150 grit sandpaper at this finished stage). in 1/35 scale i usually pass on sculpting a bulge in the tire wall at the bottom as when i have done this in the past it was not that noticeable yet was time consuming to do correctly, i don't know if it would worth to do in 1/16th?
thanks for sharing this great piece, cheers bd.

hedorah59

Joined: May 04, 2009
KitMaker: 123 posts
Armorama: 121 posts

Posted: Tuesday, January 25, 2011 - 04:57 AM UTC
Nice work - The weathering is really well done.
tominizer

Joined: September 26, 2006
KitMaker: 210 posts
Armorama: 81 posts

Posted: Tuesday, January 25, 2011 - 07:01 AM UTC
thanks for the comments guys.
The tires on this kit are rubber and hollow inside!! I had thought about this as well. Two thoughts. Heating up the rubber to flatten the bottom but any mistake would destroy the tires. Or secondly, a big bolt through the middle of the model into the base to "pull" the model down and bulge out those tires.
I did neither.........yet!!! I may just leave it as-is


meaty_hellhound

Joined: July 23, 2010
KitMaker: 786 posts
Armorama: 753 posts

Posted: Tuesday, January 25, 2011 - 11:56 AM UTC
hollow rubber tires, that does make for a novel situation. i see how a bolt would be the best solution but then you'd probably see the bolt even if you paint it black which isn't what you'd want. thanks for the info on what the tires are made of, didn't know that they are provided in this material.
like i said earlier, sweet looking vehicle to have in the display collection. cheers, bd.
like i said earlier, sweet looking vehicle to have in the display collection. cheers, bd.

Big-John

Joined: August 12, 2010
KitMaker: 731 posts
Armorama: 711 posts

Posted: Tuesday, January 25, 2011 - 12:04 PM UTC
Quoted Text
thanks for the comments guys.
The tires on this kit are rubber and hollow inside!! I had thought about this as well. Two thoughts. Heating up the rubber to flatten the bottom but any mistake would destroy the tires. Or secondly, a big bolt through the middle of the model into the base to "pull" the model down and bulge out those tires.
I did neither.........yet!!! I may just leave it as-is
I would leave the tires as is and just tell every one that they are over inflated!
tominizer

Joined: September 26, 2006
KitMaker: 210 posts
Armorama: 81 posts

Posted: Wednesday, January 26, 2011 - 05:24 AM UTC
I'm leaning to leaving as is as well.
On another note, I'm looking forward to one day assembling the 1/35 scale version as this larger scale becomes a nice reference
On another note, I'm looking forward to one day assembling the 1/35 scale version as this larger scale becomes a nice reference

vonHengest

Joined: June 29, 2010
KitMaker: 5,854 posts
Armorama: 4,817 posts

Posted: Wednesday, January 26, 2011 - 04:29 PM UTC
A thought may be to add sand to your base and let the model "sink" into it just a bit before you let the mixture set up. Again, just a thought. That aside the painting and weathering look great 

 |


