


Hosted by Darren Baker
IDF ATMD System on Merkava 4

rjc_rbnj

Joined: July 19, 2006
KitMaker: 71 posts
Armorama: 70 posts
Posted: Monday, January 03, 2011 - 02:48 PM UTC
I purchased the IDF anti-tank missle defense system from AEF Desgins for my Merkava 4. Two things, I;m looking for close up photos showing the wiring and were the extra electronic boxes go. Can someone help me with this,

bison126

Joined: June 10, 2004
KitMaker: 5,329 posts
Armorama: 5,204 posts
Posted: Monday, January 03, 2011 - 06:55 PM UTC
Rob,
have a look at the pictures I took during the 2010 Eurosatory exhibition. The "Droid" is not on the tank but some elements can be seen even if the pictures are poor quality due to the bad light conditions (indoor).
Go to the Real ones section, Events, Eurosatory 2010, page2 and scroll down the bottom of the page.
Hopefully other members will be more helpful.
Olivier


_Viper_

Joined: April 15, 2010
KitMaker: 163 posts
Armorama: 86 posts
Posted: Monday, January 03, 2011 - 08:18 PM UTC
Rob,
see if these help any (not taken from too close but details can be spotted):
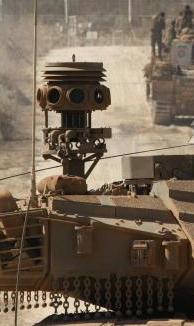
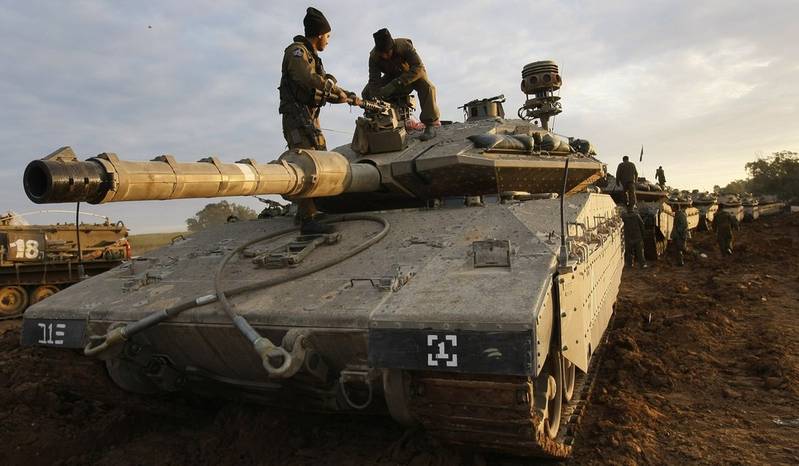


see if these help any (not taken from too close but details can be spotted):

Merki4
Joined: March 28, 2009
KitMaker: 77 posts
Armorama: 76 posts
Posted: Monday, January 17, 2011 - 11:04 AM UTC
Hi mates
Can somebody of you kindly help me?
I'm planning to add the droid on my Merkava 4 but I don't know in which way it is connected at the turret,there's a hole for the mast or the mast itself is bolted on the turret roof?
Any pics?
Many thanks in advance
Lucio
Can somebody of you kindly help me?
I'm planning to add the droid on my Merkava 4 but I don't know in which way it is connected at the turret,there's a hole for the mast or the mast itself is bolted on the turret roof?
Any pics?
Many thanks in advance
Lucio

Captin_Caveman_III
Joined: October 20, 2008
KitMaker: 1,069 posts
Armorama: 1,062 posts
Posted: Monday, January 17, 2011 - 02:27 PM UTC
Your need was like my need back when I scratchbuilt my version. Well sorry to have to point this out to you my IDF armor building friend. As I was told by mini on the Israeli sites and by IMI-Israeli Military Industries: Sorry sir but because this unit is still being used in the field, any information on this unit is classified.
So your going to have to do, what I did and come up with your own wiring lay out.
Sorry man.
So your going to have to do, what I did and come up with your own wiring lay out.
Sorry man.

Maxymilian

Joined: March 21, 2009
KitMaker: 379 posts
Armorama: 299 posts
Posted: Monday, January 17, 2011 - 08:34 PM UTC
This is the coolest looking addition to any armour ever, empire strikes back - driod, very very cool
Captin_Caveman_III
Joined: October 20, 2008
KitMaker: 1,069 posts
Armorama: 1,062 posts
Posted: Monday, January 17, 2011 - 09:08 PM UTC
I must say that the unit by AEF Desgins looks really good. I don't like my first scratchbuilt one, so I'm going to make one more and cast it. So I will not have to make any more in the future.
Say "rjc_rbnj" when are we going to see some work mate!
Say "rjc_rbnj" when are we going to see some work mate!
Merki4
Joined: March 28, 2009
KitMaker: 77 posts
Armorama: 76 posts
Posted: Tuesday, January 18, 2011 - 08:35 AM UTC
Bad news but thanks mates, an advice, if I wanna add the droid, in which way you mates suggest me to fit it, with a simple hole in the roof panel ( not credible in my opinion) or a cross section base welded or bolted on the same panel as a base for the droid mast?
Lucio
Lucio
Captin_Caveman_III
Joined: October 20, 2008
KitMaker: 1,069 posts
Armorama: 1,062 posts
Posted: Tuesday, January 18, 2011 - 11:18 AM UTC
Bother "Merki4" don't mount it by welded base look. Use a small round bolted base.

Now the mounting spot on the rear section of the Mk. IV turret is....

The red spot shows were you should mount the EWRS unit.

Now as for the cabels mounting location, I'm going to study my mini photos to come up with the closest spot. Then I'll up date this rear merkave view, with a green dot. I hope this helps some.

Now the mounting spot on the rear section of the Mk. IV turret is....
The red spot shows were you should mount the EWRS unit.
Now as for the cabels mounting location, I'm going to study my mini photos to come up with the closest spot. Then I'll up date this rear merkave view, with a green dot. I hope this helps some.
Captin_Caveman_III
Joined: October 20, 2008
KitMaker: 1,069 posts
Armorama: 1,062 posts
Posted: Wednesday, January 19, 2011 - 06:25 AM UTC
After studying all my off line photos., all the power cabels run right in the the pole that the unit is mounted on. Coil your 4 cabels that come for the roughting box under the unit. Drill a small hole med way to the top or just under the full unit.
Now remember the hold must not be drill all the way through the plastic rod or post. In this diogram I show were to drill your hole.(Red Dot) Were the The Control Module ring is located. An were you should run your cabels from and to were on the post.

Now I I suggest you use Detail Masters Race car ignition wire or PSF Hobbies ignition wire. Here in this photo of my old Merkava Mk. IIID you can see the style of the cabes. This first photo is befor I painted it.

An the finished photo.


Now if you need me to take a close-up photo of just the unit I will.
BTW I hope this helps.
Now remember the hold must not be drill all the way through the plastic rod or post. In this diogram I show were to drill your hole.(Red Dot) Were the The Control Module ring is located. An were you should run your cabels from and to were on the post.
Now I I suggest you use Detail Masters Race car ignition wire or PSF Hobbies ignition wire. Here in this photo of my old Merkava Mk. IIID you can see the style of the cabes. This first photo is befor I painted it.
An the finished photo.
Now if you need me to take a close-up photo of just the unit I will.
BTW I hope this helps.
Merki4
Joined: March 28, 2009
KitMaker: 77 posts
Armorama: 76 posts
Posted: Wednesday, January 19, 2011 - 08:32 AM UTC
WOW!!! This is an answer, great man!!
Well, Huston please correct my count 
I have to drill the mast in its middle, from this hole exit 4 cables that run into the control module and from here they run inside the droid itself. Could you confirm me if I have understood well?
About the base for the mast : I have to do a plastic washer with in its centre a small tube with 4 (?) flange and so add the bolt between the flange?
Sorry but I'm not able to add some pics as example

BTW your Merkava is amazing, well done
Lucio
Well, Huston please correct my count
I have to drill the mast in its middle, from this hole exit 4 cables that run into the control module and from here they run inside the droid itself. Could you confirm me if I have understood well?
About the base for the mast : I have to do a plastic washer with in its centre a small tube with 4 (?) flange and so add the bolt between the flange?
Sorry but I'm not able to add some pics as example
BTW your Merkava is amazing, well done
Lucio
Captin_Caveman_III
Joined: October 20, 2008
KitMaker: 1,069 posts
Armorama: 1,062 posts
Posted: Friday, January 21, 2011 - 10:24 AM UTC
First thanks for your comments on my Merkava work. Ok I'm now reading you post, an you stated. An I quote you: I have to drill the mast in its middle, from this hole exit 4 cables that run into the control module.
All od this is right. Now remember I stated that IMI told me that any information on this unit is classified. Well when it come to the internal wiring., you really can't see that. So I say just run your four cabels. AN yes you have understood it really well to a point.
So I tell you what I'll do, I'll take my Mk IV turret out and scratchbuid a EWRS pod and show you how to build or make the base. Ok
Merki4
Joined: March 28, 2009
KitMaker: 77 posts
Armorama: 76 posts
Posted: Saturday, January 22, 2011 - 04:36 AM UTC
Well great news, can't wait to see it
About the IMI stated, I'm not interested at what the device can do, as far as I concerned it could make also the coffe .
.
At this point my only interest is to know in which way the mast is connected to the turret, with some bolt or in another way, I have seen a video on Youtube , or better, in a frame of that video, an Mk4 equipped with ATMD taken by the left side and seems that the first shaped panel has been removed, so maybe under that panel there's a sort of appendix used for the mast. who know
Please exscuse me for my poor english
Lucio
About the IMI stated, I'm not interested at what the device can do, as far as I concerned it could make also the coffe
.At this point my only interest is to know in which way the mast is connected to the turret, with some bolt or in another way, I have seen a video on Youtube , or better, in a frame of that video, an Mk4 equipped with ATMD taken by the left side and seems that the first shaped panel has been removed, so maybe under that panel there's a sort of appendix used for the mast. who know
Please exscuse me for my poor english
Lucio
Captin_Caveman_III
Joined: October 20, 2008
KitMaker: 1,069 posts
Armorama: 1,062 posts
Posted: Sunday, January 23, 2011 - 09:55 AM UTC
Hey can you post a link to that youtube clip? I'm woring on it right now and in the next few minutes, I'll be posting some my progress work. So hole on mate!
Captin_Caveman_III
Joined: October 20, 2008
KitMaker: 1,069 posts
Armorama: 1,062 posts
Posted: Sunday, January 23, 2011 - 01:56 PM UTC
Now remember I have not made a full resin copy of my pod, so I have to still scratchbuild parts of my unit.

Here's my way to painting the middle section so you will not have to do it once the full unit had bean painted!

Once it's painted and filly dry...

Wrap it with masking tape, remember not to cover the end. As you will need to leave this little space for gluing.

Next mouning the support rods and more building to come.


Here's my way to painting the middle section so you will not have to do it once the full unit had bean painted!
Once it's painted and filly dry...
Wrap it with masking tape, remember not to cover the end. As you will need to leave this little space for gluing.
Next mouning the support rods and more building to come.
Captin_Caveman_III
Joined: October 20, 2008
KitMaker: 1,069 posts
Armorama: 1,062 posts
Posted: Thursday, February 03, 2011 - 09:19 PM UTC
Well I was hopping to see that video clip, I guess not. So I'll be back to finish this build and it's mouniting soon. I'll come up with what will look close to right as I can.
So see you all soon.
So see you all soon.
Merki4
Joined: March 28, 2009
KitMaker: 77 posts
Armorama: 76 posts
Posted: Monday, February 07, 2011 - 07:47 AM UTC
Hi mate, unfortunately I haven't been able to find it again, I have found it just for case, also because it was a clip about... don't remember what it concern, maybe Cast Lead op.Nice work.
Lucio

ChiefGunner

Joined: July 24, 2010
KitMaker: 205 posts
Armorama: 203 posts

Posted: Sunday, July 29, 2012 - 10:44 PM UTC
Hi
I had already open a post in Armorama, but I ask again here.
https://armorama.kitmaker.net/forums/195486&page=1
I´m interested in making my Academy Merkava IV LIC with "droid", but I have same doubts?
- The Merkava IV LIC, ever used the the droid?
- The IV LIC was ever used in real situations?
Regards,
ChiefGunner
 |

WEB HOSTING BY


Copyright ©2021 Armorama and Kitmaker Network, a subsidiary of Silver Star Enterprises
All Rights Reserved. Please read our Conditions of Use and Privacy Policy.
All Rights Reserved. Please read our Conditions of Use and Privacy Policy.