Armor/AFV: Axis - WWII
Armor and ground forces of the Axis forces during World War II.
Hosted by Darren Baker
DML #6520 StuG IV Early to Late Version
SdAufKla
Visit this Community
South Carolina, United States
Joined: May 07, 2010
KitMaker: 2,238 posts
Armorama: 2,158 posts
Posted: Monday, June 27, 2011 - 03:25 AM UTC

Quoted Text

Mikey,
My hat is off to you sir. This is some fine model building and painting for sure. And the late war in East Prussia is one of my favorite topics so it's all good man!
J


Thanks, Jerry. The late war period is pretty interesting, but hard to research.

For instance, I wish there were more photos of the PGD Brandenburg vehicles and troops available. I'm refining the plans for my vignette and could use some more "atmospheric" information on the area during winter '45.

I've found some good information on the "official" Polish road signage of the era, but given the German occupation, I also know that a lot of the place names and other information were indicated with dual language signs and many locations had "Germanisized" names as well as their original Polish names.

So, the vehicle I'm building was recovered a few years back from the "Rgilewka" river just to the east of the village of "Grzegorzew." It was under the bridge on the road that runs between "Grzegorzew" and "Ponetow Dolny." On my vignette, I'd like to establish the general location with some road signs, and if these villages and river had "Germanisized" names as well as their original Polish names, I'd like to include those too.

Anyways, it's still an interesting project.

Good luck with your current project, too. Have you posted any photos of that one here on Armorama?
RobG57
Visit this Community
Tasmania, Australia
Joined: July 03, 2009
KitMaker: 33 posts
Armorama: 26 posts
Posted: Wednesday, June 29, 2011 - 06:06 PM UTC
Outstanding detail and looks like the paint work will be outstanding as well. Excellent job.
Question? May they have used the mesh (open) type side shields on late stug IV as well as the std type? They were used on PZ IV J in the latter period of 45. Would be a different look for the Stug IV.

RobG
maartenboersma
Visit this Community
Noord-Holland, Netherlands
Joined: October 10, 2010
KitMaker: 764 posts
Armorama: 742 posts
Posted: Wednesday, June 29, 2011 - 09:42 PM UTC
Excelent .........one of my fav builds
PantherF
Visit this Community
Indiana, United States
Joined: June 10, 2005
KitMaker: 6,188 posts
Armorama: 5,960 posts
Posted: Wednesday, June 29, 2011 - 11:56 PM UTC
I LOVE the paint on this, but I have one question.

Is it my monitor, or my eyes but the brown appears to have a red wine tint to it. I've seen it many of times and wondered if I was seeing things and it does look good!


- Jeff
SdAufKla
Visit this Community
South Carolina, United States
Joined: May 07, 2010
KitMaker: 2,238 posts
Armorama: 2,158 posts
Posted: Thursday, June 30, 2011 - 02:12 AM UTC

Quoted Text

Outstanding detail and looks like the paint work will be outstanding as well. Excellent job.
Question? May they have used the mesh (open) type side shields on late stug IV as well as the std type? They were used on PZ IV J in the latter period of 45. Would be a different look for the Stug IV.

RobG


Thanks for the complements, Rob.

My research on this project suggests very strongly to me that the mesh "von Thoma" type Schurtzen used on the Pz IV J was never used on the Stug IV. (I think these were included with the ICM StuG IV kit?)

The "swinging" Schurtzen that I have modeled on my StuG was in fact a FACTORY change implemented at least starting in early Jan '45. I'm not sure if it was universally changed on all the StuG IV's coming off the assembly line at that time or if there was a somewhat gradual change where some StuG IV's had the "standard" Schurtzen and some the "swingers."

However, it is certain (at least to me) that the "standard" Schurtzen were completely phased out at the factory in favor of the "swinging" Schurtzen before StuG production ended with the end of the war. There are a couple of production line photos where all of the StuG IV's that are visible with Schurtzen mounts and brackets are set up for the "swingers."

I know of no photos which show any StuG IV's with the "mesh" Schurtzen. There are several photos which show unique, one-off crew or unit modified Schurtzen on StuG IV's, but all of these appear to use solid plates, none show "mesh-type" skirts.

The "swinging" Schurtzen design is significantly simpler to manufacture than the "standard" Schurtzen design. It uses far fewer "handed" parts or assemblies. For example, there are only three different bracket / mounts - the front mount, the center mount, and the rear mount, and these are not specifically left side or right side. Each "swinger" mount can be used on either side. The "swinging" design eliminates all of the small fittings (fender hooks, rail triangles, Schurtzen brackets, etc) used to hang the "standard" Schurtzen plates on the rails and fenders. There are only two basic plate sizes on the "swinger" versus three different plate sizes on the "standard," etc, etc. So, the "swinging" Schurtzendesign resulted in savings on man-hours and materials over the "standard" design.

It's possible that a similar FACTORY driven / permitted analyisis along with local material availablity estimates led to the "von Thoma mesh-type" Schurtzen at the Pz IV factory. Since these facilities were completely separate, and considering the universal manufacturing supply and logistics difficulties in Germany at the time, we wound up with two completely different design and manufacturing solutions - one for the Pz IV and one for the StuG IV.

Anyways, that's the long answer to your question. The short answer is, IMO, the "mesh" Pz IV Ausf J Schurtzen was never used on the StuG IV.

Hope that answers the mail…


Quoted Text

Excelent .........one of my fav builds


Thank you, Maarten. I hope that I'm posting enough progress to keep up your interests.


Quoted Text

I LOVE the paint on this, but I have one question.

Is it my monitor, or my eyes but the brown appears to have a red wine tint to it. I've seen it many of times and wondered if I was seeing things and it does look good!


- Jeff


I agree, Jeff, the brown does indeed look a bit "reddish." It was my intent to get it more a lightened "chocolaty" color, but when I lightened it up, I got a "bricky" reddish brown. I'm not 100% happy with the color, but it's within my "acceptable" range, so I'm pressing on with it.

At any rate, I hope the final results won't be too objectionable.

More to follow soon, I hope…

PantherF
Visit this Community
Indiana, United States
Joined: June 10, 2005
KitMaker: 6,188 posts
Armorama: 5,960 posts
Posted: Thursday, June 30, 2011 - 02:18 AM UTC
Oh no, not objectionable at all! I've seen the color before so I just thought I'd take the opportunity to ask. I happen to like it and the whole camo scheme works for me!!


- Jeff
SdAufKla
Visit this Community
South Carolina, United States
Joined: May 07, 2010
KitMaker: 2,238 posts
Armorama: 2,158 posts
Posted: Thursday, June 30, 2011 - 02:26 AM UTC

Quoted Text

Oh no, not objectionable at all! I've seen the color before so I just thought I'd take the opportunity to ask. I happen to like it and the whole camo scheme works for me!!


- Jeff


Thanks, again, Jeff. I guess I'm a little overly-critical since it didn't turn out exactly like I wanted.
SdAufKla
Visit this Community
South Carolina, United States
Joined: May 07, 2010
KitMaker: 2,238 posts
Armorama: 2,158 posts
Posted: Wednesday, July 27, 2011 - 06:27 AM UTC
'Bout time for an update on this project.

Since my last posts, I've added some chipping and scratching using Vallejo and Citadel acrylic paints. This was followed up with additional rain, dust, and rust streaks done with artist oils. I also added some more pin washes in a few places to emphasize some details.

The tools were painted and chipped, along with all the other loose parts, like hatches.

I spent quite a bit of time and effort to get the arc-shaped scratches on the Schurtzen. I really wanted to emphasize that the plates are suspended on single pivot points and swing to and fro as the vehicle moves.

After some assembly, like the tools, etc, I used an over-spray of Tamiya Buff mixed as a very transparent glaze over all of the vehicle's external areas above the fender lines. This glaze toned-down the "inensity" of the colors on the tools and tied together the various parts that had been finished separate up to this point.

There's stil a bit of detail painting and chipping to do, especially in areas like the hatch combings that were covered by masks. After that, I'll start with the pigments.

I'll be going for a mostly wet-mud look, but with some spatters and splatters dried around the edges.


More to follow so as to not overload this single post.
SdAufKla
Visit this Community
South Carolina, United States
Joined: May 07, 2010
KitMaker: 2,238 posts
Armorama: 2,158 posts
Posted: Wednesday, July 27, 2011 - 06:31 AM UTC
So, to follow on...


Still a few more to come...
SdAufKla
Visit this Community
South Carolina, United States
Joined: May 07, 2010
KitMaker: 2,238 posts
Armorama: 2,158 posts
Posted: Wednesday, July 27, 2011 - 06:38 AM UTC
But wait! There's more! If you order now...


A note here about the left side Schurtzen: I've deliberately hung them out of order to create (what I hope is) a candid appearance. Also, the center panel is not correctly lapped under the panel to its front. What I was trying for here is to show how the crew might have removed the Schurtzen panels in the center of the left side so as to get access to the fuel fillers located on the left hull side.

Anyways...


That's all for now...
armorcladdemon
Visit this Community
Virginia, United States
Joined: March 07, 2007
KitMaker: 6 posts
Armorama: 3 posts
Posted: Wednesday, July 27, 2011 - 08:52 AM UTC
MIKE,

Great Lookin STUG IV ! Awesome Detail inside & out !!! CHEERS !!

SDavies
Visit this Community
England - South East, United Kingdom
Joined: January 09, 2010
KitMaker: 979 posts
Armorama: 959 posts
Posted: Wednesday, July 27, 2011 - 08:12 PM UTC
Very impressive work and great camo scheme. I have always liked the agressive looking Stug IV and I have not seen it done better than in your model

Its going to look fantastic when completed

Steven
SdAufKla
Visit this Community
South Carolina, United States
Joined: May 07, 2010
KitMaker: 2,238 posts
Armorama: 2,158 posts
Posted: Thursday, July 28, 2011 - 02:50 AM UTC
Thanks for the kind words, Erik and Steven!

@Erik: I'm looking forward to the next up-date on your project:

Wittman's Last Ride

Don't let the glue stick to yer fingers!
SdAufKla
Visit this Community
South Carolina, United States
Joined: May 07, 2010
KitMaker: 2,238 posts
Armorama: 2,158 posts
Posted: Thursday, July 28, 2011 - 10:45 AM UTC
Well, this project didn't start out with the intent of building the interior, but one thing led to another, the kit radios were just too nice to not paint, research information developed just when I needed it, and so on...

So, after reaching a certain point in the construction, I started thinking about how to show-off all my hard work. I finally hit on the possibility of displaying the StuG with the superstructure roof elevated above the vehicle.

However, I've never built one like this, and I've never seen another example of exactly what I had in mind, but, hey... sometimes you gotta push the envelope.

So, here's my solution in the dry-fit stages:

First, I soldered together a frame out of brass and piano wire. It was a bit tedious, kind of like soldering up a spider web...


Once I cleaned up the frame a bit, I test fitted it to see what the final effect might look like:


After the test fit, I made some adjustments and painted the frame Floquil Engine Black:


So, that's my idea. I'm not too sure what it'll look like on the vignette, but if it looks too strange, I can aways just put the roof on loose to lift up and view.

Hope this didn't leave too many of you rollling on the floor laughing yer collective a**es off!
SdAufKla
Visit this Community
South Carolina, United States
Joined: May 07, 2010
KitMaker: 2,238 posts
Armorama: 2,158 posts
Posted: Thursday, July 28, 2011 - 10:55 AM UTC
Well, a couple of the URLs for the test fit photos didn't load, so here's another try:


Let's see if they loaded this time...
SDavies
Visit this Community
England - South East, United Kingdom
Joined: January 09, 2010
KitMaker: 979 posts
Armorama: 959 posts
Posted: Thursday, July 28, 2011 - 11:10 AM UTC
And I thought the Stug could not get any better !

Great interior and innovative way of showing it off. Reminds me of a car's sunroof.
SdAufKla
Visit this Community
South Carolina, United States
Joined: May 07, 2010
KitMaker: 2,238 posts
Armorama: 2,158 posts
Posted: Friday, July 29, 2011 - 03:53 AM UTC

Quoted Text

And I thought the Stug could not get any better !

Great interior and innovative way of showing it off. Reminds me of a car's sunroof.


Thanks, again, Steven!

I wouldn't have second thoughts using this display method on a regular base, but I'm hopeful that it won't look too strange on the planned vignette.
SdAufKla
Visit this Community
South Carolina, United States
Joined: May 07, 2010
KitMaker: 2,238 posts
Armorama: 2,158 posts
Posted: Sunday, July 31, 2011 - 02:45 PM UTC
Here's a little up-date on the intial stages for making the base for this project.

I've started here with a pre-cut and routed wooden plaque. This was stained and shot with a couple of coats of spray laquer...

"Damn it, Jim! I'm a model-builder not a carpenter!" (With appologies to Trekies the world over... )

I usually build my terrain as modules that I add to the finished wooden bases. For this I start with a piece of Styrofoam closed-cell foam material. This is very stiff, resistant to moisture and warping and can be formed easily. Here's a pic of the wood base and a section of 1-1/4" thick Styrofoam cut to fit it:


I then try out variations for the composition until I have something that satisfies my objectives:


For this vignette, I wanted to show my StuG IV near some RR tracks and incorporate a road sign to fix the place and time. After getting a basic composition, I refine the layout by establishing where I'll have the terrain contures:


The black rulers are where the road side ditches will be. I like to add some changes in elevation on my bases since very few places in the real world are perfectly flat. I think this also adds some interest in what's otherwise a very simple composition.

I then mark the locations for all the critical elements using an indelible marker (here red):


The Styrofoam can then be contoured according to the marks. If the elevation changes are steep, the Styrofoam can be layered like a cake using hot glue. In this case, though, a single layer is sufficient:


The contours can be cut, crushed, and rolled using knives and rounded rods or handles. Once I have the basic shape, one more test fit to the wooden base to be sure I didn't distort the foam:


As you could see in the intial composition tests, I used a section of plastic train track, but for the actual vignette, I've constructed a "graded crossing" out of bass wood, a piece of brass rail, and styrene strip, rod and punched rivets:


This assembly was test fitted constantly as I built it to ge the angles on the cut edges to match the terrain edges. It will be hot glued down to the Styrofoam before moving on to the ground cover.

The next step after glueing down the track will be adding plaster of Paris to the Styrofoam edges and to refine the terrain contours. The edges will be sanded flat and smooth, so it usually takes a couple of coats of plaster for that. It's a very messy job, best done with a sanding block out doors.

So, another up-date to follow later as I make a little more progress on the base.
jrutman
Visit this Community
Pennsylvania, United States
Joined: April 10, 2011
KitMaker: 7,941 posts
Armorama: 7,934 posts
Posted: Monday, August 01, 2011 - 03:43 AM UTC
Goes without saying-one of the best stugs I've seen and I am really digging the railroad crossing. Looks the biz.
J
JDBart
Visit this Community
Auckland, New Zealand
Joined: July 01, 2011
KitMaker: 29 posts
Armorama: 29 posts
Posted: Monday, August 01, 2011 - 10:50 AM UTC
I love this, when I look at these types of builds I realise that I am a kit builder, not a modeller, but still enjoy what I do, just don't have the skills, or the time to develop them to do this sort of detail!!

But just wow, some of this detailing is insane (in a good way). Superb, superb, superb!!

Keep up the good work, the great photos and the great running commentaries!


SdAufKla
Visit this Community
South Carolina, United States
Joined: May 07, 2010
KitMaker: 2,238 posts
Armorama: 2,158 posts
Posted: Tuesday, August 02, 2011 - 04:28 AM UTC
@ Jerry: Thanks, bud, you know I've always appreciated your input and observations.

@JD: Too kind, indeed sir. I think I'm blushing...
stansmith
Visit this Community
England - North West, United Kingdom
Joined: July 18, 2010
KitMaker: 611 posts
Armorama: 584 posts
Posted: Tuesday, August 02, 2011 - 06:34 AM UTC
graet stug! i can see why you want to show off the interior, it looks amazing. this dio is looking like a cool idea!
stan
dylans
Visit this Community
British Columbia, Canada
Joined: March 05, 2009
KitMaker: 394 posts
Armorama: 380 posts
Posted: Tuesday, August 02, 2011 - 07:06 AM UTC
Mike that really is a fantastic build. can you share your technique for paint chipping with us mere mortals?
SdAufKla
Visit this Community
South Carolina, United States
Joined: May 07, 2010
KitMaker: 2,238 posts
Armorama: 2,158 posts
Posted: Tuesday, August 02, 2011 - 11:49 AM UTC
@ Stanley: Thanks for the complements!

@ Dylan:


Quoted Text

Mike that really is a fantastic build. can you share your technique for paint chipping with us mere mortals?


Thanks, Dylan. No secrets for the chipping. I use techniques that have been pioneered and perfected by many others - really too many to give fair credit to. Those guys are the "gods of painting." My work is really derivative and not revolutionary. I'm a mere mortal too.

Having said that, I think the keys to doing this are:

1) The right paint thinned to the right consistency. I use Vallejo and Citadel acrylic paints. My experience is that both of these brands brush well. I mix colors and thin the paints with a combination of water and the Vallejo Acrylic Thinner. I can't give you precise thinning ratios but something about like whole milk works for me.

I use the Vallejo colors for most of the cammo colors and the Citadel colors for the metalic colors. There is a Citadel color called "Tin Bitz" that's a very nice rusty shade and their silvers ("Bolt Gun," "Chainmail," and "Mithrel" from dark to light) are very nice.

2) Good brushes. I use 10x0 sable liners. These are brushes with long bristles designed for water colors. The longer bristles hold paint well and maintain fine tips. Cleaning and maintaining your brushes is essential. If dried paint is allowed to build up where the bristles come out of the ferrule the brushes quickly become useless. I use Windsor&Newton brush cleaner - restorer and lots of TLC after each painting session.

When you find the paint won't flow easily, then take a few moments to clean your brush (just a quick swish in water with a dash of glass cleaner) will usually fix things. Paint needs clean bristles for capillary action to draw the paint into the bristle tips.

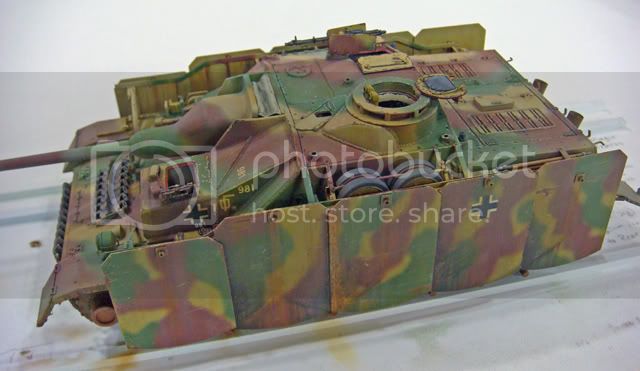
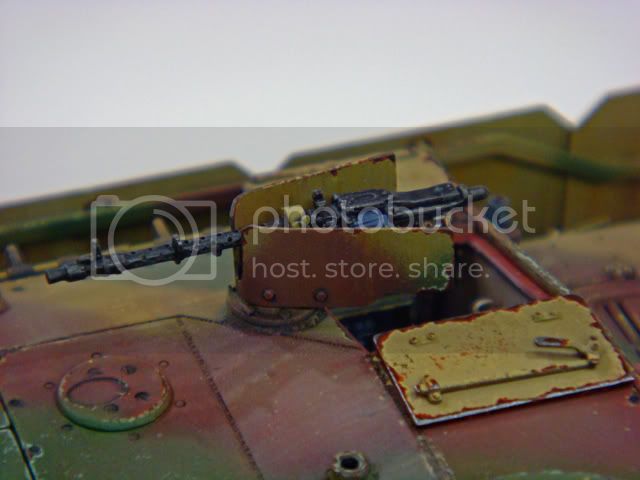
3) For chipping, I use a technique that could be thought of as the "bulls-eye" method. That is, I start with the outer edge color of the chips, then I add the inner colors leaving small thin lines of the outer colors. If you were to draw a diagram of this, it might look like a "bulls-eye" with the outer colors and inner colors laid on top of each other.

These outer chip edge colors should be (generally) lighter shades of the base paint colors that the chip is in. If you look closely, you'll see some chips have two or even three outer chip colors before the inner rust or bare metal colors. Think about the layers of color that must be worn through to get to the bare metal. Each color layer is an opportunity for an outer and subsequent inner chip colors.

If the metal is to be worn shiney, then there's probably a ring of rusty metal around the bare metal - more rings in the "bulls-eye" is you want. Not all chips need all of the potential colors, and to interject some "randomness" and create a candid appearance, it's probably best not to even try to do this on every chip.

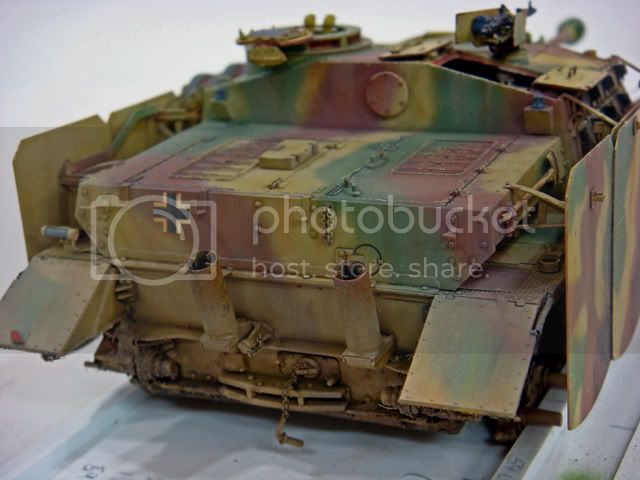
I do some scratches and chips using just thin lines of paint (see some examples on the Schurtzen), but the "bulls-eye" technique will let you get those tiny, thin outer chip color lines without having to paint hair-fine lines for all your chips.

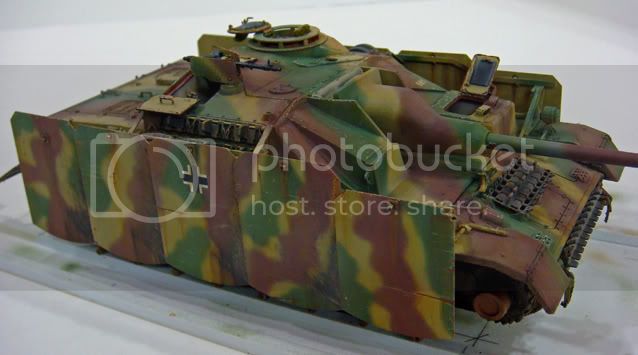
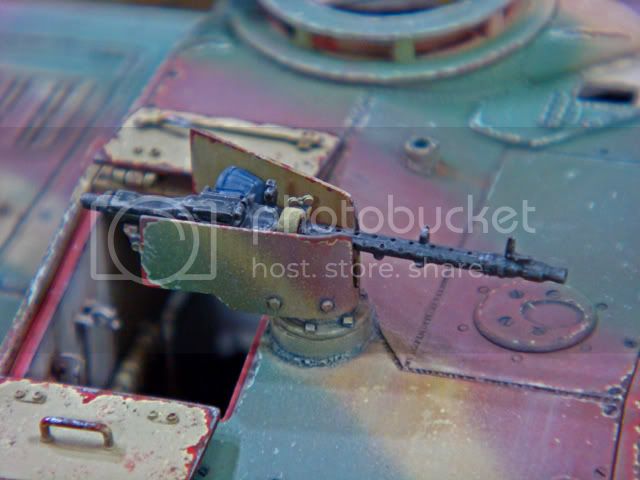
Some chips might be thought of as "scuffs" or "scrapes" and not really "chips." That is they represent places where something has "scuffed" down through the outer layers of dust and dirt to expose fresh colored paint. These scuffs can add a subtle interest to the finish without being excessive in chipping all the way down to base metal. I usually use a light shade of the base color for these "scuffs" and "scrapes."

For random small chips and scuffs, I also use the "sponge" technique. Usualy these are mostly done with lighter shades of the base colors to represent "scuffing" although sometimes I go all the way to bare metal.

Another key to effective chipping is to paint the chips in places that make sense. Think of places where you would walk and climb around the same vehicle and put chips in those spots. Also, think about where things in the environment would brush against the vehicle. Chipping shouldn't be applied evenly over the entire vehicle, but concentrated in places where the paint could be damaged. In fact. most of the vehicle probably shouldn't have any chipping or scuffing.

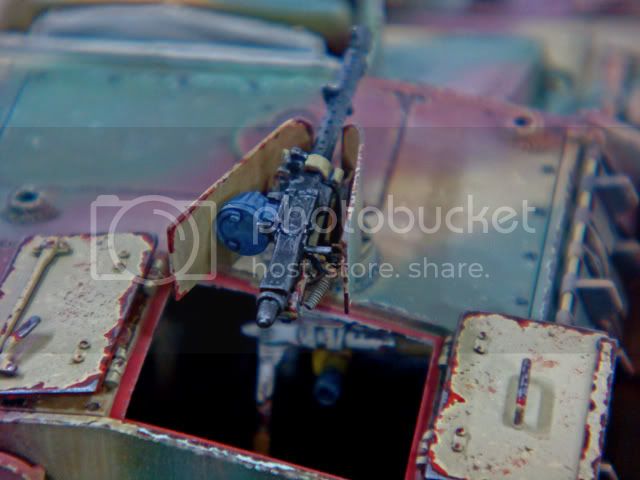
One advantage of using acrylic paints for the chips is that after they dry, you can go over them with artist oils for your rust staining and streaking. The oils and mineral spirits will not hurt the acrylic chips.

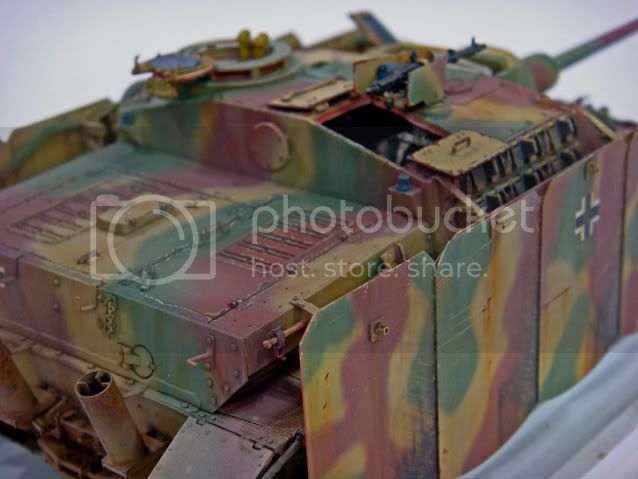
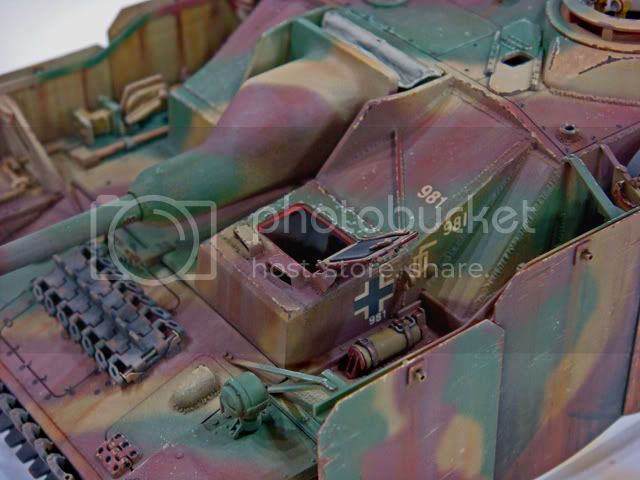
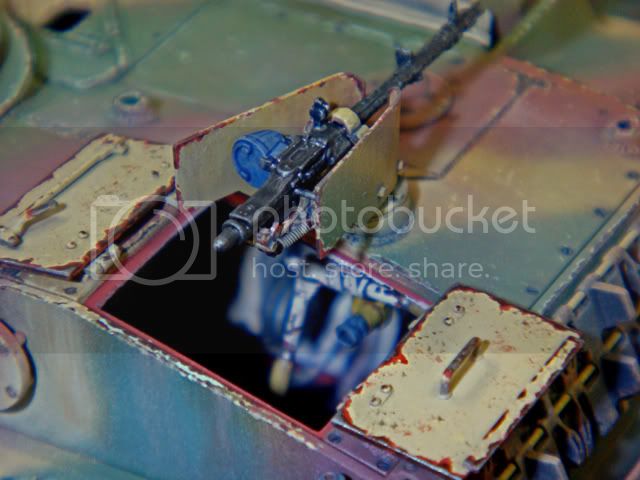
Finally, I usually spray a very transparent dust color glaze over the chips to blend them into the overall finish. (Here, a Tamiya Buff glaze made with 5 drops of paint, 15 drops of Tamiya Gloss Clear , 30 drops of Tamiya X-22A thinner and 40 drop of laquer thinner.)

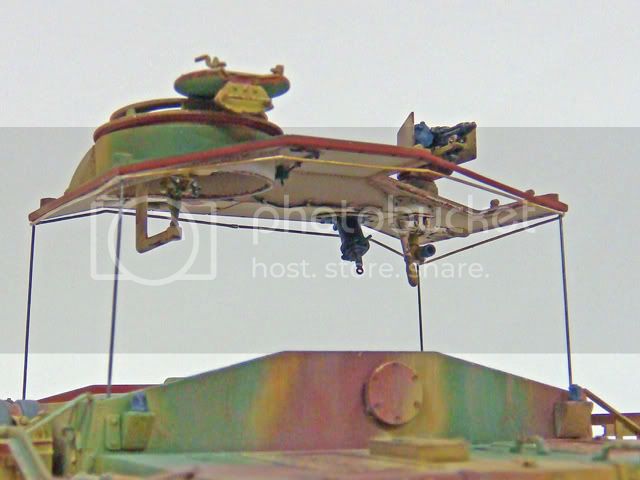
You can see how this dust glaze adds to the realism by comparing the chips in the hatch interiors (where I haven't added the dust glaze yet) to the chips in other areas. Right now, the chips on the hatch inner surfaces are vary "garish" and "intense" in their appearance. This will be reduced with some oil pin washes and a dust glaze.

So, no secrets here, Dylan. Just paint, thinners, brushes and time.

HTH,
Big-John
Visit this Community
Ohio, United States
Joined: August 12, 2010
KitMaker: 731 posts
Armorama: 711 posts
Posted: Tuesday, August 02, 2011 - 01:24 PM UTC
Mike,

That is truly an amazing build! I always enjoy following your builds. I am a big fan of your work.

I love the paint scheme, colors, and weathering. And the detail and weathering on the swinging Schurtzen is first class!