As part of the Italian Campaign, I'm building the Tamiya German Steyr Type 1500A/01 with the Real Model Personal Wagon (as they call it) conversion set for the Tamiya kit.
Right off the bat, I'm no professional modeler or photographer !!! Just a military modeling guy with more kits then one can ever build that wants to share one of his creations with the community. Criticism is highly welcome. There's so many great things shared on this form so I thought it's about time to share some more back. At the time of this post, the "thing" is still being built. It's not done.......... yet!!
Ok, let's get on with it then !!!
Here's the hardware that's being used.
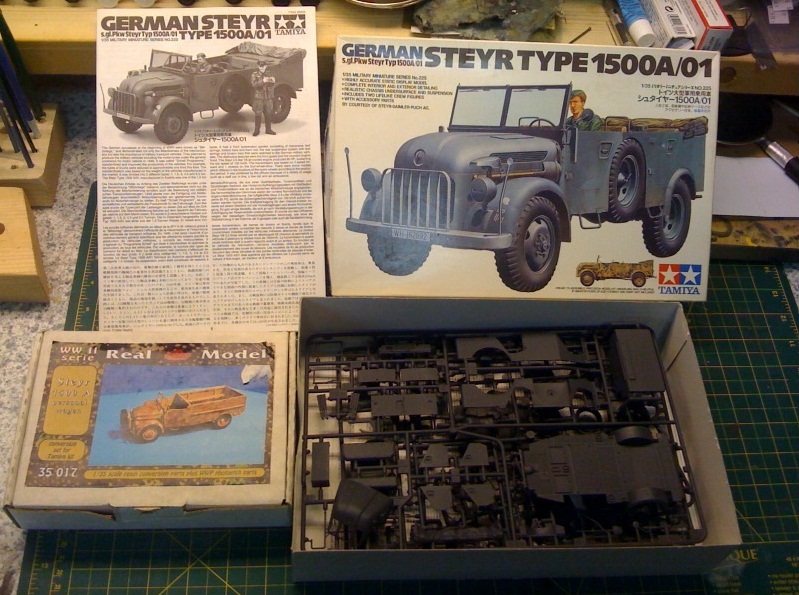
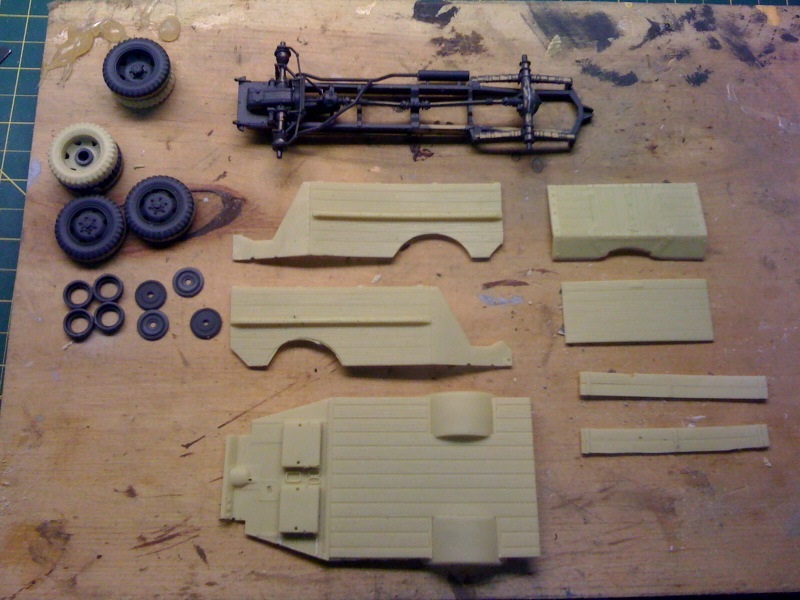
I've started breaking out the sub-assemblies trying the get my head around how I'm going to pull this off. The Tamiya parts are the darker pieces. I've assembled most of the truck frame and put the wheels together. The conversion set instructions say nothing about dual rear wheels. I couldn't find any reference material online about this either. But I liked the look and the stuff fit, so together it went !!
Hosted by Darren Baker
Steyr Type 1500 A Wagon
tominizer
Ontario, Canada
Joined: September 26, 2006
KitMaker: 210 posts
Armorama: 81 posts
Joined: September 26, 2006
KitMaker: 210 posts
Armorama: 81 posts
Posted: Monday, April 04, 2011 - 01:55 PM UTC
tominizer
Ontario, Canada
Joined: September 26, 2006
KitMaker: 210 posts
Armorama: 81 posts
Joined: September 26, 2006
KitMaker: 210 posts
Armorama: 81 posts
Posted: Monday, April 04, 2011 - 02:05 PM UTC
I don't have a great photo log like some others have put together for their detailed builds, but I'll try and put things in perspective the best I can with what pictures I did take. The honest reality is I forgot more often then not to pick up the camera.
I'll jump next to the truck frame. The helper suspension leafs in the rear were broken upon opening of the conversion set. Actually, I may as well say this now and get it off my chest. The conversion set was a piece of crap to put no fine a point on it. Warped, thousands of bubbles, broken parts and some of the worse hand rendered instructions I've seen to date. Absolute crap and not worth the money I spent. But not to be thwarted, I pushed on.
Anyways, back to the leafs. I ended up scratch building them as well as a missing bump stop. Sorry about the crappy picture, but the scratch built pieces are in white styrene. The yellow pieces of crap are just that (yes, can you feel my disappointment!??!).
The next two images show the final assembly of the rear suspension. A little bit of brass rod and styrene for the clamps that hold everything to the rear axle were also scratch built as the kit was lacking.
tominizer
Ontario, Canada
Joined: September 26, 2006
KitMaker: 210 posts
Armorama: 81 posts
Joined: September 26, 2006
KitMaker: 210 posts
Armorama: 81 posts
Posted: Monday, April 04, 2011 - 02:13 PM UTC
Here we have the truck frame primed. One thing to note is that I didn't see any instructions or not any way to get the exhaust to the back of the truck with the addition of the new helper leafs. I don't know if I'm just missing the boat, but it couldn't figure it out. What you see in the picture is my take of what Midas Muffler would have done routing wise with the exhaust to get it to the back end. It's likely wrong, but I like it anyways !! I used solder and my imagination. I left the back end of it long and will trim it once the chassis is secured to get the right length.
From there I then airbrushed the base color and added in the other appropriate base colors according to Tamiya and my experience with how
I like to start the finishes of certain components. You can see the routing of my exhaust. I'm thinking that the German's took her to Midas for a bad muffler and this is what the result was from their work !! That's my story and I'm sticking to it. Next up is a coat of satin clear, attach to the chassis/wheels and weathering.
tominizer
Ontario, Canada
Joined: September 26, 2006
KitMaker: 210 posts
Armorama: 81 posts
Joined: September 26, 2006
KitMaker: 210 posts
Armorama: 81 posts
Posted: Monday, April 04, 2011 - 02:24 PM UTC
Up now onto the chassis. My first picture is of the snapped bed wall. I luv-ed it. that nice vertical line through all that wonderful wood grain. Yeeeeeah. Also note the front cab has a missing vertical member that joins up with the dash that is shown in both the first and second picture below. Stellar stuff. Also note the superb fitment in the second picture along the floor joints.
So I get kind of cranky and decide to *cut* off the front bit and graft in the Tamiya kit where it joins with the dash.
Then toss on the front end to get a feeling of how things are going with my grafting craftsmanship. It will do I decide.
Now off to the front end with some PE grill inserts (which may be upside down, but too late now!! Blame Midas Muffler....) and toss on a bumper.
tominizer
Ontario, Canada
Joined: September 26, 2006
KitMaker: 210 posts
Armorama: 81 posts
Joined: September 26, 2006
KitMaker: 210 posts
Armorama: 81 posts
Posted: Monday, April 04, 2011 - 02:35 PM UTC
Now that the front end has taken shape, off to the back bed as it really needs attention. Rear bed assembly is all wood in the real thing from my understanding. Wood everywhere. Here the back end is taking shape with the seating on one side installed. The other side is in parts above. These were installed and the corresponding rivets on the outside bed wall properly located that hold these bench seats in. I shaved off all the conversion kit ones as half were not present on this casting. Did I mention that this conversion kit is awesome !!
I also scratch build the metal angles used on the back end to secure the wood corners of the bed. This was done with sheet brass and cut to fit.
I had to redo a lot of the wood grain on the bed. here's a few shots where the piece was crack. Grain was etched in after the putty seam was solid and then the whole thing was primed.
Bubbles. I hate bubbles.
tominizer
Ontario, Canada
Joined: September 26, 2006
KitMaker: 210 posts
Armorama: 81 posts
Joined: September 26, 2006
KitMaker: 210 posts
Armorama: 81 posts
Posted: Monday, April 04, 2011 - 02:47 PM UTC
Ok, now I have to apologize. Here's the big void in pictures. Next thing I have is base coat with the camouflaging and some paint chipping. There's a lot of little stuff I missed documenting to get to this point. Anyways, this is where I am now.
I'll be honest in that I'm a bit disappointed in my camo paint job. Not my best work. I finished it and just was not feeling it. I think the line work may be too thick. I should have done it a lot finer. But oh well. Such is the way of things some times. It's ok I guess. I left it and pressed on.
Some closer details of the camo and the chipping. This chipping will get some rust treatment and a lot more weathering. It's just getting started.
A shot of the bed. Here you can see the home made rivets in the side bed wall that hold the benches. And the grain work I did to the wood.
Here's the wheels and dash still needing attention.
Anyways, that's where she stands as of this posting. The real weathering is still to come as is the assembly of the sub-assemblies. I have a few figures selected and also want to put this all on a base. It may even end up towing something.............. who knows.
And there's some more detail to still add here as I keep finding new reference material, although it's REALLY scarce. IF you know of any good pictures, I'd love to see them.
That's all for now. Comments are definitely welcome.
Spiderfrommars
Milano, Italy
Joined: July 13, 2010
KitMaker: 3,845 posts
Armorama: 3,543 posts
Joined: July 13, 2010
KitMaker: 3,845 posts
Armorama: 3,543 posts
Posted: Monday, April 04, 2011 - 05:58 PM UTC
Although i'm not an axis vehicles expert, your model looks to me very good and convincing so far!
I like a lot the camo , really congrats!
Regards
I like a lot the camo , really congrats!
Regards
Frenchy
Rhone, France
Joined: December 02, 2002
KitMaker: 12,719 posts
Armorama: 12,507 posts
Joined: December 02, 2002
KitMaker: 12,719 posts
Armorama: 12,507 posts
Posted: Monday, April 04, 2011 - 06:52 PM UTC
Quoted Text
IF you know of any good pictures, I'd love to see them.
Hi Tom
Have you seen these ?
http://www.chmelar-diorama.cz/steyr1500-muzeum/
HTH
Frenchy
tominizer
Ontario, Canada
Joined: September 26, 2006
KitMaker: 210 posts
Armorama: 81 posts
Joined: September 26, 2006
KitMaker: 210 posts
Armorama: 81 posts
Posted: Tuesday, April 05, 2011 - 12:36 AM UTC
Whoa!! Never seen those pictures. Thanks. Wonder how true that single rear wheel setup is or if this is just a modified Steyr 1500A bed?? Regardless, thanks as those photo's are very interesting. Going to have a much closer look tonight.
Frenchy
Rhone, France
Joined: December 02, 2002
KitMaker: 12,719 posts
Armorama: 12,507 posts
Joined: December 02, 2002
KitMaker: 12,719 posts
Armorama: 12,507 posts
Posted: Tuesday, April 05, 2011 - 02:49 AM UTC
Quoted Text
Wonder how true that single rear wheel setup is or if this is just a modified Steyr 1500A bed??
You're welcome It looks like this body style could be found on both types of chassis (1500 & 2000) :
Frenchy
mzaborsk
Rhode Island, United States
Joined: June 21, 2008
KitMaker: 116 posts
Armorama: 78 posts
Joined: June 21, 2008
KitMaker: 116 posts
Armorama: 78 posts
Posted: Tuesday, April 05, 2011 - 03:08 AM UTC
Great job on the paint chipping .....It's not one of my strong points...The lighter color around the chip gives a great deal of depth. How about just a little tutorial more on just that Point... Good start and I know it will be a great finish.
Michael
Michael
tominizer
Ontario, Canada
Joined: September 26, 2006
KitMaker: 210 posts
Armorama: 81 posts
Joined: September 26, 2006
KitMaker: 210 posts
Armorama: 81 posts
Posted: Tuesday, April 05, 2011 - 06:44 AM UTC
Frenchy...... thanks for the pictures. Interesting how far inboard those rear wheels are. That second picture is a 1500. My model will have them pretty much flush with the bed wall in vertical alignment which has the inner wheel pretty much up against the truck's ladder frame. Wonder why this would be........ kit way out of wack with the real deal !??!??! That would mean the kit's ladder frame is too wide possibly.
Michael ...... the chipping is a matter of patience and a steady hand. For the larger chips, I first put down a very light color. I then followed up with a very dark grey filler to fill up 99% (exactly every time !!) of that light base. For the small chips, I use the darker color and a piece of steel wool, testing it on paper first making sure I'm not creating larger chips again.
Frenchy
Rhone, France
Joined: December 02, 2002
KitMaker: 12,719 posts
Armorama: 12,507 posts
Joined: December 02, 2002
KitMaker: 12,719 posts
Armorama: 12,507 posts
Posted: Tuesday, April 05, 2011 - 07:48 AM UTC
Tom
On a side note, I've just checked out Reinhard Franks "Trucks of the Wehrmacht" book and according to him, the designation "2000" appears to remain unproved, so these trucks are maybe all 1500s whatever the number of rear wheels
Frenchy
On a side note, I've just checked out Reinhard Franks "Trucks of the Wehrmacht" book and according to him, the designation "2000" appears to remain unproved, so these trucks are maybe all 1500s whatever the number of rear wheels
Frenchy
tominizer
Ontario, Canada
Joined: September 26, 2006
KitMaker: 210 posts
Armorama: 81 posts
Joined: September 26, 2006
KitMaker: 210 posts
Armorama: 81 posts
Posted: Tuesday, April 05, 2011 - 01:34 PM UTC
Frenchy........... I actually right-clicked on the photo to look at the photo properties and it comes up with Steyr 1500-2. So yes I'd agree its a 1500 model.
I should be working on the truck .......right now............. but I'm tired and I think coming down with the flu. I feel like crap. So she sits waiting for a better day.
tominizer
Ontario, Canada
Joined: September 26, 2006
KitMaker: 210 posts
Armorama: 81 posts
Joined: September 26, 2006
KitMaker: 210 posts
Armorama: 81 posts
Posted: Wednesday, April 06, 2011 - 01:37 PM UTC
Tonight I found some time to get a bit more work done on the Steyr.
The wheels are now on the axles and the dash is detailed up and now in the cab. Maybe a bit more work tomorrow and I'll post up some more pictures. It seems to be coming together nicely. Some serious weathering still to come.
Cheers for now...............
The wheels are now on the axles and the dash is detailed up and now in the cab. Maybe a bit more work tomorrow and I'll post up some more pictures. It seems to be coming together nicely. Some serious weathering still to come.
Cheers for now...............
tominizer
Ontario, Canada
Joined: September 26, 2006
KitMaker: 210 posts
Armorama: 81 posts
Joined: September 26, 2006
KitMaker: 210 posts
Armorama: 81 posts
Posted: Thursday, April 07, 2011 - 12:31 PM UTC
Still need to apply washes, and a host of other weathering items to the truck but here's where we stand as of today.
tominizer
Ontario, Canada
Joined: September 26, 2006
KitMaker: 210 posts
Armorama: 81 posts
Joined: September 26, 2006
KitMaker: 210 posts
Armorama: 81 posts
Posted: Wednesday, April 20, 2011 - 01:16 PM UTC
Little bit of an update........
Chassis has been secured to the truck frame, wheels bolted up and the weathering has started. In the washes stage right now. There's a ways to go still but this one is wrapping up.