

Hosted by Darren Baker
Anyone made a Pershing Manlet Cover?

GregCloseCombat

Joined: June 30, 2008
KitMaker: 2,408 posts
Armorama: 2,394 posts

Posted: Sunday, June 05, 2011 - 05:25 PM UTC
Hi, I'm doing a Tamiya WWII Pershing and need to make a manlet cover. Any pics of one done or anyone have experience. I searched the site but old posts have the dreaded 'X''s showing. Thanks


Railspltr
Joined: March 19, 2010
KitMaker: 96 posts
Armorama: 62 posts
Posted: Sunday, June 05, 2011 - 11:20 PM UTC
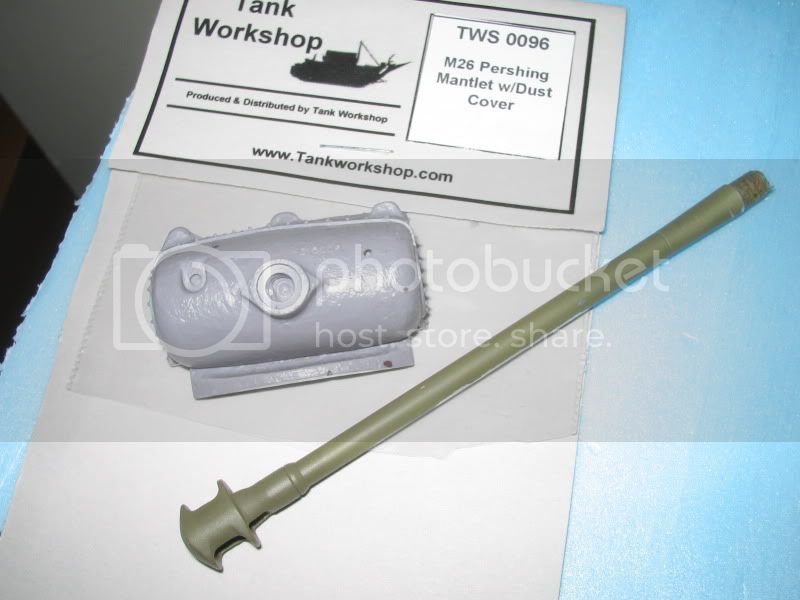
Tank Workshop has two resin peices. TWS0096 M26 mantlet with canvas cover ($5.75) and also TWS0092 90mm canvas muzzle cover ($4). There is a tutorial in the features section on how to make canvass with glue and toilet paper if you want to customize the part in question. 

jon_a_its

Joined: April 29, 2004
KitMaker: 1,336 posts
Armorama: 1,137 posts

Posted: Monday, June 06, 2011 - 12:34 AM UTC
The TWS mantlet doesn't fit the Tamiya kit at all I'm afraid it's too wide....
SFAIK, there isn't one for the Tamiya, so you now have a learning opportunity...
I'm doing my own mantlet cover.
So far as I have found, the cover is held on with 'poppers' or rivets to welded strips,
as here: SVSM M26 Mantlet
So following the TWS cover as a guide, I glued over-long 20thou strips across the top of the turret, allowed to dry, then bent the curve round the corner.
for the mantlet, I formed 1/2 circles round a paintbrush first, then did the top strip.
Then glue the mantlet to the pivot, choose your angle of elevation & glue the pivots inside the turret solid.
Bulk out the gaps between the turret & mantlet with sprue, then fill in with your favourite putty (or plasticene, if you want a looong working time....) & sculpt untill it looks like a tarp.
I'm using Halfords (UK) own-brand knifing putty, put on in thin layers & a coat or two of Mr surfacer, worked with wooden tools, brushes, etc, damped with laquer thinner.
Refs here http://svsm.org/gallery/M26
Primeportal.net & Google will help here for pics. Google Steve Zaloga as well, he's don a cracking M26 if memory serves well.
I'll have to take some pics of mine & post...
If you are doing a WW2 version from the Tamiya kit, As I am doing,
you aught to do the mantlet cover, leave off the crew telephone starboard rear fender & shave off the strengthening ribs from the rear transmission final drive covers.
I haven't altered the enlarged ventilator 'bump' between the drivers' & co-drivers hatches, not enough info about the small version.
I have a 90mm barrel & muzzle which I am using & the ABER P/E, which I am not, not really needed....
GregCloseCombat
Joined: June 30, 2008
KitMaker: 2,408 posts
Armorama: 2,394 posts
Posted: Monday, June 06, 2011 - 03:39 AM UTC
Thank you guys. I hadn't heard about the transmission before. Jon are you doing the large folded camo netting on the fender too? I have the Archer casting numbers to put on as well.
jon_a_its
Joined: April 29, 2004
KitMaker: 1,336 posts
Armorama: 1,137 posts
Posted: Monday, June 06, 2011 - 04:26 AM UTC
Quoted Text
Thank you guys. I hadn't heard about the transmission before. Jon are you doing the large folded camo netting on the fender too? I have the Archer casting numbers to put on as well.
Remove these for WW2 final drive bolts version.
Not sure what you mean about the camo netting?

AgentG
Joined: December 21, 2008
KitMaker: 1,109 posts
Armorama: 1,095 posts

Posted: Monday, June 06, 2011 - 06:43 AM UTC
Look at photo #3 on page #1 here:
http://svsm.org/gallery/M26,
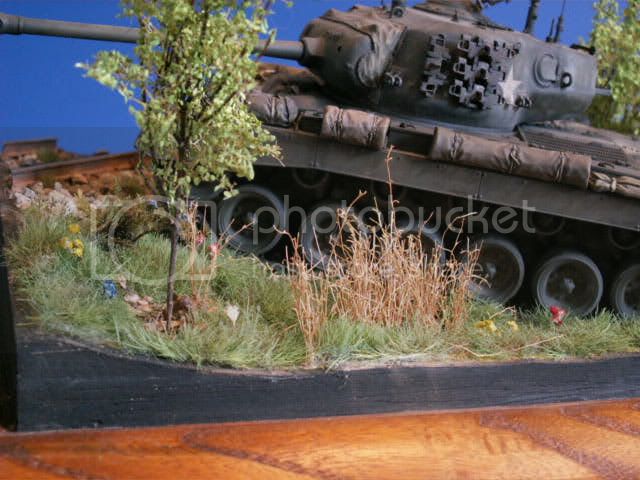
See all those tie downs that run from the back fender to the front of the tank? They were there to secure a huge camo net which was supposed to be used to cover the tank. Yeah that didn't last very long once deployed in a combat zone.
G
http://svsm.org/gallery/M26,
See all those tie downs that run from the back fender to the front of the tank? They were there to secure a huge camo net which was supposed to be used to cover the tank. Yeah that didn't last very long once deployed in a combat zone.
G

thebear

Joined: November 15, 2002
KitMaker: 3,960 posts
Armorama: 3,579 posts
Posted: Monday, June 06, 2011 - 11:55 AM UTC
Hi Greg ...Trakz models used to make one as well as a set of stowage for the Tamiya kit ...I don't know if it is still available though...I guess you should check out the Squadron site ..


Rick
Rick

thebear
Joined: November 15, 2002
KitMaker: 3,960 posts
Armorama: 3,579 posts
Posted: Monday, June 06, 2011 - 12:06 PM UTC
Just checked and Squadron no longer has it listed...I did find the stowage set on the Great models site ,but no luck on the mantlet. 
GregCloseCombat
Joined: June 30, 2008
KitMaker: 2,408 posts
Armorama: 2,394 posts
Posted: Monday, June 06, 2011 - 05:01 PM UTC
Great info guys. Richard, those are the pics I was looking for instead of the 'X''s. You did a great job on that. I'm going to be scratching the mantlet and tarps. So I'll check out that toilet tissue article Jon & Edwin.

ruzzaa

Joined: October 17, 2007
KitMaker: 197 posts
Armorama: 189 posts
Posted: Monday, June 06, 2011 - 06:48 PM UTC
Accurate Armour Scotland
A 1/35th scale accessory set for the Tamiya M26 Pershing.
The set includes resin castings for a part canvas mantlet cover with the correct 'sag' for the gun elevation, detailed seams and fixing details. Muzzle canvas cover, drivers hood stowage and crane mountings and an etched brass fret with headlamp guards and 0.50 Cal MG handle are also included.
.
http://www.accurate-armour.com/ShowProduct.cfm?manufacturer=0&category=4&subcategory=35&product=1753
Railspltr
Joined: March 19, 2010
KitMaker: 96 posts
Armorama: 62 posts
Posted: Tuesday, June 07, 2011 - 09:22 AM UTC
Those Accurate Armor parts look very nice and the description matches them to the Tamiya kit. What kits do the TWS parts fit? Dragon?
Gregg, that tutorial is on the site somewhere and specifies facial tissue instead of toilet paper which is too porous and tears easily. It is shown with an SdKfz 250/1 if that helps. I didn't save the exact spot I found it, sorry.
Gregg, that tutorial is on the site somewhere and specifies facial tissue instead of toilet paper which is too porous and tears easily. It is shown with an SdKfz 250/1 if that helps. I didn't save the exact spot I found it, sorry.
jon_a_its
Joined: April 29, 2004
KitMaker: 1,336 posts
Armorama: 1,137 posts
Posted: Wednesday, June 08, 2011 - 02:27 AM UTC
Quoted Text
Those Accurate Armor parts look very nice and the description matches them to the Tamiya kit. What kits do the TWS parts fit? Dragon?
Gregg, that tutorial is on the site somewhere and specifies facial tissue instead of toilet paper which is too porous and tears easily. It is shown with an SdKfz 250/1 if that helps. I didn't save the exact spot I found it, sorry.
Don't know what the TWS bits fit, the packaging or their website doesn't say.....
David Creels' article here.
GregCloseCombat
Joined: June 30, 2008
KitMaker: 2,408 posts
Armorama: 2,394 posts
Posted: Wednesday, June 08, 2011 - 03:29 AM UTC
Aw cool! Very good article. Nice to see it done on a similar tank.

Biggles2
Joined: January 01, 2004
KitMaker: 7,600 posts
Armorama: 6,110 posts

Posted: Wednesday, June 08, 2011 - 10:56 AM UTC
This is a recurring problem from a few manufacterers - they produce an AM part but fail to say which particular model it was made for. I also bought the same Tank Workshop M26 mantlet for my Hobby Boss Pershing. Of course it didn't fit. It took a lot of cutting away turret and resin mantlet parts to make them sort of fit, and then rebuilding the turret front contours because they still didn't match up properly, and restoring the casting texture. More recently I bought a Dragon SU 100 - not the pathetic first one, and it wasn't the newest one either, so it must be the second version. Anyway, I bought an ET P/E set for 'Dragon SU 100'. Of course most of these pieces don't fit well on my model so this P/E set was meant for one of the other Dragon SU 100 versions. Sometimes P/E producers have the idea that 'one size fits all" and sometimes this one size fits none! 
More recently I bought a Dragon SU 100 - not the pathetic first one, and it wasn't the newest one either, so it must be the second version. Anyway, I bought an ET P/E set for 'Dragon SU 100'. Of course most of these pieces don't fit well on my model so this P/E set was meant for one of the other Dragon SU 100 versions. Sometimes P/E producers have the idea that 'one size fits all" and sometimes this one size fits none! 
Kenaicop

#384
Joined: August 23, 2005
KitMaker: 1,426 posts
Armorama: 1,316 posts

Posted: Wednesday, June 08, 2011 - 11:07 AM UTC
Easy to make from fine solder and the 'ol tissue and white glue method.


GregCloseCombat
Joined: June 30, 2008
KitMaker: 2,408 posts
Armorama: 2,394 posts
Posted: Wednesday, June 08, 2011 - 02:36 PM UTC
I am now hoping my turns out as good as that. Thanks for the helpful pics. I'm getting the necessary confidence now 
jon_a_its
Joined: April 29, 2004
KitMaker: 1,336 posts
Armorama: 1,137 posts
Posted: Thursday, June 09, 2011 - 03:34 AM UTC
Nice Work Kenaicop James,
Not noticed any WW2 photos of the retaining strap holding the .30/.50 cal ammo boxes, but a logical thing to do.
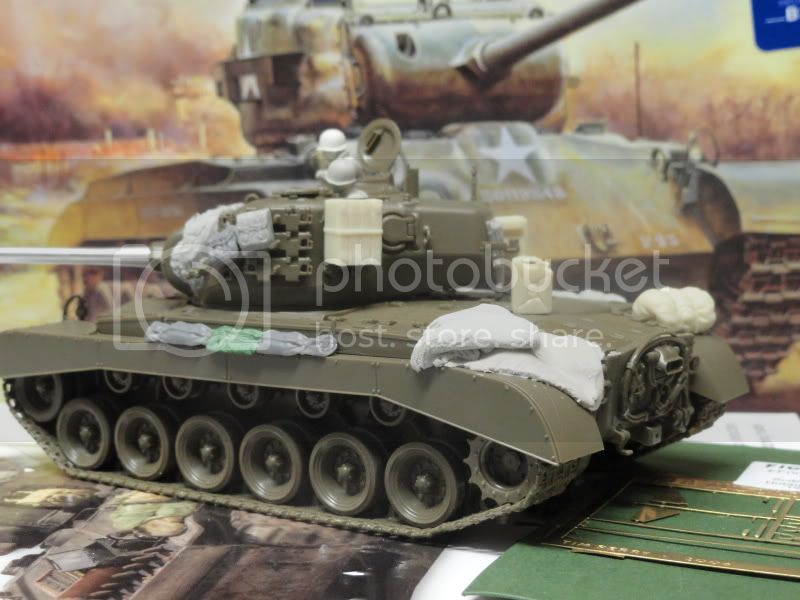
Here's my WIP
Side view, with a coat of Mr Surfacer 500 & 1 shot of Vallejo Polyeurathane primer in OD, rivets to add yet.
Single part TWS Mantlet, very nice, but no indication which kit it was for (Dragon?) and SEPERATE 2 part 90mm barrel & muzzle brake kit, eg not part of Mantlet kit.
This doesn't fit the Tamiya kit either, but a wrap of masking tape soaked in superglue round the stub at the end of barrel makes it so.
All together now.

Glasis plate with Mr Surfacer.

Not noticed any WW2 photos of the retaining strap holding the .30/.50 cal ammo boxes, but a logical thing to do.
Here's my WIP
Side view, with a coat of Mr Surfacer 500 & 1 shot of Vallejo Polyeurathane primer in OD, rivets to add yet.
Single part TWS Mantlet, very nice, but no indication which kit it was for (Dragon?) and SEPERATE 2 part 90mm barrel & muzzle brake kit, eg not part of Mantlet kit.
This doesn't fit the Tamiya kit either, but a wrap of masking tape soaked in superglue round the stub at the end of barrel makes it so.
All together now.
Glasis plate with Mr Surfacer.
GregCloseCombat
Joined: June 30, 2008
KitMaker: 2,408 posts
Armorama: 2,394 posts
Posted: Thursday, June 09, 2011 - 06:23 PM UTC
Your tank is looking real nice too Jon, especially the texture. Very helpful to follow you guys.
jon_a_its
Joined: April 29, 2004
KitMaker: 1,336 posts
Armorama: 1,137 posts
Posted: Thursday, June 09, 2011 - 10:55 PM UTC
Quoted Text
Your tank is looking real nice too Jon, especially the texture. Very helpful to follow you guys.
Oh, better get some work done then!
 On hols for a bit, need a break, but I'll be right back
GregCloseCombat
Joined: June 30, 2008
KitMaker: 2,408 posts
Armorama: 2,394 posts
Posted: Sunday, August 07, 2011 - 04:30 PM UTC
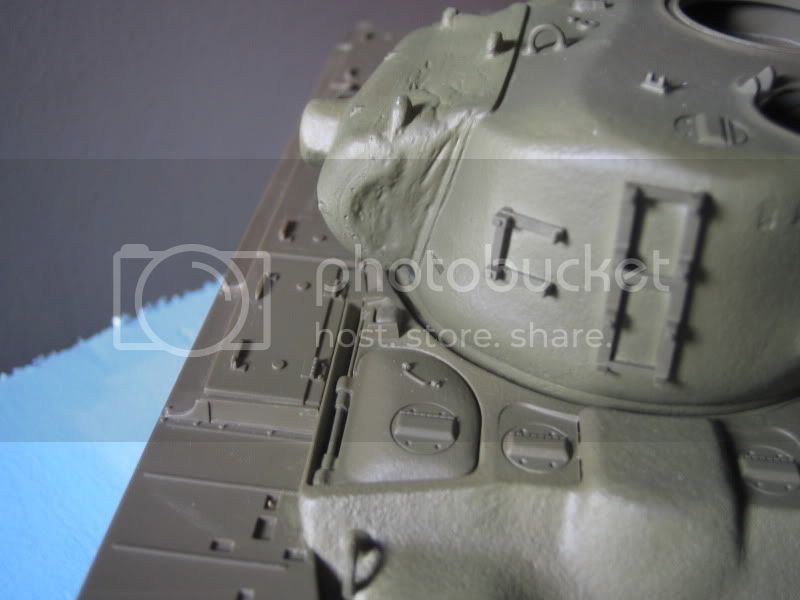
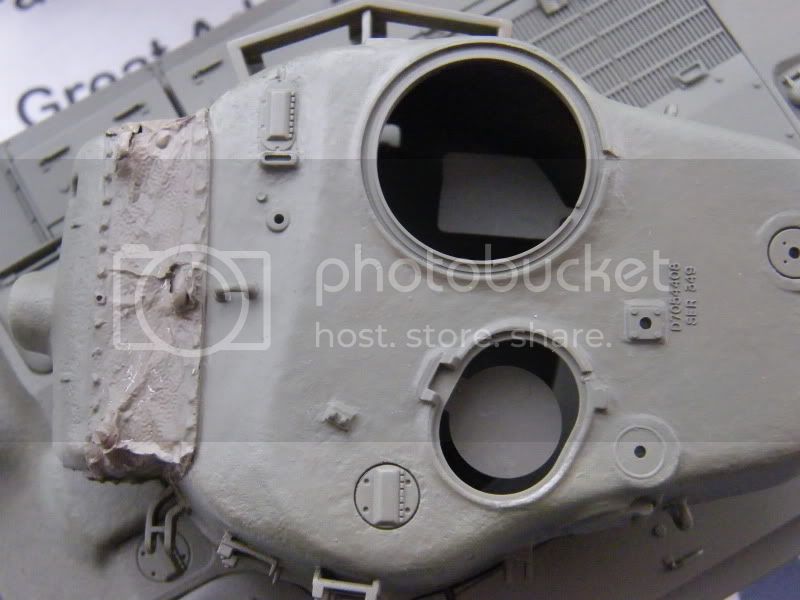
Here are my results of my first experiment making a mantlet cover and using Magic Sculpt on my Pershing. I masked the clean areas with blue painter's tape. After taking the pic and seeing it enlarged on the computer, I ran back outside to trim mostly the sides down some. So when I get more pics, it should look a little smaller. I think the grey Magic sculpt worked better then my early attempts at using Squadron putty. I'm going to add PE guards and MG next. Suggestions welcomed always


it is what it is
it is what it is
jon_a_its
Joined: April 29, 2004
KitMaker: 1,336 posts
Armorama: 1,137 posts
Posted: Sunday, August 07, 2011 - 09:13 PM UTC
Nicely done so far the casting no's look good, I must get some...
Your mantlet cover does look good!
Remember that your stowage will need straps to prevent that 'hovering' look...
I reworked mie 'cos I didn't like the way it came out, must find the pics & post.
Your mantlet cover does look good!
Remember that your stowage will need straps to prevent that 'hovering' look...
I reworked mie 'cos I didn't like the way it came out, must find the pics & post.
jon_a_its
Joined: April 29, 2004
KitMaker: 1,336 posts
Armorama: 1,137 posts
Posted: Sunday, August 07, 2011 - 11:53 PM UTC
Quoted Text
Nicely done so far the casting no's look good, I must get some...
Your mantlet cover does look good!
Remember that your stowage will need straps to prevent that 'hovering' look...
I reworked mie 'cos I didn't like the way it came out, must find the pics & post.
Edit: why can't I edit my post?
jon_a_its
Joined: April 29, 2004
KitMaker: 1,336 posts
Armorama: 1,137 posts
Posted: Sunday, August 07, 2011 - 11:58 PM UTC
I used some thin testured alu cover from a margerine tub & placed it over the previously mentioned resin mantlet & formed round it... Brass-rubbing style!
A bit of fettling & first fit! a couple of poppers/rivets to improve & maybe fill in the tears round the lifting lugs.
This is 'on hold' whoile I try to finish an AAV in time for a show in Sept...
I build very slowly...
GregCloseCombat
Joined: June 30, 2008
KitMaker: 2,408 posts
Armorama: 2,394 posts
Posted: Monday, August 08, 2011 - 03:39 AM UTC
Hi Jon - glad you spotted the thread again!
Someone else on the Tamiya Campaign tried the tissue method and cursed it so that's when I changed course for the Magic Sculpt. Also, I picked up Steve Zaloga's Modelling US WWII Armor book and he used putty stuff on his Pershing mantlet so that sealed the deal for me. Your cover turned out well and the butterdish wrapper texture looks like a nice added touch (Zaloga advises against cover texture in 1/35 but it's all art,right?). I've seen the casting #s different in all sorts of locations, and they do add a uniqueness to the model.
I need to find some plastic rod and strip (or something) to make the mantlet cover clamps still. I'll add the straps and get the stowage seated better in places too as you pointed out.
Post again when you get back to your Pershing and thanks for ALL the help!
 |

WEB HOSTING BY


Copyright ©2021 Armorama and Kitmaker Network, a subsidiary of Silver Star Enterprises
All Rights Reserved. Please read our Conditions of Use and Privacy Policy.
All Rights Reserved. Please read our Conditions of Use and Privacy Policy.