Texas, United States
Joined: March 08, 2010
KitMaker: 2,465 posts
Armorama: 2,383 posts
Posted: Sunday, June 12, 2011 - 01:32 PM UTC
Hi all,
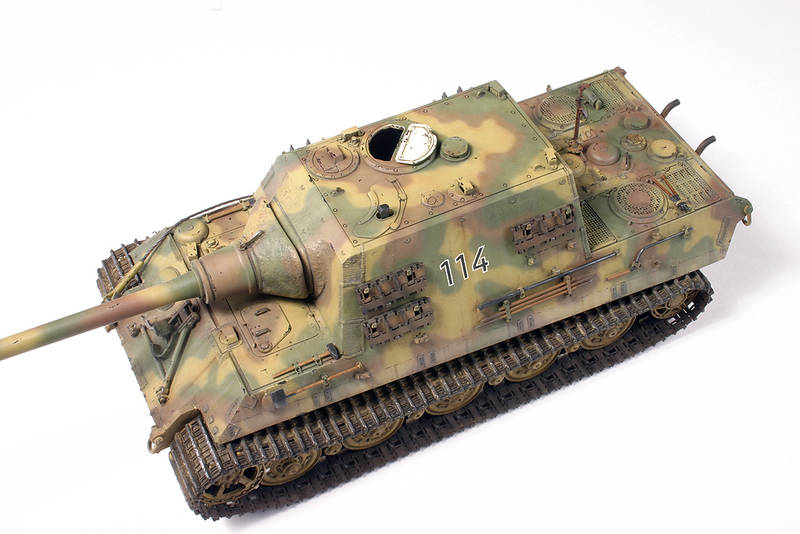
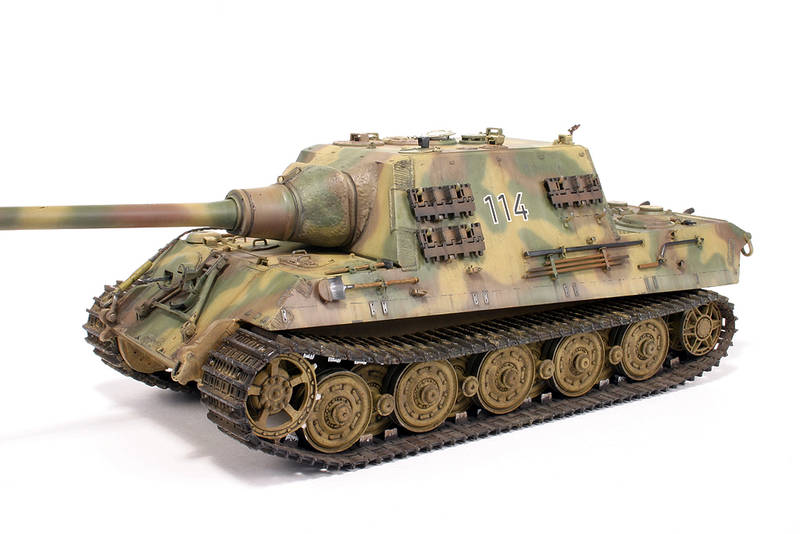
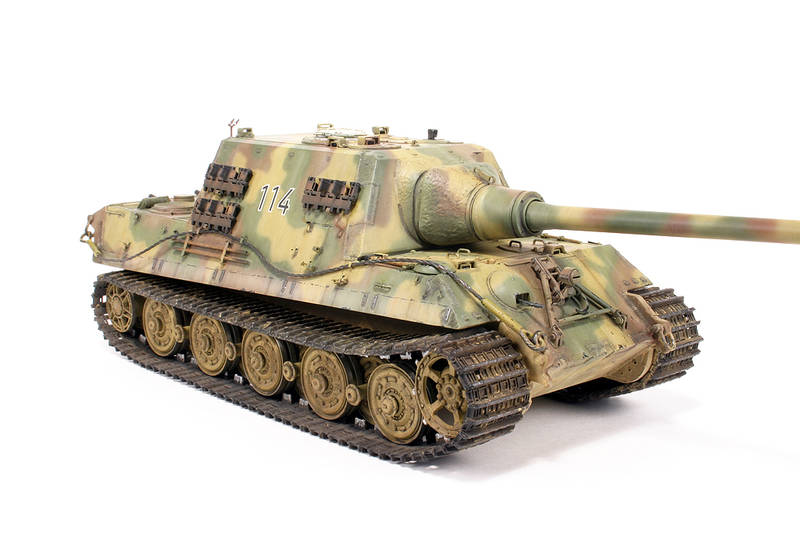
I finnished the jagdtiger 3 or 4 weeks ago but just got the pics done. This is a dragon kit with eduard photoetch. all weld beads were made with evergreen strip styrene. there are a few little areas that were scratch built. JT was finnished with tamiya acrylics and vallejo model color. washes and fadeing were done with windsor & newton and mig oils. mig pigments were also used. This jagdtiger represents no. 114 1./schwere PzJg. Abt 653 Eppingen, Germany 1945. all comments are welcome. hope you all like it. thanks for looking.


Thx,
Gary
Texas, United States
Joined: June 29, 2010
KitMaker: 5,854 posts
Armorama: 4,817 posts
Posted: Sunday, June 12, 2011 - 01:59 PM UTC
This is very nice Gary. I've been slowly working on one of these myself but haven't bothered with the aftermarket PE. What size of styrene did you use for the weld beads? I've been trying to make mine out of A/B putty and haven't been to happy with the results.
Texas, United States
Joined: March 08, 2010
KitMaker: 2,465 posts
Armorama: 2,383 posts
Posted: Sunday, June 12, 2011 - 02:14 PM UTC
Hi Jeremy,
i used evergreen .030" quarter round item no.246, .040" half round no. 240, and plastruct .015" round no. 90849. i glue them in place and let them dry, then i apply multiple coats of tamiya thin cement untill soft and work them. on the bigger welds i use a tiny quarter round tube. the smaller welds i use an old dull exacto blade. hope that helps. thanks for the compliment.
Gary
Lisboa, Portugal
Joined: March 04, 2008
KitMaker: 5,386 posts
Armorama: 4,727 posts
Posted: Sunday, June 12, 2011 - 02:48 PM UTC
Very nice build Gary !!
Clean weathering, great detailing.
Keep them coming !!

Active Builds: 0
Active Campaigns: 0
California, United States
Joined: June 30, 2008
KitMaker: 2,408 posts
Armorama: 2,394 posts
Posted: Sunday, June 12, 2011 - 04:36 PM UTC
I wish I could pull off camo like that. Awesome JT!


#135
California, United States
Joined: August 05, 2007
KitMaker: 1,501 posts
Armorama: 1,485 posts
Posted: Sunday, June 12, 2011 - 06:20 PM UTC
Gary,
Excellent job! The camouflage looks terrific as does the weathering. So far this makes this it one of the most realistic looking JT's that I've seen here.
Your photos are excellent too! Thanks for sharing your build, hoping to see more of your work.
-Eddy

If you absolutely must have a city completely destroyed overnight . . . call the MARINES
Currently on the bench:
1:12 Bandia Star Wars K-2SO
1:35 Takom T-54B Late
British Columbia, Canada
Joined: March 05, 2009
KitMaker: 394 posts
Armorama: 380 posts
Posted: Sunday, June 12, 2011 - 06:30 PM UTC
thats a perfect example of how armour should look. fantastic job
Vendee, France
Joined: December 22, 2006
KitMaker: 1,437 posts
Armorama: 1,406 posts
Posted: Sunday, June 12, 2011 - 08:12 PM UTC
Gary,
this is a splendid JT. I love the way you did the camouflage, its really perfect. One small comment if I may. From what I could see on pictures JT didn't have camouflage under the side skirts. Just red oxide primer. Your JT is perfect as it is it could be clue for the future.
spit
Texas, United States
Joined: March 08, 2010
KitMaker: 2,465 posts
Armorama: 2,383 posts
Posted: Monday, June 13, 2011 - 02:44 AM UTC
Hi all,
Thanks so much for the kind words gentlemen. you are correct pawel. i considered apllying red oxide but i chose to omit it. looking back i think it would have made it look more authentic. however im very happy with the finnished model. Thx again.
Gary
Quebec, Canada
Joined: January 01, 2004
KitMaker: 7,600 posts
Armorama: 6,110 posts
Posted: Monday, June 13, 2011 - 04:54 AM UTC
I think the exposed strip under the side skirts/fenders was the base color (not neccessarily primer). The skirting was hung and then the vehicle was camo painted. BTW I also like the camo job. Was this done completely free-hand, or with some kind of masking such as stand-off, silly putty, etc? I've tried brushing on liquid latex with success - it doesn't seem to pull off P/E as much as silly putty does.
Texas, United States
Joined: June 29, 2010
KitMaker: 5,854 posts
Armorama: 4,817 posts
Posted: Monday, June 13, 2011 - 05:04 AM UTC
Quoted Text
Hi Jeremy,
i used evergreen .030" quarter round item no.246, .040" half round no. 240, and plastruct .015" round no. 90849. i glue them in place and let them dry, then i apply multiple coats of tamiya thin cement untill soft and work them. on the bigger welds i use a tiny quarter round tube. the smaller welds i use an old dull exacto blade. hope that helps. thanks for the compliment.
Gary
Thanks Gary, I'll try my hand at the styrene and see if I can get better results with it.
And for what it's worth, I don't know that the red oxide primer would have made that much of a difference in the end with the way you weathered your build.
North Carolina, United States
Joined: June 06, 2006
KitMaker: 4,691 posts
Armorama: 3,509 posts
Posted: Monday, June 13, 2011 - 05:12 AM UTC
Very effective weathering technique ,just right.great job
Ontario, Canada
Joined: February 01, 2005
KitMaker: 1,299 posts
Armorama: 919 posts
Posted: Monday, June 13, 2011 - 05:14 AM UTC
Gary:
Nice JT you got there. I like the camo as well. I am also curious if you did that free hand or if you used masking.
Cheers.
Brian
On the WorkBench:
Dragon Tiger I Intial
Dragon Jagdtiger
New Jersey, United States
Joined: November 02, 2009
KitMaker: 609 posts
Armorama: 433 posts
Posted: Monday, June 13, 2011 - 05:24 AM UTC
Gary - Really, really sweet model. I don't know boo about the Jagdtiger, but the painting and weathering is excellent. The marks and discoloration where the fenders would have hung is always a nice touch IMHO. Are those the kit tracks or Friuls?

England - South East, United Kingdom
Joined: January 09, 2010
KitMaker: 979 posts
Armorama: 959 posts
Posted: Monday, June 13, 2011 - 05:44 AM UTC
I really love that Jagtiger the camo looks fantastic. Great job Gary
Texas, United States
Joined: March 08, 2010
KitMaker: 2,465 posts
Armorama: 2,383 posts
Posted: Monday, June 13, 2011 - 06:25 AM UTC
HI Gentlemen,
Brian& biggles. the camo was applied free hand. i used a no.2 pencil and outlined the pattern marking a G in the green areas and a B in brown areas as to keep track of the colors. i used an iwata eclipse HP-CS for the base coat and a iwata HP-B plus for the green and redbrown camo.
Bill. the tracks are kit magic track.
thanks everyone for your comments.
Gary
Nevada, United States
Joined: December 21, 2008
KitMaker: 1,109 posts
Armorama: 1,095 posts
Posted: Monday, June 13, 2011 - 10:20 AM UTC
Very very nice!
It just looks, ............. RIGHT!
G
Lasci la pistola. Porti le cannoli.
Ohio, United States
Joined: August 12, 2010
KitMaker: 731 posts
Armorama: 711 posts
Posted: Monday, June 13, 2011 - 01:47 PM UTC
Outstanding Gary!
I like the overall look and I love the tone of the colors. Very nice work!
Texas, United States
Joined: March 08, 2010
KitMaker: 2,465 posts
Armorama: 2,383 posts
Posted: Tuesday, June 14, 2011 - 01:46 AM UTC
Hi all,
Thanks for your comments gentlemen. Brian thats a sweet JT you got there.
thanks for looking.
Gary


