_GOTOBOTTOM
Armor/AFV: Group Builds
Build a model with your online buddies!
Hosted by Darren Baker
GB: North Africa - L6/40 Light Tank
scoccia
Visit this Community
Milano, Italy
Joined: September 02, 2002
KitMaker: 2,606 posts
Armorama: 1,721 posts
Posted: Saturday, September 20, 2003 - 09:23 PM UTC
Hi guys,
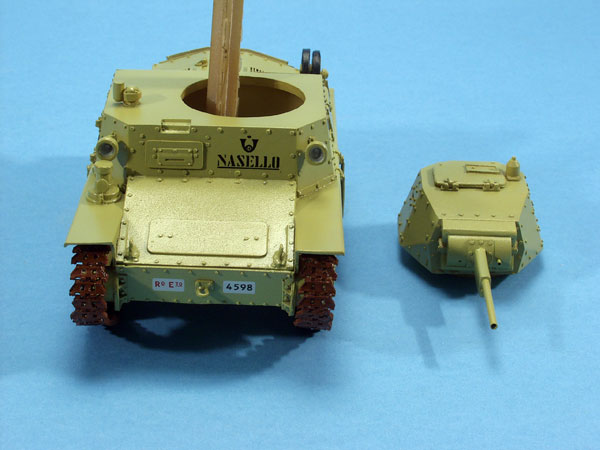
I've just got back my digital camera so I can start shooting pica again. This is the finished model's assembly (it's just about a handful of resin parts) receiving a coat of primer


More images can be seen here

As usual any comments/criticism are most welcome
Ciao
Venom
Visit this Community
Alessandria, Italy
Joined: July 28, 2003
KitMaker: 720 posts
Armorama: 0 posts
Posted: Saturday, September 20, 2003 - 09:50 PM UTC
Hi Fabio
Looks very nice, I will see follow the photos of the painted tank. Which brand is this? Because i want to do some italian tanks but only zwezda and italeri do something whit a normal price..the other brand who produced resin kit generally are too expensive for my pocket..
Another questiom.. why a lot of modeller put the track after have paint all the tank?
Do you want to use it for under the sun?
regards

ciao
Nico
scoccia
Visit this Community
Milano, Italy
Joined: September 02, 2002
KitMaker: 2,606 posts
Armorama: 1,721 posts
Posted: Saturday, September 20, 2003 - 10:33 PM UTC

Quoted Text

...Which brand is this? Because i want to do some italian tanks but only zwezda and italeri do something whit a normal price..the other brand who produced resin kit generally are too expensive for my pocket..


This is a model from Crielmodel of Rome. At the upcoming Novegro exibition (26,27,28 on Sep) another one from Model Victoria will be available so if you're coming you can have a look at tons of italian subjects. Unfortunately almost all of them are resin kits. The Crielmodel goes for 72 € and the Model Victoria one shoukd be around 60 €.


Quoted Text

...Another questiom.. why a lot of modeller put the track after have paint all the tank?


I don't know why the others do it actually, but I can answer for myself: I find almost impossible to properly paint and weather them once they're fit on the model...
Ciao

Folgore
Visit this Community
Canada
Joined: May 31, 2002
KitMaker: 1,109 posts
Armorama: 0 posts
Posted: Sunday, September 21, 2003 - 03:54 AM UTC
Very nice looking tank there, Fabio.

How would you rate Crielmodel as far as detail, warpage, accuracy, and instructions go? I have been interested in their kits, but they are very expensive for me to order in Canada so I have never tried one. Also, what are the tracks like? Workable, link-and-length, etc.......

I'm looking forward to MV's L6 and may get that when it comes out, but I notice Criel also makes the L3 tankettes and some artillery.

Nic
scoccia
Visit this Community
Milano, Italy
Joined: September 02, 2002
KitMaker: 2,606 posts
Armorama: 1,721 posts
Posted: Sunday, September 21, 2003 - 04:49 AM UTC
Nic, the Criel's L6/40 hull is quite good and well detailed. The suspensions are quite decent too. Sprockets, idler and roadwheels have got some problems but nothing too serious. All in all is air bublles free. I saw at a friend's the new MV and it looks outstanding; it fits like a Tamiya kit and comes with full interiors so it should be great value for money. If you can wait a few days I think I'll write a review for both of them, because I'll have one of the new MV kits over the next week-end.
Both of them have got link 'n length tracks and the Criel ones look very well detailed but a bit fragile.
The accuracy is quite good, anyway I'll give the Criel's scratch built exhaust and gun.
You can reach Criel at this address.
The other kits I've got from Criel are:
- L3-33
- AB 41
- Ab 42 - 47/32
- AB 42 - Breda MGs
- L6 Semovente 47/32
- L6 Company command
- Lancia Lince Armoured Car
and they all look very good compared to the average of the other local resin kits...
Ciao and feel free to contact me for any question you've got about Italian WWII vehicles
scoccia
Visit this Community
Milano, Italy
Joined: September 02, 2002
KitMaker: 2,606 posts
Armorama: 1,721 posts
Posted: Sunday, September 21, 2003 - 05:56 AM UTC
Got a bit further on in the afternoon. The model has been puttied where needed and a new exhaust has been scratchbuilt out of copper tubing/foil and plasticard. Also the main gun and the coaxial MG have been scratchbuilt; the first from brass tubing, the second from a syringe needle.


The "puttied" beast


The new exhaust compared to the one coming with the kit

More images can be seen here

As usual any comments/criticism are most welcome
Ciao


scoccia
Visit this Community
Milano, Italy
Joined: September 02, 2002
KitMaker: 2,606 posts
Armorama: 1,721 posts
Posted: Monday, September 22, 2003 - 09:02 PM UTC
The "giant" has been pre-shaded and received its basecoat. The effect of pre-shading is more evident on the turret (problem with the pics)


More images can be seen here

As usual any comments/criticism are most welcome
Ciao


Folgore
Visit this Community
Canada
Joined: May 31, 2002
KitMaker: 1,109 posts
Armorama: 0 posts
Posted: Tuesday, September 23, 2003 - 04:58 PM UTC
Lookin' good. What colour do you use for Italian Sand. I notice it's not as "pink" as the Modelmaster paint.

I really like what you did with the exhaust, too. Do you think you could share some more detailed info with us on just how you did it?

Nic
scoccia
Visit this Community
Milano, Italy
Joined: September 02, 2002
KitMaker: 2,606 posts
Armorama: 1,721 posts
Posted: Tuesday, September 23, 2003 - 08:06 PM UTC
Nic,
what I use as a base colour is 70% Tamiya XF-60 "Dark Yellow" and 30% of " XF-2 "Flat White" thinned at 50% with 90 vols rubbing alcohol (ispropylic).
The exaust, with a bit of practice, is easy to be done:

a) cut a section of copper tubing of the desired diameter to the length, file it if the edges are a bit rough and hold it in a vise
b) with a soldering gun put a bit solder around the edges of the tubing
c) cut two squares (rectangles) of copper foil exceeding the diameter of the tubing of roughtly 1mm and put some solder on one of the sides
d) position the copper square with the soldered side towards the tubing edge and heat it with the soldering gun until the solder melts and grants the adhesion between the foil square and the tubing section
e) repeat the operation turning upside downd the tubing and soldering the other copper foil square to it as done before
f) once you're done with that trim out the excess of foil and file/sand it down to shape
g) cut an other lenght of copper tubing (this will the terminal part of the exhaust) of appropriate diameter and gently "squash" it using a pair of pliers and file/sand the edges if they're rough
i) with the soldering gun apply a bit of solder on one side of the "squashed" tubing and solder it to the cylinder you obtained before
k) cut four discs out of pasticard (sheel or rod) that will give you the supports to glue the exaust to the tank on one side and the exaust "shield" on the other and glue them in place with CA
j) cut a rectangle of copper foil and shape it around a tube a couple of millimeters bigger than the one you used for the exhaust body. Cut it to match (1/2 mm longer than the width of the exhaust with the four supports glued).
l) now cut a lenght of plastic/copper tube, slice it at half to be glued on the top of the exhaust shield and finish with milliput or another epoxy putty to give it a rounded shape
m) finish with the appropriate rivets

Gosh! It takes far a lot more to be exlained than doing two or three of them...
I hope this can help
Ciao

scoccia
Visit this Community
Milano, Italy
Joined: September 02, 2002
KitMaker: 2,606 posts
Armorama: 1,721 posts
Posted: Wednesday, September 24, 2003 - 08:36 AM UTC
The "beast" has been "Futured" and "decaled".


More images can be seen here

As usual any comments/criticism are most welcome
Ciao

Machu
Visit this Community
Virginia, United States
Joined: June 18, 2003
KitMaker: 208 posts
Armorama: 0 posts
Posted: Wednesday, September 24, 2003 - 10:34 AM UTC
coming along beautifully soccia. I really like the muffler. Are you going to put some dents and dings on the muffler?
scoccia
Visit this Community
Milano, Italy
Joined: September 02, 2002
KitMaker: 2,606 posts
Armorama: 1,721 posts
Posted: Wednesday, September 24, 2003 - 06:38 PM UTC

Quoted Text

coming along beautifully soccia. I really like the muffler. Are you going to put some dents and dings on the muffler?


Machu, I'm not for a simple reason: it was made of steel thick a bit less than 1/2 inch so no denting and dinging...
Ciao
scoccia
Visit this Community
Milano, Italy
Joined: September 02, 2002
KitMaker: 2,606 posts
Armorama: 1,721 posts
Posted: Thursday, September 25, 2003 - 01:54 AM UTC
Starting to work at the "giant's" weathering...


More images can be seen here

As usual any comments/criticism are most welcome
Ciao

WeWillHold
Visit this Community
Wisconsin, United States
Joined: April 17, 2002
KitMaker: 2,314 posts
Armorama: 1,905 posts
Posted: Thursday, September 25, 2003 - 03:25 AM UTC
Fabio

I've really enjoyed going through this particular thread and watching this little beastie take shape.

I'm again amazed at your ability to effectively scratchbuild (basically whatever you want to do (lol)), and nail it every time.

This work is (as usual), outstanding. You are UOM stuff, my friend.

Steve
Folgore
Visit this Community
Canada
Joined: May 31, 2002
KitMaker: 1,109 posts
Armorama: 0 posts
Posted: Thursday, September 25, 2003 - 09:32 AM UTC
Yes. Thanks for keeping the pics up to date, Fabio. It's really coming along nicely. I must say, you work at a much faster pace than I

Nic
Alpenflage
Visit this Community
Massachusetts, United States
Joined: May 21, 2003
KitMaker: 1,120 posts
Armorama: 1,002 posts
Posted: Thursday, September 25, 2003 - 12:23 PM UTC
Very nice work here. Good to see more WWII Italian Armor, esp the L6/40. I like how you have progressed with photos, showing us how the kit went together and painting it. Its too bad this kit (and other WWII Italian vehicles) are not done in injection. These resin kits are very expensive, and are hard to work on in my opinion. Maybe companies like Italeri will take notice to the growing interest in WWII Italian armor kits ?

Great work, and hope to see some more of it !

Cheers !!

Robert
Kencelot
Visit this Community
Florida, United States
Joined: December 27, 2001
KitMaker: 4,268 posts
Armorama: 2,804 posts
Posted: Thursday, September 25, 2003 - 02:18 PM UTC
Terrific build so far Fabio. A very interesting subject choice. Did the decals come with the kit or are they homemade? Do you have lenses for the head lights? Are you going to tone down the tracks? They look a bit too rusty.
I'm looking forward to it's completion.
scoccia
Visit this Community
Milano, Italy
Joined: September 02, 2002
KitMaker: 2,606 posts
Armorama: 1,721 posts
Posted: Thursday, September 25, 2003 - 05:36 PM UTC

Quoted Text

It's really coming along nicely. I must say, you work at a much faster pace than I


Nic: it's so small that you do everything in a few seconds... I'm quite slow too in the majority of my buids...


Quoted Text

Its too bad this kit (and other WWII Italian vehicles) are not done in injection. These resin kits are very expensive, and are hard to work on in my opinion. Maybe companies like Italeri will take notice to the growing interest in WWII Italian armor kits.


I think that manufacturers do not recognize that Italian WWIII can be an interesting subject too. I know mr. "Italeri" and I told him a million time and he keeps telling me that the molds are so expensive that he prefers to make a plane or a truck that sell 100 times what a tank does. Resin kits can be scary at the very beginning but after getting confident with them they're almost like the plastic ones. I fully agree that in the majority of cases they are crazily expensive


Quoted Text

Did the decals come with the kit or are they homemade? Do you have lenses for the head lights? Are you going to tone down the tracks? They look a bit too rusty.


All of the decals on my vehicles are custom made. I've read an interesting thread on "trade marking" your models here on Armorama a few days ago and let's say that this is my way to do it, creating unique markings. I've already made them and they will be the last thing to be put on after toning down the tracks and finishing the weathering. Hopefully tomorrow night (CET) I will be able to complete the whole kit...

Ciao and thanks a lot everybody for the nice words.
scoccia
Visit this Community
Milano, Italy
Joined: September 02, 2002
KitMaker: 2,606 posts
Armorama: 1,721 posts
Posted: Saturday, September 27, 2003 - 06:53 PM UTC
Hi all,
I managed to finish my entry for this group build


more pics can be seen here

As usual feel free to post your comments/suggestions/criticism
Ciao and happy modeling everybody
Folgore
Visit this Community
Canada
Joined: May 31, 2002
KitMaker: 1,109 posts
Armorama: 0 posts
Posted: Sunday, September 28, 2003 - 01:17 PM UTC
Great build Fabio! This has been really interesting to watch and it looks like you had some fun with it too. Seeing how big the L6 is, I can now understand why the Regio Esercito could call the M13 a medium tank, despite its many inadequacies. The drybrushing really improves the appearance a lot.

Nic
scoccia
Visit this Community
Milano, Italy
Joined: September 02, 2002
KitMaker: 2,606 posts
Armorama: 1,721 posts
Posted: Monday, September 29, 2003 - 09:26 AM UTC
Tanks for the kind words, unfortunately I have to agree at 100% with you concerning our WWII AFVs: they were absolutely inadequate but the AB41 and the 75/18 semovente of which anyway we were not able to produce the required quantities for such a war...
Ciao

Venom
Visit this Community
Alessandria, Italy
Joined: July 28, 2003
KitMaker: 720 posts
Armorama: 0 posts
Posted: Monday, September 29, 2003 - 09:44 AM UTC
Scoccia
your work is simply fantastic... I really like it..I fallowed all the step by step construction.
unfortunatly for me the resin kits are too expensive...so I have to buy Zwezda when I want to do an italian tank

Folgore
also in others post I saw you are much interessed about ww2 italian tank , and also the avatar name "folgore"...are you italian?

regards
Folgore
Visit this Community
Canada
Joined: May 31, 2002
KitMaker: 1,109 posts
Armorama: 0 posts
Posted: Monday, September 29, 2003 - 01:29 PM UTC
Venom -- Indeed I am interested in Italian tanks, but I'm not actually Italian myself. For unknown reasons I have just been fascinated with the Regio Esercito of WWII for some time. I am a history major in university and am currently conducting research on the Italo-Ethiopian War of 1935-36 as well as a major project on tank tactics in North Africa between 1940 and 1942 where I am trying to find as many Italian sources as possible for I feel that aspect of the campaign is almost always neglected by historians.

My interest in Italian history led me to try some of the products from Model Victoria and I have been hooked ever since. I finished a dio with a 47mm AT gun recently, but I have yet to photograph it. When I was at a model show a little while ago, I bought the Model Victoria conversion kit for the M.40 Semovente, so that is the next Italian project on the list.

Nic
Major_Goose
Visit this Community
Kikladhes, Greece / Ελλάδα
Joined: September 30, 2003
KitMaker: 6,871 posts
Armorama: 2,071 posts
Posted: Monday, September 29, 2003 - 07:43 PM UTC
Fabio nice work
looking step by step you look experienced and knowing what to do , and the result is very good.
hope to see more step by step work from you !!
keep up
 _GOTOTOP