

Very nice Tiggy, as usual Grant, love the look! Figures are geat as well, they suit her very well!
Just a (silly) question: how do you fit the driver into the gap? Is the upperhull a dryfit or does the figure just fit into the gap?
Cheers
Hosted by Darren Baker
Tiger I late - '934' SSPzReg 3

GewoonWouter

Joined: March 31, 2010
KitMaker: 227 posts
Armorama: 123 posts

Posted: Sunday, June 17, 2012 - 06:43 AM UTC
vanhall

Joined: January 23, 2007
KitMaker: 406 posts
Armorama: 391 posts
Posted: Sunday, June 17, 2012 - 10:09 AM UTC
Quoted Text
Are you sure you want the driver to look so comfortable? Driving a Tiger with your head out the hatch, was something of a contortion.
David
Hi David,
Yes you're correct.
'He' will eventually be lower and more to the centre.
I've had it in that position once,but it was a struggle to get it out again.
I'll now wait until it's painted before I fix it permanently.
The head is also still loose and should lean back a bit more to look more stretched.
Hopefully like these:

--------------------------------------
Hi Wouter,
The figure is this one from TaNK:

I've sliced a chunk out the 'his' left side so he will sit lower on the inside.
I also left the right arm off which makes it possible (just) to get it in and out of the hatch.
The missing right arm won't be seen because eventually the whole right shoulder will be hidden under the deck.
'n beetje zo:

Best,
Grant.
GewoonWouter
Joined: March 31, 2010
KitMaker: 227 posts
Armorama: 123 posts
Posted: Monday, June 18, 2012 - 08:40 AM UTC
thanks for the info mate, will make life a bit easier when I want to fit a driver in a Tiger next time 
Cheers
Cheers
vanhall
Joined: January 23, 2007
KitMaker: 406 posts
Armorama: 391 posts
Posted: Tuesday, July 31, 2012 - 11:01 AM UTC
A little update.
The decal dilemma I mentioned on the last page has now been solved. Tom Nelson saw my plea for the extra Kagero '913' decals over at 'PlanetArmor' and very generously sent them to me, all the way from Oklahoma. So a huge thanks to him.
With the decals sorted out and the last bits and pieces done, the kit has eventually made it into the paint shop.
Primer's on:


Tracks and crew too:


As an experiment, I decided to paint the barrel 'Black Grey' before I give it all a coat of 'Dunkelgelb':

'934' doesn't look to have a Dark Grey barrel but I did notice how shiny and dark the muzzle looks:

Thanks for looking. Dunkelgelb and camo coming next,
Grant.
The decal dilemma I mentioned on the last page has now been solved. Tom Nelson saw my plea for the extra Kagero '913' decals over at 'PlanetArmor' and very generously sent them to me, all the way from Oklahoma. So a huge thanks to him.
With the decals sorted out and the last bits and pieces done, the kit has eventually made it into the paint shop.
Primer's on:
Tracks and crew too:
As an experiment, I decided to paint the barrel 'Black Grey' before I give it all a coat of 'Dunkelgelb':
'934' doesn't look to have a Dark Grey barrel but I did notice how shiny and dark the muzzle looks:
Thanks for looking. Dunkelgelb and camo coming next,
Grant.
GewoonWouter
Joined: March 31, 2010
KitMaker: 227 posts
Armorama: 123 posts
Posted: Wednesday, August 01, 2012 - 09:45 PM UTC
Nice work again Grant, lookin' forward to the next paintstep. Love the black grey barrel idea
Cheers
Cheers

BBD468

Joined: March 08, 2010
KitMaker: 2,465 posts
Armorama: 2,383 posts

Posted: Thursday, August 02, 2012 - 01:03 AM UTC
Looking fantastic Grant! Everything looks top shelf bro. 
Gary
Gary


jimz66
Joined: December 15, 2006
KitMaker: 1,165 posts
Armorama: 1,105 posts
Posted: Thursday, August 02, 2012 - 10:12 PM UTC
Great work on this Tiger I.... Very nicely done zimmerett...

Spades
Joined: February 08, 2003
KitMaker: 776 posts
Armorama: 477 posts
Posted: Friday, August 03, 2012 - 10:22 AM UTC
Enjoying this build.
vanhall
Joined: January 23, 2007
KitMaker: 406 posts
Armorama: 391 posts
Posted: Friday, August 03, 2012 - 11:07 PM UTC
Thanks for the positive comments fellas, very much appreciated.
..and thanks to those who've popped in for a look.
Looking at the very few photos there are of these 'Totenkopf' late Tigers, I can't spot any specific type of camo pattern.
In fact the patches seem to look random and in some areas a little 'blotchy'.
The only conclusion I could make was that doesn't appear to be very much 'Dunkelgelb' left showing afterwards.
Anyway, the camo is on.
Only a couple of pics because the daylight here is atrocious. Plus the camo coat is still a bit shiny and in need of a good dull coat before I do anymore.
But this should give you an idea of how it will look eventually:


PS: For those interested, all 3 colours are from Lifecolor; 'Dunkelgelb', 'Olivgrün' and 'Schokolade Braun'.
Cheers,
Grant.
..and thanks to those who've popped in for a look.
Looking at the very few photos there are of these 'Totenkopf' late Tigers, I can't spot any specific type of camo pattern.
In fact the patches seem to look random and in some areas a little 'blotchy'.
The only conclusion I could make was that doesn't appear to be very much 'Dunkelgelb' left showing afterwards.
Anyway, the camo is on.
Only a couple of pics because the daylight here is atrocious. Plus the camo coat is still a bit shiny and in need of a good dull coat before I do anymore.
But this should give you an idea of how it will look eventually:
PS: For those interested, all 3 colours are from Lifecolor; 'Dunkelgelb', 'Olivgrün' and 'Schokolade Braun'.
Cheers,
Grant.

Big-John
Joined: August 12, 2010
KitMaker: 731 posts
Armorama: 711 posts

Posted: Saturday, August 04, 2012 - 12:17 AM UTC
Hi Grant, I'm loving this build, and that paint job looks AWESOME. Looking forward to the next update.
John
John

panamadan
Joined: July 20, 2004
KitMaker: 1,513 posts
Armorama: 1,449 posts
Posted: Saturday, August 04, 2012 - 01:59 AM UTC
Glad to see someone is building a Tiger here!
The camo looks great.
Dan
The camo looks great.
Dan

SDavies

Joined: January 09, 2010
KitMaker: 979 posts
Armorama: 959 posts

Posted: Saturday, August 04, 2012 - 08:04 AM UTC
Great camo and I agree nice to see a Tiger !
vanhall
Joined: January 23, 2007
KitMaker: 406 posts
Armorama: 391 posts
Posted: Tuesday, August 07, 2012 - 08:08 AM UTC
Hi, my thanks once again fellas for your positive comments.... and to those who've looked in.
A little progress in the painting process:
All the tools, cables, fitting etc. have been painted and everything's had a dark wash. Except for the zimmerit areas, which don't look quite right with a wash IMO.
It all looks a little dark and shiny right now, but that will come good later:


What's a Tiger without a bucket hanging off it's jack..


Some might notice that the barrel looks to be sagging in the pics?
This is only temporary, it just came loose during the wash (along with 3 of the side fenders ).
).

Decals and final touches next. But that'll have to wait because I'm off away on holiday tomorrow...
Best, Grant.
A little progress in the painting process:
All the tools, cables, fitting etc. have been painted and everything's had a dark wash. Except for the zimmerit areas, which don't look quite right with a wash IMO.
It all looks a little dark and shiny right now, but that will come good later:
What's a Tiger without a bucket hanging off it's jack..
Some might notice that the barrel looks to be sagging in the pics?
This is only temporary, it just came loose during the wash (along with 3 of the side fenders
).Decals and final touches next. But that'll have to wait because I'm off away on holiday tomorrow...
Best, Grant.
GewoonWouter
Joined: March 31, 2010
KitMaker: 227 posts
Armorama: 123 posts
Posted: Wednesday, August 08, 2012 - 01:32 AM UTC
Hiya Grant, paintwork is again ace mate, and the wash really sets it off nicely. Bummer about the issues with the barrel and trackguards, but no doubt you'll manage it. Lookin' forward to the update...
And enjoy your holiday!
Cheers
And enjoy your holiday!
Cheers
vanhall
Joined: January 23, 2007
KitMaker: 406 posts
Armorama: 391 posts
Posted: Tuesday, August 14, 2012 - 11:03 PM UTC
Hi,
a quick update; the decals are on. They are mix of makers.
The '9's and the '3's are from Kagero, (2 sheets needed, one from myself and one generously donated by Tom Nelson).
And the '4's are dry transfers from Archers white outline sheet.
The size and font were a match, only the Archers '4's were a much brighter white. Once fixed I toned these down with a very very thin dirty wash:


All the loose pieces have been reattached and it's all had a good flat coat.
Still quite a bit do, but here's how it's looking now:

Cheers, Grant.
a quick update; the decals are on. They are mix of makers.
The '9's and the '3's are from Kagero, (2 sheets needed, one from myself and one generously donated by Tom Nelson).
And the '4's are dry transfers from Archers white outline sheet.
The size and font were a match, only the Archers '4's were a much brighter white. Once fixed I toned these down with a very very thin dirty wash:
All the loose pieces have been reattached and it's all had a good flat coat.
Still quite a bit do, but here's how it's looking now:
Cheers, Grant.
SDavies
Joined: January 09, 2010
KitMaker: 979 posts
Armorama: 959 posts
Posted: Wednesday, August 15, 2012 - 12:11 AM UTC
Hi,
Good looking Tiger, is the "9" supposed to be a little higher than the rest of the numbers on the turret stowage box?
Maybe you could lift and reset the decal?
S
Good looking Tiger, is the "9" supposed to be a little higher than the rest of the numbers on the turret stowage box?
Maybe you could lift and reset the decal?
S

SHAKY962

Joined: May 21, 2012
KitMaker: 765 posts
Armorama: 438 posts

Posted: Wednesday, August 15, 2012 - 04:40 AM UTC
Grant,
Excellent work!!!!!!!!!!!!!
Excellent work!!!!!!!!!!!!!
vanhall
Joined: January 23, 2007
KitMaker: 406 posts
Armorama: 391 posts
Posted: Thursday, September 06, 2012 - 08:00 AM UTC
Hi, thanks for the comments, always appreciated.
And my apologies for the late replies, but I don't really like to bump the thread unless I have some new pics to add
Hi Steven,
It wasn't exactly intentional to have the '9' higher than the other numbers.. But then, I didn't try my best to get them perfectly level either.
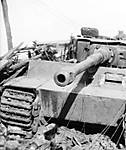
From the photos I've looked at I don't think these 'Totenkopf Tiger' turret numbers were painted (stenciled) with the greatest care in reality.
Not the best example, but the only one I have that is directly 'face on'.
This is the photo I assume 'Kagero' based there '913' decals on (and that they did an excellent job of) :

If you rotate the photo slightly to get the horizontals, they are really quite crooked:

I'll admit the bin numbers are a different story, should be easier to get level.
Unfortunately, the only two bin numbers I have pics of are '911' and '912'.
With '911' the '1's are at different heights. '912' looks pretty good, but not perfect:

----------------------
There's a little weathering done on the Tiger. I usually overdo this, but this time I think I've managed to hold myself back.
These pics are a couple weeks old now. At the moment I'm busy trying to get the track high points looking 'shiny metal like'.


Weathering casualty count at present:
4 wingnuts and 2 'modified' C-clamps, all M.I.A...

Grant.
And my apologies for the late replies, but I don't really like to bump the thread unless I have some new pics to add
Quoted Text
Hi,
Good looking Tiger, is the "9" supposed to be a little higher than the rest of the numbers on the turret stowage box?
Maybe you could lift and reset the decal?
S
Hi Steven,
It wasn't exactly intentional to have the '9' higher than the other numbers.. But then, I didn't try my best to get them perfectly level either.
From the photos I've looked at I don't think these 'Totenkopf Tiger' turret numbers were painted (stenciled) with the greatest care in reality.
Not the best example, but the only one I have that is directly 'face on'.
This is the photo I assume 'Kagero' based there '913' decals on (and that they did an excellent job of) :
If you rotate the photo slightly to get the horizontals, they are really quite crooked:
I'll admit the bin numbers are a different story, should be easier to get level.
Unfortunately, the only two bin numbers I have pics of are '911' and '912'.
With '911' the '1's are at different heights. '912' looks pretty good, but not perfect:
----------------------
There's a little weathering done on the Tiger. I usually overdo this, but this time I think I've managed to hold myself back.
These pics are a couple weeks old now. At the moment I'm busy trying to get the track high points looking 'shiny metal like'.
Weathering casualty count at present:
4 wingnuts and 2 'modified' C-clamps, all M.I.A...
Grant.
vanhall
Joined: January 23, 2007
KitMaker: 406 posts
Armorama: 391 posts
Posted: Saturday, September 22, 2012 - 01:58 AM UTC
I said:
"At the moment I'm busy trying to get the track high points looking 'shiny metal like'."
I finally got the tracks looking something like I wanted.
I had tried a couple of things first, but eventually went for Agama metal paste 'Steel', which can be polished with a soft brush or cloth once dry.
Hope you can see the difference from the photos in the last post:


Now I just have to replace the broken off wingnuts (you can see 2 missing on the rear hull C-clamp holder), and I can call this one done..
Then it's just the figures to finish
Grant.
"At the moment I'm busy trying to get the track high points looking 'shiny metal like'."
I finally got the tracks looking something like I wanted.
I had tried a couple of things first, but eventually went for Agama metal paste 'Steel', which can be polished with a soft brush or cloth once dry.
Hope you can see the difference from the photos in the last post:
Now I just have to replace the broken off wingnuts (you can see 2 missing on the rear hull C-clamp holder), and I can call this one done..
Then it's just the figures to finish
Grant.

scratchmod
Joined: November 07, 2008
KitMaker: 796 posts
Armorama: 763 posts

Posted: Sunday, October 07, 2012 - 02:06 PM UTC
This is looking sweet. I'm working on a Kursk Tiger at the moment .

Vonflak
Joined: December 06, 2010
KitMaker: 59 posts
Armorama: 53 posts

Posted: Sunday, October 07, 2012 - 02:48 PM UTC
Great Tiger Grant! Can't wait to see the figures.


Byrden

Joined: July 12, 2005
KitMaker: 2,233 posts
Armorama: 2,221 posts
Posted: Sunday, October 07, 2012 - 08:14 PM UTC
That's VERY nice.....
I'm not a fan of unrealistic chipping, but if the crew store the tow cable tied to the hooks like that, surely they will chip the Zimmerit at the top edge.
David
I'm not a fan of unrealistic chipping, but if the crew store the tow cable tied to the hooks like that, surely they will chip the Zimmerit at the top edge.
David
barkmann424

Joined: November 23, 2008
KitMaker: 357 posts
Armorama: 353 posts

Posted: Sunday, October 14, 2012 - 08:45 AM UTC
Looking good and grimy Grant! How's things in Tiger land? Hopefully be back in the promised 1/35 scale world myself soon!
Cheers Phil!
Cheers Phil!
vanhall
Joined: January 23, 2007
KitMaker: 406 posts
Armorama: 391 posts
Posted: Sunday, October 28, 2012 - 02:21 AM UTC
Hi,
thanks for the comments everyone, all appreciated and noted.
I´ve eventually made a start on the figures. They´re far from finished but the main colours are on:


I´m not so charmed from the figure in the loaders hatch. I painted 2 heads for this figure and they both don´t look right.
I might dump this one and put the figure sitting RO hatch in the loaders hatch?
I mentioned above the difficulty of getting the Driver figure in and out of position.
Well, this time I damaged his cap peak getting him in.
And typically, I had just finished painting his cap camo

I might be able to salvage it.
"Looking good and grimy Grant! How's things in Tiger land? Hopefully be back in the promised 1/35 scale world myself soon!
Cheers Phil! "
Hi Phil, long time no zim
Everythings good my side thanks, usually story though, no time & too many builds.
Hope everything and everyone is fine by you.
Look forward to your styrene return.
Best, Grant.
thanks for the comments everyone, all appreciated and noted.
I´ve eventually made a start on the figures. They´re far from finished but the main colours are on:
I´m not so charmed from the figure in the loaders hatch. I painted 2 heads for this figure and they both don´t look right.
I might dump this one and put the figure sitting RO hatch in the loaders hatch?
I mentioned above the difficulty of getting the Driver figure in and out of position.
Well, this time I damaged his cap peak getting him in.
And typically, I had just finished painting his cap camo
I might be able to salvage it.
"Looking good and grimy Grant! How's things in Tiger land? Hopefully be back in the promised 1/35 scale world myself soon!
Cheers Phil! "
Hi Phil, long time no zim
Everythings good my side thanks, usually story though, no time & too many builds.
Hope everything and everyone is fine by you.
Look forward to your styrene return.
Best, Grant.
SDavies
Joined: January 09, 2010
KitMaker: 979 posts
Armorama: 959 posts
Posted: Sunday, October 28, 2012 - 08:09 PM UTC
That is a great looking tiger !
I really like the skill that you have shown throughout this build
S
I really like the skill that you have shown throughout this build
S
 |

WEB HOSTING BY


Copyright ©2021 Armorama and Kitmaker Network, a subsidiary of Silver Star Enterprises
All Rights Reserved. Please read our Conditions of Use and Privacy Policy.
All Rights Reserved. Please read our Conditions of Use and Privacy Policy.