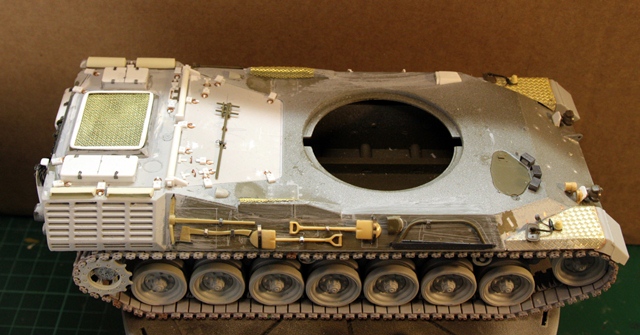
A tale of two Leopards part 1
In this build log I’ll make two Leopard 1s, a pre-production Series-0 and an A5, batch 5, version. Together they mark a span of almost half a century for this iconic cold war tank. Both models will be based on the Italeri (/Revell) Leopard 1 kits. The Series-0 will be based on Italeri 374 leopard 1A2 and the A5 version on Italeri 6481 Leopard 1A5. In general I find the Italeri/Revell kits vastly superior to the Tamiya versions; however, in this case I really don’t have an option, as I haven’t seen Tamiya’s kit of the A2 (which actually is an A1) for years.
The Italeri versions are not flawless either, however, the most noticeable of which is the shape of the turret. Shackleton mentions three alternatives in the first volume of his Leopard 1 trilogy, a replacement turret from Peddinghaus, the turret from Nichimo’s kit and one from Maple Leaf Models. All these though seem long out of production and therefore no longer an option. I’ll therefor have to live with this - but more on this when I come around to ‘em.
Assembly of the hull and running gear
A5
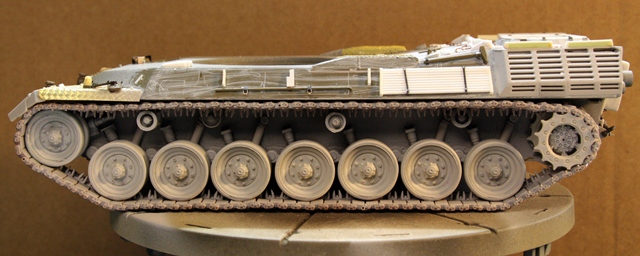
This is pretty much assembly as pr. instructions. I think it’s remarkable how well this 30 odd years old kit fit together. It truly has stood time up well. Only at very few places were filler needed. Minor things have been removed as they are to be replaced by etch later. As a batch 5 vehicle it needs the horizontal exhaust grilles.
Series-0
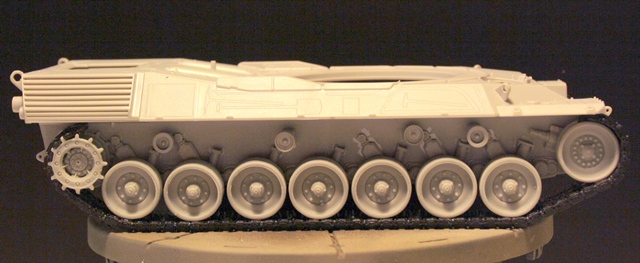
I’ve removed the engine covers at the rear of the hull as new ones have to be scratched. The splash ring around the turret on the hull is removed too, as this is something that was added to later productions runs (batch 3 and on). The plugs for lifting eyes at the rear and the front have been filled as these didn’t appear on the Series-0 (not until batch 2 and on). A lot of the markings for the tools etc. have been filled and sanded down. The undercarriage is very similar to the production apart from the shock absorbers which are unarmored on the Series-0. The biggest issue at this stage is the exhaust grills. They have a very different pattern than any of the two production models. I’ve enclosed a (poorly) picture that shows how I converted the early pattern grill to a pre-production one. In Section A you cut out the marked area, cut the bottom rove off and then replace it again. The B section has to be taken from another kit and replace the marked one.
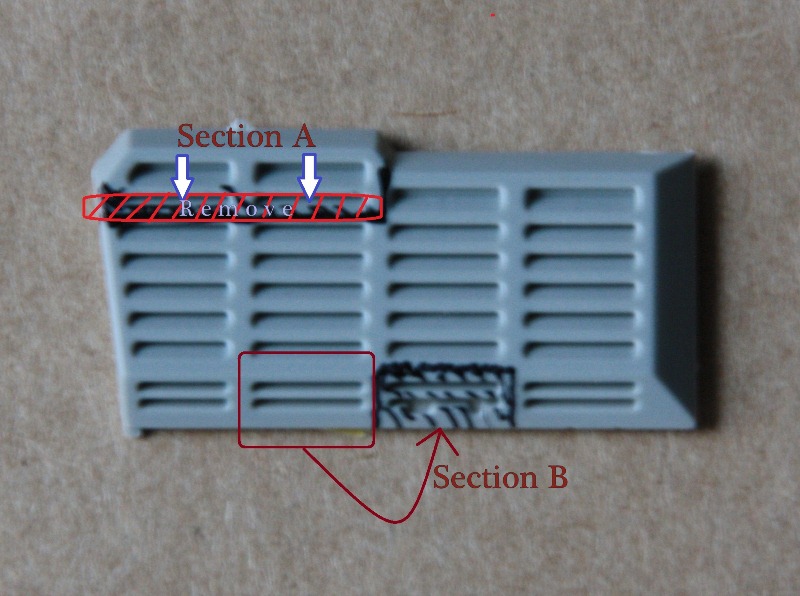
This pretty much cover the first step - next will be the tracks and wheels. I like to take this opportunity to say that any kind of comments, information, remarks and so one is very welcome. I am NOT a tanker, and though I have seen leopards “in the wild” and read about ‘em, I’m in no way an expert on ‘em. So Gents! Please participate in this build lock.
To follow this up I’d like to ask for some help regarding the finish (although it does seem l o n g away by now). For the Series-0, I need good color reference; a color photo would be nice but less can do (like, what do modelers of German AFV’s from this period paint their models in?). For the A5 I would appreciate photos of a batch 5 (or 4 - can’t really tell the difference anyhow) tank with clear details as to licenses plate no, vehicle no and other markings; so as to have a specific tank to go for.
Armor/AFV
For discussions on tanks, artillery, jeeps, etc.
Hosted by Darren Baker, Mario Matijasic
A tale of two Leopards
keo
Nordjylland, Denmark
Joined: January 30, 2006
KitMaker: 613 posts
Armorama: 508 posts
Joined: January 30, 2006
KitMaker: 613 posts
Armorama: 508 posts
Posted: Wednesday, September 28, 2011 - 08:01 AM UTC
ivanhoe6
Wisconsin, United States
Joined: April 05, 2007
KitMaker: 2,023 posts
Armorama: 1,234 posts
Joined: April 05, 2007
KitMaker: 2,023 posts
Armorama: 1,234 posts
Posted: Wednesday, September 28, 2011 - 08:38 AM UTC
A great, ambitious effort you have started here. Sorry I can not give you any technical help just encouragement. Thank you for sharing with us !
Middle_Franconian
Bayern, Germany
Joined: January 02, 2011
KitMaker: 279 posts
Armorama: 30 posts
Joined: January 02, 2011
KitMaker: 279 posts
Armorama: 30 posts
Posted: Wednesday, September 28, 2011 - 10:09 AM UTC
Hi!
Nice project! I always liked the Leo 1 due to its no-frill design. That´s mainly due to the german design approach to create a tank with the focus on movement ability and firepoer and less on armour.
I am looking forward to seeing your Leos finished!
Servus ,
Sebastian
Nice project! I always liked the Leo 1 due to its no-frill design. That´s mainly due to the german design approach to create a tank with the focus on movement ability and firepoer and less on armour.
I am looking forward to seeing your Leos finished!
Servus ,
Sebastian
GaryKato
California, United States
Joined: December 06, 2004
KitMaker: 3,694 posts
Armorama: 2,693 posts
Joined: December 06, 2004
KitMaker: 3,694 posts
Armorama: 2,693 posts
Posted: Wednesday, September 28, 2011 - 01:07 PM UTC
Tamiya never made a Leopard 1A2. They made a Leopard 1 and a Leopard 1A4. If you saw a Leopard 1A2 kit in a Tamiya box, it was probably the same kit you are building now. In Japan, Italeri kits were packaged by Tamiya.
keo
Nordjylland, Denmark
Joined: January 30, 2006
KitMaker: 613 posts
Armorama: 508 posts
Joined: January 30, 2006
KitMaker: 613 posts
Armorama: 508 posts
Posted: Sunday, October 02, 2011 - 09:55 AM UTC
A tale of two Leopards – part 2
The road wheels and the tracks
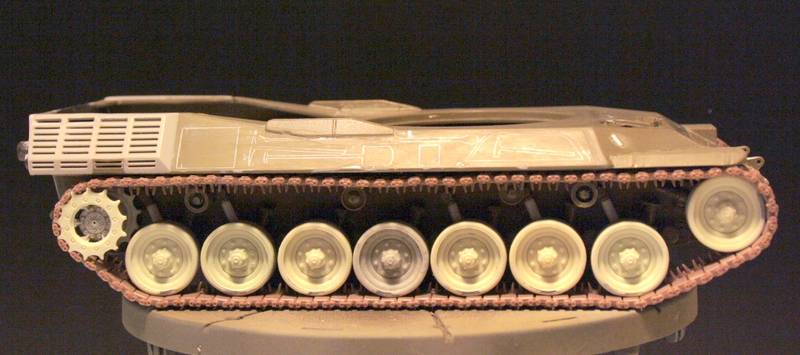
By the preproduction runs (the series-0) the Leopard had more or less gained its present looks. One area though where it still underwent huge development was this area. The tracks were altered, the road wheels were adjusted and even the idler wheel changed –although only slightly.
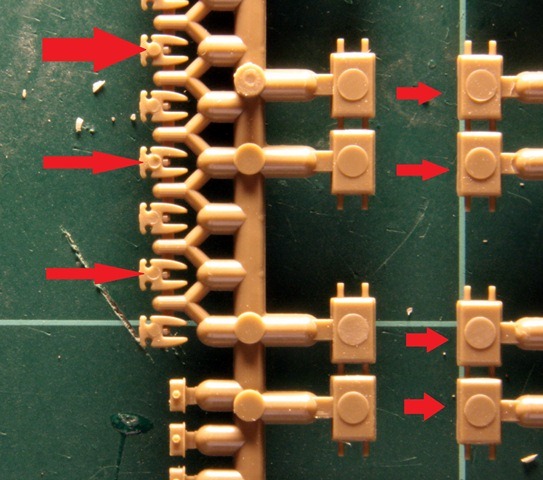
I’d like to take the opportunity to say something about single piece tracks. I HATE them – and I love ‘em! I absolutely hate making them; however, I love what they do for the model. For my two Leopards I have used AFV Club’s track set for the M26 etc, and HKCW’s track set for the Leopard 1 variants. The first is a compromise – they are NOT the right ones, but the will play the part.
As can be told from these pictures the quality of the two sets is huge. HKCW’s is free of any ejector pins mark, whereas AFV Club’s have very profound ones. This means that the assembly time is hugely different. I’ll estimate I spend five or six times more on those of AFV Club than on the ones from HKCW.
Series-0
The rims of the road wheel are different on this batch. I generally use the road wheels from Perfect Scale Modellbau. I therefore converted one of the outer wheels with a ring made of plastic card. This was then casted in resin from a homemade mould. To this purpose I always use Sylmasta product. The rubber, and indeed the resin, is cheap and of very good quality. The sprocket needed to be altered too. The AFV Club tracks are about a millimeter wider than those in the kit – moreover, the teeth don’t fit. To deal with the teeth I cut out the outer ½ a millimeter of the sprocket from the Tamiya’s Pershing and fitted it to the Leopard sprocket. This was also copied in a mould-resin casting process. The extra millimeter in width was obtained with simply adding an extra disk between the two halves.
As mentioned before, the assembly of the tracks took like forever. I have a bad habit of putting the tracks the wrong way around, I was therefore pleased to see that I did managed to put these the right way. That is until I noticed I had put the connectors upside down.
Some may say that the idler wheel is wrong as it has only eight bolts; however, for a Series-0 this IS correct.
Leopard 1A5
Compared to the Series-0 this was a walk in the park. The road wheels, the sprockets and idler wheels were replaced with the kit from Perfect Scale Modellbau. I cannot recommend this enough; high quality casted, easy to make and a perfect fit to the kit. Like stealing candy from a kid – although not as funny. The same could be said of HKCW’s tracks which can be bought with the wheels as one set from Perfect scale Modellbau. They are in fact so good that I almost like making ‘em – not!. As some part of the track is hidden behind track guards I never make complete tracks for my Leopards. I have noticed that building them partial will provide spare tracks for other Leopards. For the price of two sets I can actually build three!
Here are pictures of my Leopards
Well this pretty much is it for this time. Part 3 will be the completion of the hulls. However, as this is an extensive build it will be divided into two sub parts; the first, Part 3a, will be the A5 version, and the second part, Part 3B, will be the Series-0
sauceman
Ontario, Canada
Joined: September 28, 2006
KitMaker: 2,672 posts
Armorama: 2,475 posts
Joined: September 28, 2006
KitMaker: 2,672 posts
Armorama: 2,475 posts
Posted: Monday, October 03, 2011 - 02:35 AM UTC
Nice work so far. Those AFV tracks are horrible, I would rather use the nasty rubber bands that come in the kit.
I have built a canadian C1 and a C2 MEXAS and have used the HKCW tracks on both. They are very nice with no cleanup other than the attachment points, man those end connectors are small LOL!
cheers
I have built a canadian C1 and a C2 MEXAS and have used the HKCW tracks on both. They are very nice with no cleanup other than the attachment points, man those end connectors are small LOL!
cheers
afv_rob
England - East Anglia, United Kingdom
Joined: October 09, 2005
KitMaker: 2,556 posts
Armorama: 2,199 posts
Joined: October 09, 2005
KitMaker: 2,556 posts
Armorama: 2,199 posts
Posted: Monday, October 03, 2011 - 05:48 AM UTC
Nice work so far! Its a real shame no one has come out with a more modern kit of the Leopard 1 series.
As for the tracks, I cant believe how anyone can say those HCKW tracks are ''nice''. Ok they are accurate and look good when complete, but the construction sucks massively. I've stalled my CDN leo 1 mexas build cos of these buggers, the sprue attachment points are a pig to cut and clean and I ended up snapping about half the links in the process.
keo
Nordjylland, Denmark
Joined: January 30, 2006
KitMaker: 613 posts
Armorama: 508 posts
Joined: January 30, 2006
KitMaker: 613 posts
Armorama: 508 posts
Posted: Monday, October 03, 2011 - 06:11 AM UTC
Quoted Text
As for the tracks, I cant believe how anyone can say those HCKW tracks are ''nice''. Ok they are accurate and look good when complete, but the construction sucks massively. I've stalled my CDN leo 1 mexas build cos of these buggers, the sprue attachment points are a pig to cut and clean and I ended up snapping about half the links in the process.
Exactamente my point. There is a small trick to this though. If you cut the guide horns as shown here they fit much easily but do not influence the movability of the tracks.
recceboy
Alberta, Canada
Joined: July 20, 2006
KitMaker: 706 posts
Armorama: 665 posts
Joined: July 20, 2006
KitMaker: 706 posts
Armorama: 665 posts
Posted: Monday, October 03, 2011 - 03:49 PM UTC
Ken
Like the build, keep us posted .
Anthony
Like the build, keep us posted .
Anthony
keo
Nordjylland, Denmark
Joined: January 30, 2006
KitMaker: 613 posts
Armorama: 508 posts
Joined: January 30, 2006
KitMaker: 613 posts
Armorama: 508 posts
Posted: Sunday, October 09, 2011 - 05:37 AM UTC
A tale of two Leopards, part 3a
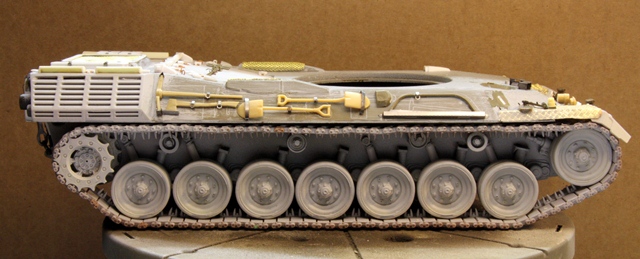
Another week has past, and what a busy one. Though nothing has been added or scratch it has still been a bigger task than I expected it to be. After having finished the tracks and wheels, I gave it a rough paint. I started by applying a black undercoat and then a NATO green overspray (all Tamiya colors). When this had dried I gave it a mixture of German fieldgray gray and glaze medium (Vallejo colors) to add some kind of dept.
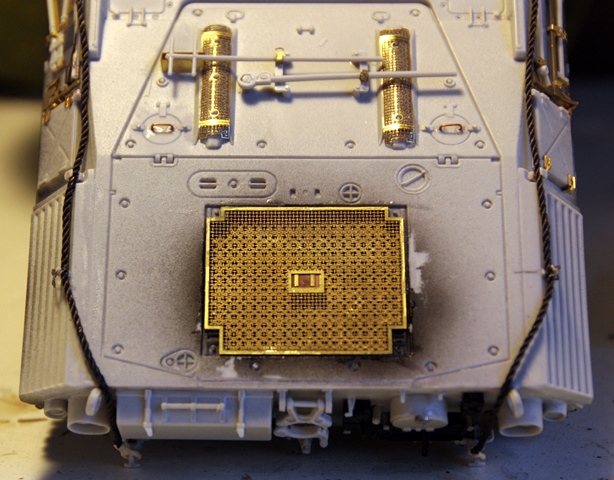
And then it was time for the work with the etch. Though Eduard has a set specifically for this model, no.36159, they have in fact a better option. Set no35753 is intended to upgrade Tamiya’s Leopard 1A4, however, it has much more parts than that for Italeri’s Leopard 1A5. AND, if you buy this at Hannants, as I did, you even get it 3-4 pound cheaper???? Set no 753 has two frets whereas no 159 has one! Having bought both I opted to mix the two.
Most of these parts are for the tools etc – and what an improvement they make. It’s so much the time spent worth, and the fit is excellent. For the grills I made an mix of a leftover from Perfect Scale modelbau’s grill set and the one from no 159. The grill is really grill-s as there are two of ‘em. One with holes at the bottom, and one with a net on top of this.
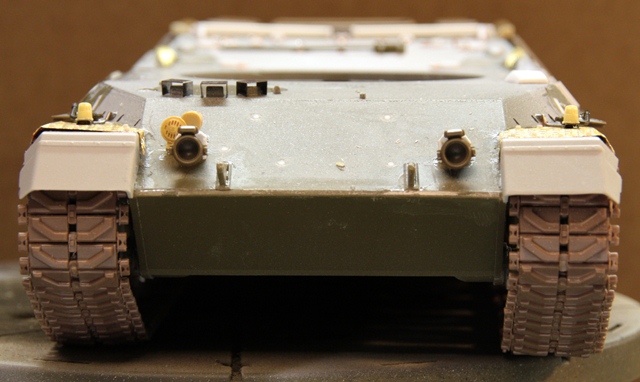
At the front I replaced the headlights with two from a Tamiya Leopard 2 kit. The attachment of the wire is always difficult I think. I usually end up with two of different sizes and both of ‘em too long. This time, however I’m pleased with the result. I had to change the wire loops as the kit offerings sucks. I also had two add some attachments points which the kit missed.
There is not that much to write about. It takes a long time to do, and I hope you like it. During this build I try to keep up on info, and I have realized that this cannot end as an A5 of batch 5. Batch 5 only turned out A2’s and A3’s, which never were turned into A5's - at least not in Germany. If will therefor become a Leopard 1A5 of batch 4.
keo
Nordjylland, Denmark
Joined: January 30, 2006
KitMaker: 613 posts
Armorama: 508 posts
Joined: January 30, 2006
KitMaker: 613 posts
Armorama: 508 posts
Posted: Wednesday, October 19, 2011 - 10:59 AM UTC
A Tale of Two Leopards part 3.b
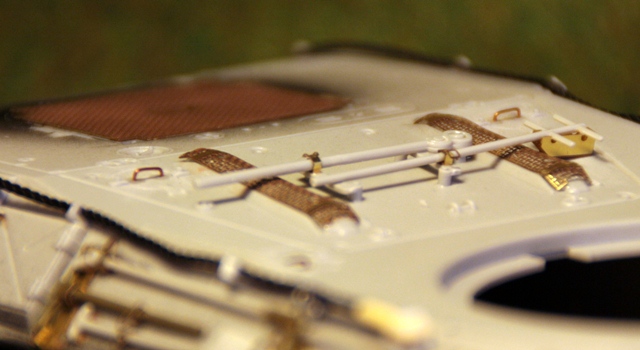
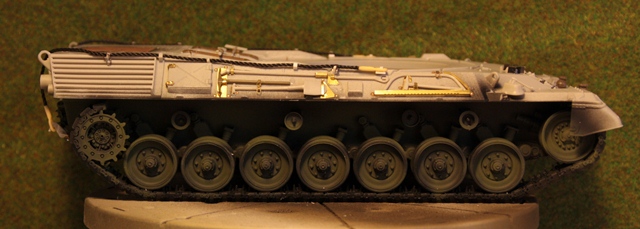
Now I have finally finished the hull of the Series 0. And it has been a hard job I can tell you – but fun of cause. Although with the Series 0 the Leopard had found a shape it was to stick with – there are huge differences between production runs and the pre-production series. One of the biggest problems with building a Series 0 is the lack of good info on it. Much of the decisions had to be based on qualified guesswork (or at least kind of …….).
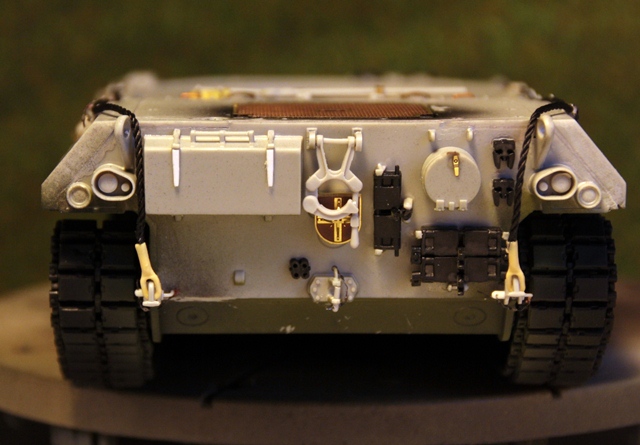
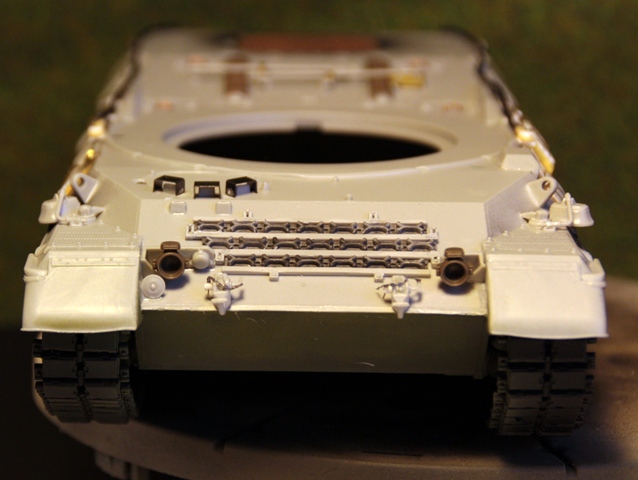
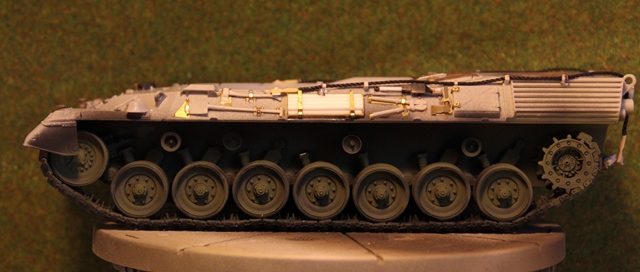
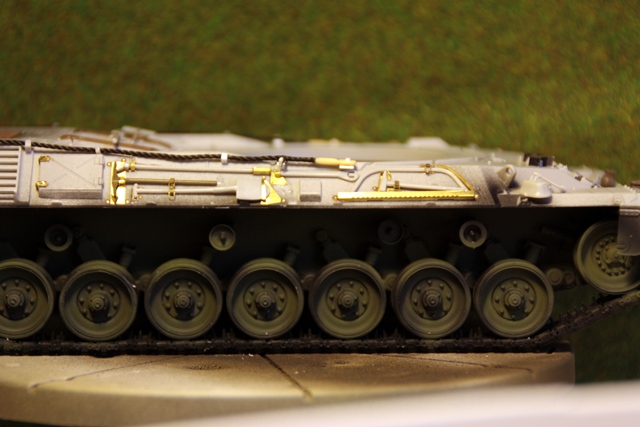
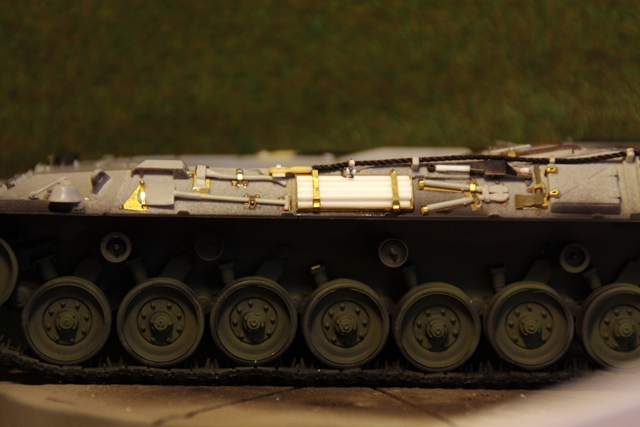
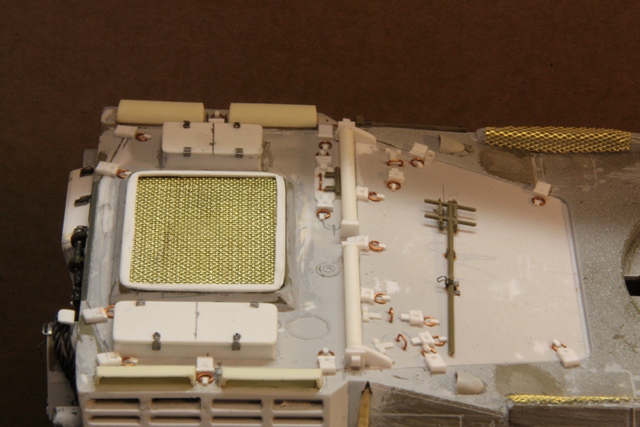
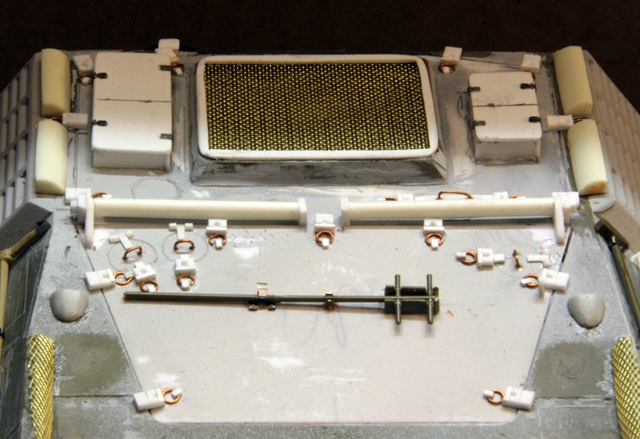
The main area of difference is the engine deck which has little similarity with production vehicles. Consequently this area had to be scratch build. I’ve seen another modeler’s attempt on this model, and he opted to keep the back part of the engine covers; however, I chose to scratch build both of ‘em. The engine covers had a pretty unique looking mechanism that took me some time to figure out how to replicate. The evaluated fan is the one from the kit shaped and raised a little.
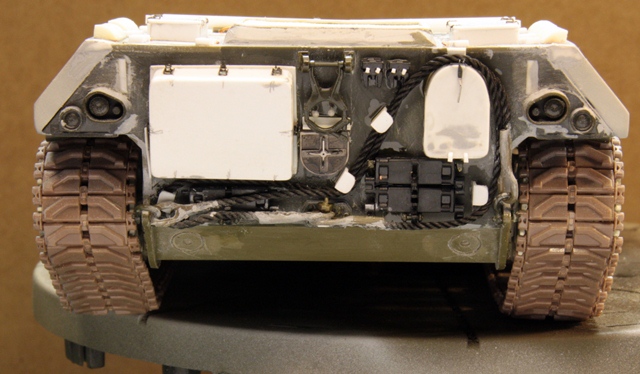
The back is also very different to production vehicles though somewhat easier to do. The toolbox and the telephone box are bigger than usual, and the wire runs exclusively at the back, but other than that is pretty much the same. Along the sides are stoved tools as on production vehicle although at different places. On the left side at the front is an empty bracket; it’s for spare torsion bars, however, they were rarely stoved in reality. The front pretty much looks like the production vehicle. I have replaced the head lights with some from Tamiya’s Leopard 2 kit (as with the A5 version). The front fenders are covered with tread plates I made from ABER etch.
Next part will cover the two turrets, though I have to ask for patience with this. Next weekend is C4 in Malmø So I will not have much time to make ‘em.
sauceman
Ontario, Canada
Joined: September 28, 2006
KitMaker: 2,672 posts
Armorama: 2,475 posts
Joined: September 28, 2006
KitMaker: 2,672 posts
Armorama: 2,475 posts
Posted: Thursday, October 20, 2011 - 02:58 AM UTC
Great scratch building, thanks for the update!
cheers
cheers
zapper
Skåne, Sweden
Joined: October 18, 2005
KitMaker: 745 posts
Armorama: 734 posts
Joined: October 18, 2005
KitMaker: 745 posts
Armorama: 734 posts
Posted: Thursday, October 20, 2011 - 03:35 AM UTC
Quoted Text
Next part will cover the two turrets, though I have to ask for patience with this. Next weekend is C4 in Malmø So I will not have much time to make ‘em.
I was hoping to see the two Leo's on C4 but I guess I have to wait untill 2012 Great to see the work you've put into these builds and by blogging them you make the life easier for those of us that have a Leo 1 on the to-do-list. I'll stay tuned for the rest.
I hope that you will find C4 OPEN 2011 worth the trip.
Cheers,
/E
keo
Nordjylland, Denmark
Joined: January 30, 2006
KitMaker: 613 posts
Armorama: 508 posts
Joined: January 30, 2006
KitMaker: 613 posts
Armorama: 508 posts
Posted: Wednesday, February 20, 2013 - 09:41 AM UTC
A Tale of Two Leopards, part 4
After a 15 month break I think it’s about time to finish this! This part will deal with the turrets. The differences between the two are huge – just as with the hulls.
The A5 version
The base is Italerie’s turret. I know that it is not accurate; however, it’s what I have to work with. I have added a Perfect Scale Modelbau barrel, E.T Models smoke Launchers and Eduard EPs. One major issue with this is the “spacers” for the add-on armor. I opted to make them as I found they would be visible under the armor plates, which they turned out hardly to be. The build is more or less as pr instructions – no major issues here
The Series O version
This is the one that really kept down progress. It may sound odd, but I have put more work into that turret than the hull. Almost everything had to be scratch build altogether. The shape of the turret is completely different to any production version, and I kept adding, removing and shaping it over and over again. But also the mantlet and the “fittings” are different. I have now decided however, that wrong or right, this is how MY version is going to look like. The barrel is a AFV Club Centurion barrel and the smoke launchers are E.T models too
So it’s on to part 5, the painting; which I promise will not be another 14 month.
LeoCmdr
Alberta, Canada
Joined: January 19, 2005
KitMaker: 4,085 posts
Armorama: 3,917 posts
Joined: January 19, 2005
KitMaker: 4,085 posts
Armorama: 3,917 posts
Posted: Wednesday, February 20, 2013 - 03:17 PM UTC
Really great work and the updates were worth the wait!
ptruhe
Texas, United States
Joined: March 05, 2003
KitMaker: 2,092 posts
Armorama: 1,607 posts
Joined: March 05, 2003
KitMaker: 2,092 posts
Armorama: 1,607 posts
Posted: Wednesday, February 20, 2013 - 04:55 PM UTC
Wow. Fantastic work. Especially on the pre-prod Leo. Are those Perfect Scale 1A2 range finder heads?
Paul
Paul
keo
Nordjylland, Denmark
Joined: January 30, 2006
KitMaker: 613 posts
Armorama: 508 posts
Joined: January 30, 2006
KitMaker: 613 posts
Armorama: 508 posts
Posted: Wednesday, February 20, 2013 - 07:50 PM UTC
Quoted Text
Wow. Fantastic work. Especially on the pre-prod Leo. Are those Perfect Scale 1A2 range finder heads?
Paul
No they are scratched too.
Posted: Wednesday, February 20, 2013 - 09:49 PM UTC
Great Work Kenneth.
Always great to see my fave Leopard tanks!!.Im up to my elbows in Leopard models!!!.Ive got 2 Danish and 1 Norwegian one on the go!!!.Your work puts mine to shame.Im a bit heavy handed and clumsy a case of mr sausage fingers!!.Watching with great interest.
Regards from Richard
Always great to see my fave Leopard tanks!!.Im up to my elbows in Leopard models!!!.Ive got 2 Danish and 1 Norwegian one on the go!!!.Your work puts mine to shame.Im a bit heavy handed and clumsy a case of mr sausage fingers!!.Watching with great interest.
Regards from Richard
keo
Nordjylland, Denmark
Joined: January 30, 2006
KitMaker: 613 posts
Armorama: 508 posts
Joined: January 30, 2006
KitMaker: 613 posts
Armorama: 508 posts
Posted: Wednesday, February 20, 2013 - 10:15 PM UTC
Thanks Richard
If you need referenc on the Danish versions I'll be happy to help you. Have tons of it, and have acces to a A5DK1 version so Can always get photoes.
mshackleton
England - South East, United Kingdom
Joined: December 16, 2007
KitMaker: 559 posts
Armorama: 517 posts
Joined: December 16, 2007
KitMaker: 559 posts
Armorama: 517 posts
Posted: Thursday, February 21, 2013 - 11:34 PM UTC
Hi Kenneth
I'm very glad that you have come back from your break and that your two Leos are now progressing - and progressing very well indeed. Keep up the good work.
Like Richard, I'm up to my ears with Leopard projects, mine being a first production Leopard 1 batch 1, an Aussie ARVM and a Finnish Leo 2A4.
Cheers
Mike
Leopard 1 Trilogy author
chnoone
Armed Forces Europe, United States
Joined: January 01, 2009
KitMaker: 1,036 posts
Armorama: 1,033 posts
Joined: January 01, 2009
KitMaker: 1,036 posts
Armorama: 1,033 posts
Posted: Thursday, February 21, 2013 - 11:46 PM UTC
Very nice !!!
Great build !!!
Thinking of getting the lastest PSM early Leopard kit but making an initial Belgian one out of it ... still with the German tool layout.
Keep up the great work
Cheers
Christopher
Great build !!!
Thinking of getting the lastest PSM early Leopard kit but making an initial Belgian one out of it ... still with the German tool layout.
Keep up the great work
Cheers
Christopher
keo
Nordjylland, Denmark
Joined: January 30, 2006
KitMaker: 613 posts
Armorama: 508 posts
Joined: January 30, 2006
KitMaker: 613 posts
Armorama: 508 posts
Posted: Tuesday, April 16, 2013 - 12:16 AM UTC
A Tale of two leopards, part 5
Finally finished. And it feels so goooood. Side by side they represent the very first and the very last version of the Leopard 1 tank.
Leopard 1A5, batch four.
It is painted in the here tone camouflage scheme using Tamiya paint. I then used dots of oil paint in different colors to give an uneven tone. The tank was then sprayed with Tamiya deck tan, Tamiya flat earth, Vallejo Model Air Flat tan and sand and finally some floor polish. Then I used my Vallejo collection to add depth, highlights, details and ware and tare.
The figures are converted Tamiya tank commanders from the Chieftain kit. They, too, were painted with Vallejo colors. The insignia are from MAIM’s decals for Bundeswehr Dientsgradabzeichen,
Leopard, Batch 0
The procedure with the paint of this one was pretty much as with the A5 version. The base color was a mix of Tamiya paint; however, I am afraid that I do not have clue how I mixed it. I just kept on mixing till it looked right.
The figures for this tank coursed some problems. I had a very hard time finding out how they looked in the first place – so the result is guess work I am afraid. The figures are WW2 German figures heavily converted with Magic Sculp. Both heads are Hornet Heads. They are painted in Vallejo too
Though this has been an ambitious build I am not afraid of another challenge. I have already bought kits for Another tale of two Leopards; this time a Leopard1 Batch 1 and a leopard 1A2A2
afv_rob
England - East Anglia, United Kingdom
Joined: October 09, 2005
KitMaker: 2,556 posts
Armorama: 2,199 posts
Joined: October 09, 2005
KitMaker: 2,556 posts
Armorama: 2,199 posts
Posted: Tuesday, April 16, 2013 - 08:24 AM UTC
Really lovely work Kenneth, you pulled those two off a treat!
Your attention to detail in both the construction and finish really pays off, the restrained and realistic weathering is spot on as well. I'm quite jealous, i'd love to own a decent model of these two.
Posted: Tuesday, April 16, 2013 - 09:13 AM UTC
Great builds, Kenneth. They really look good. Very nice details.
Thanks for sharing
Thanks for sharing
keo
Nordjylland, Denmark
Joined: January 30, 2006
KitMaker: 613 posts
Armorama: 508 posts
Joined: January 30, 2006
KitMaker: 613 posts
Armorama: 508 posts
Posted: Tuesday, April 16, 2013 - 09:25 PM UTC
Thanks for your complements Rob and Jesper.