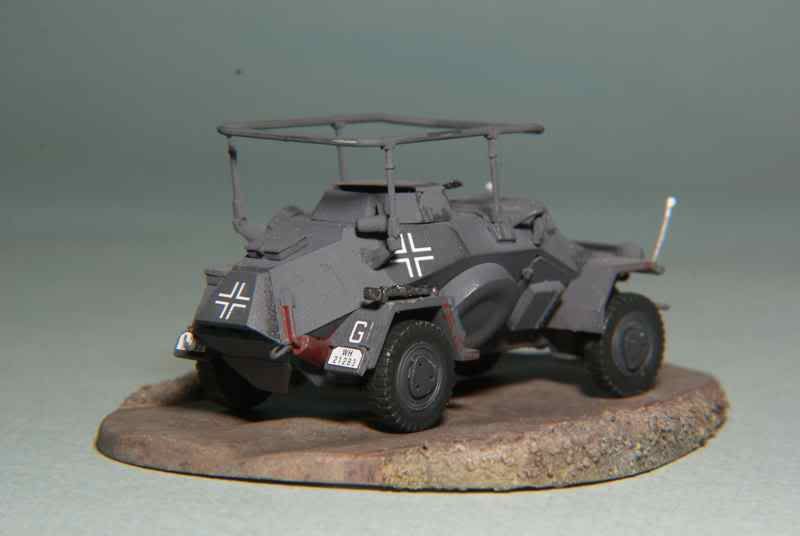
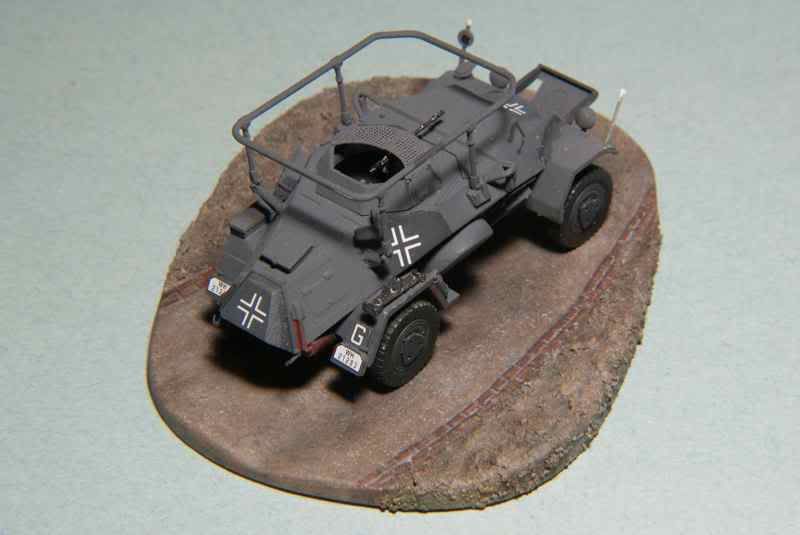
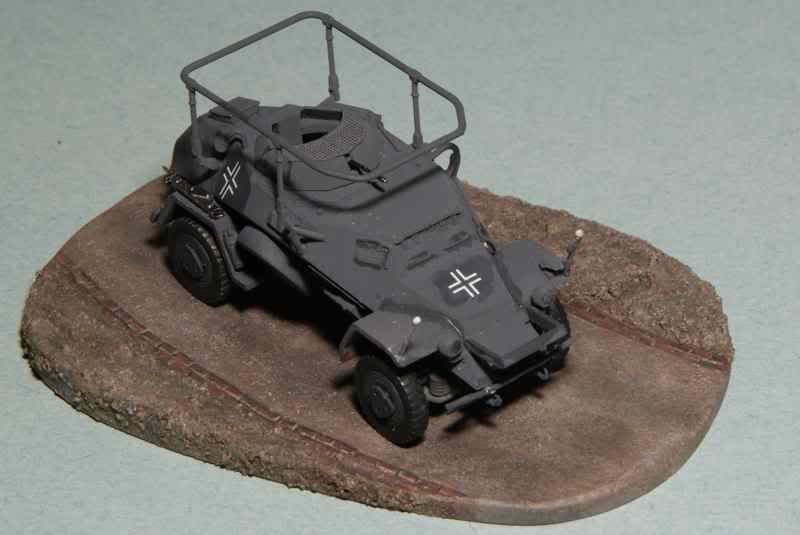
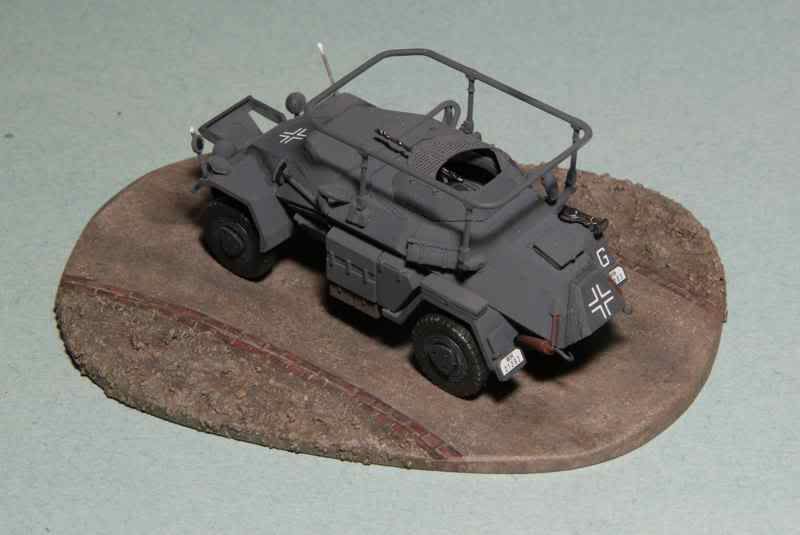
Jan Etal reviews Dragon's Sd.Kfz. 223 in a build review of one vehicle from a twin pack.
Link to Item
If you have comments or questions please post them here.
Thanks!
Armor/AFV
For discussions on tanks, artillery, jeeps, etc.
Hosted by Darren Baker, Mario Matijasic
REVIEW
DML Sd.Kfz. 223 twin packbill_c
Campaigns Administrator
New Jersey, United States
Joined: January 09, 2008
KitMaker: 10,553 posts
Armorama: 8,109 posts
Joined: January 09, 2008
KitMaker: 10,553 posts
Armorama: 8,109 posts
Posted: Monday, October 03, 2011 - 06:34 AM UTC
weathering_one
Ontario, Canada
Joined: April 04, 2009
KitMaker: 458 posts
Armorama: 456 posts
Joined: April 04, 2009
KitMaker: 458 posts
Armorama: 456 posts
Posted: Monday, October 03, 2011 - 10:02 AM UTC
Very good and detailed review that I wish was up two weeks ago. I picked up this kit last month hoping that it would be a breeze. At least now I have a reference and confirmation that there are problems with it. I stopped building the first of the two because of problems.
I see from the pictures that you had to really rework the turret interior. In looking at the instructions they really don't show where that interior is supposed to fit. I see that you tried to get everything to fit in and on that cross bar piece that you ended up modifying and lowering. Is that the best solution? Is there an alternative? Do you have any pictures of the actual interior of the real thing?
Thanks,
AJ
tread_geek
Ontario, Canada
Joined: March 23, 2008
KitMaker: 2,847 posts
Armorama: 2,667 posts
Joined: March 23, 2008
KitMaker: 2,847 posts
Armorama: 2,667 posts
Posted: Tuesday, October 04, 2011 - 08:25 AM UTC
Quoted Text
Very good and detailed review that I wish was up two weeks ago...
Thanks for the comments and the review was actually with the editors about a week ago. I'm sorry that you found out from experience that the kit wasn't as you presumed but, I was quite surprised also.
Quoted Text
I see from the pictures that you had to really rework the turret interior. In looking at the instructions they really don't show where that interior is supposed to fit. I see that you tried to get everything to fit in and on that cross bar piece that you ended up modifying and lowering. Is that the best solution?
One of the most difficult aspects of this review was finding information that pertained to this vehicle. Even information about the model itself was sketchy at best. I finally found the 222 version instructions on the Internet and from them realized too late that my radical surgery wasn't totally necessary. The top of part A34 (the seat frame) is meant to be attached to the "crossbar" piece that runs through the turret.
What I tried on the second turret is to cut the crossbar about 1.5 mm back from the two holes in it. Then I cut the piece that attaches to the turret back so that only the front portion with the two holes remains. I added the round seat (A37) to the frame but left off the "bucket seat" and will most likely remove its support arm.
Quoted Text
Do you have any pictures of the actual interior of the real thing?
A rather great resource that I found was at the AFV Interiors Web site. It has several pictures of an actual 223 interior and accompanying explanations.
If you have any further questions, please feel free to ask in this thread. I'll see if I have any pictures of the "revised" interior that I am trying with the second build.
Cheers,
Jan
tread_geek
Ontario, Canada
Joined: March 23, 2008
KitMaker: 2,847 posts
Armorama: 2,667 posts
Joined: March 23, 2008
KitMaker: 2,847 posts
Armorama: 2,667 posts
Posted: Saturday, October 15, 2011 - 08:48 AM UTC
Greetings to all,
Due to household projects, I've been slow to make any progress on this build. I've grabbed bits and pieces of time here and there and felt an update might be due. The largest progress has been on making a base for this little hot-rod. I chose to use a resin Astra Small Base in my first attempt for a base. I won't go into the details of the process as I am saving that for an upcoming review of the product. I'd also like to offer my thanks to my SWMBO (my resident artist) for help in the painting of the base.
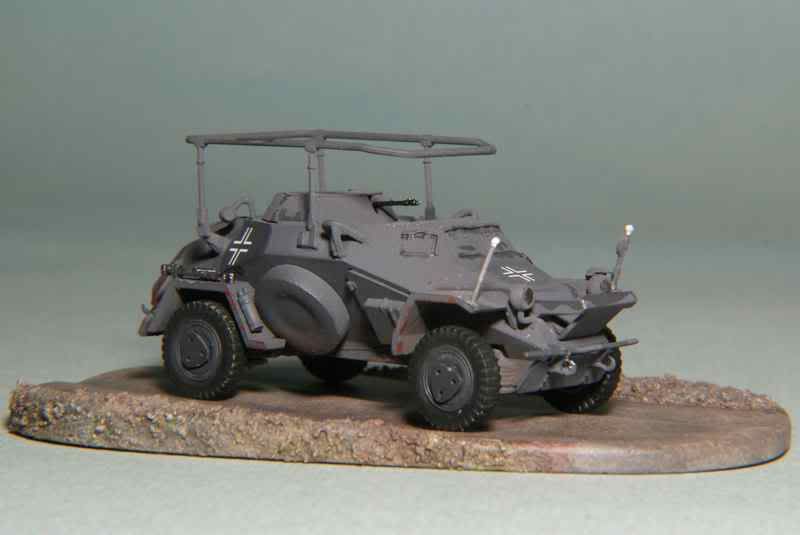
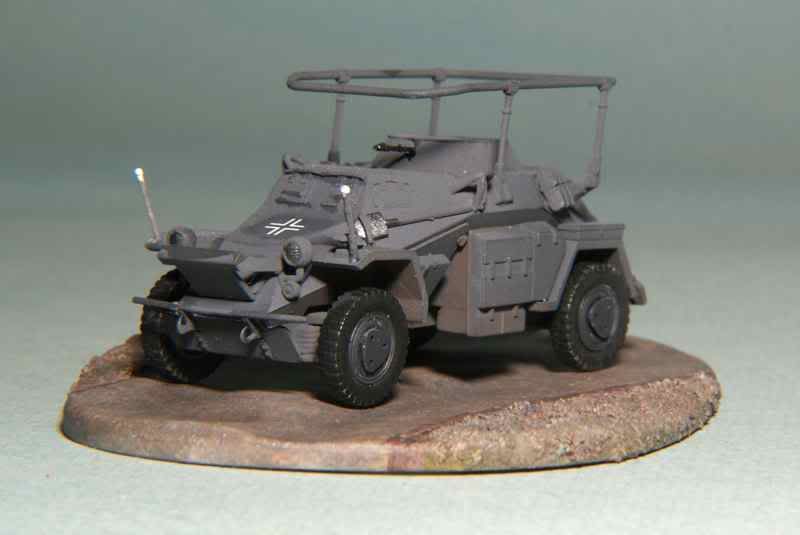
The 223 is not affixed to the base and still needs a fair amount of tweaking. The decals are applied and have received a top coat of future. With the gluing of the wheels, all parts except the front Jerry cans, are attached. I used a spare hull side Jerry can that is meant for the 222 version on this build as the 223 one does not have any kind of support rack. I have broken the right width marker more than a dozen times and finally got around to making a new one from scratch. Minor weathering has been started on the lower hull. Here's the pictures as it stands.
I have started the second model of the kit but I'll probably do a separate Blog of that assembly as I've made some modifications to it.
Cheers,
Jan
Due to household projects, I've been slow to make any progress on this build. I've grabbed bits and pieces of time here and there and felt an update might be due. The largest progress has been on making a base for this little hot-rod. I chose to use a resin Astra Small Base in my first attempt for a base. I won't go into the details of the process as I am saving that for an upcoming review of the product. I'd also like to offer my thanks to my SWMBO (my resident artist) for help in the painting of the base.
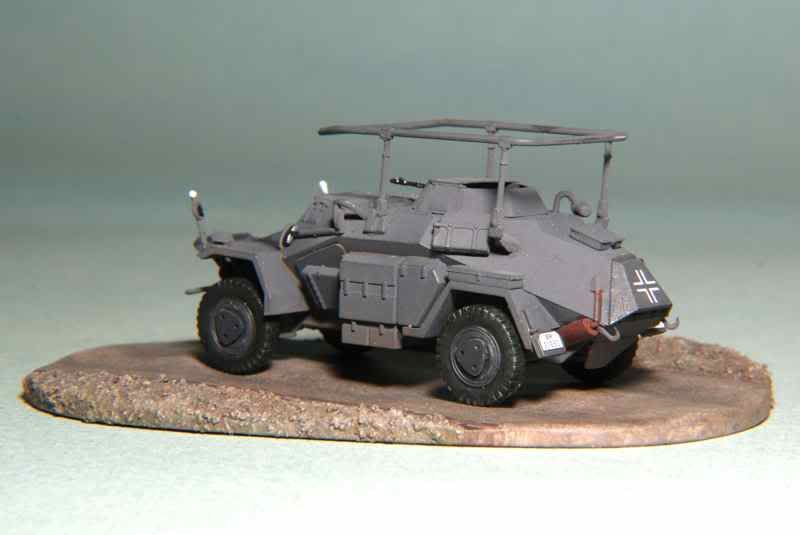
The 223 is not affixed to the base and still needs a fair amount of tweaking. The decals are applied and have received a top coat of future. With the gluing of the wheels, all parts except the front Jerry cans, are attached. I used a spare hull side Jerry can that is meant for the 222 version on this build as the 223 one does not have any kind of support rack. I have broken the right width marker more than a dozen times and finally got around to making a new one from scratch. Minor weathering has been started on the lower hull. Here's the pictures as it stands.
I have started the second model of the kit but I'll probably do a separate Blog of that assembly as I've made some modifications to it.
Cheers,
Jan
bill_c
Campaigns Administrator
New Jersey, United States
Joined: January 09, 2008
KitMaker: 10,553 posts
Armorama: 8,109 posts
Joined: January 09, 2008
KitMaker: 10,553 posts
Armorama: 8,109 posts
Posted: Tuesday, October 18, 2011 - 03:15 AM UTC
Nice work, Jan!
tread_geek
Ontario, Canada
Joined: March 23, 2008
KitMaker: 2,847 posts
Armorama: 2,667 posts
Joined: March 23, 2008
KitMaker: 2,847 posts
Armorama: 2,667 posts
Posted: Tuesday, October 18, 2011 - 05:34 AM UTC
Appreciate you taking the time to comment, Bill. As I mention earlier, I have started the second vehicle in the kit and perhaps because of the experience with the first, the second has come together a bit easier.
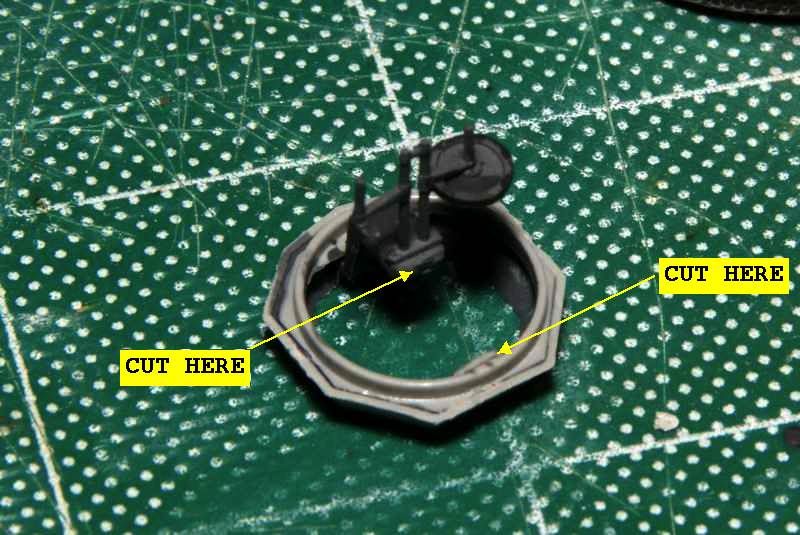
For AJ and anyone else building this kit, I used a simpler modification process to deal with the second turret interior. While not 100% historically accurate, it is closer to "the truth" than my first modification and also I believe simpler.
Part B17 has a crossbar to which the seat support (A34) is meant to attach. In the second vehicle, I cut this crossbar from just behind the seat frame mounting holes and at its rear most area. For the purposes of this option, I consider the turret front to be the end where the opening for the MG-34 is located. Here's a picture of the surgery.
The real 223 has a single seat/saddle mounted on a support and it is somewhat centrally located but offset to the left. I used the simple disc shaped seat for the gunners seat and left off the second chair-like seat.
Comments or questions are always welcome.
Cheers,
Jan
weathering_one
Ontario, Canada
Joined: April 04, 2009
KitMaker: 458 posts
Armorama: 456 posts
Joined: April 04, 2009
KitMaker: 458 posts
Armorama: 456 posts
Posted: Sunday, October 23, 2011 - 08:28 AM UTC
The 223 is really coming along great!!! For someone that always says that they can't do bases, that base looks very nice too. Can't wait to see this little beast finished.
I must also say thanks for the last picture of how to handle the turret interior and the link to pictures of the real thing. It's seems like a fairly simple solution and a lot simpler than either the first method or trying to create the real thing. Just wondering but do you think that the second seat fame should be removed from the main frame?
Thanks,
AJ
woltersk
Utah, United States
Joined: May 27, 2003
KitMaker: 1,026 posts
Armorama: 654 posts
Joined: May 27, 2003
KitMaker: 1,026 posts
Armorama: 654 posts
Posted: Saturday, November 05, 2011 - 04:31 PM UTC
Very nice Jan. It came out really well for being a bit problematic. Good looking base too!
Keith
Keith
tread_geek
Ontario, Canada
Joined: March 23, 2008
KitMaker: 2,847 posts
Armorama: 2,667 posts
Joined: March 23, 2008
KitMaker: 2,847 posts
Armorama: 2,667 posts
Posted: Sunday, November 06, 2011 - 03:58 AM UTC
Thanks for the comments people, they are always greatly appreciated.
@AJB - I haven't totally decided what to do with the frame for the second seat but it should probably be removed at the point where it attaches to the vertical piece. As for the seat that is supposed to go there, one could place it just forward of the turret in the interior as the radio operators seat.
@Woltersk - Thanks Keith, it truly was problematic and took a fair bit of thought and research to get it to the point that it is. I'm currently doing the second vehicle and it has come together rather easier than the first. I had the intention of doing a separate Blog of the second build but that will have to wait until other projects are completed. In the "you can't please all the people, all the time department," it might have been nice to have the option of having the frame antenna attached in the stowed position.
Cheers,
Jan
@AJB - I haven't totally decided what to do with the frame for the second seat but it should probably be removed at the point where it attaches to the vertical piece. As for the seat that is supposed to go there, one could place it just forward of the turret in the interior as the radio operators seat.
@Woltersk - Thanks Keith, it truly was problematic and took a fair bit of thought and research to get it to the point that it is. I'm currently doing the second vehicle and it has come together rather easier than the first. I had the intention of doing a separate Blog of the second build but that will have to wait until other projects are completed. In the "you can't please all the people, all the time department," it might have been nice to have the option of having the frame antenna attached in the stowed position.
Cheers,
Jan