_GOTOBOTTOM
Figures
Military figures of all shapes and sizes.
Legends Robot Controller
35th-scale
Visit this Community
Kildare, Ireland
Joined: November 21, 2007
KitMaker: 3,212 posts
Armorama: 2,807 posts
Posted: Thursday, December 29, 2011 - 09:39 AM UTC
Just for a quick change decided to start on this figure.

The parts are all very crisply moulded with very little flash. Comes with a ration carton to rest the laptop on and even a little PE set for the hinges
The M4 comes from the spares box but I think is also by Legend, but he needs a personal weapon ;-)


They come off the pour blocks relatively easy but I did manage to take some of the rim of the laptop screen off.


After cleanup, arms on, weapon put together and started repairs on the damaged part

35th-scale
Visit this Community
Kildare, Ireland
Joined: November 21, 2007
KitMaker: 3,212 posts
Armorama: 2,807 posts
Posted: Monday, January 02, 2012 - 03:19 PM UTC
So trying to replicate ACU I base coated with dark gray (Humbrol 27) then painted the light grey (147) onto a dimpled surface and dabbed with a dimpled kitchen towel before dabbing the figure. Works OK for me...I think!


Then did the boots, face, gloves etc as well as working on the control case


Regards
Sean
35th-scale
Visit this Community
Kildare, Ireland
Joined: November 21, 2007
KitMaker: 3,212 posts
Armorama: 2,807 posts
Posted: Thursday, January 05, 2012 - 05:08 AM UTC
Coming along...


Trying to visualise a wee vignette for him. Will have to include a wall for cover or something....anyway, i'll keep plugging away.

All comments (good or bad) welcomed

Cheers
Sean
barnsley5000
Visit this Community
England - North West, United Kingdom
Joined: September 27, 2011
KitMaker: 136 posts
Armorama: 74 posts
Posted: Thursday, January 05, 2012 - 06:02 AM UTC
not his looks great pal, like the idea of his personal weapon, but will u do me a huge favour? create a step by step guide to creating that acu pattern, either a video or a written one with some pics? i have relly struggled doing some other ways. but all in all a great project, bought this figure but used the cpu in the back of a strkyer with a miodified opperator so this guy will look nice with some signnet gear running coms to provide air cover mabye... but still... a great peice u have created here
35th-scale
Visit this Community
Kildare, Ireland
Joined: November 21, 2007
KitMaker: 3,212 posts
Armorama: 2,807 posts
Posted: Thursday, January 05, 2012 - 09:01 PM UTC
Thanks Dan.
On the next figure I'll take more pics as I go along, but hopefully I can explain the process.

1) Base coat the figure in dark grey. I used Humbrol matt enamel 27

2) next day, once he's dry, paint some light grey (Humbrol 147) onto a dimpled surface. I use the plastic boards from the bottom of a shopping bag! You'll see the painted patch in the center-left of this picture:

It should be painted on very lightly so it's not pooling in the dimples.

3) Using a square of kitchen towel or other textured material wrapped around your finger pick up some of the paint from the board and dab on to an area of the figure. Make sure not to slide the towel across either the paint or the figure. Dab it straight to the surface. The combination of dimples on the board and the towel gives you a completely random patern.

4) Repeat step 3 until the figure is covered. Always use a clean area of the towel each time. You'll also need to refresh the paint patch on the board, but don't let it get too heavy.

5) Once the figures use a pin to place some paint spots and dashes in the spots you couldn't reach so there are no large areas of plain dark grey

6) Optional: apply a light light-grey wash. I didn't do it on this guy but did to this other figure:

You can decide which you prefer.

7) Detail the remaining portions: face, boots, hands, etc. I did the velcro strips on the front & back with a 50/50 mix of dark grey and buff

Hope this helps
Sean
Karl187
#284
Visit this Community
Northern Ireland, United Kingdom
Joined: October 04, 2006
KitMaker: 3,094 posts
Armorama: 2,942 posts
Posted: Friday, January 06, 2012 - 01:31 AM UTC
Hey Sean- great job you've done on the ACU with a very innovative technique. Are you planning to add a robot?
35th-scale
Visit this Community
Kildare, Ireland
Joined: November 21, 2007
KitMaker: 3,212 posts
Armorama: 2,807 posts
Posted: Friday, January 06, 2012 - 02:03 AM UTC
Thanks Karl.

The robot is ready to go:

Just need to build a wee scene for it. A little credit card size vignette as he's about to send the robot out to do it's job. I want to get the Blast armed robot at some stage too....
Karl187
#284
Visit this Community
Northern Ireland, United Kingdom
Joined: October 04, 2006
KitMaker: 3,094 posts
Armorama: 2,942 posts
Posted: Sunday, January 08, 2012 - 03:56 AM UTC
Nicely done on that Robot Sean- is that the AFV Club one?
Ranchhand
Visit this Community
Texas, United States
Joined: September 04, 2010
KitMaker: 289 posts
Armorama: 257 posts
Posted: Sunday, January 08, 2012 - 04:14 AM UTC

Quoted Text

Nicely done on that Robot Sean- is that the AFV Club one?


Looks like the blast models one...
35th-scale
Visit this Community
Kildare, Ireland
Joined: November 21, 2007
KitMaker: 3,212 posts
Armorama: 2,807 posts
Posted: Sunday, January 08, 2012 - 08:14 AM UTC
The first one, which I did about a year ago, is the AFV Club robot. Turns out nice but is a fiddly build. If done correctly the arm is meant to be movable. Needless to say I didn't do it correctly. The hinge is just too fine and I broke it when cutting off the sprue.

The 2nd one is from the Blast website. This I'd like to get but it's already out of production and out of stock. I should have been quicker....

About to give the figure a wash using a slightly darkened base colour. Hopefully that will be it then
35th-scale
Visit this Community
Kildare, Ireland
Joined: November 21, 2007
KitMaker: 3,212 posts
Armorama: 2,807 posts
Posted: Wednesday, January 11, 2012 - 12:01 PM UTC
Thanks Karl.

Did a dark wash to give some depth and but then felt I needed to tip up the light grey afterwards. What do ye think?


Anyway, he's finished now. Just need to place him in a suitable setting. I'll get more photos from different angles tomorrow, but time to call it a night now

35th-scale
Visit this Community
Kildare, Ireland
Joined: November 21, 2007
KitMaker: 3,212 posts
Armorama: 2,807 posts
Posted: Monday, January 30, 2012 - 12:55 AM UTC
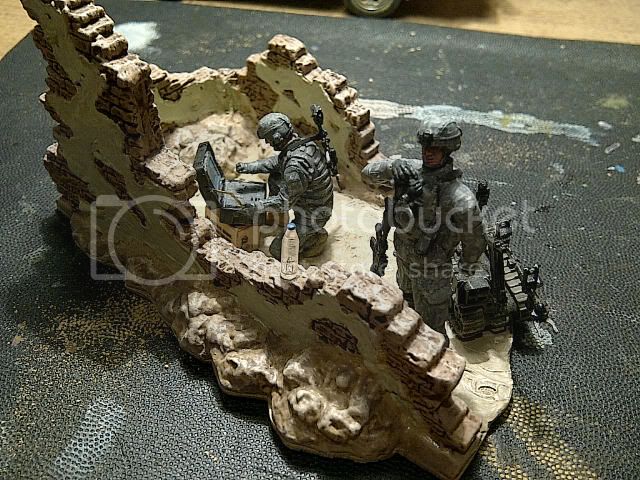
Made up a little ruin and used filler to surface the ground. The figures were just placed to see the effect so far....will do some sanding and then repaint the entire thing:


Karl187
#284
Visit this Community
Northern Ireland, United Kingdom
Joined: October 04, 2006
KitMaker: 3,094 posts
Armorama: 2,942 posts
Posted: Tuesday, January 31, 2012 - 01:15 AM UTC
Nice set-up you have there Sean, just the right size for the two soldiers and the equipment.
35th-scale
Visit this Community
Kildare, Ireland
Joined: November 21, 2007
KitMaker: 3,212 posts
Armorama: 2,807 posts
Posted: Monday, February 13, 2012 - 11:10 AM UTC
All done at last....


Hope ye like it...
barnsley5000
Visit this Community
England - North West, United Kingdom
Joined: September 27, 2011
KitMaker: 136 posts
Armorama: 74 posts
Posted: Monday, February 13, 2012 - 11:45 AM UTC
great only thing id chnage( and u dont have to because this is just personal preferance) is instead of the guy been rigid with his weapon slung id have him aiming down range for threats to the controller, either him or add another figure, that said not all palces are hostile so yours is perffect as is well done pal
35th-scale
Visit this Community
Kildare, Ireland
Joined: November 21, 2007
KitMaker: 3,212 posts
Armorama: 2,807 posts
Posted: Monday, February 13, 2012 - 08:45 PM UTC
Thanks Dan.

They're both Legend figures and done in the pose they come in. Currently working on my first figure that involves surgery to change pose: we'll see how that goes!
Karl187
#284
Visit this Community
Northern Ireland, United Kingdom
Joined: October 04, 2006
KitMaker: 3,094 posts
Armorama: 2,942 posts
Posted: Tuesday, February 14, 2012 - 12:40 AM UTC
Sean- nice work mate- simple concept, compact and it delivers the story nicely. Finishing is great and I think you have the dusty, light painted walls of the mid-east done well along with the placement of the figures and robot. Good stuff.
 _GOTOTOP