

The title says a lot. I'm building a diorama, and there will be a road running through a field.
i already have a bunch of Woodland Scenics Static Grass, as well as a bunch of really fine dirt. I'm using Celluclay as my base ground material.
Anyways, I was wondering, when I place the celluclay, I know I have to place any figures and vehicles (plus their tracks) into the cellucly while it is still wet. But how do I do groundwork?
For the dirt road I am planning on painting the base a sort of tan color, and then putting the real dirt overtop. as well as the grass, should I paint and put the dirt on while the cellucly is still wet, moist, or dry? and should I paint under the dirt or over?
Finally, should I paint under the grass and on it as well?
Any help would be awesome, thanks.
Hosted by Darren Baker
Using Celluclay and attaching dirt and Grass

EvilKiwi436

Joined: February 11, 2012
KitMaker: 15 posts
Armorama: 15 posts
Posted: Friday, February 10, 2012 - 03:22 PM UTC

sdk10159

Joined: December 08, 2005
KitMaker: 556 posts
Armorama: 433 posts

Posted: Friday, February 10, 2012 - 04:31 PM UTC
Tom,
Although I don't use Celluclay ( I use sculptamold and DAS air dry clay), the steps are just the same. Many people have different techniques, but mostly they're basically similar.
Mix your celluclay with water and White Glue 20% of the liquid should be the white glue(elmers). This will be your dirt. While it's still wet, take some fine dirt, pebbles, rocks, whatever you want to use, and press them into the Celluclay. This gives the groundwork some texture. I use dirt and sand that I've swept up off the garage floor and workshop.
When the clay is dry (usually about 24 hours), then it's time to paint. Typically, I use Raw Umber. This is a good, dark brown paint that closely resembles wet or damp earth and in my opinion, a good starting point. I like to use acrylic paints, Testors Acryl or the cheap craft paints that you can get at Michaels, but enamels will work too. If using Testors, then i airbrush, otherwise i use a brush for the craft paints.
Now, for a road, I'll dry brush a lighter brown (or lighten the raw umber with a tan or yellow) on the highlights. A variation could be to airbrush on some heavily thinned Tamiya Flat Earth to give the impression of dry dirt.
When your satisfied with the color, now you add grasses. For a really natural look, down use the Woodlands Scenic grass exclusively, as the lengths are too uniform. Gotta have different size grass. I recommend using some Silfor matting.
http://www.sceneryexpress.com/departments.asp?dept=1040
Put this stuff down in clumps. Large spots, small spots, etc. Vary the clump sizes. In the areas between the clumps, try the Woodlands Scenics grasses - use different shades.
This is the basics. I recommend that you experiment. Post some pics of your work so that we can analyze and advise. Lots of good advice from the guys and gals on this site to help.
Steve
SdAufKla
Joined: May 07, 2010
KitMaker: 2,238 posts
Armorama: 2,158 posts

Posted: Friday, February 10, 2012 - 05:10 PM UTC
+1 on all of Steve's tips.
To those I would add a couple of other thoughts:
You can add any acrylic paint to the Celluclay mix to pre-color it. I usually add a good squeze of raw unber tube acrylic artist paint. If you use a liquid craft paint, reduce the amount of water by the same amount of paint, or just add the paint first and add the water to get the right consistancy.
Mix the Celluclay, glue, paint and water as thick as you can. That is, use as little liquid as possible to get it all to mix up. The wetter the Celluclay, the more it will shrink as it dries.
Spread the Celluclay pretty thin, I shoot for no more than a 1/4" thick and at least 1/8" thick. If it's too thick, it will shrink and warp your base, and if it's too thin, it can curl up at the edges.
This means that if you're gonna have any significant contours or elevation changes, you need to build those into the base before adding the Celluclay. Don't try to build up hills, ditches, etc. with just the Celluclay. Think if it as a heavy texture and not as a structural element.
Finally, if you use acrylic paints and PVA glues (like Elmers or Woodland Scenics Scenic Cement), you can add colors and glue foliage before the Celluclay is completely dry. (Just don't add so much liquid that the Celluclay gets soppy.) This is because the water in the Celluclay is perfectly compatable with any of the acrylic or PVA products.
This is really the advantage of Celluclay over some other materials. You really don't need to let it dry for days before continuing to work on it.
On the other hand, if you're using oils or enamel paints, you do need to let it dry thoroughly.
Check out these threads:
Panther G Base
StuG IV Base
Canadian Firefly Base
I use styrofoam sheets glued together layer-cake fashion for the major terrain contours. I cover this with plaster to refine the contours. And add the Celluclay as the last texture step.
As Steve said, vary up the foliage materials to get a more candid, wild unkept look. I use Woodland Scenics Scenic Cement for most of the vegetation, just applying it with an eye dropper, but thinned white glue (PVA) will work as well. I use straight up PVA to glue down clumps of longer grasses, etc.
HTH,
EvilKiwi436
Joined: February 11, 2012
KitMaker: 15 posts
Armorama: 15 posts
Posted: Friday, February 10, 2012 - 07:14 PM UTC
Thanks a lot!
My grass portion isn't big, so I think woodland scenics static grass with a bit of larger grass thrown i will look pretty good. I'm also wondering, just how much dirt do you press into the celluclay? Amd why is that method more advisable that gluing it on top?
Also, do you know if you can mix some railroad ballast into the celluclay for texture?
pseudorealityx
Joined: January 31, 2010
KitMaker: 2,191 posts
Armorama: 1,814 posts
Posted: Friday, February 10, 2012 - 07:26 PM UTC
Hi,
Personally, I would avoid using dirt on top of celluclay at all, at least using it "as dirt". Pre color the celluclay with craft paint, and while you're laying it down, it will have it's own texture. Use a series of washes, and then drybrush layers to "deepen" the colors. Adding real dirt is way out of scale for models IMO, and is better used as gravel in scale. For the same reason, I don't think you need to use the railroad ballast either. The celluclay has plenty of texture that can be brought out via finishing techniques.
Keep in mind that grass typically grows in clumps.
To add the static grass, once the base was set, but still wet, I brushed diluted white glue in little patches, once at a time, and then took a tweezer-full of static grass and stippled it onto the glue, letting it attach in clumps.
You can see some photos in my project here:
http://armorama.com/forums/185866&page=4#1578115
EvilKiwi436
Joined: February 11, 2012
KitMaker: 15 posts
Armorama: 15 posts
Posted: Friday, February 10, 2012 - 07:53 PM UTC
Quoted Text
Hi,
Personally, I would avoid using dirt on top of celluclay at all, at least using it "as dirt". Pre color the celluclay with craft paint, and while you're laying it down, it will have it's own texture. Use a series of washes, and then drybrush layers to "deepen" the colors. Adding real dirt is way out of scale for models IMO, and is better used as gravel in scale. For the same reason, I don't think you need to use the railroad ballast either. The celluclay has plenty of texture that can be brought out via finishing techniques.
Keep in mind that grass typically grows in clumps.
To add the static grass, once the base was set, but still wet, I brushed diluted white glue in little patches, once at a time, and then took a tweezer-full of static grass and stippled it onto the glue, letting it attach in clumps.
You can see some photos in my project here:
http://armorama.com/forums/185866&page=4#1578115
While your diorama looks amazing, I'm afraid that I will have quite a bit of dirt road in my diorama, so I will need some sort of dirt replacement.
sdk10159
Joined: December 08, 2005
KitMaker: 556 posts
Armorama: 433 posts
Posted: Friday, February 10, 2012 - 08:28 PM UTC
Quoted Text
I'm also wondering, just how much dirt do you press into the celluclay? Amd why is that method more advisable that gluing it on top?
Also, do you know if you can mix some railroad ballast into the celluclay for texture?
Tom,
I found that gluing the dirt/sand to the top looks like just what it is: glued sand/dirt. What I do is sprinkle fine sand/dirt on top of the wet clay and gently tap it in with my fingers.
Railroad ballast has it's uses in 1/35 scale, but I wouldn't mix it in the clay. It can be used to simulate gravel, but like the sand/dirt, it needs to be pressed in slightly. I've used it to simulate small stones in river bed scenes.
Celluclay does have texture, as Jesse pointed out, but I think that adding a little fine sand/dirt adds a different texture.
One thing where I differ with Jesse and Mike - don't add the paint while mixing the clay. To color the celluclay with that method takes a lot of paint because you have to color ALL of the clay. Painting after the clay dries requires only enough paint to cover the top of the clay - less paint used. Just my method.
Experiment - see what works best for you.
Also, heres another tip for grass. If you want really long grass, get some cheap paint brushes, and I mean the $1.50 ones from Home Depot/Lowes with tan bristles. THe bristles can be stained/painted any color you want (or no color) and used for really long grass, like what Jesse has in his T-55 dio.
Steve
sdk10159
Joined: December 08, 2005
KitMaker: 556 posts
Armorama: 433 posts
Posted: Friday, February 10, 2012 - 08:52 PM UTC
Tom,
I'd like to suggest you give this stuff a try at some point. I think it's much better than Celluclay or Sculptamold.
DAS Air Dry Clay
http://www.fineartstore.com/Catalog/tabid/365/CategoryID/14213/List/1/Level/a/ProductID/29937/Default.aspx?SortField=UnitCost%2cUnitCost
I got mine from Michaels. It requires no mixing, dries hard within a few hours depending on how thick you make it. It does not shrink when it dries, nor do the edges curl up if made too thin, problems I've encountered when using Celluclay.
I use MDF for my bases and I've found that I need to spread a thin layer of Elmers before I put the DAS clay down. Not much glue - just sorta painted on.
Give it a try.
Steve
EvilKiwi436
Joined: February 11, 2012
KitMaker: 15 posts
Armorama: 15 posts
Posted: Saturday, February 11, 2012 - 06:29 AM UTC
Quoted Text
Tom,
I'd like to suggest you give this stuff a try at some point. I think it's much better than Celluclay or Sculptamold.
DAS Air Dry Clay
http://www.fineartstore.com/Catalog/tabid/365/CategoryID/14213/List/1/Level/a/ProductID/29937/Default.aspx?SortField=UnitCost%2cUnitCost
I got mine from Michaels. It requires no mixing, dries hard within a few hours depending on how thick you make it. It does not shrink when it dries, nor do the edges curl up if made too thin, problems I've encountered when using Celluclay.
I use MDF for my bases and I've found that I need to spread a thin layer of Elmers before I put the DAS clay down. Not much glue - just sorta painted on.
Give it a try.
Steve
Wow, that's awesome. So, in short, I should lay down the celluclay, press in the dirt, let it dry, glue on grass and paint the dirt. Should I paint under the grass? Finally, should I leave the figures and vehicles in place for a bit, or just press them in and take them right out.
pseudorealityx
Joined: January 31, 2010
KitMaker: 2,191 posts
Armorama: 1,814 posts
Posted: Saturday, February 11, 2012 - 06:44 AM UTC
With celluclay, you add the grass while it's still wet, although you still want to add diluted glue to the locations where you want grass. You definitely want to do this for any taller grass, because it's easy to make a small hole with a wet toothpick to push grass into.
I would leave the vehicle/figures in for a little while, but take them out so you can paint and finish the base. As I mentioned before, I used some washes, and then after dry came back and drybrushed with a number of various earth tones. I do this around the grass, as well as drybrushing the grass itself. A lot of store bought static grass aren't exactly life-like grass colors, plus you'll want to add variation so it doesn't end up looking like a golf course. The drybrush also helps to 'pick up' the static grass a bit.
Maybe you can't tell from the photos on my base, but there is quite a bit of celluclay visible that is not covered in rocks, grass, or bushes.
EvilKiwi436
Joined: February 11, 2012
KitMaker: 15 posts
Armorama: 15 posts
Posted: Saturday, February 11, 2012 - 09:05 AM UTC
Just wondering, what is your guys' methods for making the static grass stand up? Do you just wait 5 minutes and use a ballon that has been rubbed on your hair?
sdk10159
Joined: December 08, 2005
KitMaker: 556 posts
Armorama: 433 posts
Posted: Saturday, February 11, 2012 - 09:54 AM UTC
Quoted Text
Just wondering, what is your guys' methods for making the static grass stand up? Do you just wait 5 minutes and use a ballon that has been rubbed on your hair?
Interesting. I've never heard of that method but it sounds like it would work fine. I'll have to try that.
What I've done is after spreading the grass down and waiting a few minutes, I gently blow on the grass. That gets most of the stuff to stand up.
Steve
sdk10159
Joined: December 08, 2005
KitMaker: 556 posts
Armorama: 433 posts
Posted: Saturday, February 11, 2012 - 09:57 AM UTC
"Wow, that's awesome. So, in short, I should lay down the celluclay, press in the dirt, let it dry, glue on grass and paint the dirt. Should I paint under the grass? Finally, should I leave the figures and vehicles in place for a bit, or just press them in and take them right out."
I would paint the dirt before putting down the grass. When I used those paint brush bristles for longer grass, I'll drill small holes in the clay and insert several bristles. Takes a little longer, but it works.
Jesse's method may work for you - it's all about experimenting to see what you think works. Try different methods outlined here. What works for me or Jesse or Mike, may not be to your liking.
Steve
EvilKiwi436
Joined: February 11, 2012
KitMaker: 15 posts
Armorama: 15 posts
Posted: Saturday, February 11, 2012 - 11:17 AM UTC
About how tall is WS scenic grass when standing up? This is crucial.
AJLaFleche
Joined: May 05, 2002
KitMaker: 8,074 posts
Armorama: 3,293 posts
Posted: Saturday, February 11, 2012 - 12:14 PM UTC
I agree, dirt, sand, etc., on top of Celluclay (or any base)is way out of scale. I use fine railroad ballast mixed in with the Celluclay and some turf from a dwindling supply of sawdust railroad turf from many, many years ago. I add cheap brown graft paint and white glue with just enough water toget to a thick oatmeal consistency.
For grasses, I use Silfor tufts, supposedly self adhessive, but much more permanent with a touch of superglue. Paint, wash and druybrush before adding your turf.
Sources for Silfor and other landscaping materials: Military Miniatures Warehouse and Scenic Express.
For grasses, I use Silfor tufts, supposedly self adhessive, but much more permanent with a touch of superglue. Paint, wash and druybrush before adding your turf.
Sources for Silfor and other landscaping materials: Military Miniatures Warehouse and Scenic Express.
sdk10159
Joined: December 08, 2005
KitMaker: 556 posts
Armorama: 433 posts
Posted: Saturday, February 11, 2012 - 04:32 PM UTC
Quoted Text
About how tall is WS scenic grass when standing up? This is crucial.
Not very. Maybe 1 or 2 mm
EvilKiwi436
Joined: February 11, 2012
KitMaker: 15 posts
Armorama: 15 posts
Posted: Saturday, February 11, 2012 - 05:01 PM UTC
Quoted Text
Quoted TextAbout how tall is WS scenic grass when standing up? This is crucial.
Not very. Maybe 1 or 2 mm
Alright, so would medium sized stretches that are drybrushed various shades look alright, or mundane. I'll definately post pictures of the final diorama!
sdk10159
Joined: December 08, 2005
KitMaker: 556 posts
Armorama: 433 posts
Posted: Saturday, February 11, 2012 - 10:30 PM UTC
"Alright, so would medium sized stretches that are drybrushed various shades look alright, or mundane. I'll definately post pictures of the final diorama!"
Let's see if I can answer this with a couple of pictures.
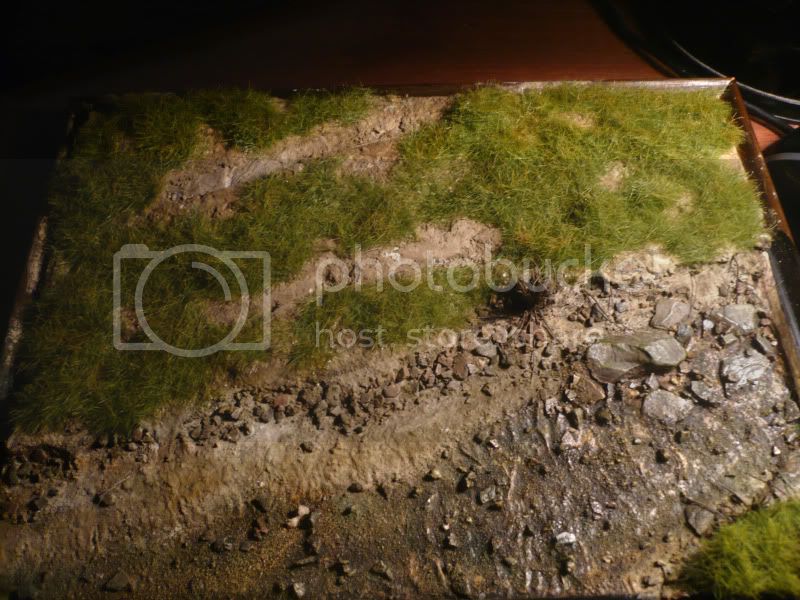
Here's a base that I'm currently working on. Ground work was done using DAS clay, with very fine sand sprinkled over the top and then pressed in gently. I painted the groundwork Raw Umber, then oversprayed with Tamiya Flat Earth. Then I used Silfor grass tufts in three different colors and sizes. In between that, I sprinkled WS Static Grass Harvest Gold and Burnt Grass for color variation. In this instance, I left the static grass flat, as I'm trying to simulate wet grass laying flat.


Let's see if I can answer this with a couple of pictures.
Here's a base that I'm currently working on. Ground work was done using DAS clay, with very fine sand sprinkled over the top and then pressed in gently. I painted the groundwork Raw Umber, then oversprayed with Tamiya Flat Earth. Then I used Silfor grass tufts in three different colors and sizes. In between that, I sprinkled WS Static Grass Harvest Gold and Burnt Grass for color variation. In this instance, I left the static grass flat, as I'm trying to simulate wet grass laying flat.
EvilKiwi436
Joined: February 11, 2012
KitMaker: 15 posts
Armorama: 15 posts
Posted: Sunday, February 12, 2012 - 08:44 AM UTC
Quoted Text
"Alright, so would medium sized stretches that are drybrushed various shades look alright, or mundane. I'll definately post pictures of the final diorama!"
Let's see if I can answer this with a couple of pictures.
Here's a base that I'm currently working on. Ground work was done using DAS clay, with very fine sand sprinkled over the top and then pressed in gently. I painted the groundwork Raw Umber, then oversprayed with Tamiya Flat Earth. Then I used Silfor grass tufts in three different colors and sizes. In between that, I sprinkled WS Static Grass Harvest Gold and Burnt Grass for color variation. In this instance, I left the static grass flat, as I'm trying to simulate wet grass laying flat.
Wow, that looks really good! I hope I can make mine look that good, or close to it. I also have Harvest Gold static grass, and the color looks really good.
sdk10159
Joined: December 08, 2005
KitMaker: 556 posts
Armorama: 433 posts
Posted: Sunday, February 12, 2012 - 11:26 PM UTC
Thanks - it still has a ways to go, yet.
The key is to experiment. Try the different methods that were pointed out and see what works best for you. Post some pictures for feedback - it's the only way to learn.
Steve
The key is to experiment. Try the different methods that were pointed out and see what works best for you. Post some pictures for feedback - it's the only way to learn.
Steve

lespauljames

Joined: January 06, 2007
KitMaker: 3,661 posts
Armorama: 2,764 posts

Posted: Monday, February 13, 2012 - 12:29 AM UTC
Hey Steve, I use plaster mixed with pigments and brown paint, stipple and sprinkle for texture, and then glue on static grass ( single colour )
then dry brush the grass for highlights, and add clumps of other stuff.
Picture (1.48 scale)
here it is without tall grass and foliage.
Hth
then dry brush the grass for highlights, and add clumps of other stuff.
Picture (1.48 scale)
here it is without tall grass and foliage.
Hth

EvilKiwi436
Joined: February 11, 2012
KitMaker: 15 posts
Armorama: 15 posts
Posted: Monday, February 13, 2012 - 01:45 PM UTC
Quoted Text
Hey Steve, I use plaster mixed with pigments and brown paint, stipple and sprinkle for texture, and then glue on static grass ( single colour )
then dry brush the grass for highlights, and add clumps of other stuff.
Picture (1.48 scale)
here it is without tall grass and foliage.
Hth
Golly that looks amazing! I'm just waiting for my base to completely dry before I glue on the static grass.

 |

WEB HOSTING BY


Copyright ©2021 Armorama and Kitmaker Network, a subsidiary of Silver Star Enterprises
All Rights Reserved. Please read our Conditions of Use and Privacy Policy.
All Rights Reserved. Please read our Conditions of Use and Privacy Policy.