_GOTOBOTTOM
Dioramas
Do you love dioramas & vignettes? We sure do.
"The diorama for the Sherman and ... "
4egevara
Visit this Community
Vladimir, Russia
Joined: November 20, 2010
KitMaker: 209 posts
Armorama: 205 posts
Posted: Monday, March 05, 2012 - 10:04 AM UTC
Hello!
Up to this point, I built a small stand for the models, but finally decided to try to make a full diorama.
On the plot, I'll talk slowly, with the progress of construction to keep the suspense (and you will be more interesting and I no longer have the desire to make the diorama)
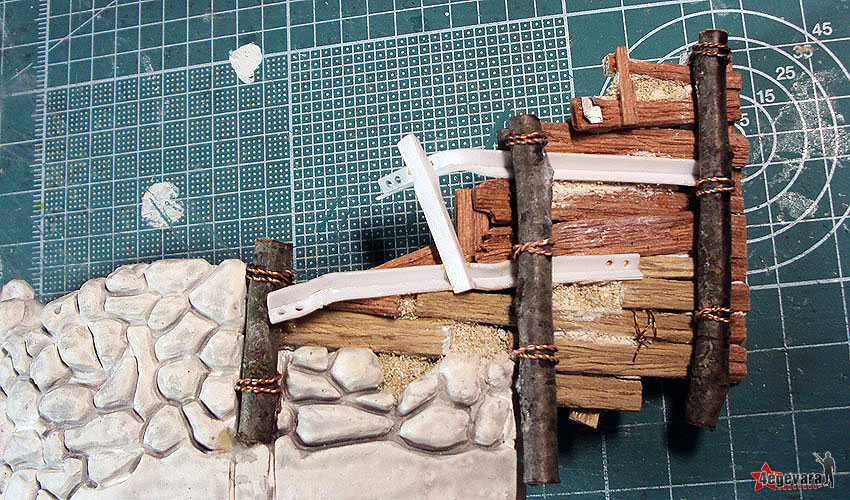
One of the main characters will dioramas Sherman, on the other, I still keep silence if you please ...
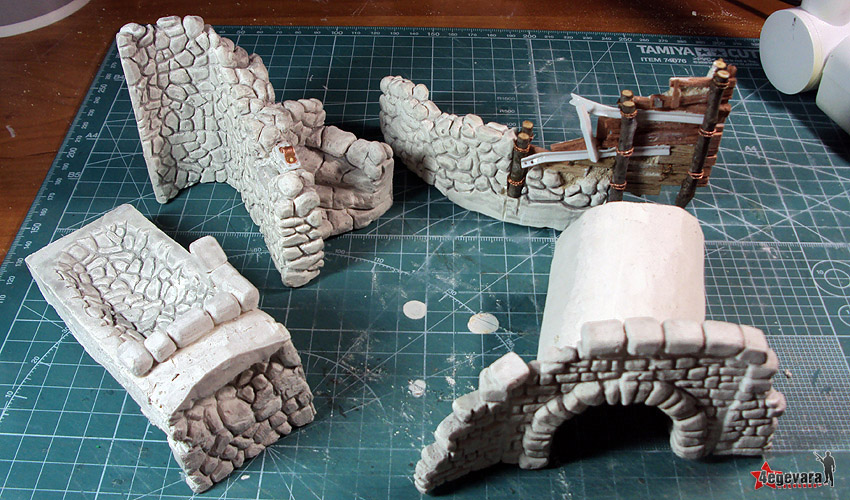
While the premise of the various additional sets in a way, I decided to start manufacturing base for the project ...

Perhaps this step is not related to models, it is likely a carpenter, but I think that light, this stage will not be superfluous ... In general we go!
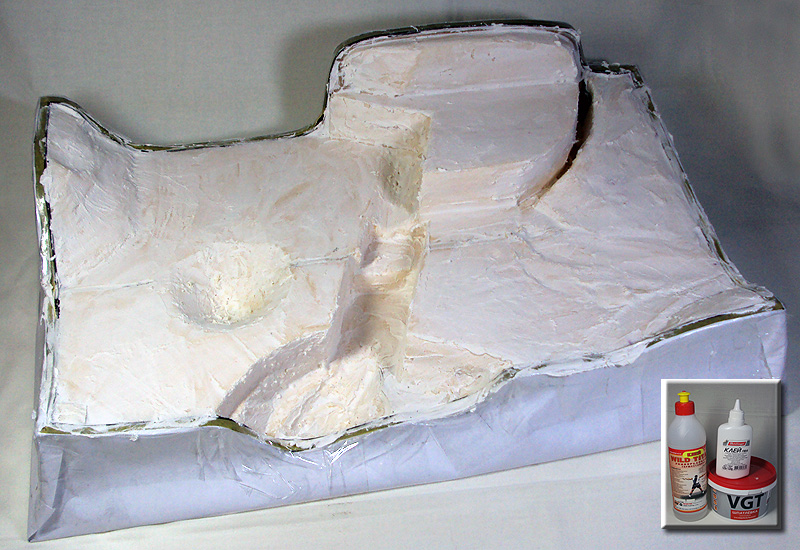
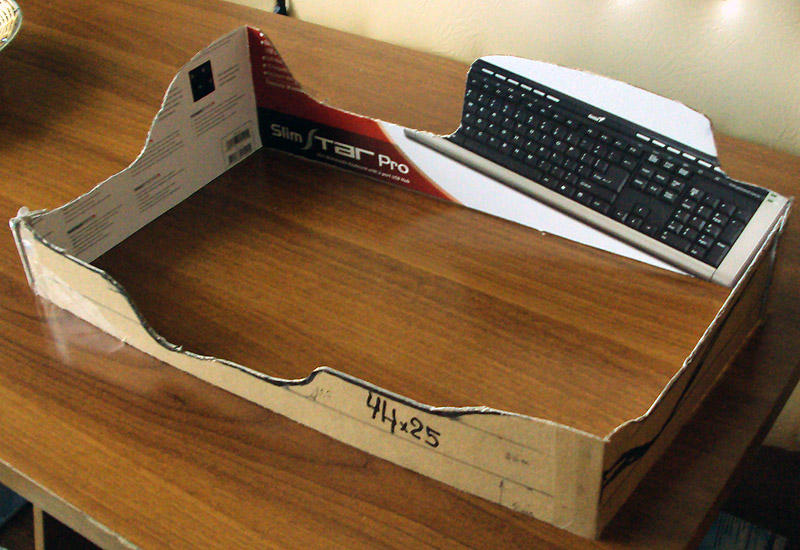
First, I made the pattern for the future of the diode board. It is easier to be determined with the size of the base and adjust the relief ...

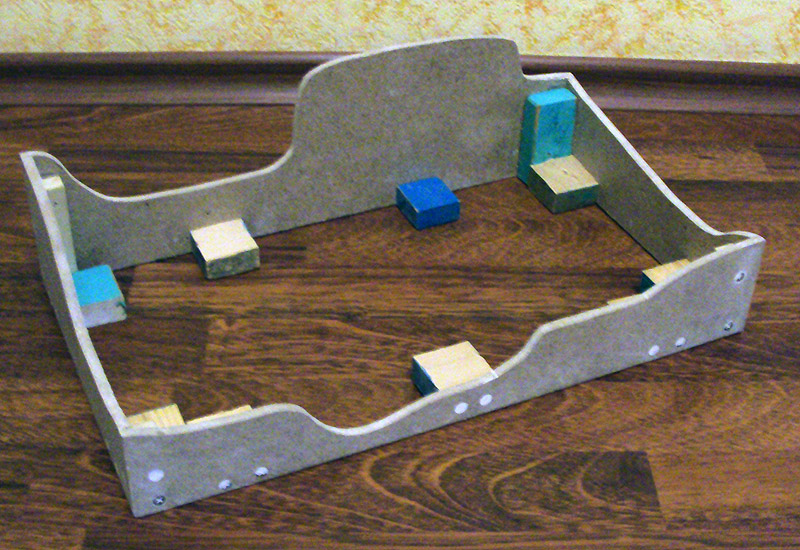
Then on a cardboard template sawed blanks similar walls made of MDF.
All screws and sealed with carpenter's glue.

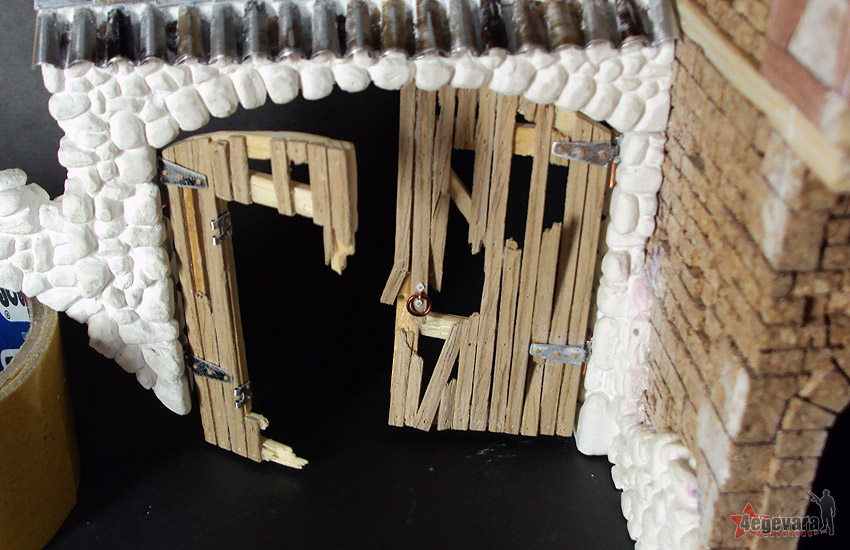
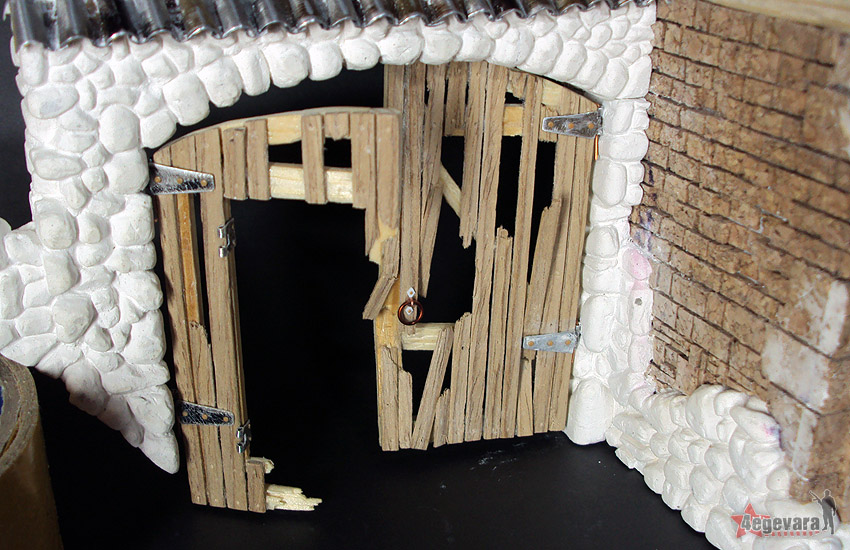
Later, I plastered MDF veneer colors and fumed oak frame made of bead (covered it with stained mahogany color and gloss varnish).


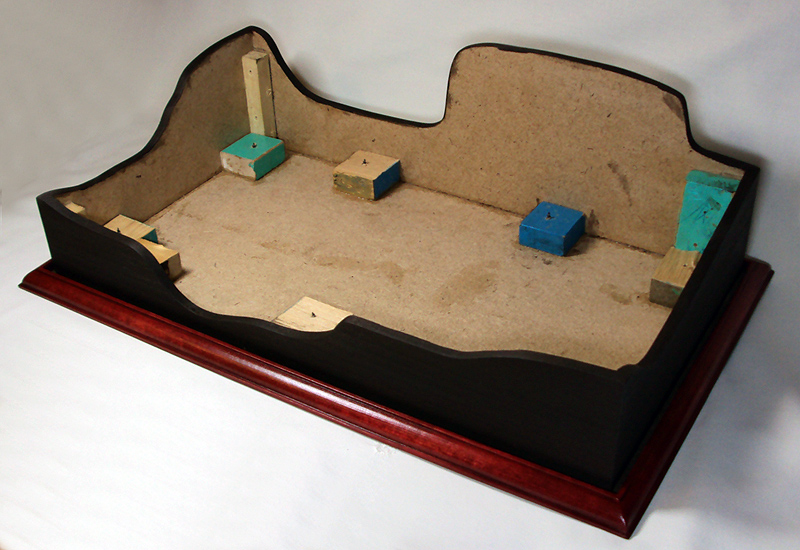
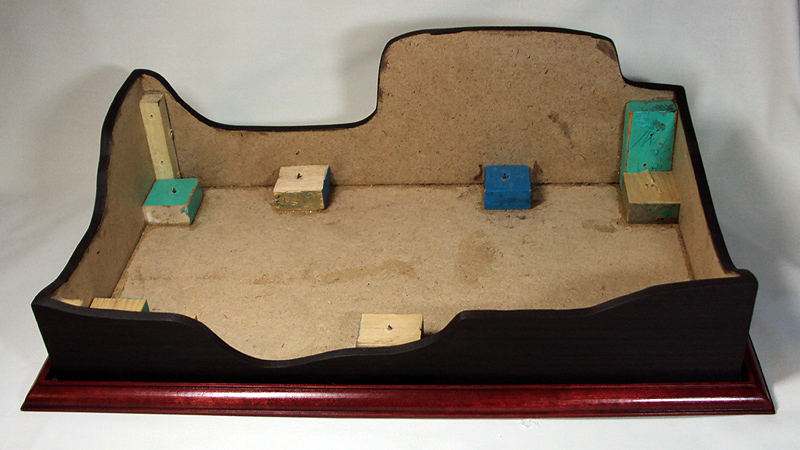
Between the frame and walls made of MDF left a gap of 3 mm, for the future of the dome of glass. Finally got this.

Ironmike
Visit this Community
California, United States
Joined: March 28, 2006
KitMaker: 287 posts
Armorama: 270 posts
Posted: Monday, March 05, 2012 - 10:41 AM UTC
Hiya Kirill,
A lot of work so far but I am a bit confused. Is the framework done so ground work can be added for an elevated landscape? Or are they supposed to be ruins of a house? If so for the later, how did the Sherman (I assume you are putting a Sherman inside the ruins) get into said ruins as there are four walls. Just curious and perhaps too soon to comment. Keep it coming, lad.
Ironmike
4egevara
Visit this Community
Vladimir, Russia
Joined: November 20, 2010
KitMaker: 209 posts
Armorama: 205 posts
Posted: Monday, March 05, 2012 - 06:41 PM UTC

Quoted Text

Hiya Kirill,
A lot of work so far but I am a bit confused. Is the framework done so ground work can be added for an elevated landscape? Or are they supposed to be ruins of a house? If so for the later, how did the Sherman (I assume you are putting a Sherman inside the ruins) get into said ruins as there are four walls. Just curious and perhaps too soon to comment. Keep it coming, lad.
Ironmike


Hi, Mike!
This is not a ruin, it is just the wall base.
The entire void within will be filled with foam.
4egevara
Visit this Community
Vladimir, Russia
Joined: November 20, 2010
KitMaker: 209 posts
Armorama: 205 posts
Posted: Tuesday, March 06, 2012 - 03:44 AM UTC
Again a small update ... carpentry and again. But see the future shape of the surface ...
To fill the internal volume of the material I have used "tehnopleks" thick 2cm.
The material is very light, thus preserving the low weight of the project at relatively large sizes.
Panels glued together ordinary adhesive foam.

Then the whole landscape was covered with carpenter glue. After complete drying of the surface was covered with dioramas acrylic putty,
in which structure is the same as carpenter's glue (the presence of the same glue will give better adhesion of the layers).
Finishing the relief will be formed from terracotta clay
but first we need to manufacture Activities of individual elements that must be built into the base prior to pouring the base layer of soil.

4egevara
Visit this Community
Vladimir, Russia
Joined: November 20, 2010
KitMaker: 209 posts
Armorama: 205 posts
Posted: Thursday, March 08, 2012 - 07:20 AM UTC
The new update.
As I said earlier, I decided to manufacture Activities of individual elements for dioramas. The first of these elements was the house ... Yes - yes, the most common highest European house.
The house will be a relative remake (well of course for the 40s), but it will be built on the foundation of the structure remaining from the much more ancient ...
What was this building before? And who knows, the main thing of it we were thoroughly built stone walls ...
The image of the home will be a collective ...

I started with the casting of the plaster walls of my right.
Then, for 2 hours, until completely hardened plaster is not, I cut through all the stones.

The template for the construction of the house I made from 1.5 mm cardboard.
Glued and pasted it in the right place made me a plate with a masonry ...

After the glue dries, I'm putty plaster cracks between the slabs and also cut through the masonry at these places ...


Then it was time to begin to erect the building. For walls, I decided to use the plug.
She will give a plausible structure of the stone all the building going to be easy ..

At the moment the house is not finished yet, and is now in such a state!


retiredyank
Visit this Community
Arkansas, United States
Joined: June 29, 2009
KitMaker: 11,610 posts
Armorama: 7,843 posts
Posted: Thursday, March 08, 2012 - 12:04 PM UTC
Looks to be a German trade house, but that's just MHO. Buildings really get me going. I used to be a carpenter, among other things. I'll bite. Subscribed.
bill1
Visit this Community
West-Vlaaderen, Belgium
Joined: August 14, 2005
KitMaker: 3,938 posts
Armorama: 520 posts
Posted: Friday, March 09, 2012 - 09:50 AM UTC
Yo Kirill,

Nice start!

Good planning on your project.

Nice scratch work, in witch scale is this?

Greetz Nico
4egevara
Visit this Community
Vladimir, Russia
Joined: November 20, 2010
KitMaker: 209 posts
Armorama: 205 posts
Posted: Tuesday, March 13, 2012 - 09:21 AM UTC

Quoted Text

Looks to be a German trade house, but that's just MHO. Buildings really get me going. I used to be a carpenter, among other things. I'll bite. Subscribed.


Yes, you're right, I'm building a house with an eye on the German home ...

Quoted Text

Yo Kirill,

Nice start!

Good planning on your project.

Nice scratch work, in witch scale is this?

Greetz Nico


Hello Nico!
Thank you for your assessment, look what happens in the end.
Everything is done by hand in 35 scale.


The new update.

I continue to tinker with a house ...

On all the walls completed the laying of the stone.
On the left side of the house there was support for the tower-gate.
Also added a small tube.
Made a tiled roof.
To do this manually produced 684 hand-tiled. Made of metal and bending the metal cone.
At the moment the house is finished to 60% ...


But this is the future gate ...


Ironmike
Visit this Community
California, United States
Joined: March 28, 2006
KitMaker: 287 posts
Armorama: 270 posts
Posted: Tuesday, March 13, 2012 - 10:37 AM UTC
Understood, Kirill. Outstanding project results thus far. The detail work is excellent and you efforts will produce a great diorama. The house is amazing, I am jealous. I tried the cork blocks before and had good results. keep us posted as this looks mighty interesting.
Ironmike
DogGreen1
Visit this Community
England - East Anglia, United Kingdom
Joined: December 11, 2010
KitMaker: 15 posts
Armorama: 13 posts
Posted: Wednesday, March 14, 2012 - 12:31 PM UTC
Wow. Consider me subscribed.
4egevara
Visit this Community
Vladimir, Russia
Joined: November 20, 2010
KitMaker: 209 posts
Armorama: 205 posts
Posted: Wednesday, March 14, 2012 - 10:08 PM UTC

Quoted Text

Understood, Kirill. Outstanding project results thus far. The detail work is excellent and you efforts will produce a great diorama. The house is amazing, I am jealous. I tried the cork blocks before and had good results. keep us posted as this looks mighty interesting.
Ironmike


Hi, Mike!
I first tried to work with the plug and I really liked it. Thank you for rating.

Quoted Text

Wow. Consider me subscribed.


Thank you! I'll try not to reduce the level of work.
slodder
Visit this Community
North Carolina, United States
Joined: February 22, 2002
KitMaker: 11,718 posts
Armorama: 7,138 posts
Posted: Thursday, March 15, 2012 - 12:42 AM UTC
this is going to be a very dynamic diorama. I like the layout very much. The combination of textures, and techniques is really nice.
My only critique so far is that the 'setback' of the cork blocks on the ancient rock foundation is to far. I personally would have made that a bit smaller and built the cork block out only a couple of scale inches or made the rocks thinner.
I'll be watching updates.
4egevara
Visit this Community
Vladimir, Russia
Joined: November 20, 2010
KitMaker: 209 posts
Armorama: 205 posts
Posted: Friday, March 16, 2012 - 08:05 AM UTC

Quoted Text

this is going to be a very dynamic diorama. I like the layout very much. The combination of textures, and techniques is really nice.
My only critique so far is that the 'setback' of the cork blocks on the ancient rock foundation is to far. I personally would have made that a bit smaller and built the cork block out only a couple of scale inches or made the rocks thinner.
I'll be watching updates.


Thank you Scott!
I specifically chose to use the plug 5mm thick. In the future, I wipe the slit paneer acrylic putty and places it crumble - to get the effect of the old cement dissolve.

NEW UPDATE
Just a little update.
Finished with a gate. Frankly, the idea with them occurred spontaneously at all, nothing like I planned.
I had hoped to make a principle the only arch .... but after trying them once I was not impressed with the pass-through opening created under it, and I decided to make the door ...
Invented - done!
For more watchable decided to make a broken gate ... we assume that they rammed when they were closed ....
Material of frame - wood.
Loop (working) - metal.
Lumber - veneer.


retiredyank
Visit this Community
Arkansas, United States
Joined: June 29, 2009
KitMaker: 11,610 posts
Armorama: 7,843 posts
Posted: Friday, March 16, 2012 - 09:57 AM UTC
The gate looks superb! Are you going to age the wood or keep the "new" look?
4egevara
Visit this Community
Vladimir, Russia
Joined: November 20, 2010
KitMaker: 209 posts
Armorama: 205 posts
Posted: Friday, March 16, 2012 - 10:29 AM UTC

Quoted Text

The gate looks superb! Are you going to age the wood or keep the "new" look?


Of course it will all be painted and tinted ... yet it is only building.
4egevara
Visit this Community
Vladimir, Russia
Joined: November 20, 2010
KitMaker: 209 posts
Armorama: 205 posts
Posted: Tuesday, March 20, 2012 - 01:40 AM UTC
NEW UPDATE

Just a little update.
A couple of days has done little for the details of the structure ...


Tanksami
Visit this Community
Victoria, Australia
Joined: August 06, 2011
KitMaker: 1,314 posts
Armorama: 1,217 posts
Posted: Wednesday, March 21, 2012 - 08:20 AM UTC
Looks incredible!!! I will keep watching with interest!!
4egevara
Visit this Community
Vladimir, Russia
Joined: November 20, 2010
KitMaker: 209 posts
Armorama: 205 posts
Posted: Thursday, March 22, 2012 - 08:04 AM UTC

Quoted Text

Looks incredible!!! I will keep watching with interest!!


I'm glad I do the same like it is done, Mike.
In fact, I am also very interested in what happens in the end - it all depends on how well I manage to fulfill his plan.


NEW UPDATE
Hello!
So I finished the construction of his house .... But ... what's the house!
I confess that I deceived you with one legend of the house ...
I'm not building a house, a water mill ...
Happened or not - you decide, but personally I like it.
The first photo - a photo a few little things that I have decided to once again add a very spontaneous ...
Sign. One decided to break the chain, so that the tablet "painterly" hanging


Weathervane. Sorry for the blurry photo, but the object was very fine ... In the photo presentedin some burrs on the letters, but I have removed them.


Well, perhaps the main object of a water wheel ... ...


On the walls of the mill took a diluted acrylic sealer (closed up the seams between the stones), specially in some places did not clobber - in order to try to get to the place had fallen from the old solution.
It also decided to try on all the details made earlier, just to see what happens. Some details in the process of shooting bent, but I think the general idea of the structure is you can fill.


Tanksami
Visit this Community
Victoria, Australia
Joined: August 06, 2011
KitMaker: 1,314 posts
Armorama: 1,217 posts
Posted: Thursday, March 22, 2012 - 08:21 AM UTC
Stunning,amazing & totally hooked!!!! Can't wait to see it all painted up!!
Just fantastic!!!

Mike
bill1
Visit this Community
West-Vlaaderen, Belgium
Joined: August 14, 2005
KitMaker: 3,938 posts
Armorama: 520 posts
Posted: Friday, March 23, 2012 - 10:47 AM UTC
Yo Kirill,

Suberp looking scratch work...so much detail.

Do you really want to paint this....

Greetz Nico
retiredyank
Visit this Community
Arkansas, United States
Joined: June 29, 2009
KitMaker: 11,610 posts
Armorama: 7,843 posts
Posted: Friday, March 23, 2012 - 11:10 AM UTC
You have crazy-mad skills scratchbuilding. The water wheel is outstanding! This stands with the entire mill! Can't wait for you to lay some paint on it.
4egevara
Visit this Community
Vladimir, Russia
Joined: November 20, 2010
KitMaker: 209 posts
Armorama: 205 posts
Posted: Monday, March 26, 2012 - 02:59 AM UTC

Quoted Text

Stunning,amazing & totally hooked!!!! Can't wait to see it all painted up!!
Just fantastic!!!

Mike


Thank you for your kind words, Mike.
I also really want to start to paint everything, but there is still much work and many elements need to do from scratch.

Quoted Text

Yo Kirill,

Suberp looking scratch work...so much detail.

Do you really want to paint this....

Greetz Nico


Hello Nico!
You're right, I really want to bring this project to completion. Glad you like my work, and you watch it.

Quoted Text

You have crazy-mad skills scratchbuilding. The water wheel is outstanding! This stands with the entire mill! Can't wait for you to lay some paint on it.


Hi, Matt! Thank you for the evaluation of the work. In fact, there is nothing unusual in my work - so can do any of us. The main thing is to want to bring the idea to life!


NEW UPDATE
A small update.
Molded and carved plaster are still some elements for dioramas.
The most difficult at this stage was to make the casing for objects - a very complex shapes required.


Wall, suitable for rock, decided to make not just made ​​of stone.
According to the plan began to crumble the soil there, and to prevent the continued slide of soil on the road. Local residents have made from old fence boards, any piece of iron, etc. ... short of what was at hand ...


hofpig
Visit this Community
England - South East, United Kingdom
Joined: March 04, 2007
KitMaker: 1,330 posts
Armorama: 1,017 posts
Posted: Monday, March 26, 2012 - 03:53 AM UTC
Looks great even unpainted, a mark of a true master.

paul
4egevara
Visit this Community
Vladimir, Russia
Joined: November 20, 2010
KitMaker: 209 posts
Armorama: 205 posts
Posted: Tuesday, March 27, 2012 - 06:18 AM UTC

Quoted Text

Looks great even unpainted, a mark of a true master.

paul


Thank you for the appreciation of the work.
But actually I'm still just learning to do a diorama ... This is the first.
Ironmike
Visit this Community
California, United States
Joined: March 28, 2006
KitMaker: 287 posts
Armorama: 270 posts
Posted: Tuesday, March 27, 2012 - 10:02 AM UTC
Hi Kirill,
I must say, I have seen lots of scratch built projects in my time, but this is one of the very best. The gate, the latches, the doors, the stonework, the waterwheel are superb. I am impressed as I mentioned before. You should make this talent available on YouTube as it makes any of my efforts look downright primative. I can't wait to see the finished project. I would also like to see your hand at figures and or vehicles. Looking forward to the rest, so do keep us posted, pal.
Ironmike
 _GOTOTOP