I tried again and again.
And I don't like the way my paint chiPs look like.
They are always dot like shape whatever I am doing. What ever paint I am using.
Is this lack of training??
Or the brush??
I cannot achieve nice little line or small chips.
It is always big fat plain dots or heavy lines.
Can you help me please??
Seb
AFV Painting & Weathering
Answers to questions about the right paint scheme or tips for the right effect.
Answers to questions about the right paint scheme or tips for the right effect.
Hosted by Darren Baker, Matthew Toms
Paint chipping, am I stupid??
seb43

Joined: August 30, 2005
KitMaker: 2,315 posts
Armorama: 2,158 posts

Posted: Tuesday, April 17, 2012 - 09:11 AM UTC
Posted: Tuesday, April 17, 2012 - 09:35 AM UTC
Well I have no clue how you put the chips but For me good thinned paint and a very small brush works best. Take your time and try to get irregular shapes by painting several very small dots clustered together.
Citizinsane
Joined: July 27, 2006
KitMaker: 463 posts
Armorama: 450 posts
KitMaker: 463 posts
Armorama: 450 posts

Posted: Tuesday, April 17, 2012 - 10:19 AM UTC
Hey Seb,
to be perfectly honest, that's about the exact way I feel about most of my attempts at chipping...
anyway, some more info about what materials you use might be of help here (like brush size, colors, etc...)
Cheers, Max
to be perfectly honest, that's about the exact way I feel about most of my attempts at chipping...

anyway, some more info about what materials you use might be of help here (like brush size, colors, etc...)
Cheers, Max
heliman

Joined: June 14, 2010
KitMaker: 702 posts
Armorama: 604 posts

Posted: Tuesday, April 17, 2012 - 10:35 AM UTC
Seb- If your trying to do chips, I have used a small piece of kitchen sponge to apply small chips. Dab end in small amount of chosen paint..I've used enamel and acrylic, now similar to drybrushing, blot the sponge on paper towel to rid of heavy paint. now LIGHTLY touch model where ya want chips..edges, high traffic areas. The paint should slowly build up..takes a light touch. I found if using Tamiya paints..add a drop or 2 of thinner.not much.
Another new favorite of mine is the hairspray method..very controlled wear. A search here will explain the method ..
Hope that helps!
Another new favorite of mine is the hairspray method..very controlled wear. A search here will explain the method ..
Hope that helps!
seb43

Joined: August 30, 2005
KitMaker: 2,315 posts
Armorama: 2,158 posts

Posted: Tuesday, April 17, 2012 - 11:39 PM UTC
Guys
Thanks for the reply
Some input to understand my doubts.
With hairspray no problem
With sponge no problem
So my question is only with brush
But with brush, i am so bad, i am alwyas using Vallejo or Tam paint with 4/0 or 10/0 brush.
And i dont like the outcome.
I will try to post a trial on ZU-23-2 tonight
Thanks anywas
SdAufKla

Joined: May 07, 2010
KitMaker: 2,238 posts
Armorama: 2,158 posts

Posted: Wednesday, April 18, 2012 - 02:14 AM UTC
Seb,
I would suggest the following:
1) Forget about trying to brush paint using the Tamiya paints. They are unsuitable. Vallejo paints are excellent for hand-brushing.
2) You must thin the Vallejo paint almost 50% to get it to flow nicely from any brush. I use the Vallejo thinner mixed with water at a thinner/water ratio of 1:1. To this, I add 5% each by volume an acrylic flow enhancer and an acrylic retarder (both are obtained from an arts supply store).
This is the mixture that I add to the Vallejo paint at an approximate ratio of thinner/paint 1:1. This ratio must be varied slightly accoring to humidity, age of the paint, and other factors that only experience can tell.
3) I use 10/0 sable liner brushes, not rounds or "brights" for chipping. This type of brush, a liner, will hold a usable load of paint while still retaining a fine point. Rounds or "brights" (another name for round brushes), tend to hold much less paint in the smaller sized and this causes them to dry out faster and consequently lose their capillary ability.
Liner brushes have very long bristles when compared to rounds for any given size (their diameter). This extra length holds a good amount of paint and slows down how fast it dries in the brush.
4) When painting with acryics, your brushed must be kept claen, so when chipping, you should clean your brushes by swishing them in water quite often. As the paint begines to dry in the bristles, the paint will no longer flow easily. Adding more paint only creates the potential for uncontrolled blobs and spots because you must press the bristles harder agaist the surface. This sets up uncontrolled releases of paint.
In a clean brush, the paint will flow through the bristles and tip to the surface with no pressure required. When this is the case, the pressure is used to spread the bristles and control the width of the line. The speed that the brush is moved controls the amount of paint released to the surface.
5) For chipping, I use a "bulls eye" method of painting several colors, one on top of the other, with each successive spot smaller than the last. This leaves the small lines that represent the edges of the chipped paint and other contrasts that give the chip the appearance of depth.
Here are a couple of examples:
Armorama::Panther G Chipping
Armorama::StuG IV Chipping
Using a paint formulated for hand-brushing, proper thinning, using the correct type of brush, and keeping it clean are the keys to any acrylic brush painting project, to include chipping.
The only way to gain skill and brush control is through practice and experience.
Keep at it and don't give up.
Posted: Wednesday, April 18, 2012 - 05:50 AM UTC
I see you tried your way with Acrylics... I never got around it succesfully. Too gritty as endresult. Try to do chipping with Enamels. Dilute them well with turpentine or something similar. I do my chips with a 10/0 marder hair brush. They are not cheap but well worth it.
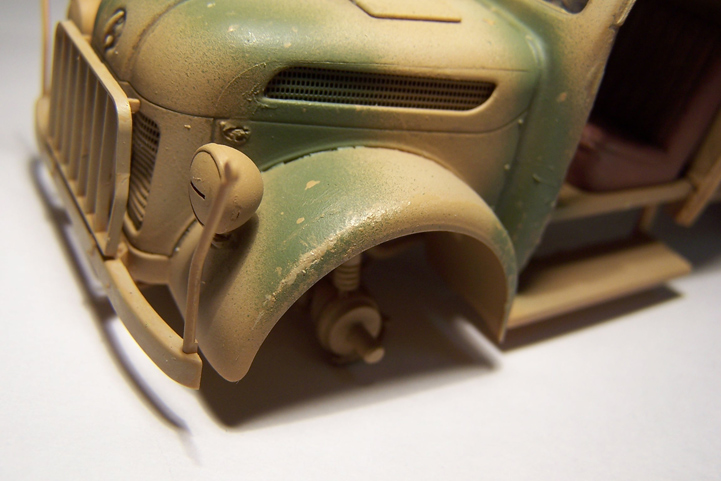
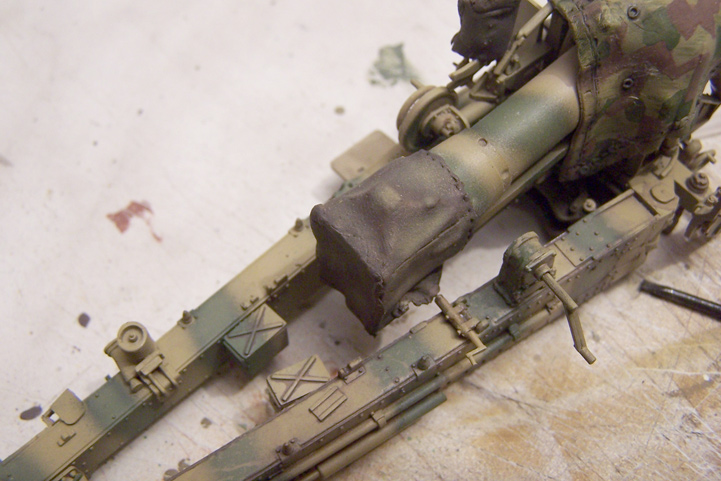
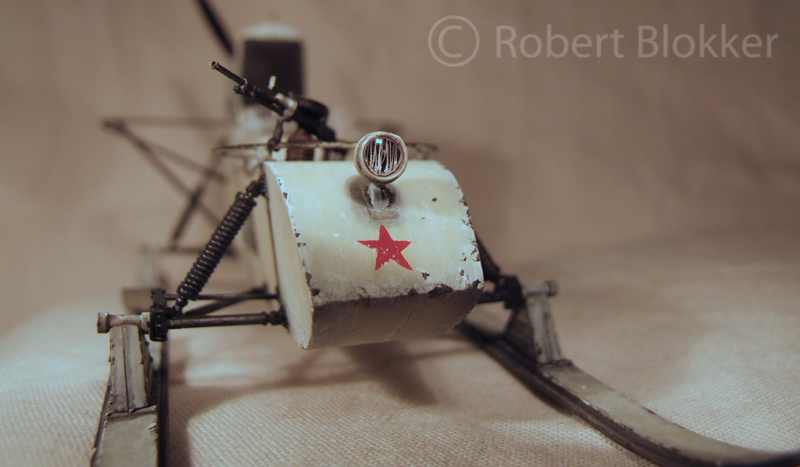
Another tip. Don't overdo it. Military paint is quite hard and allthough there were vehicles with heavy damage to the paint a lot of the models I have seen look like they were pulled straight through a Barbedwire production facility before they were pulled into a Rollerbearing shooting gun test ground. Do the high traffic areas in the vehicle and on the outside the parts that get easily damaged and scuffed. Rims of hatches. Handrails, edges of fenders, edges of hatches. Flat surfaces on which stowage was carried. Note that a lot of surface can get some scuffing and scratching without completely damaging the paint.
Some examples from my builts.
Hotchkiss H39 interior.
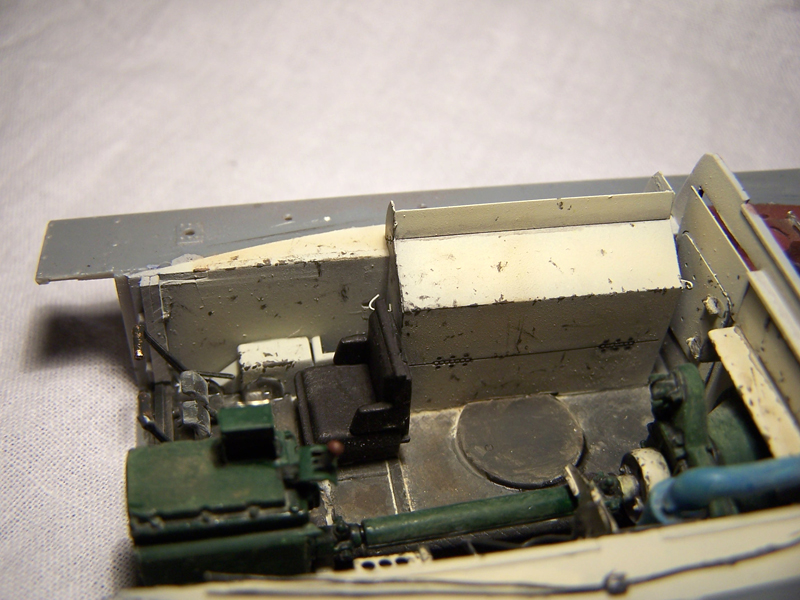
Steyr 1500 Sanka interior

Fender from the same Steyr Sanka
Paint damage on the trailarm of an sFH18
Aerosled
Flaked paint from a Mess tin. Also the edges of the gasmask cannister are chipped showing the aluminum underneath.
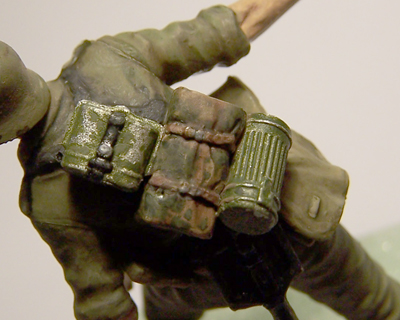
I hope you can find some usefull tips from my explanations. It is a job that takes a lot of time but when done correctly It is well worth it. I'm not a big fan of the sponge method as you get a really high chance of pattern repetition. Even the multilayered chipping method is not always convincing. I know where it comes from but often it looks like a 1:1 tank had a 7cm thick primer layer. I know several modelers who are quite good at the technique but more then not it looks like a very weird local spotty camojob
Another tip. Don't overdo it. Military paint is quite hard and allthough there were vehicles with heavy damage to the paint a lot of the models I have seen look like they were pulled straight through a Barbedwire production facility before they were pulled into a Rollerbearing shooting gun test ground. Do the high traffic areas in the vehicle and on the outside the parts that get easily damaged and scuffed. Rims of hatches. Handrails, edges of fenders, edges of hatches. Flat surfaces on which stowage was carried. Note that a lot of surface can get some scuffing and scratching without completely damaging the paint.
Some examples from my builts.
Hotchkiss H39 interior.

Steyr 1500 Sanka interior

Fender from the same Steyr Sanka

Paint damage on the trailarm of an sFH18

Aerosled

Flaked paint from a Mess tin. Also the edges of the gasmask cannister are chipped showing the aluminum underneath.

I hope you can find some usefull tips from my explanations. It is a job that takes a lot of time but when done correctly It is well worth it. I'm not a big fan of the sponge method as you get a really high chance of pattern repetition. Even the multilayered chipping method is not always convincing. I know where it comes from but often it looks like a 1:1 tank had a 7cm thick primer layer. I know several modelers who are quite good at the technique but more then not it looks like a very weird local spotty camojob
Posted: Saturday, April 21, 2012 - 07:52 AM UTC
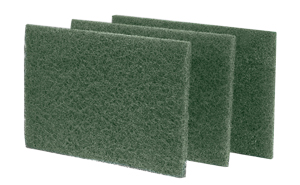
I use a green scrubbing pad cut into very small shapes dipped into full strength paint. Then blot most of the paint off onto a paper towel. Then carefully apply the pad by holding it with a tweezers to the model surface were I want the chipping.

 |


