_GOTOBOTTOM
Armor/AFV: AA/AT/Artillery
For discussions about artillery and anti-aircraft or anti-tank guns.
Hosted by Darren Baker
Howitzer M-109a1 Spanish Army (Italeri 1:35)
ppoller
Visit this Community
Cadiz, Spain / España
Joined: November 06, 2011
KitMaker: 25 posts
Armorama: 24 posts
Posted: Wednesday, June 06, 2012 - 11:49 AM UTC
My name is Pepe. I am a compulsive amateur at modeling.

I present this work to the delight of the fans. My English is null. Therefore will use the google translator. I apologize in advance if I make a mistake in translation.

This project started in September 2011. It consists in the reconstruction of M-109 howitzer from Italeri recreating the entire interior. Both the driver's seat as the camera and combat power plant.

To not show you some pictures as I take. The entire process at: http://escala135.blogspot.com.es/search/label/OB%C3%9AS%20155%2F32%20ATP%20M109A1?max-results=20


I think with these pictures you can get an idea of ​​the magnitude of the project developed. Of course I can put more but the article could be very long. In any case, you can see the work already done at the above address. Although some of you probably already know this work. I hope you enjoy it and greetings from North Africa.
ppoller
Visit this Community
Cadiz, Spain / España
Joined: November 06, 2011
KitMaker: 25 posts
Armorama: 24 posts
Posted: Thursday, June 07, 2012 - 08:05 AM UTC
After my presentation and the Howitzer I'm doing I'll put a summary of what I have done so far. I made this model for over 20 years as it came from box. In its day it seemed pretty good. But lately I looked awful.

So I thought I'd remake it. But it apart and do it again seemed to me silly. So I thought that I could redo in more detail. But a little detail it was not worth it.

Looking for information thought that the detail should be deep so I decided to remake it with the doors, hatches and windows open. Thus the details of whether it would be worthwhile. Would have to recreate all the interior and not just combat camera but also the well of the driver, engine, transmission and batteries.

I did not think enough for the transformation is a huge job and it is not certain to succeed. And if this is not enough, for not only do I have to start cutting up the model, if I have to destroy it to open all the windows.

But who's afraid ... If it goes well it will be the first to the second or whatever. So here goes.

Now put a series of photographs to summarize what I have done. Hope you like.


Whiskey6
Visit this Community
North Carolina, United States
Joined: August 15, 2006
KitMaker: 408 posts
Armorama: 215 posts
Posted: Sunday, June 10, 2012 - 02:02 AM UTC
Excellent work. I have an M-109A2 in my stash that I hope to build into an M-109A1 one of these years......if I can ever get enough time away from work.
ppoller
Visit this Community
Cadiz, Spain / España
Joined: November 06, 2011
KitMaker: 25 posts
Armorama: 24 posts
Posted: Sunday, June 10, 2012 - 02:24 AM UTC
Thanks David, I'm glad you like it. I'll watch when you start the model.
Hi all again.
I continue with the summary of this work.


And here the summary. I hope it is of interest.
The entire process at: http://escala135.blogspot.com.es/
Greetings from North Africa
bigmal
Visit this Community
England - East Midlands, United Kingdom
Joined: February 21, 2011
KitMaker: 211 posts
Armorama: 176 posts
Posted: Sunday, June 10, 2012 - 08:37 AM UTC
Superb modelling, Pepe, very impressive.


Malcolm
ppoller
Visit this Community
Cadiz, Spain / España
Joined: November 06, 2011
KitMaker: 25 posts
Armorama: 24 posts
Posted: Sunday, June 10, 2012 - 08:43 AM UTC

Quoted Text

Superb modelling, Pepe, very impressive.


Malcolm


Malcolm thank you very much. Glad you like it.
Teaker11
Visit this Community
California, United States
Joined: July 02, 2009
KitMaker: 962 posts
Armorama: 786 posts
Posted: Sunday, June 10, 2012 - 10:01 AM UTC
Outstanding work I really like your paint job.
Jim
redleg12
Visit this Community
New Jersey, United States
Joined: March 11, 2007
KitMaker: 872 posts
Armorama: 831 posts
Posted: Sunday, June 10, 2012 - 11:30 AM UTC
I absolutely love all the scratch work ,especially the interior of the fighting compartment.....outstanding.

Rounds Complete!!
ppoller
Visit this Community
Cadiz, Spain / España
Joined: November 06, 2011
KitMaker: 25 posts
Armorama: 24 posts
Posted: Monday, June 11, 2012 - 08:49 AM UTC
Mike, Jim thank you very much for your visit. I'm glad you like this job.
Greetings from North Africa.


http://escala135.blogspot.com.es/
ppoller
Visit this Community
Cadiz, Spain / España
Joined: November 06, 2011
KitMaker: 25 posts
Armorama: 24 posts
Posted: Tuesday, July 10, 2012 - 06:56 AM UTC
Hi all.
Once I decided on the figure that I will use in this project I show progress.
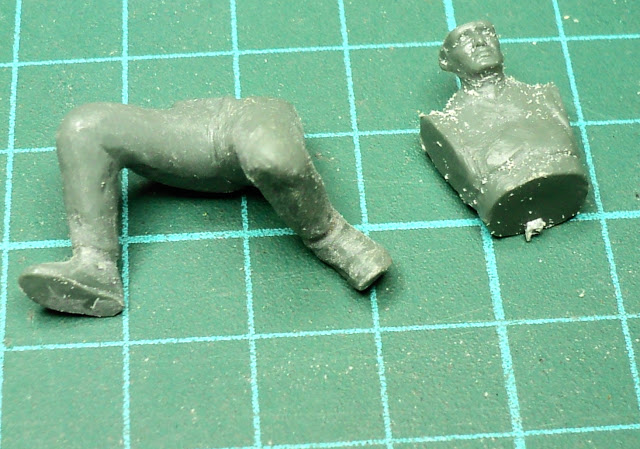
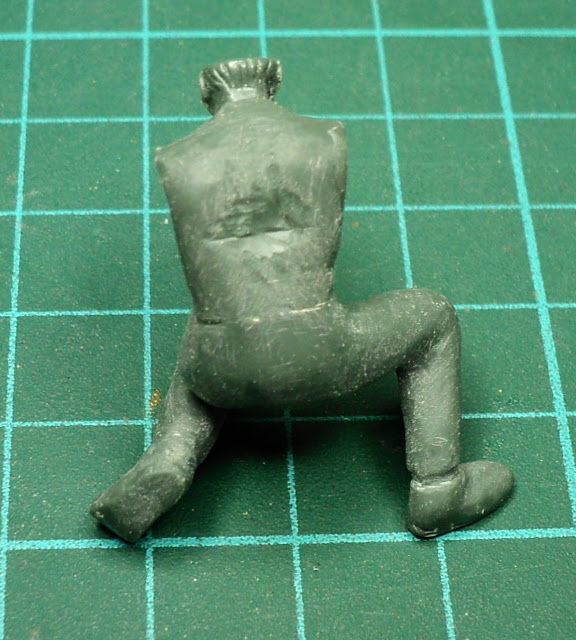
After thinking a lot about how he would put the figure (bearing in mind that I wanted a logical position but without a bullet, much less one as he put it just to be able to assess the actual size of the piece)and find that I could serve, I found these pieces. If I remember correctly, are old Tamiya figures accompanying a demo coming. From the waist down is a German soldier that I came with the model of PAK-40. Of the arms I have no idea. And the body of a German rider, I think the model of the FLAK 36/37 from Tamiya. Between all parties will think that I will figure it.

Hola a todos.

Una vez me he decidido por la figura que voy a emplear en este proyecto os muestro los avances.
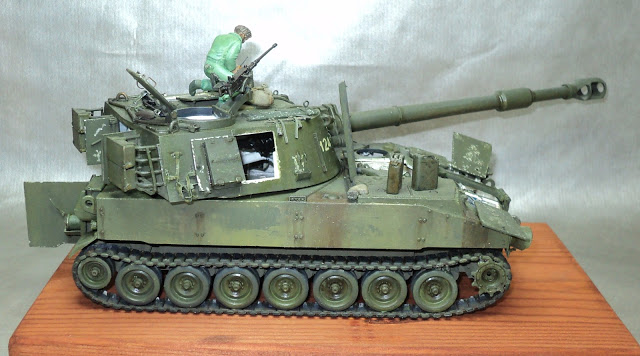
Después de darle muchas vueltas a cómo iba a poner la figura (teniendo en cuenta que quería una postura lógica pero sin hacer una viñeta ni mucho menos un dio ya que sólo la pongo para que se pueda apreciar el tamaño real de la Pieza) y de buscar en el cajón de sastre la que me pudiera servir, encontré estos trozos. Si no recuerdo mal, son viejas figuras de Tamiya que venían acompañando alguna maqueta. De cintura para abajo es un soldado aleman que creo venia con el PAK-40. Los brazos ni idea. Y el tronco un motorista alemán creo que del FLAK 36/37 también de Tamiya. Entre todas las partes creo que saldrá la figura que me vendrá bien:


The next thing is to remove all the bas-relief (wrinkles, clothes, etc ...) with the Dremel, sand, lime and blade:

Lo siguiente es quitarle todo el bajo relieve (arrugas , ropa, etc...) con la Dremel, lija, lima y cuchilla:


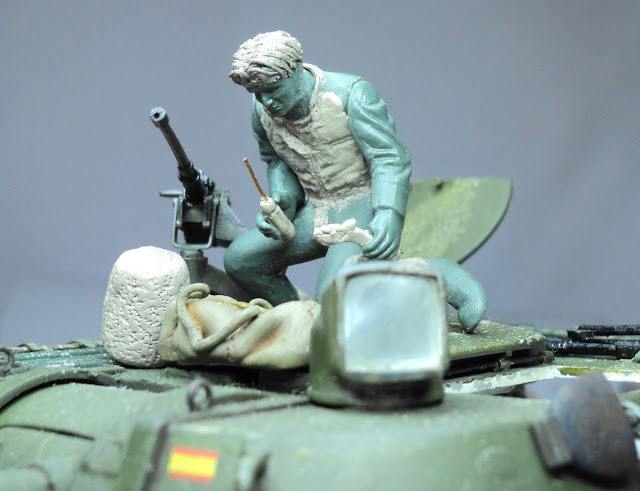
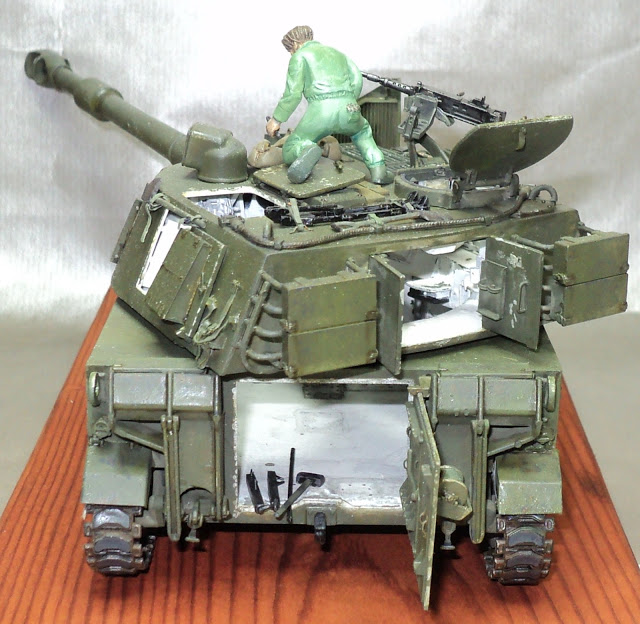
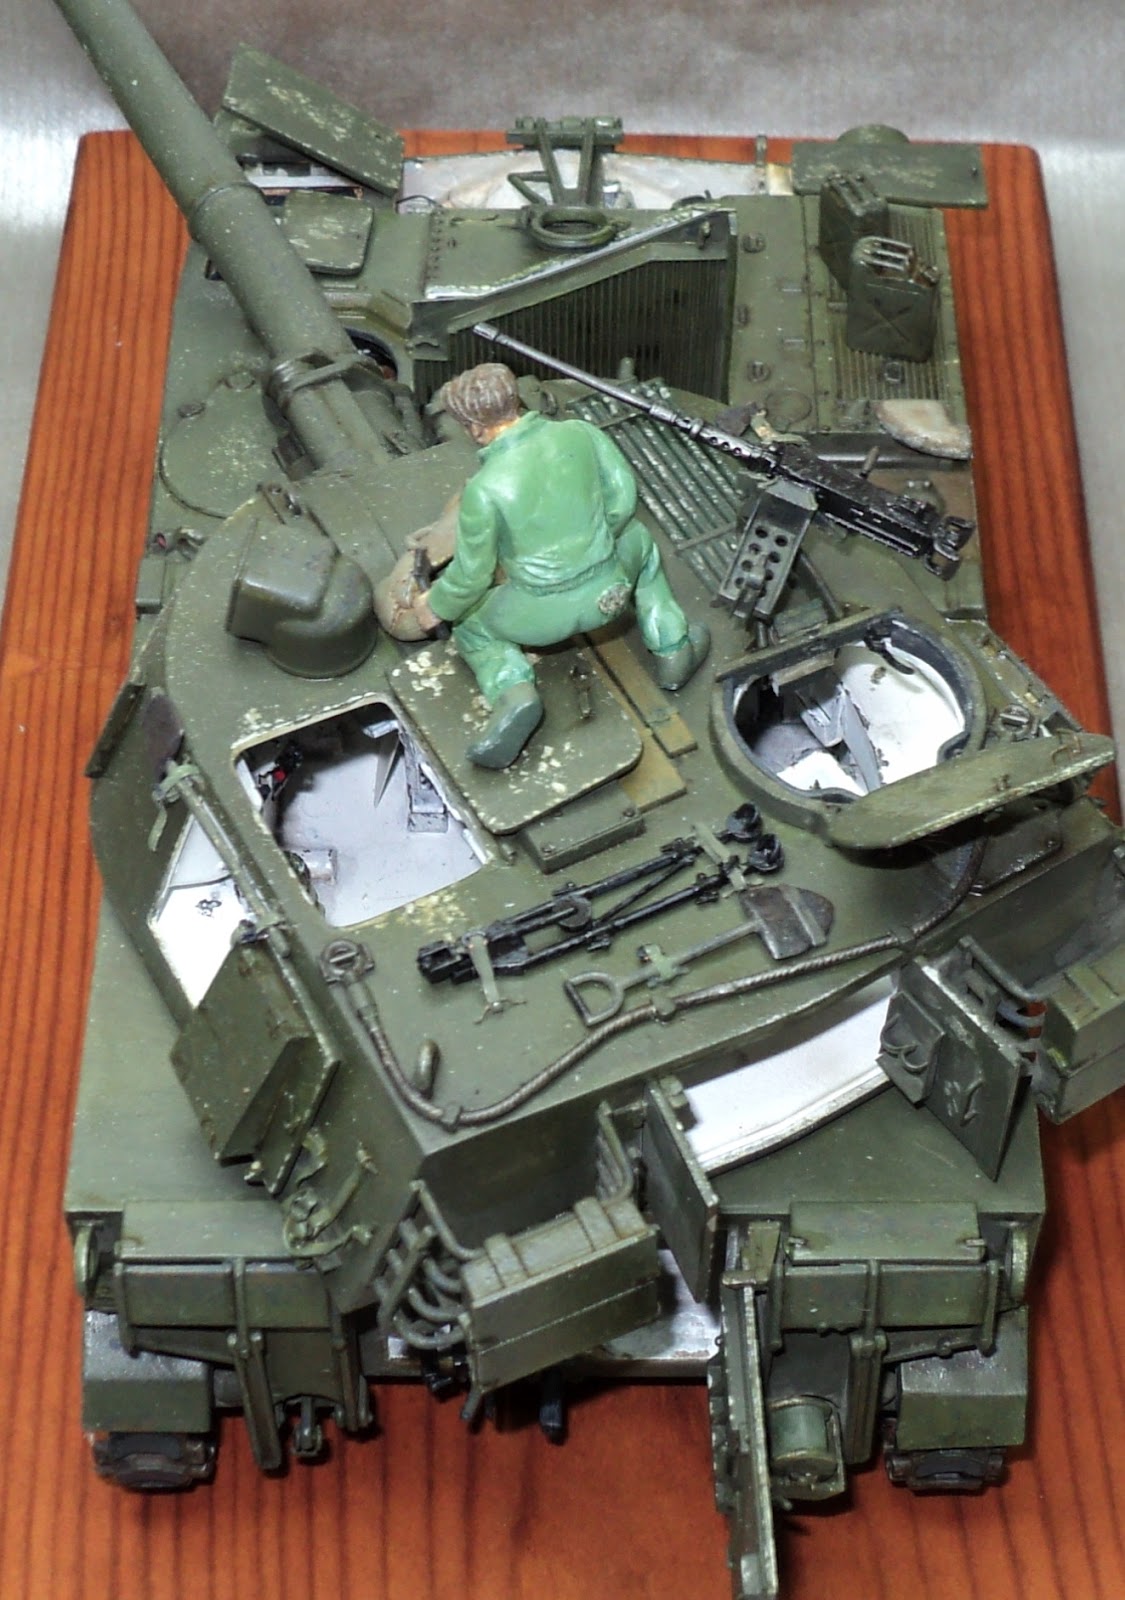
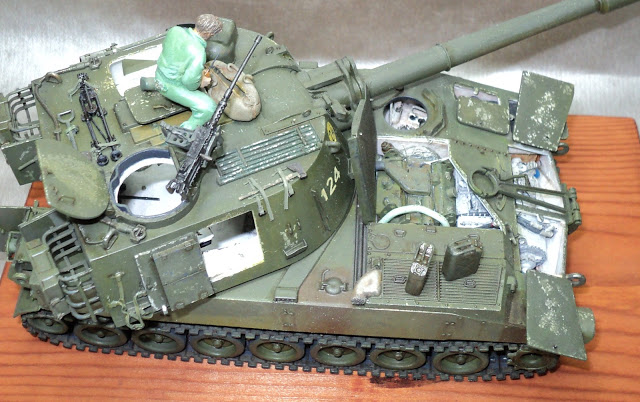
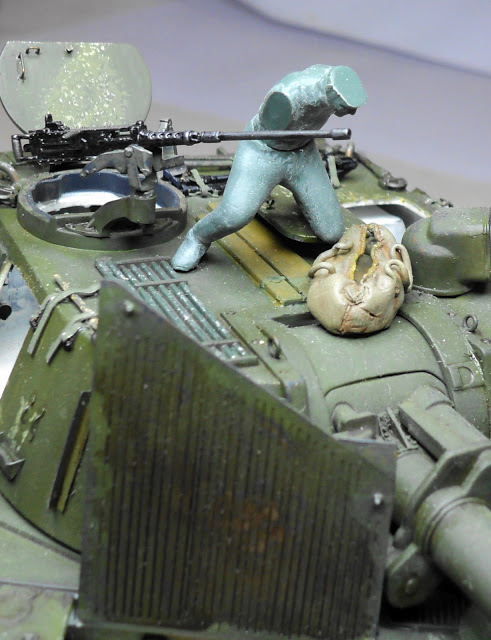
And this is the idea. Place it on the tower, looking for something in the tool bag with a screwdriver in his hand:

Y esta es la idea. Colocarlo sobre la torre, buscando algo en la bolsa de herramientas con un destornillador en la mano:


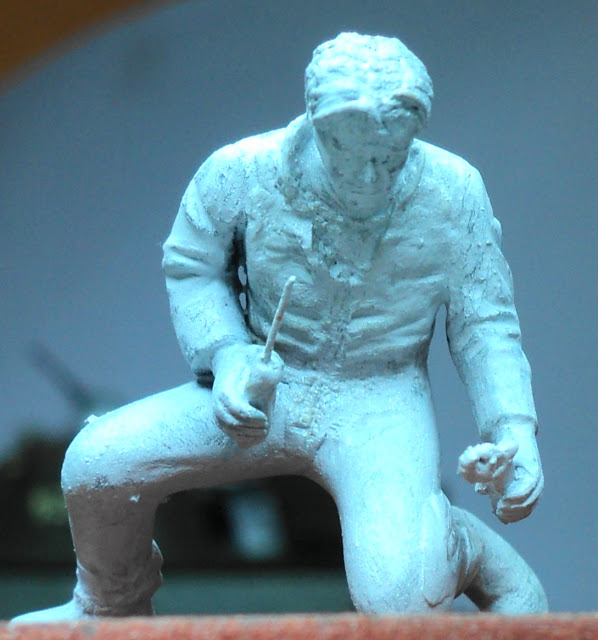
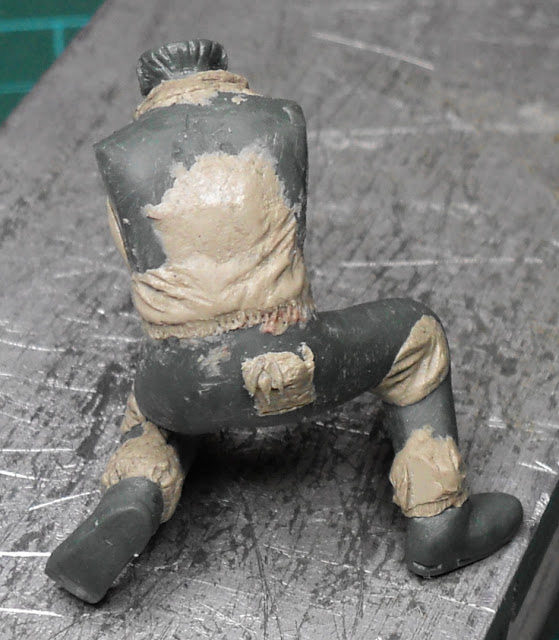
The uniform that you want to put your typical "cute" green they gave us for use in maintenance and cleaning, to save the slaughter. It had a zipper front with a pocket, also zippered chest, two open pockets on the waist and one in the rear. The shoe that was used was the boot three buckles or shoes, type loot, green canvas of the brand "shoes" or "chain" with a thin rubber sole. Surely anyone remember the damn things shoes. I want to make the figure with these shoes (lol). After filing and sanding hit the body and legs and adjusted with sandpaper. Needless puty that I have to add putty to model the ways:

El uniforme que le quiero poner es el típico "mono" verde que nos daban para usarlo en tareas de mantenimiento y limpieza para no gastar el de faena. Éste llevaba una cremallera delante, con un bolsillo, también con cremallera, en el pecho, dos bolsillos abiertos en la cintura y uno en la parte trasera. El calzado que se usaba era la bota de tres hebillas o las zapatillas, tipo botín, de lona color verde de la marca "keds" o "la cadena" con una suela fina de goma. Seguro que alguno se acuerda de la puñeteras zapatillas. Yo quiero hacer la figura con estas zapatillas (jejeje). Una vez limado y lijado uno el tronco con las piernas y ajusto con lija. No hace falta puty por que le tengo que añadir masilla para modelar las formas:


Here are appreciated additions to the rear with the marking of the elastic waistband and back pocket when he placed the typical strand cotton ball we used to clean our hands instead of rags. It is also seen round the neck, lifted (typical also in the workshops) and elastic ankles:

Aquí se aprecian los añadidos de la parte trasera con el marcado de la cinturilla elástica y el bolsillo trasero al que le colocado la típica bola de hebras de algodón que usábamos para limpiarnos las manos en lugar de utilizar trapos. También se aprecia el cuello redóndo, levantado a lo elvis (típico también en los talleres) y el elástico de los tobillos:


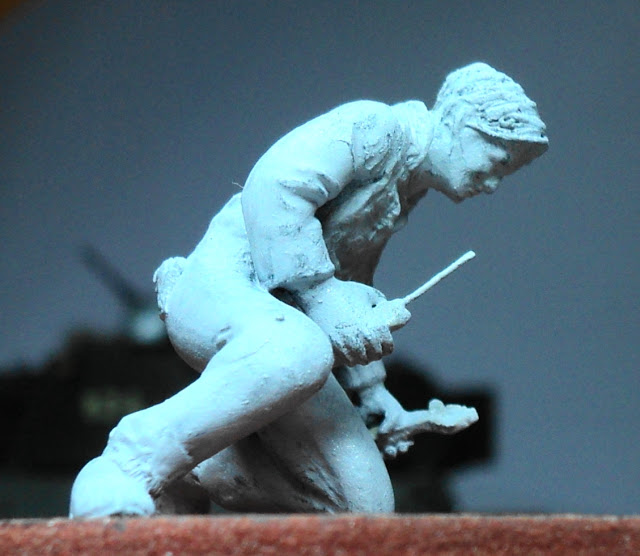
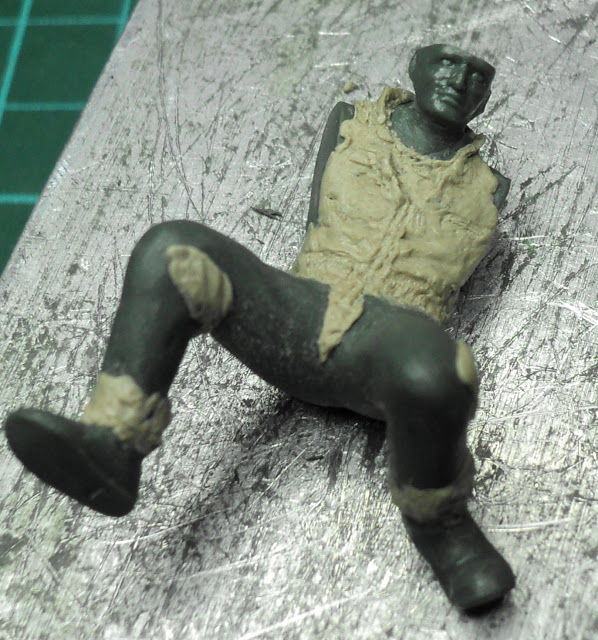
From the front shows the zipper halfway down the chest and the green jersey. I had to stop until the putty hardens and can continue placing the front pockets, shaping and sanding the volumes without distorting the shoes recreate what has been done:

Por la parte delantera se aprecia la cremallera bajada hasta la mitad del pecho, asomando la camiseta verde. He tenido que parar para que se endurezca la masilla y poder continuar colocando los bolsillos delanteros, darle forma a los volúmenes con lija y recrear las zapatillas sin deformar lo ya hecho:


I hope you are enjoying and greetings from North Africa.
And forgive the "translator" of Google and me for not knowing English
Espero que os esté gustando y un saludo desde el norte de África.
ppoller
Visit this Community
Cadiz, Spain / España
Joined: November 06, 2011
KitMaker: 25 posts
Armorama: 24 posts
Posted: Wednesday, July 11, 2012 - 08:00 AM UTC
Hi all again
Once dry I've stuck their arms. In his left hand I put a screwdriver and a wrench right. I have made the top of his head and I added strands of hair putty made ​​with Andrea Sculp

Una vez seca la parte anterior sigo con la figura.

Le he pegado los brazos. En la mano izquierda le he puesto un destornillador y en la derecha una llave inglesa. Le he hecho la parte superior de la cabeza y le he añadido mechones de pelo con masilla Andrea Sculp


When dry it will adjust the arms shoulders.

Cuando estén secos los brazos le ajustaré los hombros.


And so far will be (more or less):

Y de momento así va a quedar (más o menos):


I hope you are enjoying and greetings from North Africa.

Espero que os esté gustando y un saludo desde el norte de África.
Dangeroo
#023
Visit this Community
Zurich, Switzerland
Joined: March 13, 2009
KitMaker: 2,058 posts
Armorama: 1,656 posts
Posted: Wednesday, July 11, 2012 - 08:09 PM UTC
Great work on the 109. I served on these and have had plans to build one for years. Your build might just have brought me a little closer...

Cheers!
Stefan
ppoller
Visit this Community
Cadiz, Spain / España
Joined: November 06, 2011
KitMaker: 25 posts
Armorama: 24 posts
Posted: Saturday, July 14, 2012 - 06:12 AM UTC

Quoted Text

Great work on the 109. I served on these and have had plans to build one for years. Your build might just have brought me a little closer...

Cheers!
Stefan


Thank you very much, Stefan. I'm glad that you like and mood.
PedroA
Visit this Community
Valencia, Spain / España
Joined: December 27, 2010
KitMaker: 324 posts
Armorama: 322 posts
Posted: Sunday, July 15, 2012 - 07:46 AM UTC
Excellent model Pepe. You have work very hard detailing this old kit.

Congratulations.

Un abrazo.

Pedro.
sampiero
Visit this Community
Cote-d`Or, France
Joined: January 14, 2008
KitMaker: 257 posts
Armorama: 250 posts
Posted: Sunday, July 15, 2012 - 08:45 AM UTC
ola hombre
excellent work, I monitor this arrangement for my M108.
good luck
sampiero
ppoller
Visit this Community
Cadiz, Spain / España
Joined: November 06, 2011
KitMaker: 25 posts
Armorama: 24 posts
Posted: Monday, July 16, 2012 - 08:48 AM UTC

Quoted Text

Excellent model Pepe. You have work very hard detailing this old kit.

Congratulations.

Un abrazo.

Pedro.


Muchas gracias Pedro. Un abrazo desde el norte de África.
ppoller
Visit this Community
Cadiz, Spain / España
Joined: November 06, 2011
KitMaker: 25 posts
Armorama: 24 posts
Posted: Monday, July 16, 2012 - 08:49 AM UTC

Quoted Text

ola hombre
excellent work, I monitor this arrangement for my M108.
good luck
sampiero


thanks sampiero
ppoller
Visit this Community
Cadiz, Spain / España
Joined: November 06, 2011
KitMaker: 25 posts
Armorama: 24 posts
Posted: Monday, July 16, 2012 - 08:53 AM UTC
And with the next set of photos end figure:

After sanding, grinding and polishing have given a dilute layer puty:


Then I tried to paint according to the canons of painting (unsuccessfully, of course)


And ready to put in place.

Finally I will end this project I started ne September 2011 and held in July 2012.

That said, the super detailed finished Howitzer 155/32 M-109a1. Kit Italeri old, which I've added everything I could from scrtach.

And here you have more than what I got:


The full process:http://escala135.blogspot.com.es/search/label/OB%C3%9AS%20155%2F32%20ATP%20M109A1

I hope not to bore you with both roll and you liked the pattern obtained with utlizadas techniques.
Thank you very much to tosdos those who have helped me, encouraged and followed, I hope the next project and greetings from North Africa.

Ceuta in July 2012.
 _GOTOTOP