Hello everyone,
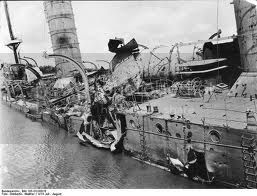
I thought I would post a few pictures of my latest project. I have avid interest in the First World War, especially as the conflict spread to the various European colonies across the world. This photograph may be familiar to a few people :
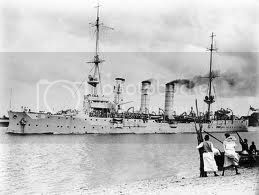
This is the German commerce raider SMS Konigsberg. This photograph and the story around this ship is the basis and inspiration for my vignette.
Hosted by Darren Baker
Vignette : The Rufiji Delta 1915
garthj
Ontario, Canada
Joined: August 15, 2006
KitMaker: 282 posts
Armorama: 229 posts
Joined: August 15, 2006
KitMaker: 282 posts
Armorama: 229 posts
Posted: Saturday, June 09, 2012 - 01:20 AM UTC
garthj
Ontario, Canada
Joined: August 15, 2006
KitMaker: 282 posts
Armorama: 229 posts
Joined: August 15, 2006
KitMaker: 282 posts
Armorama: 229 posts
Posted: Saturday, June 09, 2012 - 01:41 AM UTC
To continue the story :
SMS Konigsberg was delpyed to the Indian Ocean in 1906. She was relentlessly pursued by the Royal Navy and by August 1914, she was tracked to Dar-Es-Salaam where she sought refuge in the Rufiji delta, in modern day Tanzania. After numerous attempts to sink her, she was finally damaged beyond repair and on July 11, 1915, she was scuttled by her crew.
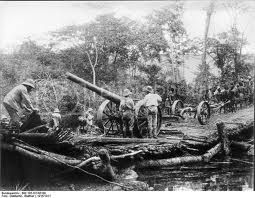
Much of Konigsberg armament was removed, including her 4-inch guns, which were pressed into land-based service with General Paul Lettow-Vorbeck's land based troops.
I was inspired to capture this story in a small vignette. I decided to include a few key aspects. The terrain and vegetation, the aftermath of the naval battle, the loss of the ship and the isolation of the crew.
I decided on an initial layout of 1 or 2 figures, a section of the river bank, the dark, fetid river water and a way to tie this all together.
More to follow soon.
Cheers,
Garth
REMEARMR
United Kingdom
Joined: August 17, 2002
KitMaker: 443 posts
Armorama: 357 posts
Joined: August 17, 2002
KitMaker: 443 posts
Armorama: 357 posts
Posted: Saturday, June 09, 2012 - 02:06 AM UTC
Sounds good, are you going to try to recreate the bridge picture?
garthj
Ontario, Canada
Joined: August 15, 2006
KitMaker: 282 posts
Armorama: 229 posts
Joined: August 15, 2006
KitMaker: 282 posts
Armorama: 229 posts
Posted: Saturday, June 09, 2012 - 02:10 AM UTC
The build begins:
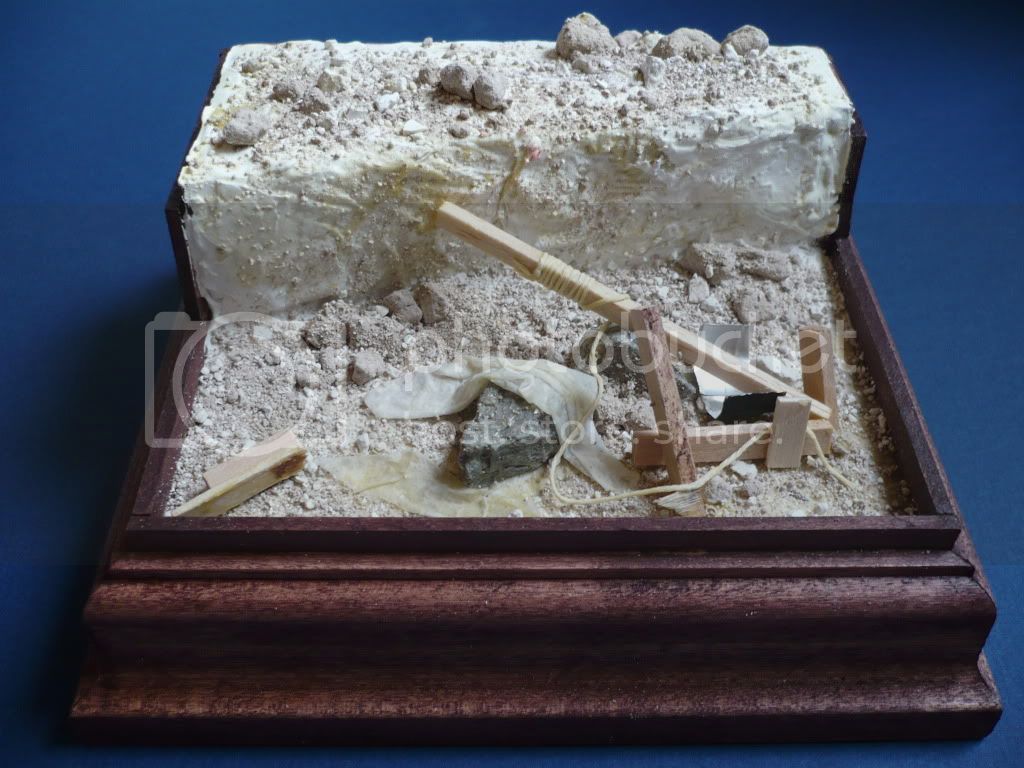
The base is a 6 inch by 6 inch piece of expanded polysyrene, with a raised portion for the riverbank. The base is enclosed with mitred poplar moulding (from the hardware store). I stained the decorative edges with cherry oak stain.
The groundwork is Polyfilla, mixed with white glue for strength. I added a few natural rocks and some debris to rivers edge and for this I used a few offcuts of balsa wood, string (for rope) and bits of tissue paper, to simulate discarded tarps. I sealed all the edges of the base with PVA adhesive. This base would be holding resin and so it had to be perfectly sealed to prevent any leaks.
Photographs of the wreck show she was scuttled a fair distance off-shore, so it would be impossible to show a section of the ship. The presence of debris and some wreckage is being used to imply its presence.
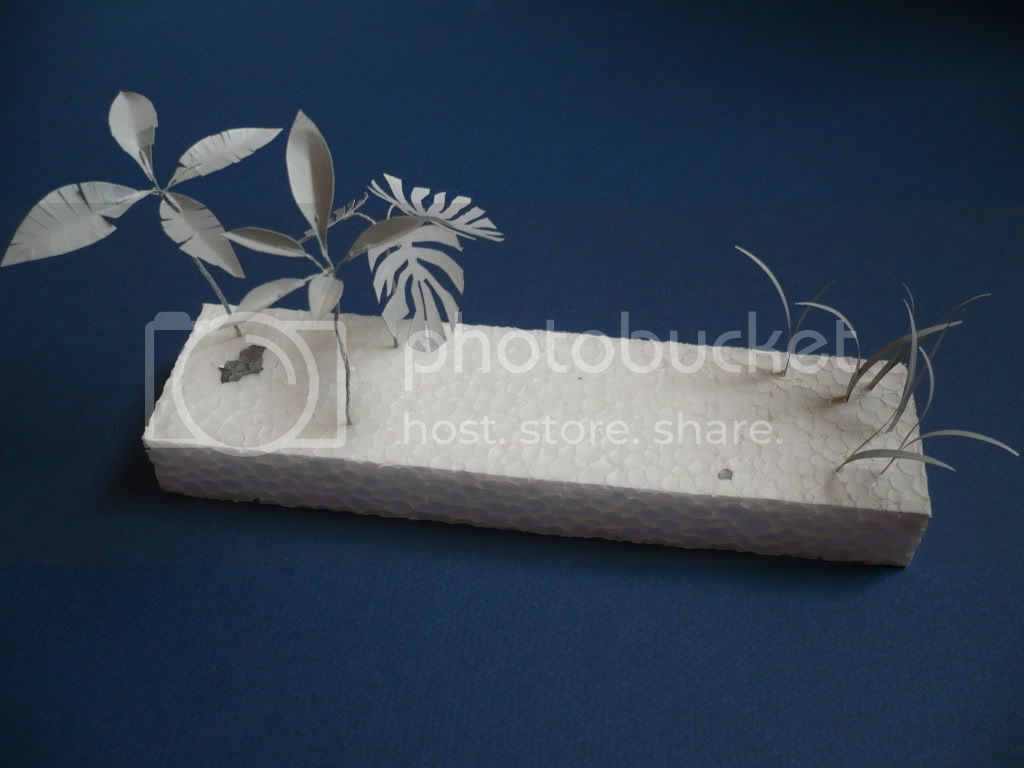
Work then began on the plants and foliage. All my plants were made with paper, coated with liquid plastic (essentially plastic sprue dissolved in chloroform ( watch out for the fumes!) Stems are made from twisted picture framing wire. At this stage they have been primed for painting.
More pictures to come soon.
Cheers Garth
garthj
Ontario, Canada
Joined: August 15, 2006
KitMaker: 282 posts
Armorama: 229 posts
Joined: August 15, 2006
KitMaker: 282 posts
Armorama: 229 posts
Posted: Saturday, June 09, 2012 - 03:56 AM UTC
Hi REMEARMR,
Not exactly, I though something a little more simple this time. Thanks for taking the time to look in.
Regards,
Garth
Not exactly, I though something a little more simple this time. Thanks for taking the time to look in.
Regards,
Garth
garthj
Ontario, Canada
Joined: August 15, 2006
KitMaker: 282 posts
Armorama: 229 posts
Joined: August 15, 2006
KitMaker: 282 posts
Armorama: 229 posts
Posted: Saturday, June 09, 2012 - 04:00 AM UTC
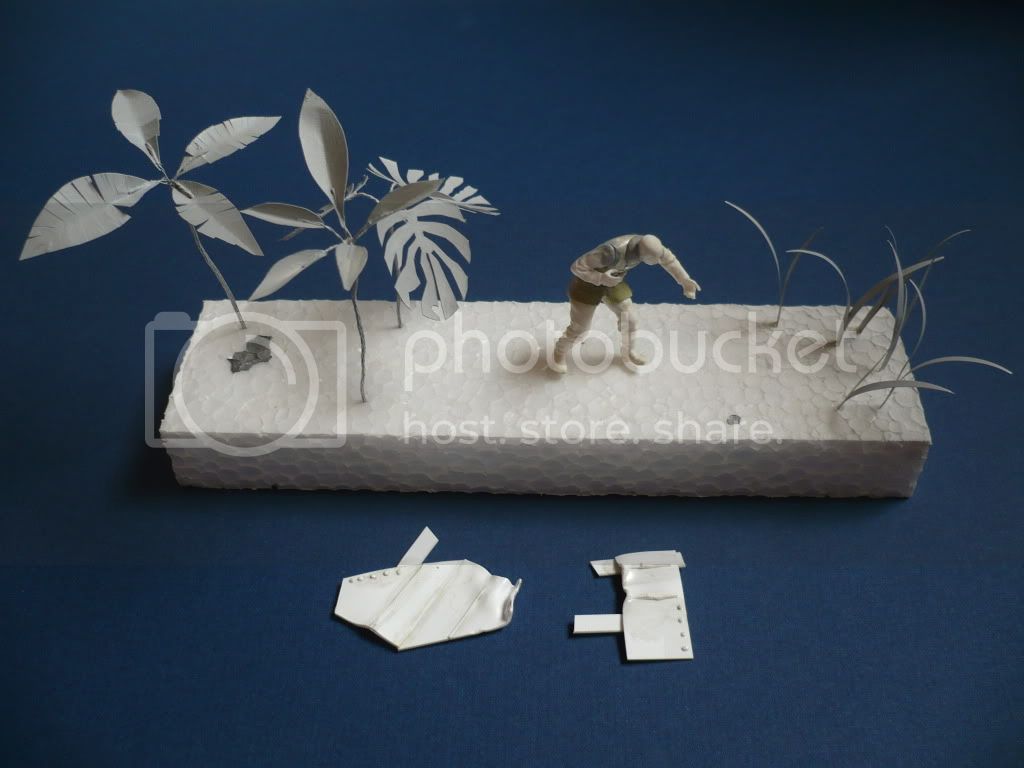
This picture shows some work on the main figure. He is essentially based on Airfix Multipose parts, from the German WW2 set. Left arm has been modified. All the tunic details were sanded off with my motor tool and the M1914 field 'bluse' has been rebuilt with Milliput. He will be wearing the M1914 issue tropical helmet which will be sculpted from Milliput as well. His head is from the kit parts.
I also put together two sections of plastic card. These will represent a few twisted, rusted metal portions of the wreckage.
garthj
Ontario, Canada
Joined: August 15, 2006
KitMaker: 282 posts
Armorama: 229 posts
Joined: August 15, 2006
KitMaker: 282 posts
Armorama: 229 posts
Posted: Saturday, June 09, 2012 - 06:00 AM UTC
Here is an update on the figure work:
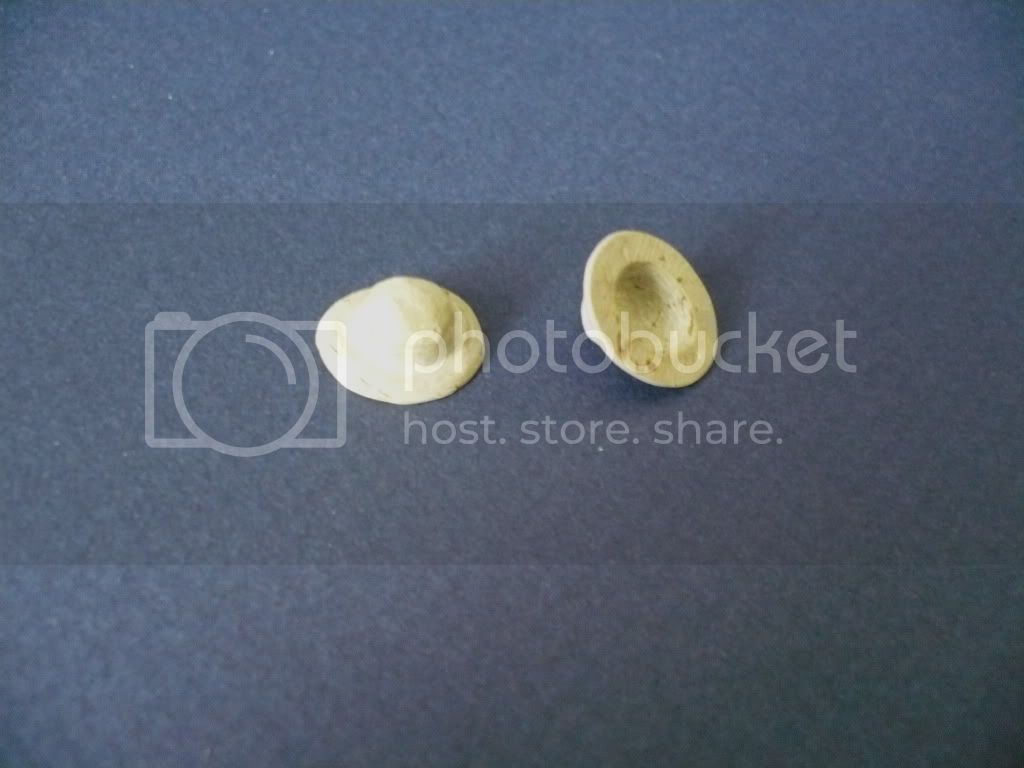
M1914 issue German tropical helemts, sculpted from Millput. The helmets needed to be hollow, so this was achieved with my motor tool and a cutting / carving bit. I made 3 helmets so that I have a master to cast in resin for other projects.
garthj
Ontario, Canada
Joined: August 15, 2006
KitMaker: 282 posts
Armorama: 229 posts
Joined: August 15, 2006
KitMaker: 282 posts
Armorama: 229 posts
Posted: Saturday, June 09, 2012 - 07:02 AM UTC
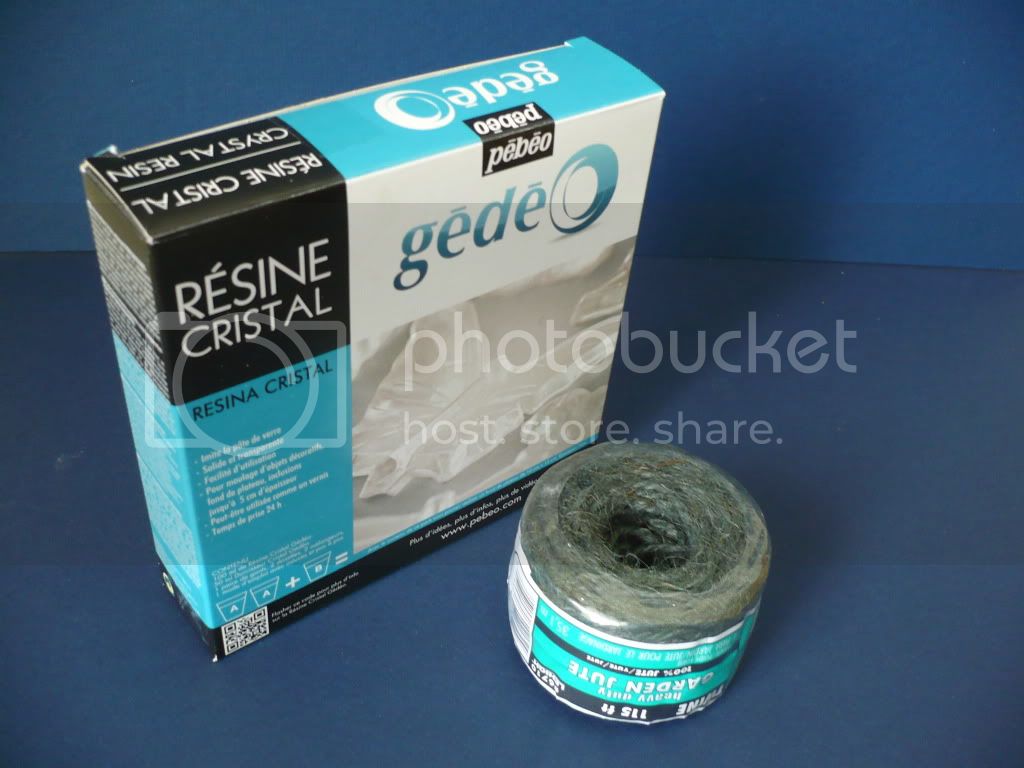
Here's a few items which will be used in the project:
Epoxy resin - slow drying, takes 24 hours to dry. Available from art shops (Deserres in Canada)
Garden twine - for tufts of long grass
Epoxy resin - slow drying, takes 24 hours to dry. Available from art shops (Deserres in Canada)
Garden twine - for tufts of long grass
Peelou75
Budapest, Hungary
Joined: April 09, 2009
KitMaker: 140 posts
Armorama: 138 posts
Joined: April 09, 2009
KitMaker: 140 posts
Armorama: 138 posts
Posted: Saturday, June 09, 2012 - 07:46 AM UTC
Very interesting subjects, I really look forward to it.
garthj
Ontario, Canada
Joined: August 15, 2006
KitMaker: 282 posts
Armorama: 229 posts
Joined: August 15, 2006
KitMaker: 282 posts
Armorama: 229 posts
Posted: Saturday, June 09, 2012 - 09:48 AM UTC
Next stage:
This photograph shows quite a big jump in progress. The groundwork was airbrushed with Tamiya Red Brown (XF64) and then over-sprayed with Tamiya Dark Yellow (XF60). This gave a dry, dusty appearance to the river bank. The river bed was also sprayed with Red Brown and then washed with Sepia oil paint.
The figure was painted with Tamiya acrylic base colours, heavily thinned and then over-painted with artist oils, for shading and highlights. For flesh, I undercoat with Tamiya Desert Yellow and finish with artists oils.
The plants have been sprayed with Tamiya Nato Green (XF67).Highlights were sprayed with Tamiya Flat Green (XF-5).
Additional grasses were added with garden twine, glued in place and then teased out. Static grass provided some fill in colour and texture.
I will explain the water effects in a little more detail.
garthj
Ontario, Canada
Joined: August 15, 2006
KitMaker: 282 posts
Armorama: 229 posts
Joined: August 15, 2006
KitMaker: 282 posts
Armorama: 229 posts
Posted: Saturday, June 09, 2012 - 09:55 AM UTC
Water effects and debris :
The rusted metal parts were sprayed with Tamiya Neutral Grey and then heavily drybrushed. The rust was added with artists pastels mixed with white spirit. The debris was weathered with pastels and artists oils. My reeds were drilled and glued into the riverbed with PVA glue.
Water was reproduced using epoxy resin (pictured above). The resin was mixed according to the instructions and then tinted with artists oil colours. Adding white to the resin helped turn the resin somewhat opaque. About 30 ml of resin was needed to complete the water. A single pour was used, some 5ml thick
Cheers
Garth
kiweed420
Hamilton, New Zealand
Joined: October 18, 2011
KitMaker: 21 posts
Armorama: 19 posts
Joined: October 18, 2011
KitMaker: 21 posts
Armorama: 19 posts
Posted: Saturday, June 09, 2012 - 05:51 PM UTC
looks like a great dio Garth.
The paper plants looks awesome
saarrefaeli
Israel
Joined: January 21, 2006
KitMaker: 7 posts
Armorama: 7 posts
Joined: January 21, 2006
KitMaker: 7 posts
Armorama: 7 posts
Posted: Saturday, June 09, 2012 - 10:09 PM UTC
looks great
garthj
Ontario, Canada
Joined: August 15, 2006
KitMaker: 282 posts
Armorama: 229 posts
Joined: August 15, 2006
KitMaker: 282 posts
Armorama: 229 posts
Posted: Saturday, June 09, 2012 - 11:18 PM UTC
Hi,
Thanks for looking in.
Cheers,
Garth
Thanks for looking in.
Cheers,
Garth
wildsgt
Kentucky, United States
Joined: May 27, 2007
KitMaker: 327 posts
Armorama: 259 posts
Joined: May 27, 2007
KitMaker: 327 posts
Armorama: 259 posts
Posted: Saturday, June 09, 2012 - 11:21 PM UTC
Outstanding work the plants are great.
garthj
Ontario, Canada
Joined: August 15, 2006
KitMaker: 282 posts
Armorama: 229 posts
Joined: August 15, 2006
KitMaker: 282 posts
Armorama: 229 posts
Posted: Saturday, June 09, 2012 - 11:23 PM UTC
Update:
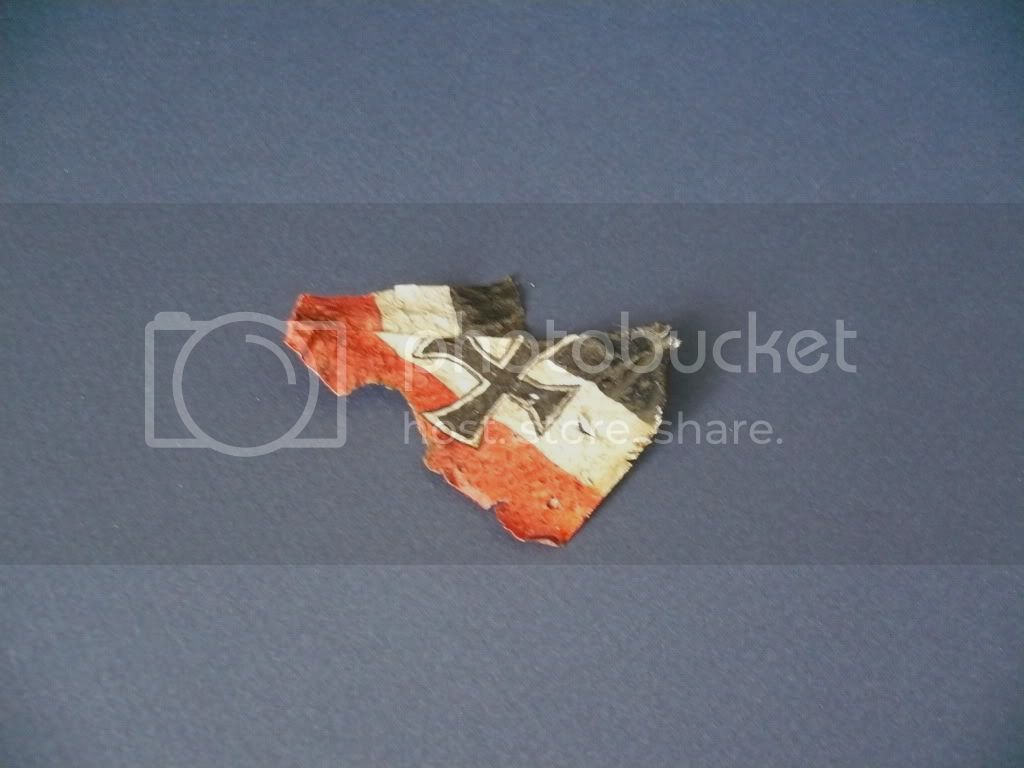
The focal point of the vignette would be this Imperial German Naval ensign. It was made from thin paper towel, set with PVA glue mixed with water. After achieving a natural shape, it was dried for 12 hours. I painted the flag with waterproof acrylic inks. This would allow the flag to be moistened with water again to allow it to be re-shaped.
garthj
Ontario, Canada
Joined: August 15, 2006
KitMaker: 282 posts
Armorama: 229 posts
Joined: August 15, 2006
KitMaker: 282 posts
Armorama: 229 posts
Posted: Saturday, June 09, 2012 - 11:25 PM UTC
Hi Bill,
Thanks for the comments. I think I can improve on the next attempt, hopefully.
Cheers
Garth
Thanks for the comments. I think I can improve on the next attempt, hopefully.
Cheers
Garth
garthj
Ontario, Canada
Joined: August 15, 2006
KitMaker: 282 posts
Armorama: 229 posts
Joined: August 15, 2006
KitMaker: 282 posts
Armorama: 229 posts
Posted: Saturday, June 09, 2012 - 11:32 PM UTC
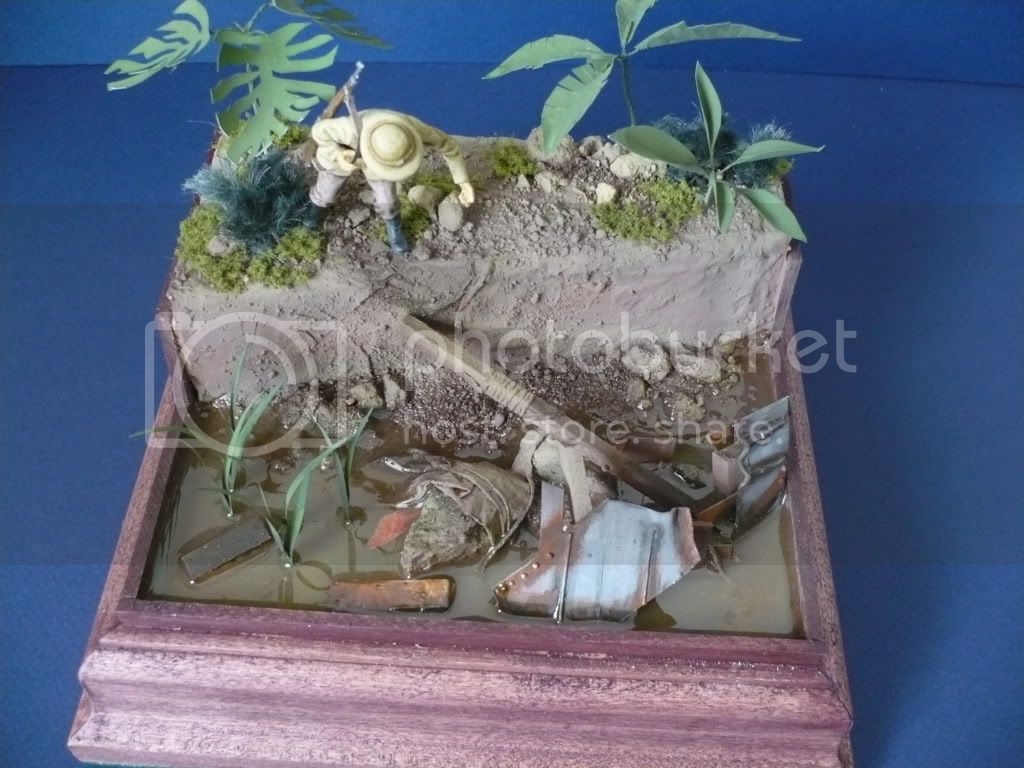
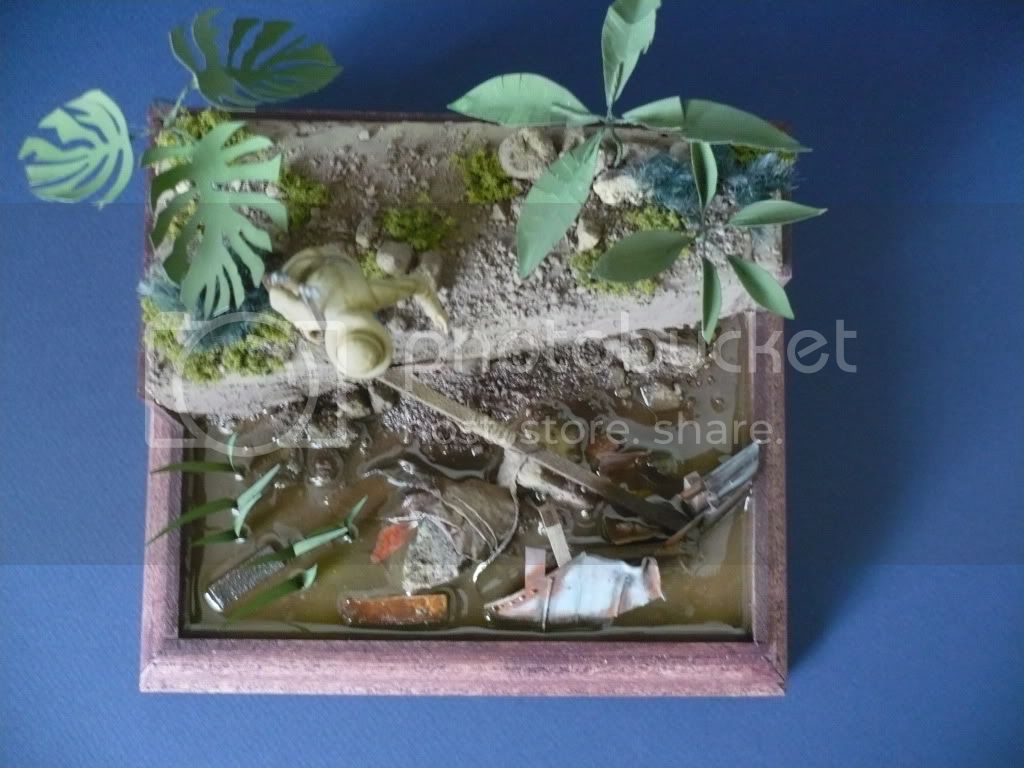
Here is a top view of the diorama, showing all the elements in place:
I just have to get the flag positioned.
garthj
Ontario, Canada
Joined: August 15, 2006
KitMaker: 282 posts
Armorama: 229 posts
Joined: August 15, 2006
KitMaker: 282 posts
Armorama: 229 posts
Posted: Saturday, June 09, 2012 - 11:39 PM UTC
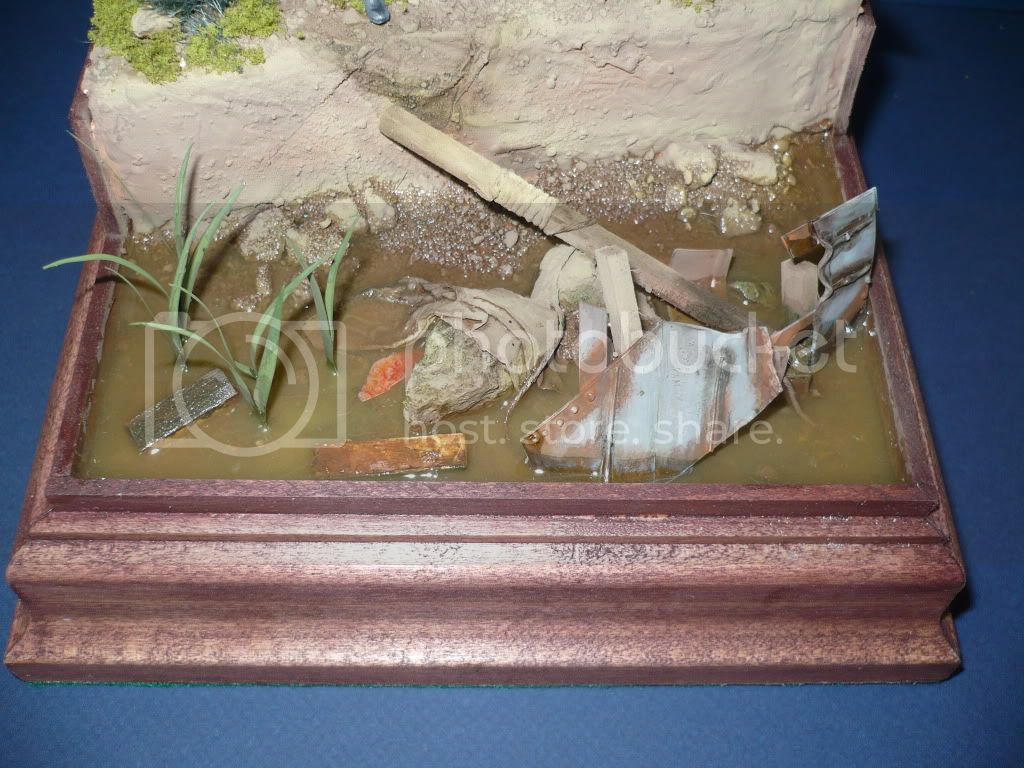
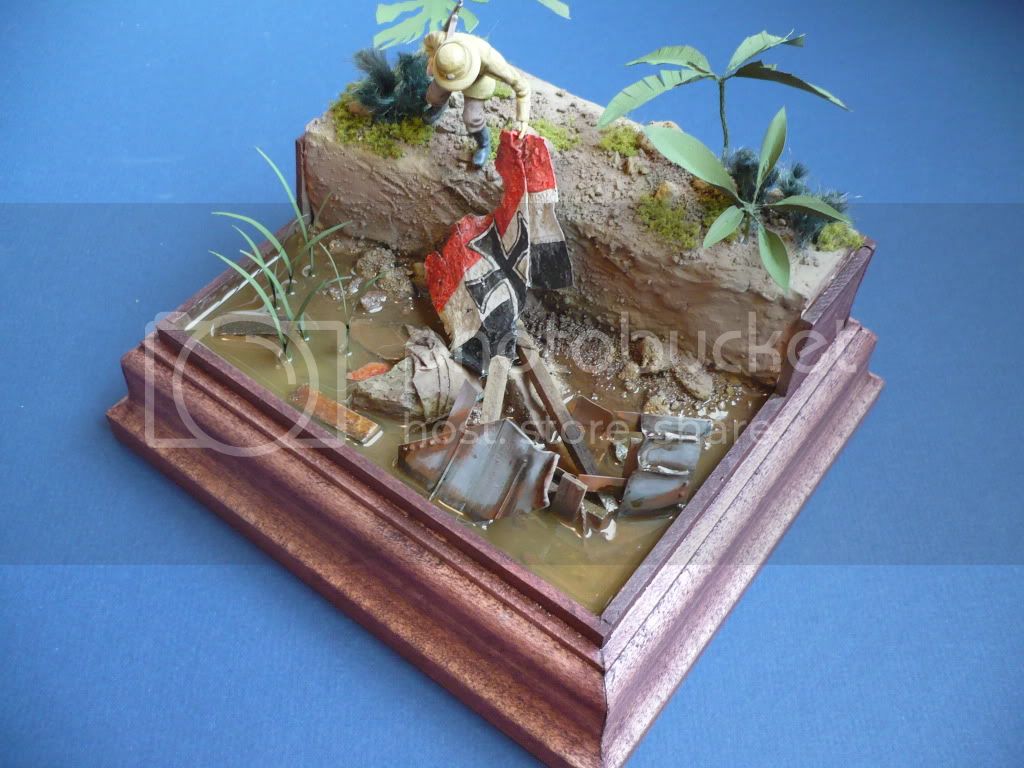
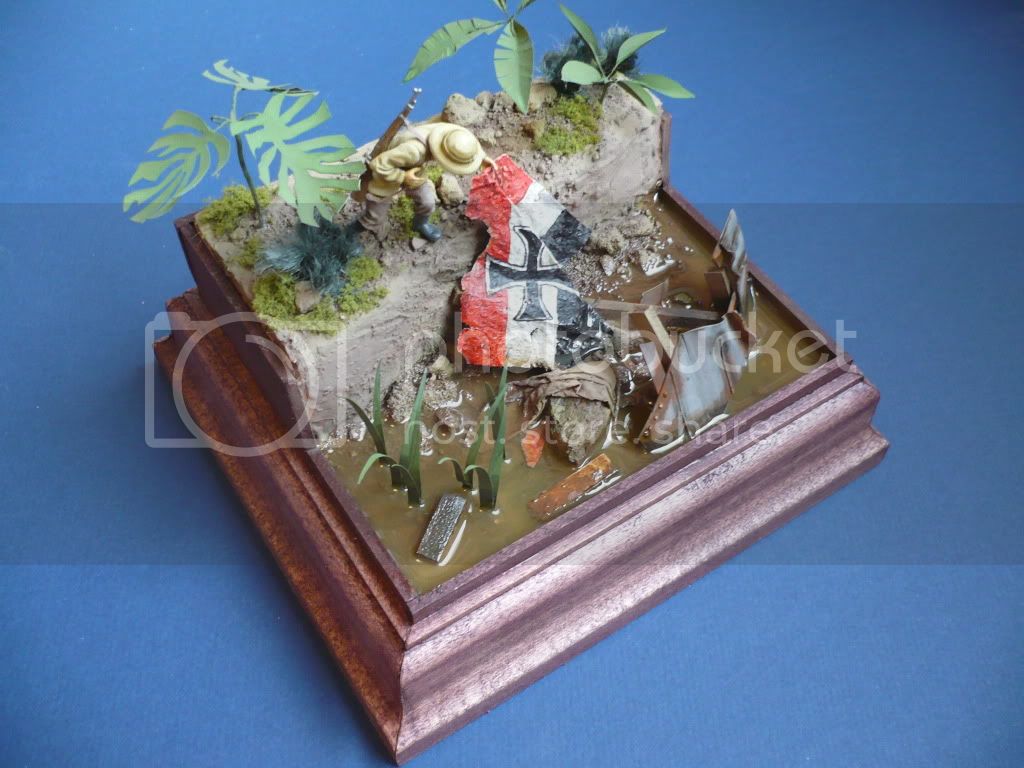
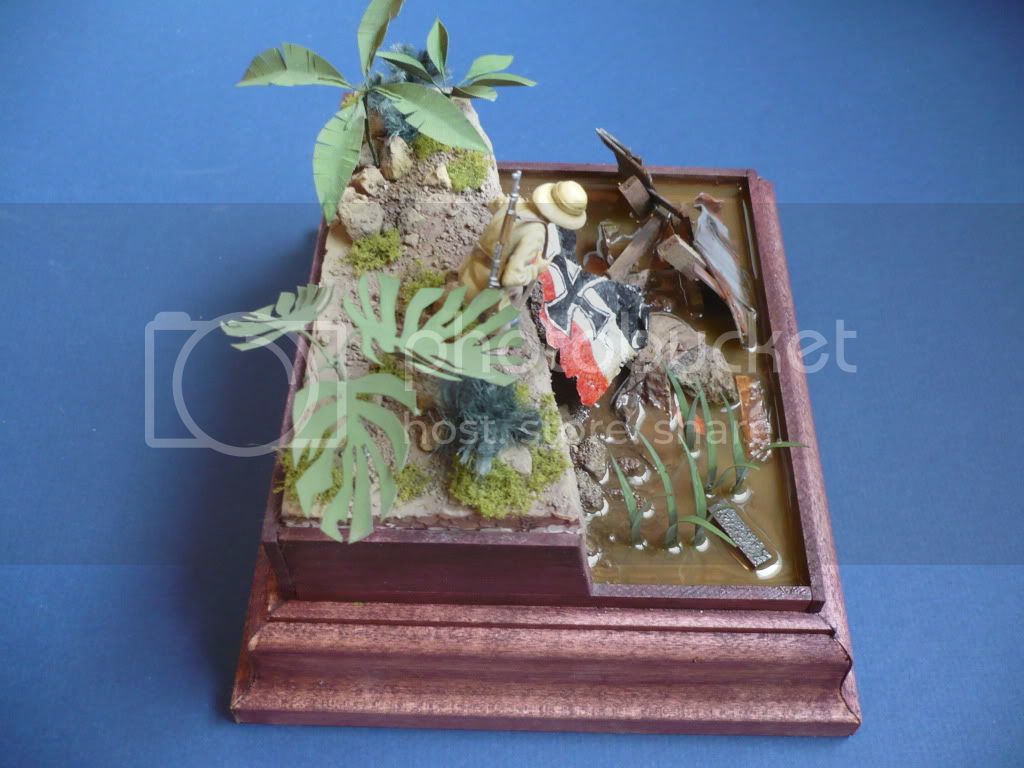
With all the elements assembled, here are the final pictures of the completed scene.
A lone member of the German Schutztruppen or perhaps a member of the crew rescues the Konigsberg's ensign from the muddy waters of the Rufiji delta.
I hope you enjoy the pictures.
All comments and critique are welcomed.
Cheers
Garth
A lone member of the German Schutztruppen or perhaps a member of the crew rescues the Konigsberg's ensign from the muddy waters of the Rufiji delta.
I hope you enjoy the pictures.
All comments and critique are welcomed.
Cheers
Garth
REMEARMR
United Kingdom
Joined: August 17, 2002
KitMaker: 443 posts
Armorama: 357 posts
Joined: August 17, 2002
KitMaker: 443 posts
Armorama: 357 posts
Posted: Sunday, June 10, 2012 - 12:26 AM UTC
I really like this vignette, the ensign you did is very good.
If I had to make comments it would be:
The water plants look a little bit to uniform in direction and spacing, Maybe it could be amended by possibly twisting a couple of leaves?
the large plants on the bank (which are very good, Handmade?) lack detail on the leaf tops , maybe add a line down each one?
Great job, love the wreckage.
Cheers
Robbo
garthj
Ontario, Canada
Joined: August 15, 2006
KitMaker: 282 posts
Armorama: 229 posts
Joined: August 15, 2006
KitMaker: 282 posts
Armorama: 229 posts
Posted: Sunday, June 10, 2012 - 05:49 AM UTC
Hi Rob,
Thanks for the comments. I agree with you, I believe I can improve on these plants.
Cheers,
Garth
Thanks for the comments. I agree with you, I believe I can improve on these plants.
Cheers,
Garth