

Alex,
thank you for your kind words.
I have included the pictures (not all, but many) into the gallery.
Regarding your idea to show one figure, shocked and frozen with fear - that's a great idea, I missed that completely. But all the figures are glued on the diorama, and I don't want to rearrange them.
But I will definitively use you idea - only later, when I have again motivation to touch the diorama.
I have that close combat tank crew from miniart - there are to figures kneeling included. I may take one of these and place it somewhere with on the scene with another head attached.
Cheers
Thomas
Campaigns
Where Armorama group builds can be discussed, organized, and updates posted.
Where Armorama group builds can be discussed, organized, and updates posted.
Hosted by Darren Baker, Richard S.
End of Days 2 Campaign

1967er

Joined: March 12, 2012
KitMaker: 224 posts
Armorama: 201 posts
Posted: Saturday, August 10, 2013 - 07:13 PM UTC

bdanie6

Joined: November 09, 2008
KitMaker: 615 posts
Armorama: 60 posts

Posted: Monday, August 12, 2013 - 08:37 AM UTC
@Thomas, uhmm...it is painted 
nice back story on the dio by the way. And the scene came out great. I only hope I can do something half as good
Nearing the end now, guard rails and posts up now

The view from the top

close up from the front

Next to weather this beastie, and add boxes and junk to the cargo space
Later
nice back story on the dio by the way. And the scene came out great. I only hope I can do something half as good
Nearing the end now, guard rails and posts up now
The view from the top
close up from the front
Next to weather this beastie, and add boxes and junk to the cargo space
Later

17741907

Joined: December 05, 2007
KitMaker: 953 posts
Armorama: 705 posts

Posted: Monday, August 12, 2013 - 09:22 AM UTC
Looks "great" Bruce.... 

bdanie6
Joined: November 09, 2008
KitMaker: 615 posts
Armorama: 60 posts
Posted: Tuesday, August 13, 2013 - 01:36 AM UTC
and with weathering

from the top

the other side

and last by not least, from the front

now just to fill up the cargo compartment
Later
from the top
the other side
and last by not least, from the front
now just to fill up the cargo compartment
Later

35th-scale

Joined: November 21, 2007
KitMaker: 3,212 posts
Armorama: 2,807 posts

Posted: Tuesday, August 13, 2013 - 10:02 AM UTC
Flying through it now Bruce....and all coming together nicely....
Fantastic dio Thomas...all those details all over from every angle is just stunning!
Fantastic dio Thomas...all those details all over from every angle is just stunning!


Bluestab
Joined: December 03, 2009
KitMaker: 2,160 posts
Armorama: 1,906 posts
Posted: Tuesday, August 13, 2013 - 11:43 AM UTC
Phil,
This one still ending on the 22nd?
This one still ending on the 22nd?

WARDUKWNZ

Joined: June 01, 2011
KitMaker: 1,716 posts
Armorama: 1,638 posts

Posted: Tuesday, August 13, 2013 - 02:28 PM UTC
Hey lads ,, If anyone wants a extension just say the word and i'll message the main man and extend it for a month ..looks like i am going to miss out on this one tho ..finding a new home here is a freakin nightmare .
Oh and if anyone wants it even longer than that ,that shouldnt be a hassle either .
Oh and if anyone wants it even longer than that ,that shouldnt be a hassle either .

Bluestab
Joined: December 03, 2009
KitMaker: 2,160 posts
Armorama: 1,906 posts
Posted: Tuesday, August 13, 2013 - 02:53 PM UTC
Phil,
Sorry you won't be making it this go around.
I asked about the extension because of a screw-up. Today, I was taking some pictures and managed to knock the street light and one of the figures off. It's not a big deal to glue them back on. But I got to thinking about adding a sandbag post and altering the "tone" to more of a checkpoint/roadblock than a hazmat equipped hunter-killer-rescue team moving through downtown Mayberry.
I don't want to hold this one up. If no one else needs an extension, don't worry about it. I may push ahead anyway and try to add the sandbags before the 22nd deadline.
Did we ever get a ribbon for this one?
bdanie6
Joined: November 09, 2008
KitMaker: 615 posts
Armorama: 60 posts
Posted: Tuesday, August 13, 2013 - 03:52 PM UTC
I should have the truck done before the end of the week, with luck. On the other hand the dio is being held up for lack of figures, so if an extension is in the offing, I'll take it!
Thanks and
Later
Thanks and
Later
Removed by original poster on 08/14/13 - 08:18:45 (GMT).
Removed by original poster on 08/14/13 - 08:20:55 (GMT).
Removed by original poster on 08/14/13 - 08:22:26 (GMT).
Removed by original poster on 08/14/13 - 08:35:41 (GMT).
M-123driver
Joined: December 19, 2012
KitMaker: 24 posts
Armorama: 20 posts
Posted: Tuesday, August 13, 2013 - 08:44 PM UTC
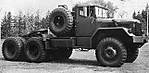
I'm making some progress but could definitely use more time so an extension would be great. I've mounted the rear running gear and am working on the drivelines and front axles which will have to steer. The engine will then be mounted and I will fashion the intake and exhaust plumbing, wiring, fuel lines, etc. I ended up using Testor's pin striping tape for the fan belts. It worked great, too bad they are mostly hidden by the radiator. I have made a hinge for the tilt-cab, removed the doors and am building an interior. I have a few photos with some bits dry fit to give you an idea where I'm going with my build. The area behind the drivers compartment will house armored, slide out machine gun positions. The rest of the deck area between the cab and fifth wheel will be a fighting compartment with the heavy weapons.

 " BORDER="0">
 " BORDER="0">
  " BORDER="0">
  " BORDER="0">
  " BORDER="0">
" BORDER="0"> " BORDER="0"> " BORDER="0"> " BORDER="0"> " BORDER="0"> 
Nito74

Joined: March 04, 2008
KitMaker: 5,386 posts
Armorama: 4,727 posts
Posted: Wednesday, August 14, 2013 - 12:14 PM UTC
Alex & Phill, 2 more weeks ? How long do you need ?
Just let me know .
Just let me know .
Bluestab
Joined: December 03, 2009
KitMaker: 2,160 posts
Armorama: 1,906 posts
Posted: Wednesday, August 14, 2013 - 12:57 PM UTC
John,
A couple of weeks is fine for me. Probably more than I need. Frank could probably use the time. I might try to do something with the Mutt I built for the Road diorama I planned to do. Maybe some gear and a figure or two.
I went ahead and started the sandbag post. I took some pictures of the original just in case I couldn't finish with the changes.
WARDUKWNZ
Joined: June 01, 2011
KitMaker: 1,716 posts
Armorama: 1,638 posts
Posted: Wednesday, August 14, 2013 - 02:14 PM UTC
Frank ...  lovin where this is going mate ,,extended cab idea is sweet ,,just one thing tho ,,its not a issue with the build at all ,,its an idea ,,how bout instead of a straight 6 engine ..hows a twin turbo straight 12 sound ,,that motor would haul the ass of this monster around for sure
John ... Mate can you please add a month to this campaign ? will give the guys more time so rushing needed .
Cheers
Phill
lovin where this is going mate ,,extended cab idea is sweet ,,just one thing tho ,,its not a issue with the build at all ,,its an idea ,,how bout instead of a straight 6 engine ..hows a twin turbo straight 12 sound ,,that motor would haul the ass of this monster around for sure John ... Mate can you please add a month to this campaign ? will give the guys more time so rushing needed .
Cheers
Phill
Nito74
Joined: March 04, 2008
KitMaker: 5,386 posts
Armorama: 4,727 posts
Posted: Wednesday, August 14, 2013 - 03:08 PM UTC
Done !
M-123driver
Joined: December 19, 2012
KitMaker: 24 posts
Armorama: 20 posts
Posted: Wednesday, August 14, 2013 - 07:22 PM UTC
Phill, your killin me here. I had originally had the same thought regarding a dual engine but had decided against it since I did not want to buy another Renwal wrecker kit just for the motor. Economics is also why I ruled out some Live Resin armaments, now you have me reconsidering both. I know I could use a lot of the pieces from the wrecker in my parts box and a local hobby shop has one in stock.....I'll sleep on it. In the meantime, I've already figured how I can fit it in without too much extra work or delay. John, thanks for the extra time.
Bluestab
Joined: December 03, 2009
KitMaker: 2,160 posts
Armorama: 1,906 posts
Posted: Thursday, August 15, 2013 - 02:55 AM UTC
With the extra time, Operation Facelift is in motion. With the change to a checkpoint, the role of the Humvee has changed. I cracked open the cab last night and will remove at least one of the crew. I'll be using the humvee as a supply vehicle and the removed crewman as labor to offload water and stuff. I'm debating on keeping the MG gunner. I might put him in the sandbagged position. I've got to come up with some sort of barricade as well.

strongarden
Joined: May 14, 2012
KitMaker: 730 posts
Armorama: 624 posts
Posted: Thursday, August 15, 2013 - 03:08 PM UTC
Phil, John, Alex- Thanks for talkin' and granting the extension.
I really want to get back into my rig I've started for this GB, some awesome creations here!
Thomas- Great storyline, and you are truly gifted w/ your figure painting. And your diorama is a really a nice composition too.
Bruce- Look forward to when your trailer's all loaded and ready for action, cool job you've done.
Frank- I have to say, at least your truck HAS an engine
Lookin' good it's gonna build out nice.
Sean- Like your hauler, that's one serious vehicle.
My time at the bench looks clear, so far, for this wknd and will def get goin' again. Thanks for the inspiration guys.
Cheers
Dave
WARDUKWNZ
Joined: June 01, 2011
KitMaker: 1,716 posts
Armorama: 1,638 posts
Posted: Friday, August 16, 2013 - 10:50 PM UTC
Frank ,, Well bugger me mate ,,i am getting a Renwal wrecker kit from a buddy of mine soon and converting it to 1/35th,,replacing the cab and once done it will be a 10 ton wrecker and not a 5 ton ,,it will need a lot of work but its gonna be worth it in the long run ,,Oh as to Live Resin bud ,,dude do your self a favor and get some ..its more than well worth it ..its the best weapons i have ever seen so now i have a heap of their stuff..its mind blowing man ..it really is .
John .. Cheers matey for that ...i do get a feeling tho it might need another one lol
Alex ,, Glad to hear your going to attack that dio ,,i know how it feels not having the time to do what you want to do ..not a problem now dude
Dave ..Your most welcome mate ..help out anyway i can
,,it will need a lot of work but its gonna be worth it in the long run ,,Oh as to Live Resin bud ,,dude do your self a favor and get some ..its more than well worth it ..its the best weapons i have ever seen so now i have a heap of their stuff..its mind blowing man ..it really is .John .. Cheers matey for that ...i do get a feeling tho it might need another one lol
Alex ,, Glad to hear your going to attack that dio ,,i know how it feels not having the time to do what you want to do ..not a problem now dude
Dave ..Your most welcome mate ..help out anyway i can
bdanie6
Joined: November 09, 2008
KitMaker: 615 posts
Armorama: 60 posts
Posted: Saturday, August 17, 2013 - 01:53 AM UTC
Getting nearer the end now.
I finished getting the cargo area filled up. Trumpeters Logistic Supply Team set comes with 4 figures, of which I am using 2 for this dio, and 12 boxes. The problem with the boxes is they are printed on tissue thin paper.
My solution for this was to glue the boxes to a sheet of printer paper and then cut them out and glue them together.

I used my small clamp to hold the boxes in shape until the glue set. Then I took some sheet styrene and made some crude (even for me!)box shapes that I glued together and then covered with blue tissue paper to simulate cargo covered with a tarp.

When all that was done, I rooted thru my spare parts drawer and found some old resin oil cans I had and painted them up and glued them in the tanker.
Installing everything in the tanker I came up with this arrangement.

Which brings us to the last part for this truck, the rear stinger

Yarslov out did himself with this set, which is actually the second M-134D minigun set. This is what comes in the box.

Right now I have the parts primed and ready to assemble, but more on that next time
Question tho! The ammo runs are molded straight, but I need to put a few curves in the chutes. How does one bend resin without it breaking?
Later
I finished getting the cargo area filled up. Trumpeters Logistic Supply Team set comes with 4 figures, of which I am using 2 for this dio, and 12 boxes. The problem with the boxes is they are printed on tissue thin paper.
My solution for this was to glue the boxes to a sheet of printer paper and then cut them out and glue them together.
I used my small clamp to hold the boxes in shape until the glue set. Then I took some sheet styrene and made some crude (even for me!)box shapes that I glued together and then covered with blue tissue paper to simulate cargo covered with a tarp.
When all that was done, I rooted thru my spare parts drawer and found some old resin oil cans I had and painted them up and glued them in the tanker.
Installing everything in the tanker I came up with this arrangement.
Which brings us to the last part for this truck, the rear stinger
Yarslov out did himself with this set, which is actually the second M-134D minigun set. This is what comes in the box.
Right now I have the parts primed and ready to assemble, but more on that next time
Question tho! The ammo runs are molded straight, but I need to put a few curves in the chutes. How does one bend resin without it breaking?
Later
35th-scale
Joined: November 21, 2007
KitMaker: 3,212 posts
Armorama: 2,807 posts
Posted: Saturday, August 17, 2013 - 09:11 AM UTC
Put it in a cup of hot water for about 20-30 seconds....you may need to do it a few times to get the shape you want though.
Those LR sets are just sweet! I've done the Mk19 & 47 grenade launchers and the clean-up is minimal and the fit is perfect! That Gatling will be perfect on the truck. Nice job on all the stores too.....
Those LR sets are just sweet! I've done the Mk19 & 47 grenade launchers and the clean-up is minimal and the fit is perfect! That Gatling will be perfect on the truck. Nice job on all the stores too.....
Bluestab
Joined: December 03, 2009
KitMaker: 2,160 posts
Armorama: 1,906 posts
Posted: Saturday, August 17, 2013 - 02:35 PM UTC
Thanks Phill. I scrapped the sandbag position and checkpoint idea. It didn't look good on the base and I was over-planning it to sell the idea. Instead, I'm going back to the street scene's roots and having the hazmat troops entering the downtown area. I cleared the base of figures and vehicles. I went ahead and started reworking several figures to pose them like they are walking.
 |

WEB HOSTING BY


Copyright ©2021 Armorama and Kitmaker Network, a subsidiary of Silver Star Enterprises
All Rights Reserved. Please read our Conditions of Use and Privacy Policy.
All Rights Reserved. Please read our Conditions of Use and Privacy Policy.