_GOTOBOTTOM
Armor/AFV: 48th Scale
1/48 scale discussion group hosted by Rob Gronovius
Hosted by Darren Baker
Tamiya M10 scene finished
GregCloseCombat
Visit this Community
California, United States
Joined: June 30, 2008
KitMaker: 2,408 posts
Armorama: 2,394 posts
Posted: Thursday, August 16, 2012 - 01:26 PM UTC


Pops53
Visit this Community
United States
Joined: November 05, 2011
KitMaker: 100 posts
Armorama: 98 posts
Posted: Thursday, August 16, 2012 - 05:13 PM UTC
Nicely done, Greg! A story well told, with neither too much detail, nor too little. Congratulations!
PantherF
Visit this Community
Indiana, United States
Joined: June 10, 2005
KitMaker: 6,188 posts
Armorama: 5,960 posts
Posted: Thursday, August 16, 2012 - 10:11 PM UTC
I really luv it Greg! That M10 is loaded down man and looking like it's ready for business!

The only thing my in-experienced eyes would change is to add a little wash to the stone wall there to give it some depth and maybe just a little battle damage too on the exterior.

Top class stuff! Makes me want to build my Tamiya M10.


~ Jeff
vertigo
Visit this Community
Dublin, Ireland
Joined: November 11, 2004
KitMaker: 388 posts
Armorama: 113 posts
Posted: Thursday, August 16, 2012 - 10:16 PM UTC
I would second the wash on the wall but otherwise you've done a great job.
Dangeroo
#023
Visit this Community
Zurich, Switzerland
Joined: March 13, 2009
KitMaker: 2,058 posts
Armorama: 1,656 posts
Posted: Thursday, August 16, 2012 - 10:22 PM UTC
Greg, nice work on another one! I agree with the building, other than that it's top notch as always. really like the figures, they look quite natural.

Cheers!
Stefan
GregCloseCombat
Visit this Community
California, United States
Joined: June 30, 2008
KitMaker: 2,408 posts
Armorama: 2,394 posts
Posted: Friday, August 17, 2012 - 11:45 AM UTC
Thank you!!!!

By popular demand, I can whip up a darker oil wash for the wall.
Marlowe
Visit this Community
Ontario, Canada
Joined: June 12, 2005
KitMaker: 289 posts
Armorama: 286 posts
Posted: Friday, August 17, 2012 - 11:56 AM UTC
You probably don't need a dark wash as it would darken the mortar between the stones and that isn't necessary. I like using various pastel shades ( for this wall try shades of greys, buff, dust-a destroyed wall would be dust covered)which can be applied by rubbing them on with your finger or using make-up applicator sponges.

Another suggestion is to replace the plastic logs out front with dowling soaked in a weathering solution. Real wood, aged, can really enhance the realism of the scene.

I like the sandbags. How did you do them?
Ironmike
Visit this Community
California, United States
Joined: March 28, 2006
KitMaker: 287 posts
Armorama: 270 posts
Posted: Friday, August 17, 2012 - 12:48 PM UTC
Nicely done, Greg, the wash on the wall, as mentioned would enhance the wall, a bit more rubble on the outer area is missing. Some of the sandbags and stowage seem to 'float' as they say in the hobby. A bit of mud spatter wouldn't hurt and the Germans look as if they are coming home from the factory - rough them up, dirty the sling and slap some mud on their knees and boots. Otherwise, lookin' good, amigo
California Ironmike
GregCloseCombat
Visit this Community
California, United States
Joined: June 30, 2008
KitMaker: 2,408 posts
Armorama: 2,394 posts
Posted: Friday, August 17, 2012 - 03:36 PM UTC
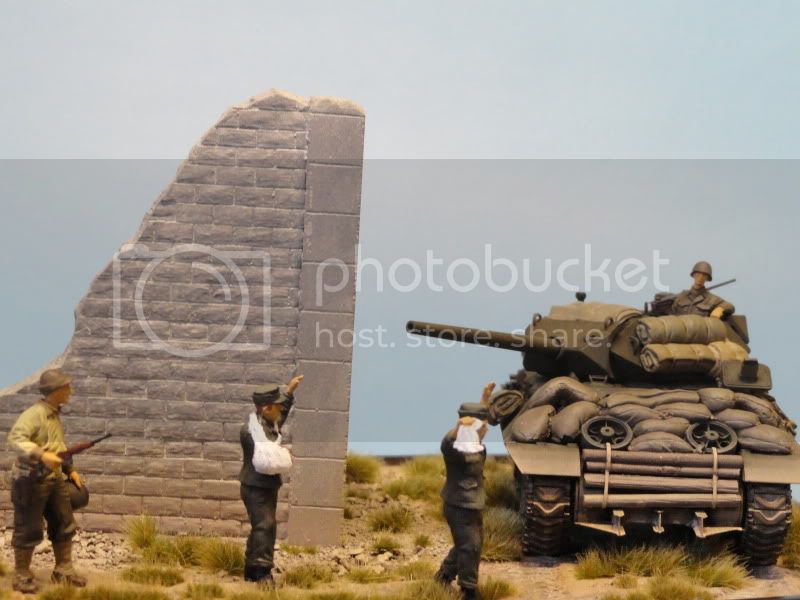
Hi Glenn - thanks for the tips. Even if I don't use all tips now, there's always the next build. The sanbags are partially from the Legend set and I added more of my own made from resin from TAP Plastics which is down the street from me. The bricks did have light dust pigments rubbed into the grey but it may be too light and not enough contrast between.

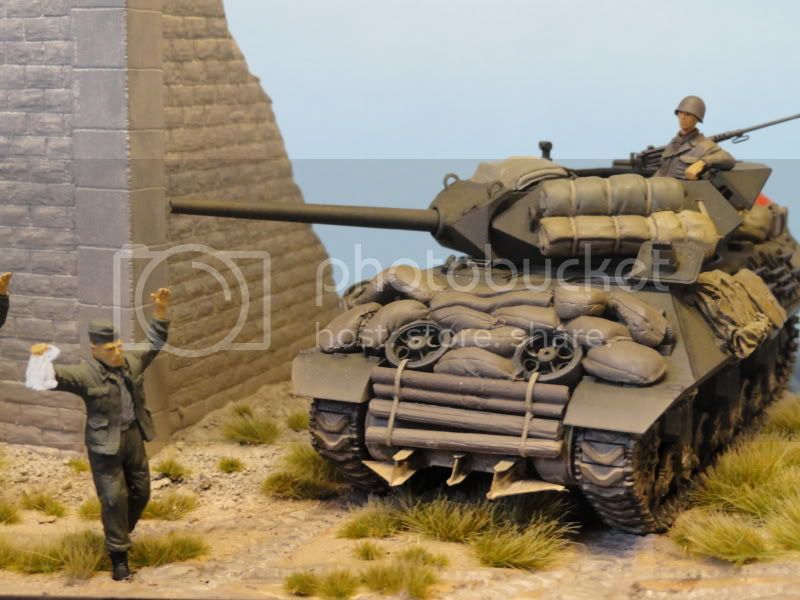
Hello Mike - the floating stowage is hard to hide sometimes. I try to add some of that TAP resin putty under most things before placing down, but I shouldve added some under the fender sandbags too and then blended. I agree about the figures too, especially the guy with the sling I think would look better as a brown or grey rag vs sterile dressing maybe a little blood or white bandage showing through. Thanks for pointing that out as the look bothered me. I didn't want too much rubble as I did tracks like a fairly used road but a couple few large rubble on the side mixed in the overgrown grass would spice it up.

It was kinda hard to photograph and also thinking everything should have been in a little tighter, well the next build.
Mustanger
Visit this Community
Virginia, United States
Joined: July 06, 2012
KitMaker: 94 posts
Armorama: 55 posts
Posted: Saturday, August 18, 2012 - 03:12 AM UTC
Nice M10, good diorama.
Marlowe
Visit this Community
Ontario, Canada
Joined: June 12, 2005
KitMaker: 289 posts
Armorama: 286 posts
Posted: Saturday, August 18, 2012 - 03:25 AM UTC
I looked at the pics again and could see subtleties of colour on the wall. If you want to enhance the visual effect of the mortar you can rub MIG pigments dust over the walls and remove the excess. Or, just dry brush the brick part with stone grey and buff, but keep the paint to a minimum. However, I wouldn't be too concerned about it.
GregCloseCombat
Visit this Community
California, United States
Joined: June 30, 2008
KitMaker: 2,408 posts
Armorama: 2,394 posts
Posted: Sunday, August 19, 2012 - 06:20 AM UTC
Jim - thank you sir

Glenn - I'll go with a darker color, thanks again
 _GOTOTOP