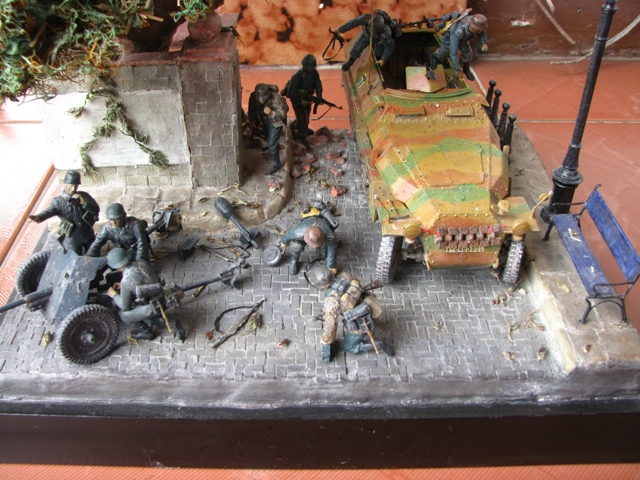
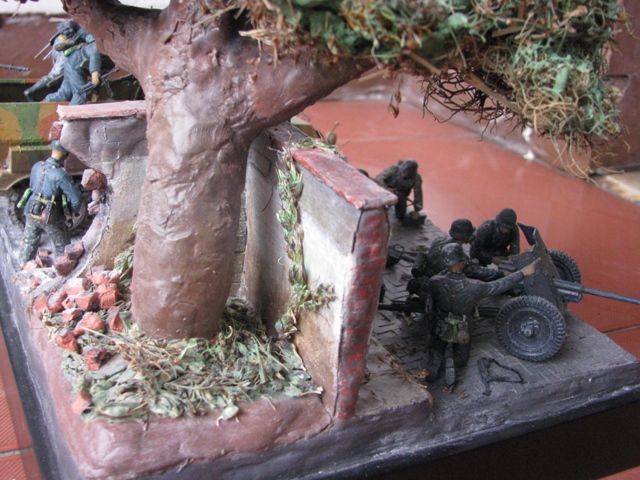
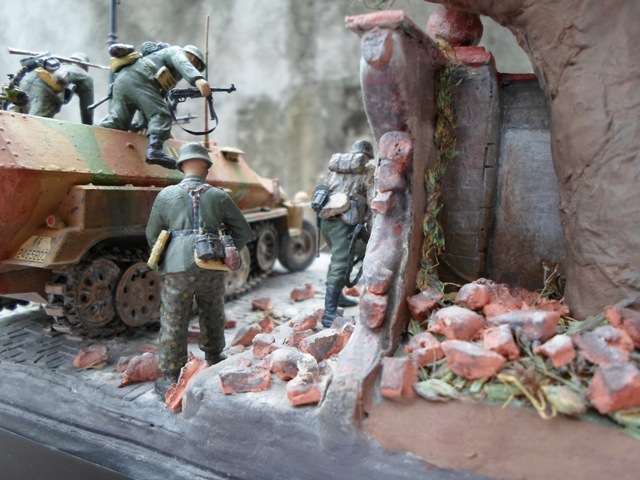
"Komm & nimm es dir!(Come & Get It!)" Diorama
Jakarta Raya, Indonesia
Joined: August 22, 2012
KitMaker: 599 posts
Armorama: 527 posts
Posted: Thursday, August 23, 2012 - 01:11 AM UTC
From A Dream Becomes A Vision
From A Vision Becomes A Reality
(Hiram Maxim)
Luxembourg
Joined: January 19, 2004
KitMaker: 2,406 posts
Armorama: 2,224 posts
Posted: Thursday, August 23, 2012 - 04:38 AM UTC
Hi Ricky,
Normally i don't like to discuss old dioramas as nothing can be changed anymore. Anyway.
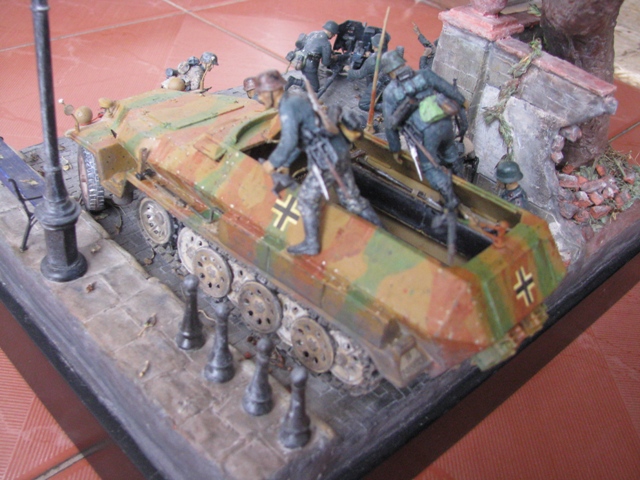
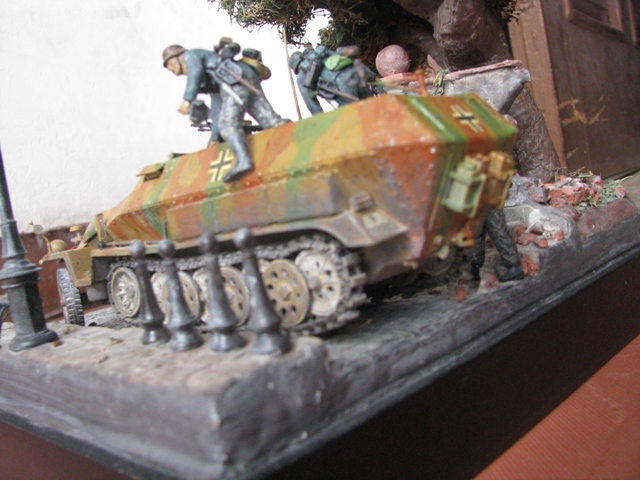
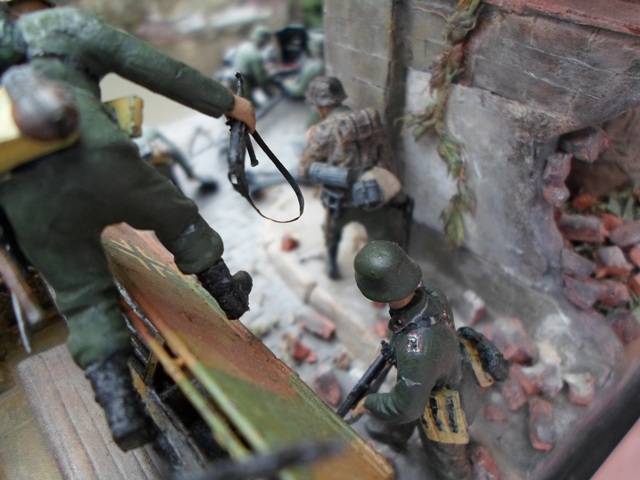
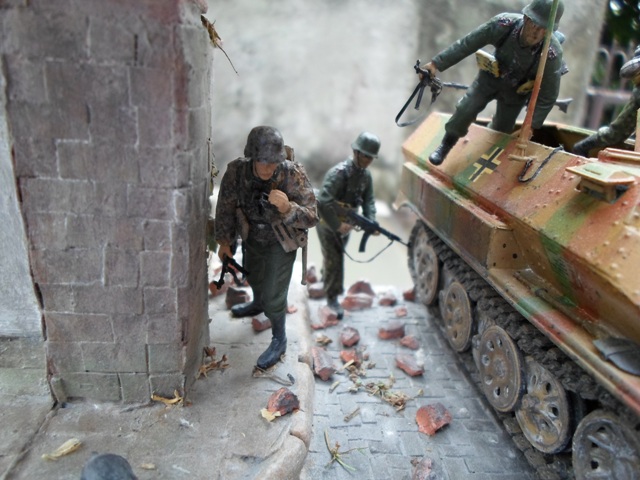
Did you notice where the soldier is jumping from the truck?
Right into the posts ! Ouch!!!
Your layout is good. The scene is good to. Some colors are not so good.
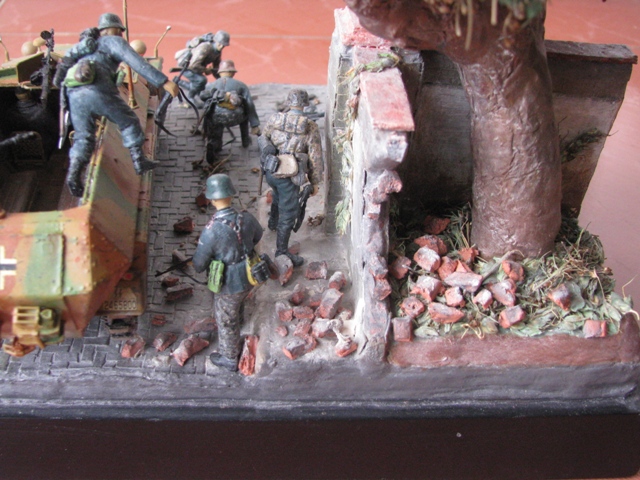
Mainly the trucks coloring and also the tree. You should google some pictures about tree trunk colors in Europe. It should be more light gray or very light brown (a mix )
The leaves are also a bit out of scale, to big.
All in all not bad for a third diorama.
Welcome
Claude
Indiana, United States
Joined: August 19, 2007
KitMaker: 2,184 posts
Armorama: 1,468 posts
Posted: Thursday, August 23, 2012 - 03:35 PM UTC
Hey Ricky, welcome aboard. Hope you find Armorama as helpful and friendly as I do. And don't worry about your English, it's better than the young kids here I have to deal with, I'll 2nd what Claude said. Also try a dark wash on your street section. It will darken up the space inbetween the cobble stones so it wont look white. When you think about a pose for your figures, try standing that way and see if it feels normal. Unless it was an emergency, I would not jump out of the halftrack onto stone like that. It's going to really hurt the knees. Of course, there is always the exception, in your story it might be. Anyway, a good start to building dio's. Story is pretty much to the point, and belivable. And not bad artistry either. Hope the tips help you along and remember, it's a hobby so have fun no matter how good or bad you feel you skill is.
There is no return policy on time spent
Jakarta Raya, Indonesia
Joined: August 22, 2012
KitMaker: 599 posts
Armorama: 527 posts
Posted: Friday, August 24, 2012 - 12:11 AM UTC
Quoted Text
...Did you notice where the soldier is jumping from the truck? Right into the posts ! Ouch!!!
Your layout is good. The scene is good to. Some colors are not so good.
Mainly the trucks coloring and also the tree. You should google some pictures about tree trunk colors in Europe. It should be more light gray or very light brown (a mix )
The leaves are also a bit out of scale, to big...
Hi Claude! Glad to discuss with you and I already know your name from the discussion about Clervaux Castle. That's a wonderful creation!

It's okay Claude since I have to learn better for another project. Thanks for your criticsm, similar word also fed by most of my local modelling friends. Let's say that the SS troop cancelled his jump immediately when he realized that there are several standing posts at his landing spot

About the tree trunk, thanks also for your suggestion, next time I will perform deeper research to ensure that the applied color could represent the actual tree trunk, especially in Europe. Also for the leaves, I will make a correction in another project.
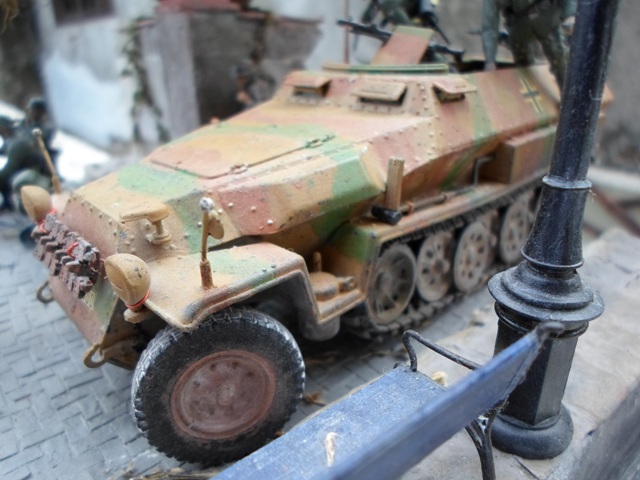
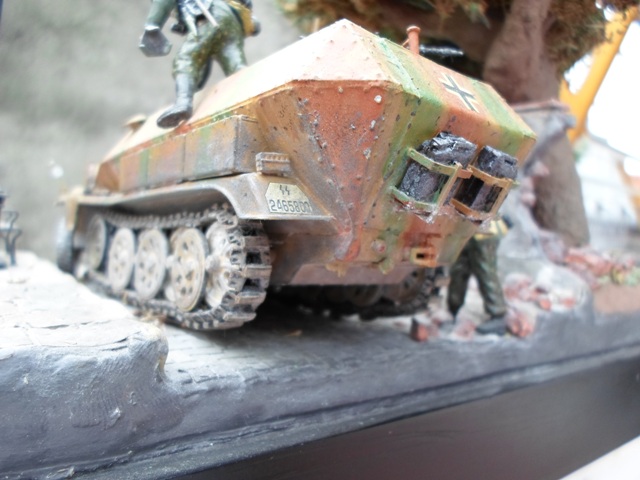
For the halftrack, I just want to adopt the camouflage as depicted below:
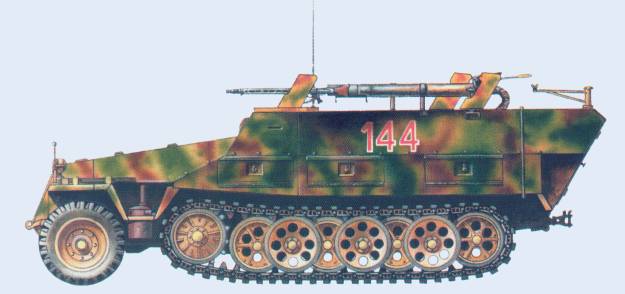 (From www.achtungpanzer.com; for discussion purposes only)
I still learn how to apply soft edge on 3-tone camouflage. Since I have no airbrush tools to paint the halftrack, so I perform freehand painting onto it

Many thanks Claude for your valuable advises and suggestions, I will learn a lot.
Best regards,
Garry
From A Dream Becomes A Vision
From A Vision Becomes A Reality
(Hiram Maxim)
Jakarta Raya, Indonesia
Joined: August 22, 2012
KitMaker: 599 posts
Armorama: 527 posts
Posted: Friday, August 24, 2012 - 12:23 AM UTC
Quoted Text
...Also try a dark wash on your street section. It will darken up the space inbetween the cobble stones so it wont look white. When you think about a pose for your figures, try standing that way and see if it feels normal. Unless it was an emergency, I would not jump out of the halftrack onto stone like that. It's going to really hurt the knees. Of course, there is always the exception, in your story it might be...
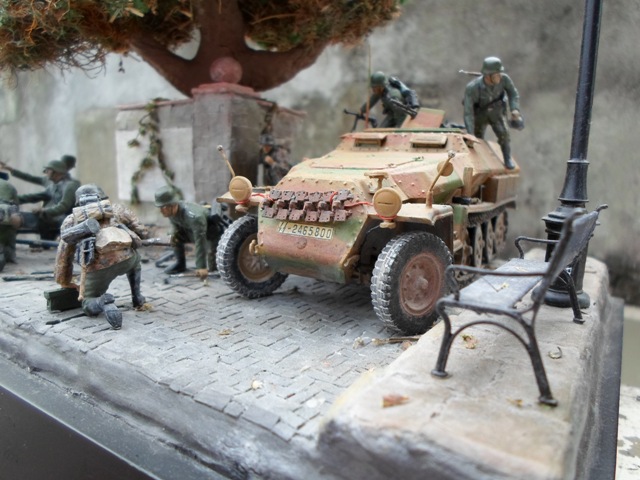
Hello Bob, nice to know you and many thanks for your advises. The white look may caused by too many white powder applied there, since I want to make the cobblestones look dusty. But, it seems not worked, isn't it? Just hope that I won't forget to apply such dark wash on my another "cobblestone diorama project"

Yeah, I realize that it was too early to glued the troop into such positions and... later, unfortunately I found that such situations could really injured him, not only his knees, but also both of his thighs!
Thanks Bob, have a nice time
Best regards,
Garry
From A Dream Becomes A Vision
From A Vision Becomes A Reality
(Hiram Maxim)
Jakarta Raya, Indonesia
Joined: August 22, 2012
KitMaker: 599 posts
Armorama: 527 posts
Posted: Friday, January 18, 2013 - 10:33 PM UTC
From A Dream Becomes A Vision
From A Vision Becomes A Reality
(Hiram Maxim)
Arkansas, United States
Joined: June 29, 2009
KitMaker: 11,610 posts
Armorama: 7,843 posts
Posted: Friday, January 18, 2013 - 10:49 PM UTC
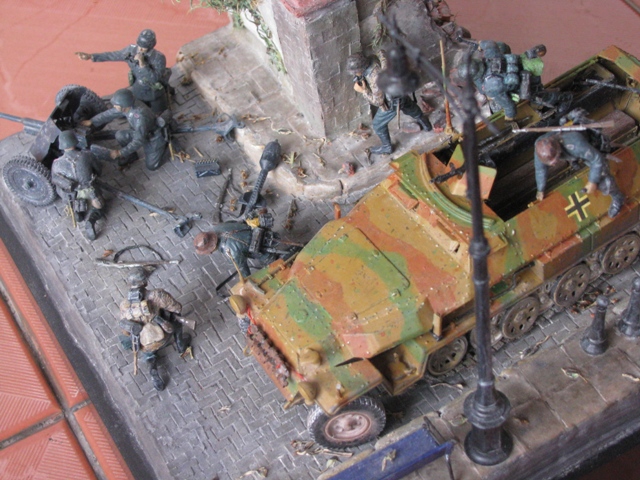
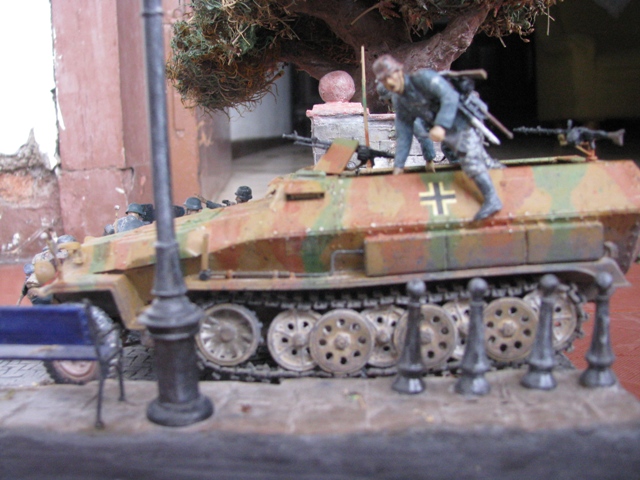
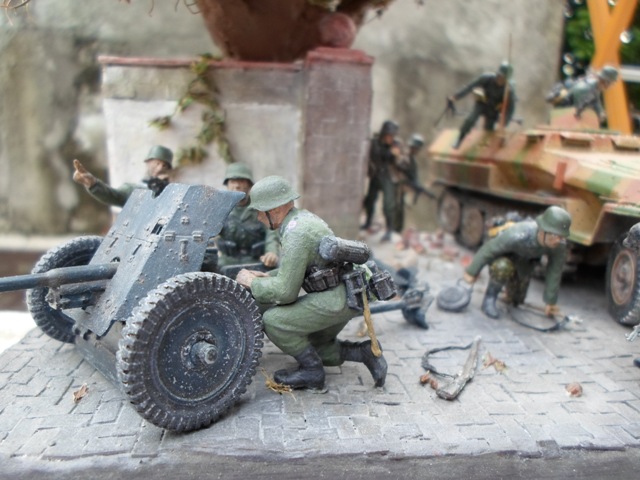
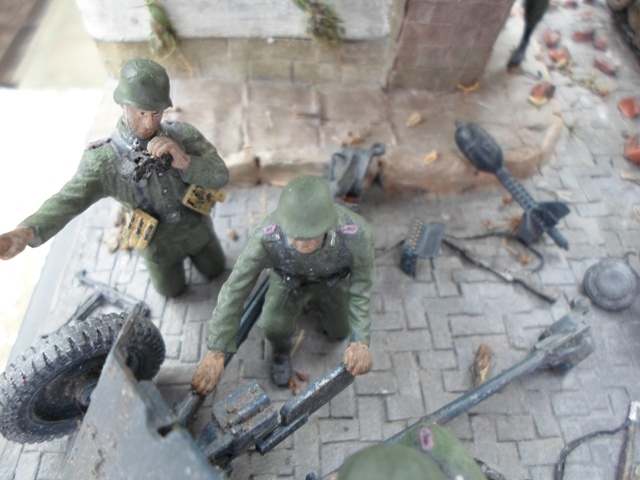
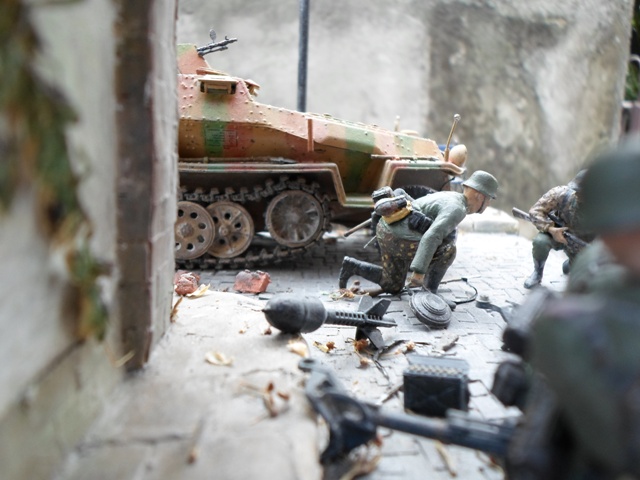
The machine gun on the back of the half-track should be black. At the very least, paint it gunmetal. Why is the SS dragging a mine? It doesn't have any location to be implemented on your diorama. IMO, the knocked out part of the wall should be a little rougher. Maybe some more bricks sticking out. There should be something in between the plaster. Overall, it looks like it was fun and hopefully you have picked up some tips for your next dio.
Ideals are peaceful. History is violent.
Jakarta Raya, Indonesia
Joined: August 22, 2012
KitMaker: 599 posts
Armorama: 527 posts
Posted: Friday, January 18, 2013 - 11:05 PM UTC
Quoted Text
The machine gun on the back of the half-track should be black. At the very least, paint it gunmetal. Why is the SS dragging a mine? It doesn't have any location to be implemented on your diorama. IMO, the knocked out part of the wall should be a little rougher. Maybe some more bricks sticking out. There should be something in between the plaster. Overall, it looks like it was fun and hopefully you have picked up some tips for your next dio.
Hi Matt!

Thank you for your reply, so fast!
For the machine gun, I already paint it with flat black and applied steel-silver (since I'm out of supplies of gunmetal paint
) by drybrushing technique. Maybe not too clearly lookin'
I have no story about the soldaten that draggin' mine, maybe he will put it somewhere else or return it to the halftrack cabin after he realize that such stuff wasn't needed. LOL
Just kiddin'... Honestly, I don't have any attention on what he carried out, just assembled him directly like shown in the box art.
Yeah, the knocked out wall also will be my lesson for another project. I have no experience making a plaster before and I will consider about it. Sorry for my English and many thanks Matt, have a nice day and happy modelling also
Best regards

Garry
From A Dream Becomes A Vision
From A Vision Becomes A Reality
(Hiram Maxim)
California, United States
Joined: December 25, 2011
KitMaker: 314 posts
Armorama: 244 posts
Posted: Saturday, January 19, 2013 - 07:45 PM UTC
Good start good scene layout
A little tight but it adds a sense of motion to the scene
Have fun do what feels right to you your models are your creations
Have fun

Kentucky, United States
Joined: May 27, 2007
KitMaker: 327 posts
Armorama: 259 posts
Posted: Saturday, January 19, 2013 - 09:34 PM UTC
keep having fun nice Dio.
Jakarta Raya, Indonesia
Joined: August 22, 2012
KitMaker: 599 posts
Armorama: 527 posts
Posted: Saturday, January 19, 2013 - 09:40 PM UTC
Quoted Text
Good start good scene layout
A little tight but it adds a sense of motion to the scene
Have fun do what feels right to you your models are your creations
Have fun
Thank you Frank!
Since I always try to get better and better. For now, I like a small scene with small workbase, but I realize that to make a diorama becomes better, it may be enlarged in the future. I get my passion in this hobby, especially when a project start and make me feel challenged. Have fun also, Frank and happy modelling for us
Nice to share with you and sorry for my English if not too good implemented

Best regards
Garry
From A Dream Becomes A Vision
From A Vision Becomes A Reality
(Hiram Maxim)
Jakarta Raya, Indonesia
Joined: August 22, 2012
KitMaker: 599 posts
Armorama: 527 posts
Posted: Saturday, January 19, 2013 - 09:46 PM UTC
Quoted Text
keep having fun nice Dio.
Thank you so much Bill! Glad to know you
I will keep it in mind and have fun on modelling for us
Best regards from Indonesia
Garry
From A Dream Becomes A Vision
From A Vision Becomes A Reality
(Hiram Maxim)
Wien, Austria
Joined: May 20, 2011
KitMaker: 1,744 posts
Armorama: 1,727 posts
Posted: Sunday, January 20, 2013 - 12:27 AM UTC
Hi Garry,
thanks for sharing the pics of your dio with us, and you have come to the right place..to find competent and friendly co-modellers.

There is much to say about your dio...and certainly not only criticism! That's normal and if you study a work carefully, that goes for ALL the dios (I'm sure even Claude finds things in his Clervaux that he can -and will- "improve" in the future
)
As stated above you can and should squeeze maximum info out of the Internet. As you are not living in Europe, you cannot get first hand info as easily as Claude f.ex. (who can drive to Clervaux anytime he wants
).
Believe me, we would make similar mistakes if we try a dio scene sited in Indonesia!!
A tree is not just a tree, a wall may be very different from what is standard in your area, etc.
IMHO you are on the right track! Keep searching and above all, keep asking yourself questions.
..and best advice so far
keep having fun!!!!
Cheers
Romain
un pour tous et tous pour un!
Arkansas, United States
Joined: June 29, 2009
KitMaker: 11,610 posts
Armorama: 7,843 posts
Posted: Sunday, January 20, 2013 - 12:54 AM UTC
Quoted Text
Quoted Text
The machine gun on the back of the half-track should be black. At the very least, paint it gunmetal. Why is the SS dragging a mine? It doesn't have any location to be implemented on your diorama. IMO, the knocked out part of the wall should be a little rougher. Maybe some more bricks sticking out. There should be something in between the plaster. Overall, it looks like it was fun and hopefully you have picked up some tips for your next dio.
Hi Matt! Thank you for your reply, so fast! For the machine gun, I already paint it with flat black and applied steel-silver (since I'm out of supplies of gunmetal paint ) by drybrushing technique. Maybe not too clearly lookin'
I have no story about the soldaten that draggin' mine, maybe he will put it somewhere else or return it to the halftrack cabin after he realize that such stuff wasn't needed. LOL Just kiddin'... Honestly, I don't have any attention on what he carried out, just assembled him directly like shown in the box art.
Yeah, the knocked out wall also will be my lesson for another project. I have no experience making a plaster before and I will consider about it. Sorry for my English and many thanks Matt, have a nice day and happy modelling also
Best regards
Garry
I wouldn't highlight the gun with anything other than burnt iron or gunmetal. I have never seen a gun that has worn through to silver. My dad just purchased a pistol from 1918. It has not been clean, since it was issued. It is rusty, but there are no signs of silver on it. Another alternative is to run a piece of graphite over the edges. This will give a very light dark metallic luster.
Ideals are peaceful. History is violent.
Jakarta Raya, Indonesia
Joined: August 22, 2012
KitMaker: 599 posts
Armorama: 527 posts
Posted: Sunday, January 20, 2013 - 04:46 AM UTC
Hello Romain, nice to know you!
Glad to know that I'm already on the right track. Yeah, I think minor deviations arise from finished project compared to everything we already collect as our resources in research phase are common, right? But, from one project to another, we always try to minimize even to eliminate such deviations. I will keep it my mind and many thanks Romain, your opinions are very valuable
Best regards
Garry
From A Dream Becomes A Vision
From A Vision Becomes A Reality
(Hiram Maxim)
Jakarta Raya, Indonesia
Joined: August 22, 2012
KitMaker: 599 posts
Armorama: 527 posts
Posted: Sunday, January 20, 2013 - 04:53 AM UTC
Quoted Text
Quoted Text
Quoted Text
The machine gun on the back of the half-track should be black. At the very least, paint it gunmetal. Why is the SS dragging a mine? It doesn't have any location to be implemented on your diorama. IMO, the knocked out part of the wall should be a little rougher. Maybe some more bricks sticking out. There should be something in between the plaster. Overall, it looks like it was fun and hopefully you have picked up some tips for your next dio.
Hi Matt! Thank you for your reply, so fast! For the machine gun, I already paint it with flat black and applied steel-silver (since I'm out of supplies of gunmetal paint ) by drybrushing technique. Maybe not too clearly lookin'
I have no story about the soldaten that draggin' mine, maybe he will put it somewhere else or return it to the halftrack cabin after he realize that such stuff wasn't needed. LOL Just kiddin'... Honestly, I don't have any attention on what he carried out, just assembled him directly like shown in the box art.
Yeah, the knocked out wall also will be my lesson for another project. I have no experience making a plaster before and I will consider about it. Sorry for my English and many thanks Matt, have a nice day and happy modelling also
Best regards
Garry
I wouldn't highlight the gun with anything other than burnt iron or gunmetal. I have never seen a gun that has worn through to silver. My dad just purchased a pistol from 1918. It has not been clean, since it was issued. It is rusty, but there are no signs of silver on it. Another alternative is to run a piece of graphite over the edges. This will give a very light dark metallic luster.
Honestly, I never try the color of gunmetal or burnt iron before. I just have only silver color on my workbench and I force to applied it on the gun LOL
Ok, thank you for your suggestions, I will try it soon. Thank you Matt
Best regards,
Garry
From A Dream Becomes A Vision
From A Vision Becomes A Reality
(Hiram Maxim)
Quebec, Canada
Joined: January 01, 2004
KitMaker: 7,600 posts
Armorama: 6,110 posts
Posted: Monday, January 21, 2013 - 04:06 AM UTC
On your next project you might do some shading on the flesh portions of your figures (face and hands). The easiest and quickest (although not entirely professional) way to do it is to run a reddish-brown wash over the flesh parts so it will settle in the crevises and creases. When dry drybrush with lightened flesh color on the highlight areas - nose, cheekbones, chin, jawline, fingers, and knuckles. Also try to avoid the 'popeyed' look by making the iris less round and actually touching the upper eyelid. Studying your own face in a mirror, or pictures of faces in magazines will help. Some figures with a 'five o'clock shadow'(drybrush with thinned flesh with a tiny amount of blue) will help to break up their uniformity and add some individuality. Paint some hair color on the backs of their heads where it shows under their helmets, otherwise they all look bald! These are just general guidelines, and with some experimentation and refinement you will find your own technique.
Jakarta Raya, Indonesia
Joined: August 22, 2012
KitMaker: 599 posts
Armorama: 527 posts
Posted: Monday, January 21, 2013 - 08:44 AM UTC
Quoted Text
On your next project you might do some shading on the flesh portions of your figures (face and hands). The easiest and quickest (although not entirely professional) way to do it is to run a reddish-brown wash over the flesh parts so it will settle in the crevises and creases. When dry drybrush with lightened flesh color on the highlight areas - nose, cheekbones, chin, jawline, fingers, and knuckles. Also try to avoid the 'popeyed' look by making the iris less round and actually touching the upper eyelid. Studying your own face in a mirror, or pictures of faces in magazines will help. Some figures with a 'five o'clock shadow'(drybrush with thinned flesh with a tiny amount of blue) will help to break up their uniformity and add some individuality. Paint some hair color on the backs of their heads where it shows under their helmets, otherwise they all look bald! These are just general guidelines, and with some experimentation and refinement you will find your own technique.
Sure, the face of the figures, you're right. Right now, I'm building a small diorama (again
) with rural theme and start to learn on figures' face... along with their hair!
LOL
Hard to do, but such action is an investment for better diorama presentation, especially on the figures shown up, right? Your guidelines are so meaningful and valuable, I will keep it implemented on my current project. Many thanks Biggles2 and glad to know you
Best regards
Garry
From A Dream Becomes A Vision
From A Vision Becomes A Reality
(Hiram Maxim)
Wien, Austria
Joined: May 20, 2011
KitMaker: 1,744 posts
Armorama: 1,727 posts
Posted: Tuesday, January 22, 2013 - 07:51 AM UTC
Hi Garry,
Biggles has a sound piece of advice in his post....look at the real thing as thoroughly as possible!
If you consider all the parameters (light, distance, etc) you get a good picture that you can then emulate.
Shep Paine's book on building dios has been a 1st class teacher for me...and I am still learning (after 40 years
)
And believe me, unless you are a super painter, avoid posting close-up pics of your figs and models. They show even the slightest deficiencies without any mercy!
When you have to decide on which details to include as "visible" and relevant, try to find pictures that +/- render the 1/35 figures in size (hope you understand what I mean
) and then adapt your models.
I better stop hic et nunc!!
Cheers
Romain
un pour tous et tous pour un!
Jakarta Raya, Indonesia
Joined: August 22, 2012
KitMaker: 599 posts
Armorama: 527 posts
Posted: Wednesday, January 23, 2013 - 12:25 PM UTC
Quoted Text
Hi Garry,
Biggles has a sound piece of advice in his post....look at the real thing as thoroughly as possible!
If you consider all the parameters (light, distance, etc) you get a good picture that you can then emulate.
Shep Paine's book on building dios has been a 1st class teacher for me...and I am still learning (after 40 years )
And believe me, unless you are a super painter, avoid posting close-up pics of your figs and models. They show even the slightest deficiencies without any mercy!
When you have to decide on which details to include as "visible" and relevant, try to find pictures that +/- render the 1/35 figures in size (hope you understand what I mean ) and then adapt your models.
I better stop hic et nunc!!
Cheers
Romain
It's a nice idea Romain, but I decide not to "hide" any weakness point of my diorama postings. Although I'm not a super painter
but from any suggestions replied on my topic, I hope I will be able to improve my techniques to increase the details in my future project
That's it, from my earlier postings, you may see the minor changes in color, placement, and other minor details.
I have not read Sheperd Paine's book yet, since it rare in my country, but several WWII books published by Osprey are very helpful as my references
By the way, I don't understand the phrase '
hic et nunc', is it France?

Thank you my friend
Best regards
Garry
From A Dream Becomes A Vision
From A Vision Becomes A Reality
(Hiram Maxim)
Wien, Austria
Joined: May 20, 2011
KitMaker: 1,744 posts
Armorama: 1,727 posts
Posted: Wednesday, January 23, 2013 - 01:23 PM UTC
Hi Garry,
"hic et nunc" is latin and simply means "here and now"
If you decide to stick to zoomed-in views, you should definitely examine the clean-up job on your figures 1) in a mirror and 2) under a magnifying glass. You will discover lots of little flaws, even after you were of the opinion everything is cleaned up and fit!
It is true that you listen to advice and even modify your dio accordingly. That's impressive on its own!
Now you should not believe we all want to pester you and show any (non-existing) "superiority" on our side. It's only because we see the potential in you and feel compelled to share some of our accumulated knowledge.
And Shep Paine's book is a tutorial for all different kinds of dios and painting/modelling/converting in general. Its full title is
"How to build dioramas"
and you can find it on Amazon f.ex. It is fairly cheap, but it provides great reading/learning for years on end!!
Keep up the good work!!
Cheers
Romain
un pour tous et tous pour un!
Jakarta Raya, Indonesia
Joined: August 22, 2012
KitMaker: 599 posts
Armorama: 527 posts
Posted: Wednesday, January 23, 2013 - 03:04 PM UTC
Quoted Text
Hi Garry,
"hic et nunc" is latin and simply means "here and now"
If you decide to stick to zoomed-in views, you should definitely examine the clean-up job on your figures 1) in a mirror and 2) under a magnifying glass. You will discover lots of little flaws, even after you were of the opinion everything is cleaned up and fit!
It is true that you listen to advice and even modify your dio accordingly. That's impressive on its own!
Now you should not believe we all want to pester you and show any (non-existing) "superiority" on our side. It's only because we see the potential in you and feel compelled to share some of our accumulated knowledge.
And Shep Paine's book is a tutorial for all different kinds of dios and painting/modelling/converting in general. Its full title is
"How to build dioramas"
and you can find it on Amazon f.ex. It is fairly cheap, but it provides great reading/learning for years on end!!
Keep up the good work!!
Cheers
Romain
"Magic mirror, which figures that already get finest finishing touch in the diorama..?" LOL
Just kidding, of course I will not questioned the mirror like that, maybe only when we build dioramas in Snow White's world
You're right, since I never try to examine figures before placing them on the groundwork permanently. I have to try it, also the usage of the magnifying glass.
Thank you Romain, there are many valuable information and I will search for it, soon

Best regards
Garry
From A Dream Becomes A Vision
From A Vision Becomes A Reality
(Hiram Maxim)
Quebec, Canada
Joined: January 01, 2004
KitMaker: 7,600 posts
Armorama: 6,110 posts
Posted: Thursday, January 24, 2013 - 03:36 AM UTC
Sometimes we have a 'blind eye' for our own work. Before final placement of figures, etc. on your diorama, have a friend examine your work. But don't let it turn into a love/hate relationship when your friends criticize your work!
Jakarta Raya, Indonesia
Joined: August 22, 2012
KitMaker: 599 posts
Armorama: 527 posts
Posted: Thursday, January 24, 2013 - 03:48 AM UTC
Quoted Text
Sometimes we have a 'blind eye' for our own work. Before final placement of figures, etc. on your diorama, have a friend examine your work. But don't let it turn into a love/hate relationship when your friends criticize your work!
I agree with that my friend, if the relationship turns into hate, I wouldn't ask my friend to examine my work because sure, I will suffer for a losing a friend. But if such relationship turns into love, I will often ask my friend to examine it, and of course... she must be a girl!

LOL Just kiddin', I will keep it in my mind and have a practice of it
Thank you Biggles2, have a fun modelling time
Cheers
Garry
From A Dream Becomes A Vision
From A Vision Becomes A Reality
(Hiram Maxim)
Jakarta Raya, Indonesia
Joined: August 22, 2012
KitMaker: 599 posts
Armorama: 527 posts
Posted: Saturday, February 23, 2013 - 08:01 PM UTC
Hello guys! Just FYI, I post a build log (not really, actually, this is a kind of build story
) of this diorama, just click it:
Build Log:"Komm und nimm es dir!"DioramaHope it will be useful, many thanks!
Cheers,
Garry
From A Dream Becomes A Vision
From A Vision Becomes A Reality
(Hiram Maxim)