

Yes, an excellent job so far... and the kit looks GREAT!
Thanks for the link Raul!
Яusso-Soviэt Forum
Russian or Soviet vehicles/armor modeling forum.
Russian or Soviet vehicles/armor modeling forum.
Hosted by Darren Baker, Jacques Duquette
Trumpeter T-64 Model 1972

Spiderfrommars

Joined: July 13, 2010
KitMaker: 3,845 posts
Armorama: 3,543 posts
Posted: Sunday, September 09, 2012 - 03:24 AM UTC

Karl187

#284

Joined: October 04, 2006
KitMaker: 3,094 posts
Armorama: 2,942 posts

Posted: Sunday, September 09, 2012 - 04:00 AM UTC
Thanks Mauro, I'm onto the tracks now- I have to be careful and go a bit slower with them!

Spiderfrommars
Joined: July 13, 2010
KitMaker: 3,845 posts
Armorama: 3,543 posts
Posted: Monday, September 10, 2012 - 01:55 AM UTC
...S**t happens...


Let me know about the track links Karl. As you know, the Trumpeter solution for their reproduction, doesn't convince me.
Let me know about the track links Karl. As you know, the Trumpeter solution for their reproduction, doesn't convince me.

BBD468

Joined: March 08, 2010
KitMaker: 2,465 posts
Armorama: 2,383 posts

Posted: Monday, September 10, 2012 - 05:03 AM UTC
Quoted Text
...S**t happens...
Let me know about the track links Karl. As you know, the Trumpeter solution for their reproduction, doesn't convince me.
OOOOOOPS!!! Damn cell phones!
Nice pic Mauro. 
Gary

Spiderfrommars
Joined: July 13, 2010
KitMaker: 3,845 posts
Armorama: 3,543 posts
Posted: Monday, September 10, 2012 - 05:37 AM UTC
Quoted Text
Quoted Text...S**t happens...
Let me know about the track links Karl. As you know, the Trumpeter solution for their reproduction, doesn't convince me.
OOOOOOPS!!! Damn cell phones!
Gary
...well...I think I know what has actually happened...

Gary, as you probably know,some stunning tanks are not the only stunning things which you can find in Russia...

Karl187
#284
Joined: October 04, 2006
KitMaker: 3,094 posts
Armorama: 2,942 posts
Posted: Tuesday, September 11, 2012 - 03:37 AM UTC
Nice pic Mauro...I think I can see why that tank ended up in a ditch !
So, some progress on the tracks. In this kit they are link and length with a few individual links that make up the tracks as they fit around the idler and sprocket.
I usually end up painting the tracks and lower hull first on most tanks I build. I find it easier to do as it allows me to paint the tracks and wheels before they are glued in place. I find painting them once they are all in place is trickier.
So in order to do this I break down the parts into sub-assemblies- there's the lower hull itself with all the glue attachment points masked off, the wheels and finally the track assemblies.


The tracks are broken down into four parts for each side- the idler, the sprocket, the top run and lower run (I've only detached the left lower and upper runs from the sprue so far). I followed the instructions for the most part but found I needed to add an extra link to each sprocket and idler track assembly to achieve the proper 'drape' as it comes down to the wheels. Some modification may have to be made to the lower run of track but I won't know for sure until I come to attach it.


I'm just getting the primer on all these sub-assemblies at the minute, so more to follow soon.
Thanks for checking out the thread.
-KARL187-
!So, some progress on the tracks. In this kit they are link and length with a few individual links that make up the tracks as they fit around the idler and sprocket.
I usually end up painting the tracks and lower hull first on most tanks I build. I find it easier to do as it allows me to paint the tracks and wheels before they are glued in place. I find painting them once they are all in place is trickier.
So in order to do this I break down the parts into sub-assemblies- there's the lower hull itself with all the glue attachment points masked off, the wheels and finally the track assemblies.
The tracks are broken down into four parts for each side- the idler, the sprocket, the top run and lower run (I've only detached the left lower and upper runs from the sprue so far). I followed the instructions for the most part but found I needed to add an extra link to each sprocket and idler track assembly to achieve the proper 'drape' as it comes down to the wheels. Some modification may have to be made to the lower run of track but I won't know for sure until I come to attach it.
I'm just getting the primer on all these sub-assemblies at the minute, so more to follow soon.
Thanks for checking out the thread.
-KARL187-

markchis

Joined: February 09, 2009
KitMaker: 467 posts
Armorama: 392 posts

Posted: Tuesday, September 11, 2012 - 04:37 AM UTC
great to see this being blogged Karl - and nice work !
best
Mark
best
Mark
Spiderfrommars
Joined: July 13, 2010
KitMaker: 3,845 posts
Armorama: 3,543 posts
Posted: Tuesday, September 11, 2012 - 05:27 AM UTC

Well, I've changed my mind. Trumpeter track look quite good. They look convincing, unless you have to set the model on a uneven terraain.
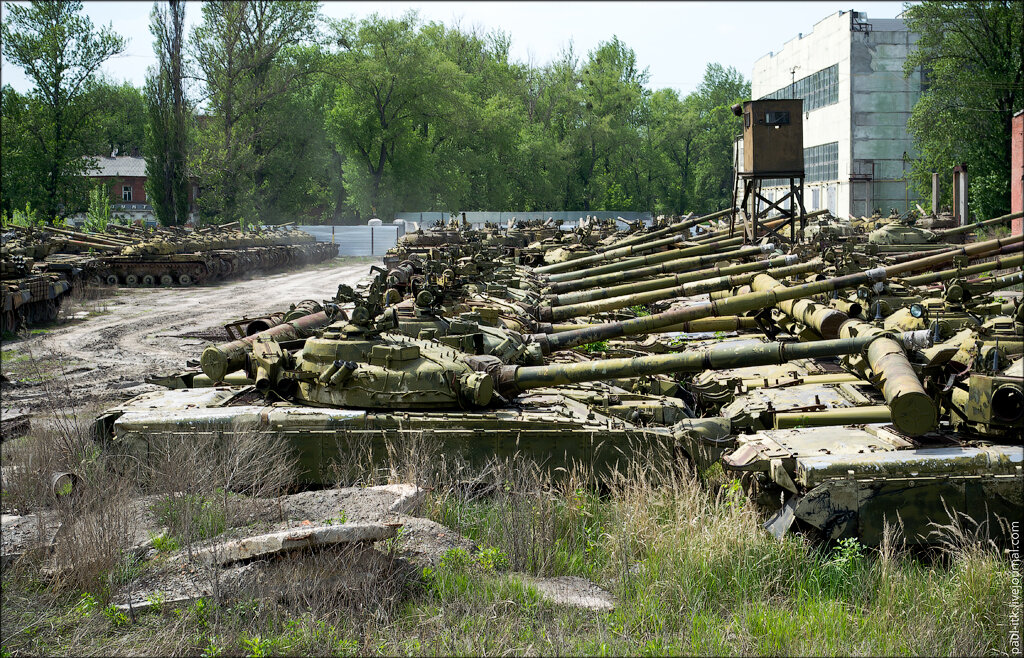
Great job so far Karl. What about the camo? Have you already decided? I'd like to represent mine (...when I'll get it, of course) quite worn, abandoned in a russian graveyard
http://defensetech.org/2012/06/05/tanks-as-far-as-the-eye-can-see/
http://paul-itk.livejournal.com/9681.html


Karl187
#284
Joined: October 04, 2006
KitMaker: 3,094 posts
Armorama: 2,942 posts
Posted: Wednesday, September 12, 2012 - 04:25 AM UTC
Mark- welcome along to the build log, cheers!
Mauro- I haven't fully decided on camo yet but since I haven't done a single color model in a while I will probably go for simple Russian Green. I really want to do one depicted in a tank graveyard- I particularly like the way the ERA blocks look on those old tanks so I kind of want to wait and see if Trumpy release the BV! I also want to try something I read in an article by Mike Rinaldi- what he calls 'Oil Paint Rendering'- I want to give it a try on Russian Green so thats why I'm leaning towards that color at the minute.
As I've been waiting for the paint on the lower hull, wheels and tracks to dry I've been getting on with the rear deck. This is quite a busy area with a good deal of small parts and a generous helping of PE. So far I've got the first stages of it done.


I must say the PE is great to work with and so far has been fitting very precisely.
On the rear deck I think Trumpeter have missed out something- namely a small lift-grab handle- the triangular ones. As I said earlier I'm using the Kagero walk around as I build this so I've marked out where it is on the walk-around and where the part is missing on the kit:

[PICTURE POSTED FOR DISCUSSION ONLY.)
The strange thing is I believe these triangular handles are included in the kit- there are six across both B Sprues and I can't seem to find them mentioned elsewhere in the build. At the minute I'm leaving the part as is and will come back to it towards the end of the build- the reason being is I don't want to use the parts on the B Sprues now and find out they are needed somewhere else later. If that happens I can always scratch build them but there's no rush and it is a place on the model that is easy to access.
Anyway, the painting of the lower hull continues so more updates soon.
Thanks for reading.
-KARL187-
Mauro- I haven't fully decided on camo yet but since I haven't done a single color model in a while I will probably go for simple Russian Green. I really want to do one depicted in a tank graveyard- I particularly like the way the ERA blocks look on those old tanks so I kind of want to wait and see if Trumpy release the BV! I also want to try something I read in an article by Mike Rinaldi- what he calls 'Oil Paint Rendering'- I want to give it a try on Russian Green so thats why I'm leaning towards that color at the minute.
As I've been waiting for the paint on the lower hull, wheels and tracks to dry I've been getting on with the rear deck. This is quite a busy area with a good deal of small parts and a generous helping of PE. So far I've got the first stages of it done.
I must say the PE is great to work with and so far has been fitting very precisely.
On the rear deck I think Trumpeter have missed out something- namely a small lift-grab handle- the triangular ones. As I said earlier I'm using the Kagero walk around as I build this so I've marked out where it is on the walk-around and where the part is missing on the kit:
[PICTURE POSTED FOR DISCUSSION ONLY.)
The strange thing is I believe these triangular handles are included in the kit- there are six across both B Sprues and I can't seem to find them mentioned elsewhere in the build. At the minute I'm leaving the part as is and will come back to it towards the end of the build- the reason being is I don't want to use the parts on the B Sprues now and find out they are needed somewhere else later. If that happens I can always scratch build them but there's no rush and it is a place on the model that is easy to access.
Anyway, the painting of the lower hull continues so more updates soon.
Thanks for reading.
-KARL187-
markchis
Joined: February 09, 2009
KitMaker: 467 posts
Armorama: 392 posts
Posted: Wednesday, September 12, 2012 - 04:35 AM UTC
thats just the sort of tips we need Karl. hmmm... reminds me of the BMP-3 kit that had the brush guards for the bow mmachine guns included in the kit - but absent from the instructions.
like the pe work on the deck - seems well thought out. allways find the trumpeter brass of a sturdy gauge - but those rear grills look very fine.
best
Mark
like the pe work on the deck - seems well thought out. allways find the trumpeter brass of a sturdy gauge - but those rear grills look very fine.
best
Mark

retiredyank
Joined: June 29, 2009
KitMaker: 11,610 posts
Armorama: 7,843 posts
Posted: Wednesday, September 12, 2012 - 05:00 AM UTC
I'll try your technique for shaping the tracks on my next build; or whichever build reaches that stage first.

BBD468
Joined: March 08, 2010
KitMaker: 2,465 posts
Armorama: 2,383 posts
Posted: Wednesday, September 12, 2012 - 05:30 AM UTC
Great progress Karl! Nice PE work too. 
Gary
Gary

Violetrock

Joined: March 09, 2003
KitMaker: 831 posts
Armorama: 791 posts
Posted: Wednesday, September 12, 2012 - 05:36 AM UTC
Karl,
don´t forget the welded protective bar next to the plate.
You can see it on the picture you posted.
Thomas
don´t forget the welded protective bar next to the plate.
You can see it on the picture you posted.
Thomas
Karl187
#284
Joined: October 04, 2006
KitMaker: 3,094 posts
Armorama: 2,942 posts
Posted: Thursday, September 13, 2012 - 01:13 AM UTC
Mark- thanks mate! And yeah, I must agree that I like Trumpy's PE too, its just about the right thickness and it usually bends nicely yet things like the grille, as you said, are still quite finely detailed.
Matt- thanks for checking out the build. I would say if you are going to do the tracks in sub-assemblies as I did then just take care with smaller links- I find the larger links are always much more sturdy when they are build up like that, whereas the smaller links will allow a bit of movement but they can sometimes break apart as I've had happen a couple of times!
Gary- cheers bud!
Thomas- is the small welded guard you are talking about the small shaped bit in front of the cap with the two bolts? If it is that part you are talking about then it is there but its no very visible on the model at that angle. This picture shows it up close:

Was that the bit you were talking about?
As you guys can see in that picture above I have finished the rest of the rear deck. There wasn't much to do.


There was a second PE grille to add (the long, thin one), plus a small PE plate on the opposite side and then there was what I think are heat deflectors beside the long thin grille- these are on the flexible styrene sprue and I think, judging by the references, they look quite convincing.
The front glacis plate also had a few items to add- some very small but they were still nicely detailed.


I'm still continuing with the painting of the lower hull, wheels and tracks so pictures of those will be up whenever I get them finished.
Thanks for reading the blog and thanks for the support thus far, its been fantastic and I thank you all!
-KARL187-
Matt- thanks for checking out the build. I would say if you are going to do the tracks in sub-assemblies as I did then just take care with smaller links- I find the larger links are always much more sturdy when they are build up like that, whereas the smaller links will allow a bit of movement but they can sometimes break apart as I've had happen a couple of times!
Gary- cheers bud!
Thomas- is the small welded guard you are talking about the small shaped bit in front of the cap with the two bolts? If it is that part you are talking about then it is there but its no very visible on the model at that angle. This picture shows it up close:
Was that the bit you were talking about?
As you guys can see in that picture above I have finished the rest of the rear deck. There wasn't much to do.
There was a second PE grille to add (the long, thin one), plus a small PE plate on the opposite side and then there was what I think are heat deflectors beside the long thin grille- these are on the flexible styrene sprue and I think, judging by the references, they look quite convincing.
The front glacis plate also had a few items to add- some very small but they were still nicely detailed.
I'm still continuing with the painting of the lower hull, wheels and tracks so pictures of those will be up whenever I get them finished.
Thanks for reading the blog and thanks for the support thus far, its been fantastic and I thank you all!
-KARL187-

Antoon3103

Joined: March 31, 2012
KitMaker: 224 posts
Armorama: 67 posts

Posted: Thursday, September 13, 2012 - 01:57 AM UTC
Hello Karl,
Nice work so far. I enjoy reading ur build log. Very informative and clear pics.
Earlier today I had this kit in my hands, together with Trumpeters T-62s.
But as i am currently on holliday in the Philippines, i did not yet buy them. I will however when i get home.
Keep up the good work, and thanks for the efford.
I admire all who take the time to do this kind of blogs.
Greetz
Tony
Violetrock
Joined: March 09, 2003
KitMaker: 831 posts
Armorama: 791 posts
Posted: Thursday, September 13, 2012 - 02:17 AM UTC
Karl,
yes that was it. On your close ups I can see it now.
Thomas
yes that was it. On your close ups I can see it now.
Thomas
Violetrock
Joined: March 09, 2003
KitMaker: 831 posts
Armorama: 791 posts
Posted: Thursday, September 13, 2012 - 06:33 AM UTC
Karl,
could you check if the paint adheres well on the soft plastic?
Thanks,
Thomas
could you check if the paint adheres well on the soft plastic?
Thanks,
Thomas
Spiderfrommars
Joined: July 13, 2010
KitMaker: 3,845 posts
Armorama: 3,543 posts
Posted: Thursday, September 13, 2012 - 07:19 AM UTC
Quoted Text
I really want to do one depicted in a tank graveyard- I particularly like the way the ERA blocks look on those old tanks so I kind of want to wait and see if Trumpy release the BV! e
Yes, you're right. Blocks look interesting indeed because they have lots of color shades.
Anyway, looking at you build, I really don't know if I'll resist untill the BV version issue
Great job so far...and yes. Please, let us know if the soft plastic could be painted in a simple way
Cheers
RuloMxy
Joined: March 05, 2009
KitMaker: 154 posts
Armorama: 137 posts
Posted: Thursday, September 13, 2012 - 12:27 PM UTC
Hi Karl,
Maybe is too late, but you may want to add the weld seams in the KMT mounts and towing hooks.
http://btvt.narod.ru/5/t64bv/4.jpg
Nice job, I have your build already bookmarked.
Raul
Maybe is too late, but you may want to add the weld seams in the KMT mounts and towing hooks.
http://btvt.narod.ru/5/t64bv/4.jpg
Nice job, I have your build already bookmarked.
Raul
Karl187
#284
Joined: October 04, 2006
KitMaker: 3,094 posts
Armorama: 2,942 posts
Posted: Thursday, September 13, 2012 - 11:39 PM UTC
Tony- I'm glad your enjoying the build, thanks!
Thomas- Thanks for clarifying that. I tried out some paint on the flexible sprue and some Vallejo paint went on well- I would advise using a good primer though, just to make sure. Hope that answers your question aswell Mauro!
Raul- thanks for stopping by and pointing out those weld seams- the tank featured in the Kagero book doesn't have the KMT attachment points for some reason. In any case I usually don't add weld seams that are that small because I find with primer and then a paint coat most of the detail of the weld dissappears! I do appreciate you pointing it out though as I'm sure it will be useful for those who are planning to add the seams. Plus that picture is pretty cool as it shows a BV with some interesting paint chipping on that area !
Thomas- Thanks for clarifying that. I tried out some paint on the flexible sprue and some Vallejo paint went on well- I would advise using a good primer though, just to make sure. Hope that answers your question aswell Mauro!
Raul- thanks for stopping by and pointing out those weld seams- the tank featured in the Kagero book doesn't have the KMT attachment points for some reason. In any case I usually don't add weld seams that are that small because I find with primer and then a paint coat most of the detail of the weld dissappears! I do appreciate you pointing it out though as I'm sure it will be useful for those who are planning to add the seams. Plus that picture is pretty cool as it shows a BV with some interesting paint chipping on that area
!Spiderfrommars
Joined: July 13, 2010
KitMaker: 3,845 posts
Armorama: 3,543 posts
Posted: Friday, September 14, 2012 - 04:40 AM UTC
Quoted Text
Thomas- Thanks for clarifying that. I tried out some paint on the flexible sprue and some Vallejo paint went on well- I would advise using a good primer though, just to make sure. Hope that answers your question aswell Mauro!
Yes it does mate. I think I'll use Vallejo primer because being an acrylic one, it might be more elastic than the Tamiya one.
Some other questions. Do plastic parts have any flash? If yes, are they easy to remove? I suspect that Trumpeter parts are made in the same material used by DML for its DS tracks. It might be a sort of soft styrene, which is easier to glue and paint than vynil.
Are the soft parts of your kit easy to glue?
General speaking, I really hope that they'll finally start to make the softskin vehicle wheels in that kind of styrene...Vinyl is cheesy and afwul!
UGBEAR

Joined: December 01, 2011
KitMaker: 248 posts
Armorama: 247 posts
Posted: Friday, September 14, 2012 - 01:27 PM UTC
looks neat! Time for mighty turret right?
ComradeMP

#0
Joined: July 31, 2011
KitMaker: 472 posts
Armorama: 453 posts
Posted: Friday, September 14, 2012 - 03:56 PM UTC
Quoted Text
Some other questions. Do plastic parts have any flash? If yes, are they easy to remove?
I didn't find any, not on even the smallest bits. Everything was nice, crisp and clean.
I did find a bit of chipping on my gun barrel though.....
Spiderfrommars
Joined: July 13, 2010
KitMaker: 3,845 posts
Armorama: 3,543 posts
Posted: Friday, September 14, 2012 - 05:41 PM UTC
Quoted Text
Quoted Text
Some other questions. Do plastic parts have any flash? If yes, are they easy to remove?
I didn't find any, not on even the smallest bits. Everything was nice, crisp and clean.
Have you already tried putting some glue on a piece of sprue made in soft plastic? If yes, the glue has melted it? I'm sure that I'm not the only one, but usually that's the trial which I make to verify the material quality.
Quoted Text
I did find a bit of chipping on my gun barrel though.....
It could be due to a friction between the sprues which were too close in the box. I wonder if Karl has found the same issue
Thanks a lot for the reply.
Karl187
#284
Joined: October 04, 2006
KitMaker: 3,094 posts
Armorama: 2,942 posts
Posted: Friday, September 14, 2012 - 10:08 PM UTC
Mauro- To be honest I haven't seen any flash on the kit parts at all. And normal poly-cement glues the flexible styrene parts just fine with no problems. I suspect it is, as you said, the same stuff DML use for their DS tracks. It certainly would be a major improvement if Trumpy were to make their tyres from this material as it is way better than vinyl.
Dave- Cheers! I haven't got near the turret yet actually- there's still a fair amount on the hull to get sorted!
ComradeMP & Mauro- I didn't find any blemishes on the metal barrel- it was seperately packed in a small bag in a little cardboard section of the box alongside the lower hull tub.
Dave- Cheers! I haven't got near the turret yet actually- there's still a fair amount on the hull to get sorted!
ComradeMP & Mauro- I didn't find any blemishes on the metal barrel- it was seperately packed in a small bag in a little cardboard section of the box alongside the lower hull tub.
 |

WEB HOSTING BY


Copyright ©2021 Armorama and Kitmaker Network, a subsidiary of Silver Star Enterprises
All Rights Reserved. Please read our Conditions of Use and Privacy Policy.
All Rights Reserved. Please read our Conditions of Use and Privacy Policy.